
Article Categories
- All Categories
-
 Data Structure
-
 Networking
-
 RDBMS
RDBMS
-
 Operating System
-
 Java
Java
-
 MS Excel
-
 iOS
iOS
-
 HTML
HTML
-
 CSS
CSS
-
 Android
-
 Python
-
 C Programming
-
 C++
C++
-
 C#
C#
-
 MongoDB
-
 MySQL
MySQL
-
 Javascript
-
 PHP
PHP
-
 Economics & Finance
Importing / Exporting CSV file in PowerShell
In this article, we will work with CSV files in PowerShell which is considered one of the most efficient ways to deal with data.
We have considered the below points for this article.
Exporting data to the CSV file using PowerShell.
Importing data from the CSV file using PowerShell.
Let’s get started.
Exporting data to the CSV file using PowerShell
Using Direct command output
To export data to the csv file in PowerShell we can use Out-File which is the common cmdlet for storing the output to the file. The below command will get the top 10 CPU-consuming processes in the csv file.
Example
Get-Process | Sort-Object CPU -Descending | Select -First 10 |
Out-File C:\Temp\Top10Procs.csv
Output
Let’s check the csv file.
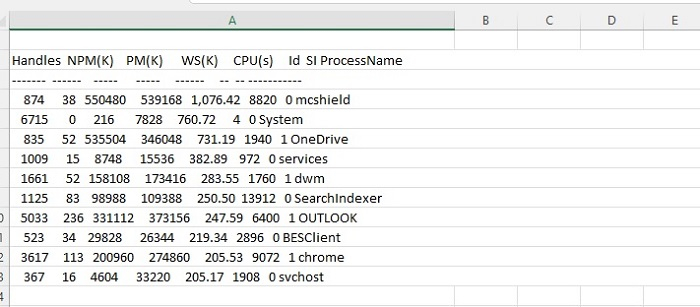
As you can see the cmdlet could retrieve the output, but the output is in the single-column which reduces the readability of the user and is also not an efficient way to deal with the data.
PowerShell provides another inbuilt cmdlet, Export-CSV which dumps data into the csv file. We have to select properties for this command because some commands would expose all properties when the output is exported to the csv file.
Example
Get-Process | Sort-Object CPU -Descending | Select -First 10 | `
   Select Name, id, CPU, WorkingSet | Export-Csv C:\Temp\Top10Procs.csv
Output
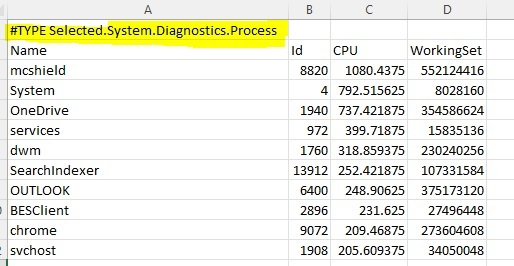
If you notice, the output shows the Type information (Highlighted in yellow). If we don’t need it then add -NoTypeInformation parameter at the end of the Export-Csv cmdlet.
If you are working on a script that requires appending data into the csv file then use -Append parameter. For example, as shown below we have used the above same command in the foreach loop to append the data.
$procs = Get-Process | Sort-Object CPU -Descending | Select -First 10 | `
   Select Name, id, CPU, WorkingSet
foreach($proc in $procs){
   $proc | Export-Csv C:\Temp\Top10Procs.csv -NoTypeInformation -Append
}
Using PSCustomObject
You can also export csv file from the Hashtable or PSCustomObject. For example,
[PSCustomObject]@{
   Name = 'OneDrive'
   ID = '1001'
   Memory_Usage = '20%'
   CPU_Usage = '10%'
} | Export-Csv C:\Temp\SingleProcessInfo.csv -NoTypeInformation
Importing data from the csv file
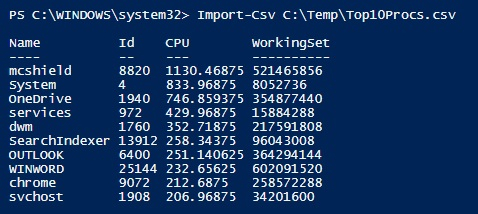
Importing data from the csv file is as easier as exporting data from the csv file. To import data from the csv file, we need to use Import-CSV inbuilt cmdlet.
Let’s consider an earlier example of the file created by the top 10 high CPU utilization processes. The below command will import that csv file.
Example
Import-Csv C:\Temp\Top10Procs.csv
Output
We can perform a normal operation on it that we perform on the pipeline output.
Import-Csv C:\Temp\Top10Procs.csv | Select -First 2

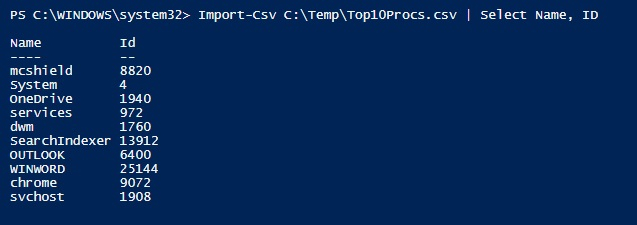
To select specific properties,
Import-Csv C:\Temp\Top10Procs.csv | Select Name, ID
We can sort data of the csv output using the pipeline.
Import-Csv C:\Temp\Top10Procs.csv | Sort-Object -Property Name

Filter the specific data,
Example
Import-Csv C:\Temp\Top10Procs.csv | where{$_.Name -eq "OneDrive"}
Output


9K+ Views
