
Article Categories
- All Categories
-
 Data Structure
-
 Networking
-
 RDBMS
RDBMS
-
 Operating System
-
 Java
Java
-
 MS Excel
-
 iOS
iOS
-
 HTML
HTML
-
 CSS
CSS
-
 Android
-
 Python
-
 C Programming
-
 C++
C++
-
 C#
C#
-
 MongoDB
-
 MySQL
MySQL
-
 Javascript
-
 PHP
PHP
-
 Economics & Finance
How to Use Light Dependent Resistor (LDR) with Arduino?
The resistance of a Light Dependent Resistor (LDR) changes depending on the intensity of the light falling on it. Interfacing an LDR with Arduino is quite straightforward. You just create a voltage divider as shown below −
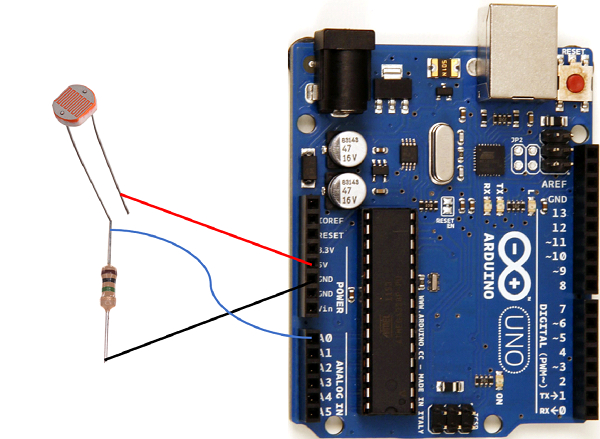
One end of the LDR is connected to 5V, the other end to a resistor (whose resistance should be approx. the same order of magnitude as the max resistance of the LDR). For instance, we are using an LDR with a resistance of 90K and the resistor has the maximum resistance of 150K. The other end of the resistor is connected to GND, and the common terminal of the LDR and the resistor is fed to an Analog pin (A0) in this case.
Now all you need to do is read the analog voltage using analogRead(A0). And try covering the LDR with your hand and later uncovering it and flashing a torch on it. The resistance will be at two extremes in the two cases, and the readings will also be at two opposite extremes.
Example Code
The code is given below −
int ldrPin = A0;
void setup() {
   // put your setup code here, to run once:
    Serial.begin(9600);
}
void loop() {
   // put your main code here, to run repeatedly:
   Serial.println(analogRead(ldrPin));
   delay(100);
} 
803 Views
