
Article Categories
- All Categories
-
 Data Structure
-
 Networking
-
 RDBMS
RDBMS
-
 Operating System
-
 Java
Java
-
 MS Excel
-
 iOS
iOS
-
 HTML
HTML
-
 CSS
CSS
-
 Android
-
 Python
-
 C Programming
-
 C++
C++
-
 C#
C#
-
 MongoDB
-
 MySQL
MySQL
-
 Javascript
-
 PHP
PHP
-
 Economics & Finance
How to send one or more files to an API using axios in ReactJS?
ReactJS is a frontend library, so we can use it to create web pages. It?s natural to show data in real-time applications, and the backend manages it. So, whenever React needs data to show on the web page, it gets it from the backend by making API calls.
Sometimes, we may require to send data to the backend to store it in the database. For example, we have taken the user?s profile image and need to send it to the backend to store it in the database.
In many cases, we require to send single or multiple files to the backend using ReactJs. For example, some plagiarism checker tools allow the uploading multiple files to check for plagiarism in the content.
This tutorial will use the axios to send single or multiple files to the backend in ReactJs.
Steps to create the application and send multiple files
Here, we will create two applications. One is React application which we will use for the frontend part, and another is a Node application which we will use as a backend.
Creating the React application
Step 1 - Use the below command to create a react app in the project directory.
npx create-react-app app-name
In the above command, the app-name is the name of the app, which users can replace with any name.
Step 2 - Now, use the below command and install the axios NPM package in the React application.
npm i axios
Step 3 - Create a file input that can handle multiple files. Also, create a submit button, and when the user clicks it, it should call a function that makes the post request to the backend with multiple files.
Step 4 - Create a uploadMultipleFiles() function, which can make post requests using axios.
uploadMultipleFiles() {
   axios({
      url: "http://localhost:8080/addFiles",
      method: "POST",
      data: { allFiles: files },
   })
}
In the above code, users can observe that we have used the endpoints of the backend and "POST" as a value of the method to make a post request to the backend. Furthermore, we have passed the data object while making the request, which we can receive in the backend and manipulate the files.
Step 5 - Next, users can add the below code to the App.js file of the application.
<div class="code-mirror  language-java" contenteditable="plaintext-only" spellcheck="false" style="outline: none; overflow-wrap: break-word; overflow-y: auto; white-space: pre-wrap;"><span class="token keyword">import</span> <span class="token class-name">React</span> from <span class="token string">"react"</span><span class="token punctuation">;</span>
<span class="token keyword">import</span> <span class="token namespace">axios</span> from <span class="token string">"axios"</span><span class="token punctuation">;</span>

<span class="token keyword">class</span> <span class="token class-name">App</span> <span class="token keyword">extends</span> <span class="token class-name">React<span class="token punctuation">.</span>Component</span> <span class="token punctuation">{</span>
   state <span class="token operator">=</span> <span class="token punctuation">{</span>
      allFiles<span class="token operator">:</span> <span class="token punctuation">[</span><span class="token punctuation">]</span><span class="token punctuation">,</span>
   <span class="token punctuation">}</span><span class="token punctuation">;</span>

   <span class="token function">changeFileInput</span><span class="token punctuation">(</span>event<span class="token punctuation">)</span> <span class="token punctuation">{</span>
      <span class="token comment">// using the setState method to set uploaded files to allFiles in the state object</span>
      let files <span class="token operator">=</span> event<span class="token punctuation">.</span>target<span class="token punctuation">.</span>files<span class="token punctuation">;</span>
      <span class="token keyword">this</span><span class="token punctuation">.</span><span class="token function">setState</span><span class="token punctuation">(</span><span class="token punctuation">{</span> allFiles<span class="token operator">:</span> files <span class="token punctuation">}</span><span class="token punctuation">)</span><span class="token punctuation">;</span>
   <span class="token punctuation">}</span>

   <span class="token function">uploadMultipleFiles</span><span class="token punctuation">(</span><span class="token punctuation">)</span> <span class="token punctuation">{</span>
      <span class="token comment">// get files from the state</span>
      let uploadedFiles <span class="token operator">=</span> <span class="token keyword">this</span><span class="token punctuation">.</span>state<span class="token punctuation">.</span>allFiles<span class="token punctuation">;</span>
      let files <span class="token operator">=</span> <span class="token punctuation">[</span><span class="token punctuation">]</span><span class="token punctuation">;</span>
      <span class="token comment">// get the name of the files and push them to the files array</span>
      <span class="token comment">//users can also get files content, convert it to blob format and send it to the backend</span>
      <span class="token keyword">for</span> <span class="token punctuation">(</span>let the file of uploadedFiles<span class="token punctuation">)</span> <span class="token punctuation">{</span>
         files<span class="token punctuation">.</span><span class="token function">push</span><span class="token punctuation">(</span><span class="token punctuation">{</span> name<span class="token operator">:</span> file<span class="token punctuation">.</span>name <span class="token punctuation">}</span><span class="token punctuation">)</span><span class="token punctuation">;</span>
      <span class="token punctuation">}</span>
      <span class="token function">axios</span><span class="token punctuation">(</span><span class="token punctuation">{</span>
         url<span class="token operator">:</span> <span class="token string">"http://localhost:8080/addFiles"</span><span class="token punctuation">,</span> <span class="token comment">// URL to make request</span>
         method<span class="token operator">:</span> <span class="token string">"POST"</span><span class="token punctuation">,</span> <span class="token comment">// post method to send data</span>
         data<span class="token operator">:</span> <span class="token punctuation">{</span> allFiles<span class="token operator">:</span> files <span class="token punctuation">}</span><span class="token punctuation">,</span> <span class="token comment">// attaching the files</span>
      <span class="token punctuation">}</span><span class="token punctuation">)</span>
      <span class="token punctuation">.</span><span class="token function">then</span><span class="token punctuation">(</span><span class="token punctuation">(</span>res<span class="token punctuation">)</span> <span class="token operator">=</span><span class="token operator">></span> <span class="token punctuation">{</span>
         <span class="token comment">// handle response</span>
         console<span class="token punctuation">.</span><span class="token function">log</span><span class="token punctuation">(</span>res<span class="token punctuation">)</span><span class="token punctuation">;</span>
      <span class="token punctuation">}</span><span class="token punctuation">)</span>
      <span class="token punctuation">.</span><span class="token keyword">catch</span><span class="token punctuation">(</span><span class="token punctuation">(</span>err<span class="token punctuation">)</span> <span class="token operator">=</span><span class="token operator">></span> <span class="token punctuation">{</span>
         <span class="token comment">// handle errors</span>
         console<span class="token punctuation">.</span><span class="token function">error</span><span class="token punctuation">(</span>err<span class="token punctuation">)</span><span class="token punctuation">;</span>
      <span class="token punctuation">}</span><span class="token punctuation">)</span><span class="token punctuation">;</span>
   <span class="token punctuation">}</span>

   <span class="token function">render</span><span class="token punctuation">(</span><span class="token punctuation">)</span> <span class="token punctuation">{</span>
      <span class="token keyword">return</span> <span class="token punctuation">(</span>
         <span class="token generics"><span class="token punctuation"><</span>div<span class="token punctuation">></span></span>
            <span class="token generics"><span class="token punctuation"><</span>h2<span class="token punctuation">></span></span>
               <span class="token punctuation">{</span><span class="token string">" "</span><span class="token punctuation">}</span>
               <span class="token class-name">Using</span> the <span class="token generics"><span class="token punctuation"><</span>i<span class="token punctuation">></span></span> axios <span class="token operator"><</span><span class="token operator">/</span>i<span class="token operator">></span> <span class="token keyword">to</span> <span class="token namespace">upload</span> multiple files on <span class="token class-name">NodeJs</span> server<span class="token punctuation">.</span><span class="token punctuation">{</span><span class="token string">" "</span><span class="token punctuation">}</span>
            <span class="token operator"><</span><span class="token operator">/</span>h2<span class="token operator">></span>
            <span class="token operator"><</span>input
               <span class="token class-name">Type</span> <span class="token operator">=</span> <span class="token string">"file"</span>
               multiple <span class="token comment">// adding multiple attributes to allow users to upload multiple files.</span>
               onChange <span class="token operator">=</span> <span class="token punctuation">{</span><span class="token punctuation">(</span>event<span class="token punctuation">)</span> <span class="token operator">=</span><span class="token operator">></span> <span class="token keyword">this</span><span class="token punctuation">.</span><span class="token function">changeFileInput</span><span class="token punctuation">(</span>event<span class="token punctuation">)</span><span class="token punctuation">}</span>
            <span class="token operator">/</span><span class="token operator">></span>
            <span class="token operator"><</span>button onClick <span class="token operator">=</span> <span class="token punctuation">{</span><span class="token punctuation">(</span><span class="token punctuation">)</span> <span class="token operator">=</span><span class="token operator">></span> <span class="token keyword">this</span><span class="token punctuation">.</span><span class="token function">uploadMultipleFiles</span><span class="token punctuation">(</span><span class="token punctuation">)</span><span class="token punctuation">}</span><span class="token operator">></span>
               <span class="token class-name">Send</span> <span class="token class-name">Multiple</span> <span class="token class-name">Files</span> <span class="token keyword">to</span> <span class="token namespace">the</span> server
            <span class="token operator"><</span><span class="token operator">/</span>button<span class="token operator">></span>
         <span class="token operator"><</span><span class="token operator">/</span>div<span class="token operator">></span>
      <span class="token punctuation">)</span><span class="token punctuation">;</span>
   <span class="token punctuation">}</span>
<span class="token punctuation">}</span>
export <span class="token keyword">default</span> <span class="token class-name">App</span><span class="token punctuation">;</span>
</div>
In the above code, we have created the file input. Whenever the user uploads multiple files, we call the changeFileInput() function, which sets all files in the allFiles variable of the state object.
When a user clicks the button, it invokes the uplaodMultipleFiles() function, which accesses all files from the state and makes the array of file objects. However, we have only added the file name in the object, but users can access the file content, convert it into the blob object, and add it to the file object.
After that, we used the axios to make post requests to the backend and passed the object as a data value.
Step 6 - As a final step, users need to run the application using the below command.
npm start
Creating the Node application
Step 1 - Enter the below command in the terminal to create a node application.
node init -y
Step 2 - Now, install the required dependencies in the node project. Users should enter the below command in the terminal to install dependencies in the application.
npm i express cors body-parser
We will use express to create a server, cors as a middleware, allowing us to send post requests from frontend to backend. The body-parse will parse the data we have passed while making the post request from the frontend.
Step 3 - In the node application, set up the server using the code below.
var express = require("express");
var app = express();
app.listen(8080, function () {
   console.log("server started successfully");
});
Step 4 - Now, handle the post request on the ?/addFiles? route. In the callback function, get the files from the body using the below code.
app.post("/addFiles", function (req, res) {
   // get files from the body here
});
Step 5 - Users can add below full code to the server.js file. If the server.js file doesn?t exist in the project, users can create one file with the server.js name.
<div class="code-mirror  language-java" contenteditable="plaintext-only" spellcheck="false" style="outline: none; overflow-wrap: break-word; overflow-y: auto; white-space: pre-wrap;"><span class="token comment">// Importing the required and installed modules</span>
<span class="token keyword">var</span> express <span class="token operator">=</span> <span class="token function">require</span><span class="token punctuation">(</span><span class="token string">"express"</span><span class="token punctuation">)</span><span class="token punctuation">;</span>
<span class="token keyword">var</span> cors <span class="token operator">=</span> <span class="token function">require</span><span class="token punctuation">(</span><span class="token string">"cors"</span><span class="token punctuation">)</span><span class="token punctuation">;</span>
<span class="token keyword">var</span> app <span class="token operator">=</span> <span class="token function">express</span><span class="token punctuation">(</span><span class="token punctuation">)</span><span class="token punctuation">;</span>
<span class="token keyword">const</span> bodyParser <span class="token operator">=</span> <span class="token function">require</span><span class="token punctuation">(</span><span class="token string">"body-parser"</span><span class="token punctuation">)</span><span class="token punctuation">;</span>
<span class="token comment">// using middleware with app</span>
app<span class="token punctuation">.</span><span class="token function">use</span><span class="token punctuation">(</span><span class="token function">cors</span><span class="token punctuation">(</span><span class="token punctuation">)</span><span class="token punctuation">)</span><span class="token punctuation">;</span>
app<span class="token punctuation">.</span><span class="token function">use</span><span class="token punctuation">(</span>bodyParser<span class="token punctuation">.</span><span class="token function">urlencoded</span><span class="token punctuation">(</span><span class="token punctuation">{</span> extended<span class="token operator">:</span> <span class="token boolean">false</span> <span class="token punctuation">}</span><span class="token punctuation">)</span><span class="token punctuation">)</span><span class="token punctuation">;</span>
app<span class="token punctuation">.</span><span class="token function">use</span><span class="token punctuation">(</span>bodyParser<span class="token punctuation">.</span><span class="token function">json</span><span class="token punctuation">(</span><span class="token punctuation">)</span><span class="token punctuation">)</span><span class="token punctuation">;</span>

<span class="token comment">// allow users to make a post request.</span>
app<span class="token punctuation">.</span><span class="token function">post</span><span class="token punctuation">(</span><span class="token string">"/addFiles"</span><span class="token punctuation">,</span> function <span class="token punctuation">(</span>req<span class="token punctuation">,</span> res<span class="token punctuation">)</span> <span class="token punctuation">{</span>
   let allFiles <span class="token operator">=</span> req<span class="token punctuation">.</span>body<span class="token punctuation">;</span>
   console<span class="token punctuation">.</span><span class="token function">log</span><span class="token punctuation">(</span>allFiles<span class="token punctuation">)</span><span class="token punctuation">;</span>
<span class="token punctuation">}</span><span class="token punctuation">)</span><span class="token punctuation">;</span>

<span class="token comment">// Allowing the app to listen on port 8080</span>
app<span class="token punctuation">.</span><span class="token function">listen</span><span class="token punctuation">(</span><span class="token number">8080</span><span class="token punctuation">,</span> function <span class="token punctuation">(</span><span class="token punctuation">)</span> <span class="token punctuation">{</span>
   console<span class="token punctuation">.</span><span class="token function">log</span><span class="token punctuation">(</span><span class="token string">"server started successfully"</span><span class="token punctuation">)</span><span class="token punctuation">;</span>
<span class="token punctuation">}</span><span class="token punctuation">)</span><span class="token punctuation">;</span>
</div>
In the above code, we have imported the required libraries. After that, we set up the express server in the node application. Also, we have used the body-parse to extract the data from the body and cors as a middleware in the express application.
After that, we created the endpoint which handles the files and prints all the files in the console.
Step 6 - We are ready to handle post requests on the node application. Users need to run the node application by running the below command on the terminal.
node server.js
Output
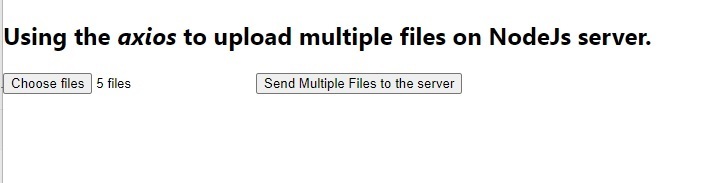
Now, users have both applications running on a different ports. Users can see the output of react application in the image below.
When we upload multiple files on the webpage, the node application prints all file names in the console, as shown in the image below.
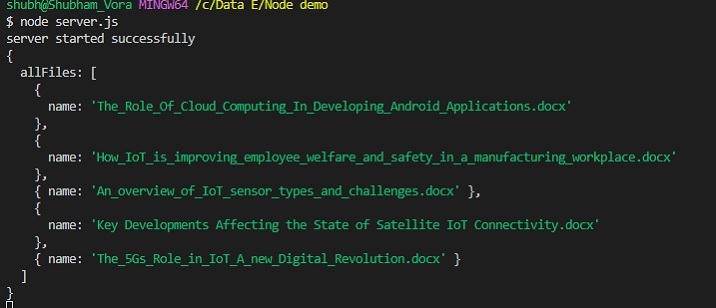
We learned to send multiple files to the backend using the axios post request. However, we have sent only file names in this tutorial, but users can also send the file content and updated date, etc.

2K+ Views
