 Data Structure
 Networking
 RDBMS
RDBMS Operating System
 Java
Java MS Excel
 iOS
iOS HTML
HTML CSS
CSS Android
 Python
 C Programming
 C++
C++ C#
C# MongoDB
 MySQL
MySQL Javascript
 PHP
PHP
- Selected Reading
- UPSC IAS Exams Notes
- Developer's Best Practices
- Questions and Answers
- Effective Resume Writing
- HR Interview Questions
- Computer Glossary
- Who is Who
How to modify HTML using BeautifulSoup?
HTML (Hypertext Markup Language) is the foundation of the internet. Websites use HTML to create and display content in a structured manner. In many cases, it's necessary to modify HTML code to add new elements, remove unwanted elements, or make other changes. This is where BeautifulSoup comes in.
BeautifulSoup is a Python library that allows you to parse HTML and XML documents. It provides a simple interface for navigating and searching the document tree, as well as for modifying the HTML code. In this article, we'll learn to modify HTML using BeautifulSoup. We will learn the steps of modifying HTML using BeautifulSoup.
Steps to Modify HTML Using Beautifulsoup
Below are the complete steps to modify HTML using Beautifulsoup ?
Step 1: Install and Import Module
The first step in modifying HTML with the help of Beautifulsoup is to install the Beautifulsoup module and import it after. We can install the module using pip, the Python package manager. Open a terminal window and run the following command ?
pip install beautifulsoup4
Once BeautifulSoup is installed, we need to import it into our Python script. We'll also import the requests library, which we'll use to fetch the HTML code from a webpage.
from bs4 import BeautifulSoup
import requests
Step 2: Fetch HTML Code
The next step is to fetch the HTML code, and we'll use the requests library to fetch the HTML code from a webpage. In the below syntax, we'll fetch the HTML code from the tutorialspoint homepage.
url = "https://www.tutorialspoint.com"
response = requests.get(url)
html_code = response.content
Step 3: Create a BeautifulSoup Object
Now that we have the HTML code, we can create a BeautifulSoup object. This will allow us to navigate and modify the HTML code.
soup = BeautifulSoup(html_code, "html.parser")
Step 4: Modifying the HTML
With the BeautifulSoup object, we can now modify the HTML code. There are several ways to do this, but we'll cover a few common scenarios.
Syntax to Add new Elements
# create a new div element
new_div = soup.new_tag("div")
# set the text of the div element
new_div.string = "This is a new div element"
# add the div element to the body tag
soup.body.append(new_div)
Syntax to remove elements
# find all div elements with class="remove-me"
divs_to_remove = soup.find_all("div", class_="remove-me")
# remove each div element from the soup
for div in divs_to_remove:
   div.decompose()
Syntax to modify attributes
# find the first a element with href="https://example.com"
a_tag = soup.find("a", href="https://example.com")
# change the href attribute to "https://new-example.com"
a_tag["href"] = "https://new-example.com"
Step 5: Save the HTML
Once we've made our modifications, we'll want to save the modified HTML code to a file or send it back to the webpage.
# write the modified HTML code to a file
with open("modified.html", "w") as f:
   f.write(str(soup))
Example 1: Adding a new Element to a Webpage
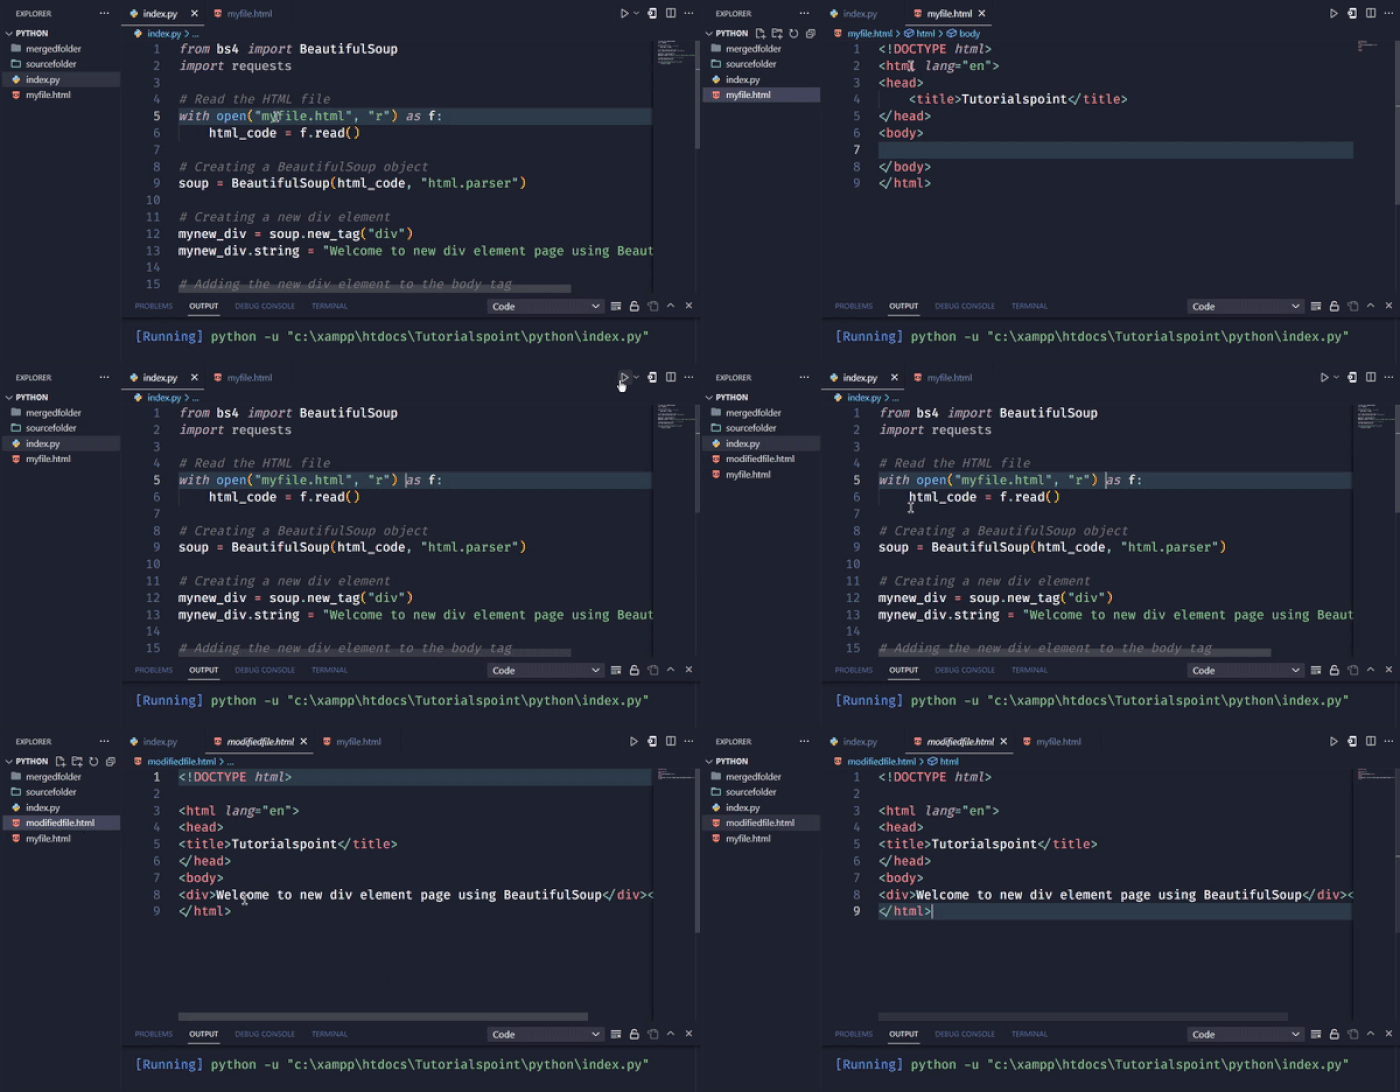
In the below example, we'll use BeautifulSoup to add a new element to a webpage. We'll fetch the HTML code from a webpage, create a new div element, and add it to the end of the body tag.
from bs4 import BeautifulSoup
import requests

# Read the HTML file
with open("myfile.html", "r") as f:
   html_code = f.read()

# Creating a BeautifulSoup object
soup = BeautifulSoup(html_code, "html.parser")

# Creating a new div element
mynew_div = soup.new_tag("div")
mynew_div.string = "Welcome to new div element page using BeautifulSoup"

# Adding the new div element to the body tag
soup.body.append(mynew_div)

# Saving the modified HTML code to a file
with open("modifiedfile.html", "w") as f:
   f.write(str(soup))
Output

In the given example, we're using the new_tag method to create a new div element. We're setting the text of the div element using the string attribute. Then, we're using the append method to add the new div element to the end of the body tag.
Example 2: Removing Elements From a Webpage
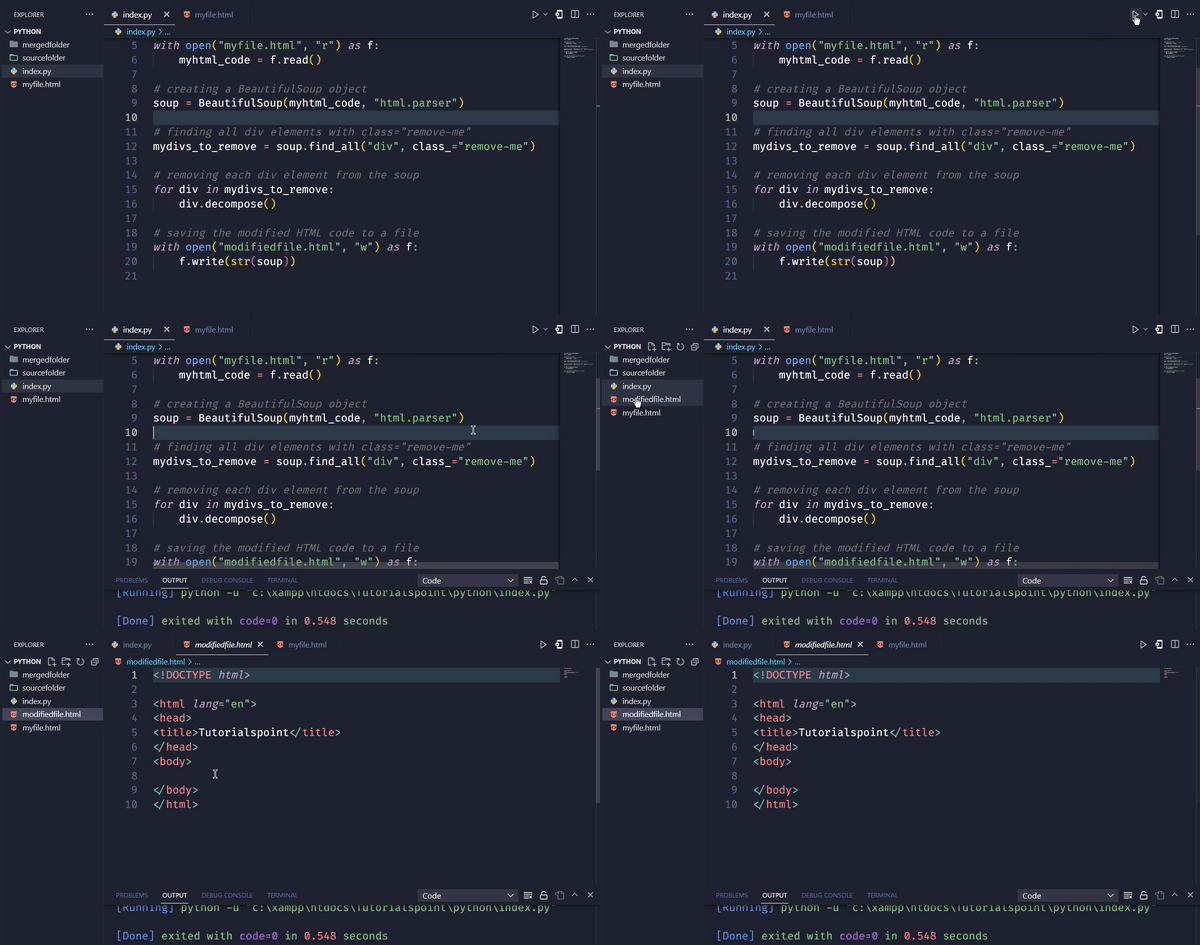
In the below example, we'll use BeautifulSoup to remove elements from a webpage. We'll fetch the HTML code from a webpage, find all div elements with class="remove-me", and remove them from the HTML code.
#imports
from bs4 import BeautifulSoup
import requests

# Read the HTML file
with open("myfile.html", "r") as f:
   myhtml_code = f.read()


# creating a BeautifulSoup object
soup = BeautifulSoup(myhtml_code, "html.parser")

# finding all div elements with class="remove-me"
mydivs_to_remove = soup.find_all("div", class_="remove-me")

# removing each div element from the soup
for div in mydivs_to_remove:
   div.decompose()

# saving the modified HTML code to a file
with open("yourmodifiedfile.html", "w") as f:
   f.write(str(soup))
Output

In the given example, we're using the find_all method to find all div elements with class="remove-me". We're storing them in a list called divs_to_remove. Then, we're using a for loop to iterate through the list and remove each div element from the soup using the decompose method. Finally, we're saving the modified HTML code to a file.
Example 3: Modifying the Text of a Specific HTML tag
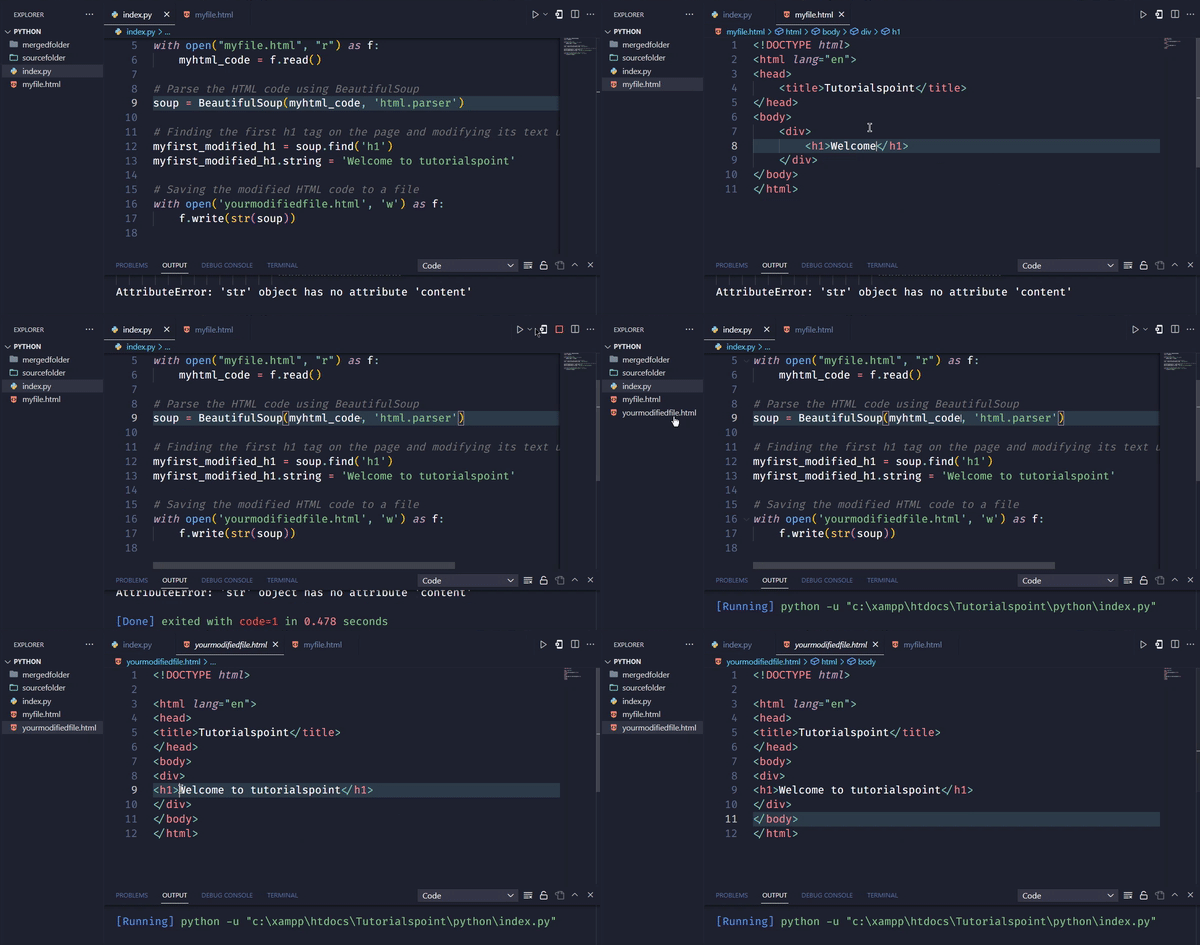
In the below example, we'll modify the text of a specific HTML tag on a webpage.
# Imports
import requests
from bs4 import BeautifulSoup

# Defining the URL of the webpage to fetch
myurl = 'https://www.tutorialspoint.com'

# Sending a GET request to fetch the HTML code of the webpage
myresponse = requests.get(myurl)

# Read the HTML file
with open("myfile.html", "r") as f:
   myhtml_code = f.read()

# Parse the HTML code using BeautifulSoup
soup = BeautifulSoup(response.content, 'html.parser')

# Finding the first h1 tag on the page and modifying its text using BeautifulSoup
myfirst_modified_h1 = soup.find('h1')
myfirst_modified_h1.string = 'Welcome to tutorialspoint'

# Saving the modified HTML code to a file
with open('yourmodifiedfile.html', 'w') as f:
   f.write(str(soup))
Output

In the above example, we start by importing the necessary libraries, requests and BeautifulSoup. We then define the URL of the webpage that we want to modify, and send a GET request to fetch the HTML code of the webpage. After fetching the code, we then create a BeautifulSoup object to parse it and used it to find the first h1 tag on the page using the find() method and modify its text using the string attribute.
Finally, we save the modified HTML code to a file called modified.html using the open() function with the w mode. We pass the modified BeautifulSoup object to the write() method to write the modified HTML code to the file.
Conclusion
To sum up, modifying HTML is a common requirement in web development, and BeautifulSoup, a Python library, provides an easy way to parse and modify HTML code. In this article, we've learned how to modify HTML using BeautifulSoup. We've seen the steps involved in modifying HTML using Beautifulsoup, including installing and importing the module, fetching HTML code, creating a BeautifulSoup object, modifying HTML code, and saving the modified HTML code to a file. We've also seen two complete examples of modifying HTML code using BeautifulSoup - adding a new element to a webpage and removing elements from a webpage. With these tools and techniques, developers can easily modify HTML code to suit their needs.

