
Article Categories
- All Categories
-
 Data Structure
-
 Networking
-
 RDBMS
RDBMS
-
 Operating System
-
 Java
Java
-
 MS Excel
-
 iOS
iOS
-
 HTML
HTML
-
 CSS
CSS
-
 Android
-
 Python
-
 C Programming
-
 C++
C++
-
 C#
C#
-
 MongoDB
-
 MySQL
MySQL
-
 Javascript
-
 PHP
PHP
-
 Economics & Finance
How to install graylog 1 3graylog2 on centos 7rhel 7
In this article we will configure and install the Graylog 1.3 (which is also referred as Graylog2) on CentOS 7, Graylog gathers the syslog’s of the machines into a centralized location. Graylog is a log management and analysis tool that can be used in many cases, for monitoring the SSH logins and unusual activity for debugging applications and logs, the uses Elasticsearch, Java and MangoDB.
Graylog Features and Components
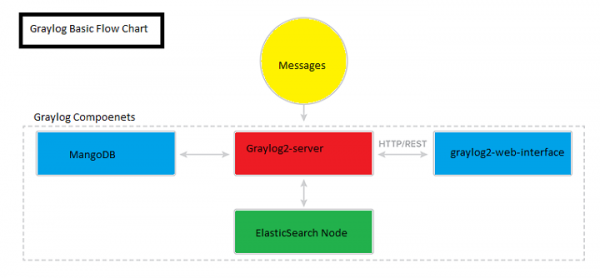
GrayLog Server Node − Server mainly receives and processes the messages and communicates with the non-servers components.
Elastic search Nodes − This will store the messages and logs.
MangoDB − This stores metadata.
Web Interfaces − This is the main user interface.
Prerequisites
For the demo purpose, we needed CentOS 7 server with 2GB RAM with User having root user permissions.
Installing MangoDB
First, we needed to import the public GPC key into the RPM. To get the public key we needed to run the below command.
# rpm --import https://www.mongodb.org/static/pgp/server-3.2.asc
Adding the MangoDB repo source.
# vi /etc/yum.repos.d/mango.repo
[mongodb-org-3.2]
name=MongoDB Repository
baseurl=https://repo.mongodb.org/yum/redhat/$releasever/mongodb-org/3.2/x86_64/
gpgcheck=1
enabled=1
We will install the stable version of MangoDB from the server
# yum install -y mongodb-org
Starting the MongoDB
# systemctl restart mangod
We can see that MangoDB is up and running.
Installing Java on the Server
Now, we shall install Java since Elasticserach and Logstash both requires the Java. So, we will install the Java on the server. We can download and install by using the below command, after installation, we can delete the source files.
# wget --no-cookies --no-check-certificate --header "Cookie: gpw_e24=http%3A%2F%2Fwww.oracle.com%2F; oraclelicense=accept-securebackup-cookie" "http://download.oracle.com/otn-pub/java/jdk/8u73-b02/jdk-8u73-linux-x64.rpm"
# yum -y localinstall jdk-8u73-linux-x64.rpm
# rm ~/jdk-8u*-linux-x64.rpm
Installing the Elasticsearch
Graylog2 only works with the pre-2.0 version of Elasticsearch so we will install the Elasticsearch 1.7.x. We can install the package with the bellow command by adding the repo to the local yum repositories.
# vi /etc/yum.repos.d/elasticsearch.repo
[elasticsearch-1.7]
name=Elasticsearch repository for 1.7.x packages
baseurl=http://packages.elastic.co/elasticsearch/1.7/centos
gpgcheck=1
gpgkey=http://packages.elastic.co/GPG-KEY-elasticsearch
After adding the repo to the local yum, we need to install the package using the below command –
# yum -y install elasticsearch
Once, we install the elasticsearch we needed to edit the configuration file.
# vi /etc/elasticsearch/elasticsearch.yml
Find the cluster.name section and add the cluster name as graylog-server and also find the section network.host and add the losthost to that section so that others can access the Elasticsearch and shut down
....
cluster.name: graylog-server
....
network.host: localhost
Starting the Elasticsearch
# systemctl restart elasticsearch
Installing Graylog Server
As we have installed all the dependencies we will now install the Graylog Server.
First, we will download the Graylog server software using the RPM command, run the below command to download the .rpm file
# rpm -Uvh https://packages.graylog2.org/repo/packages/graylog-1.3-repository-el7_latest.rpm
We will install the Graylog server using the below command
# yum -y install graylog-server
We needed to install the pwgen software for generating the passwords secret keys in the software.
# yum -y install epel-release
# yum -y install pwgen
Now we will generate and configure the admin password and secret key. Please note that, the secret key is configured in the server.conf file with the password_secret parameter. We can generate the random keys and insert these keys in the Graylogconfiguration files with the below commands
# SECRET=$(pwgen -s 96 1)
# sudo -E sed -i -e 's/password_secret =.*/password_secret = '$SECRET'/' /etc/graylog/server/server.conf
The admin password has been assigned by creating a shasum with the desired password and assigned to the root_password_sha2 parameter in the configuration file.
Below is the command to create the password for the admin –
# PASSWORD=$(echo -n password | sha256sum | awk '{print $1}')
# sudo -E sed -i -e 's/root_password_sha2 =.*/root_password_sha2 = '$PASSWORD'/' /etc/graylog/server/server.conf
Now we will make a few changes in the ‘server.conf’ files
# vi /etc/graylog/server/server.conf
Here, we will change four places to run the Graylogserver
We will un-comment the rest_transport_uri
rest_transport_uri = http://127.0.0.1:12900/
We will change the Elasticserach value to 1 as we have only one Elasticseach shared.
elasticsearch_shards = 1
Change the elasticsearch_cluster_name to graylog-server as the server name
elasticsearch_cluster_name = graylog-server
Un-comment the below lies to discover the Elasticsearch instance to uni-cast of multicast.
elasticsearch_discovery_zen_ping_multicast_enabled = false
elasticsearch_discovery_zen_ping_unicast_hosts = 127.0.0.1:9300
Save the file and exit
Start the graylog-server with the below command
# systemctl start graylog-server
Installing the GraylogWeb Server
Below is the command to install the graylog-web server
# yum -y install graylog-web
Now, we will generate the web interface secret key and add to the web.conf file in the application.secret parameter.
# SECRET=$(pwgen -s 96 1)
# sudo -E sed -i -e 's/application\.secret=""/application\.secret="'$SECRET'"/' /etc/graylog/web/web.conf
Now edit the web.conf file and make some changes to run the web interface.
# vi /etc/graylog/web/web.conf
We need to change the web interface configuration to specify the graylog2-server.urils parameter in the config files. As we have configured only one Graylogserver node, the value should match the rest_listen_uri in the Graylogserver config file. http://127.0.0.1:12900/
# graylog2-server.uris="http://127.0.0.1:12900/"
Start the Graylog web interface with the below command –
# systemctl restart graylog-web
Configuring the Graylogto and Receive the Syslog Messages.
Log into the Graylog Web Interface, open the below link in the web browser with http://ip-address:9000/
Login into the interface using the admin user name and password which we set in the previous steps in configuring the Graylog server.
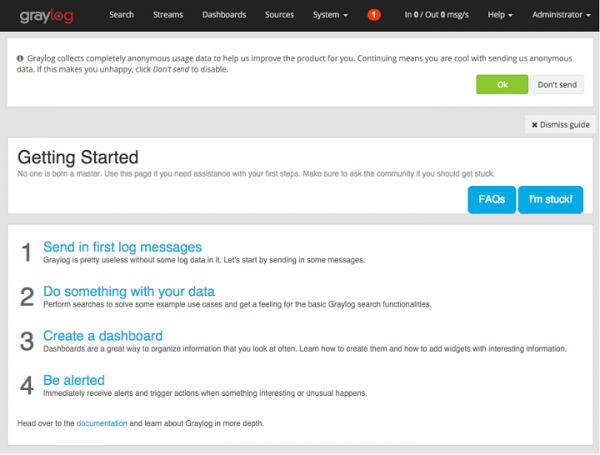
A Red icon on the top of the notification show that we have a node without any running inputs. Let us add the input to receive the syslog message using the UDP.
Creating Syslog input using UDP Input
To add the input for receiving the syslog’s messages, Click on System -> select Inputs -> Syslog UDP -> click on Launch new input button
Please enter the values for the Syslog UDP
Title: Systemlog
Port: 8514
Bind address: graylog_IP_address
and finally Click Launch
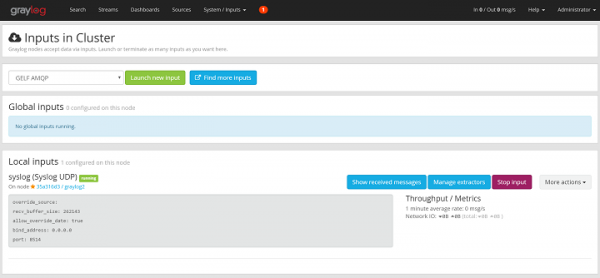
Now the Graylog server will receive the system logs using the port 8514 from the client or server
Configuring the Rsyslog to Send System Logs to Graylog Server
On the Client side we needed to configure so that it will send the system logs messages to the Graylogserver with the below commands
# vi /etc/rsyslog.d/90-graylog.conf
Add the below command to the Syslog file
$template GRAYLOGRFC5424,"<%pri%>%protocol-version% %timestamp:::date-rfc3339% %HOSTNAME% %app-name% %procid% %msg%<br>"*.* @graylog_private_IP:8514;GRAYLOGRFC5424
Restart the rsyslog to send the logs to the Graylogserver
# systemctl restart rsyslog
Viewing the Graylog Sources on the Graylog Server
In the search type ‘sshd’ for sshd logins in the server
We can see the ‘sshd’ logs from all the clients with lot of failed login attempts.
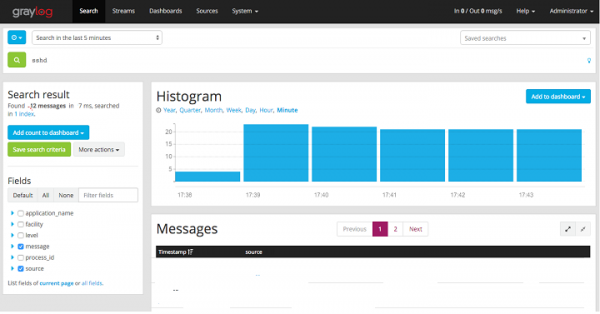
After the configuration and setup of Graylog Server, we can now see the logs and analysis of the system logs and we have many other functionalities in the Graylog server, we can send another type of logs in the Graylog and extract and reformat the logs using the Graylog server which is searchable and can me more structured.

265 Views
