- MySQL - Home
- MySQL - Introduction
- MySQL - Features
- MySQL - Versions
- MySQL - Variables
- MySQL - Installation
- MySQL - Administration
- MySQL - PHP Syntax
- MySQL - Node.js Syntax
- MySQL - Java Syntax
- MySQL - Python Syntax
- MySQL - Connection
- MySQL - Workbench
- MySQL Databases
- MySQL - Create Database
- MySQL - Drop Database
- MySQL - Select Database
- MySQL - Show Database
- MySQL - Copy Database
- MySQL - Database Export
- MySQL - Database Import
- MySQL - Database Info
- MySQL Users
- MySQL - Create Users
- MySQL - Drop Users
- MySQL - Show Users
- MySQL - Change Password
- MySQL - Grant Privileges
- MySQL - Show Privileges
- MySQL - Revoke Privileges
- MySQL - Lock User Account
- MySQL - Unlock User Account
- MySQL Tables
- MySQL - Create Tables
- MySQL - Show Tables
- MySQL - Alter Tables
- MySQL - Rename Tables
- MySQL - Clone Tables
- MySQL - Truncate Tables
- MySQL - Temporary Tables
- MySQL - Repair Tables
- MySQL - Describe Tables
- MySQL - Add/Delete Columns
- MySQL - Show Columns
- MySQL - Rename Columns
- MySQL - Table Locking
- MySQL - Drop Tables
- MySQL - Derived Tables
- MySQL Queries
- MySQL - Queries
- MySQL - Constraints
- MySQL - Insert Query
- MySQL - Select Query
- MySQL - Update Query
- MySQL - Delete Query
- MySQL - Replace Query
- MySQL - Insert Ignore
- MySQL - Insert on Duplicate Key Update
- MySQL - Insert Into Select
- MySQL Indexes
- MySQL - Indexes
- MySQL - Create Index
- MySQL - Drop Index
- MySQL - Show Indexes
- MySQL - Unique Index
- MySQL - Clustered Index
- MySQL - Non-Clustered Index
- MySQL Operators and Clauses
- MySQL - Where Clause
- MySQL - Limit Clause
- MySQL - Distinct Clause
- MySQL - Order By Clause
- MySQL - Group By Clause
- MySQL - Having Clause
- MySQL - AND Operator
- MySQL - OR Operator
- MySQL - Like Operator
- MySQL - IN Operator
- MySQL - ANY Operator
- MySQL - EXISTS Operator
- MySQL - NOT Operator
- MySQL - NOT EQUAL Operator
- MySQL - IS NULL Operator
- MySQL - IS NOT NULL Operator
- MySQL - Between Operator
- MySQL - UNION Operator
- MySQL - UNION vs UNION ALL
- MySQL - MINUS Operator
- MySQL - INTERSECT Operator
- MySQL - INTERVAL Operator
- MySQL Joins
- MySQL - Using Joins
- MySQL - Inner Join
- MySQL - Left Join
- MySQL - Right Join
- MySQL - Cross Join
- MySQL - Full Join
- MySQL - Self Join
- MySQL - Delete Join
- MySQL - Update Join
- MySQL - Union vs Join
- MySQL Keys
- MySQL - Unique Key
- MySQL - Primary Key
- MySQL - Foreign Key
- MySQL - Composite Key
- MySQL - Alternate Key
- MySQL Triggers
- MySQL - Triggers
- MySQL - Create Trigger
- MySQL - Show Trigger
- MySQL - Drop Trigger
- MySQL - Before Insert Trigger
- MySQL - After Insert Trigger
- MySQL - Before Update Trigger
- MySQL - After Update Trigger
- MySQL - Before Delete Trigger
- MySQL - After Delete Trigger
- MySQL Data Types
- MySQL - Data Types
- MySQL - VARCHAR
- MySQL - BOOLEAN
- MySQL - ENUM
- MySQL - DECIMAL
- MySQL - INT
- MySQL - FLOAT
- MySQL - BIT
- MySQL - TINYINT
- MySQL - BLOB
- MySQL - SET
- MySQL Regular Expressions
- MySQL - Regular Expressions
- MySQL - RLIKE Operator
- MySQL - NOT LIKE Operator
- MySQL - NOT REGEXP Operator
- MySQL - regexp_instr() Function
- MySQL - regexp_like() Function
- MySQL - regexp_replace() Function
- MySQL - regexp_substr() Function
- MySQL Fulltext Search
- MySQL - Fulltext Search
- MySQL - Natural Language Fulltext Search
- MySQL - Boolean Fulltext Search
- MySQL - Query Expansion Fulltext Search
- MySQL - ngram Fulltext Parser
- MySQL Functions & Operators
- MySQL - Date and Time Functions
- MySQL - Arithmetic Operators
- MySQL - Numeric Functions
- MySQL - String Functions
- MySQL - Aggregate Functions
- MySQL Misc Concepts
- MySQL - NULL Values
- MySQL - Transactions
- MySQL - Using Sequences
- MySQL - Handling Duplicates
- MySQL - SQL Injection
- MySQL - SubQuery
- MySQL - Comments
- MySQL - Check Constraints
- MySQL - Storage Engines
- MySQL - Export Table into CSV File
- MySQL - Import CSV File into Database
- MySQL - UUID
- MySQL - Common Table Expressions
- MySQL - On Delete Cascade
- MySQL - Upsert
- MySQL - Horizontal Partitioning
- MySQL - Vertical Partitioning
- MySQL - Cursor
- MySQL - Stored Functions
- MySQL - Signal
- MySQL - Resignal
- MySQL - Character Set
- MySQL - Collation
- MySQL - Wildcards
- MySQL - Alias
- MySQL - ROLLUP
- MySQL - Today Date
- MySQL - Literals
- MySQL - Stored Procedure
- MySQL - Explain
- MySQL - JSON
- MySQL - Standard Deviation
- MySQL - Find Duplicate Records
- MySQL - Delete Duplicate Records
- MySQL - Select Random Records
- MySQL - Show Processlist
- MySQL - Change Column Type
- MySQL - Reset Auto-Increment
- MySQL - Coalesce() Function
- MySQL Useful Resources
- MySQL - Useful Functions
- MySQL - Statements Reference
- MySQL - Quick Guide
- MySQL - Useful Resources
- MySQL - Discussion
MySQL - Import CSV into database

Import MySQL CSV into Database
To import the MySQL data from a CSV file into a database table, we can use the MySQL LOAD DATA INFILE statement.
Before importing the CSV file into the database server, we must ensure the following things −
- Database Table − Ensure you have a database table already set up to receive the incoming data.
- CSV File − You need a CSV file containing the data to be imported.
- User Privileges − Ensure your account has the necessary privileges, specifically FILE and INSERT, to perform this operation.
- Matching Columns − The target table and the CSV file should have matching columns with the same data types.
- CSV Format − The CSV file should be in a comma-separated format, with each row representing a record.
Syntax
Following is the syntax of the LOAD DATA INFILE statement in MySQL −
LOAD DATA INFILE file_path
INTO TABLE table_name
FIELDS TERMINATED BY delimiter
ENCLOSED BY enclosure
LINES TERMINATED BY line_separator
IGNORE number_of_lines_to_skip;
Where,
file_path is the path to the CSV file that contains the data to be imported.
table_name is the name of the target table, where the data will be imported.
delimiter is a character that separates each record in the CSV file.
Enclosure is a character that encloses string records in the CSV file.
line_seperator is a character that marks the end of a line in the CSV file.
number_of_lines_to_skip is the number of lines to ignore at the beginning of the CSV file.
Example
First of all, let us create a table with the name EMPLOYEES using the following query −
CREATE TABLE EMPLOYEES(
   ID INT NOT NULL,
   NAME VARCHAR(20) NOT NULL,
   AGE INT NOT NULL,
   ADDRESS CHAR(25) NOT NULL,
   SALARY DECIMAL(18, 2),
   PRIMARY KEY(ID)
);
Now, let us insert rows into the above created table −
INSERT INTO EMPLOYEES VALUES
(1, 'Ramesh', 32, 'Ahmedabad', 2000.00 ),
(2, 'Khilan', 25, 'Delhi', 1500.00 ),
(3, 'kaushik', 23, 'Kota', 2000.00 ),
(4, 'Chaitali', 25, 'Mumbai', 6500.00 ),
(5, 'Hardik', 27, 'Bhopal', 8500.00 ),
(6, 'Komal', 22, 'MP', 4500.00 ),
(7, 'Muffy', 24, 'Indore', 10000.00 );
The EMPLOYEES table obtained is as shown below −
| ID | NAME | AGE | ADDRESS | SALARY |
|---|---|---|---|---|
| 1 | Ramesh | 32 | Ahmedabad | 2000.00 |
| 2 | Khilan | 25 | Delhi | 1500.00 |
| 3 | Kaushik | 23 | Kota | 2000.00 |
| 4 | Chaitali | 25 | Mumbai | 6500.00 |
| 5 | Hardik | 27 | Bhopal | 8500.00 |
| 6 | Komal | 22 | MP | 4500.00 |
| 7 | Muffy | 24 | Indore | 10000.00 |
Export Data to CSV −
Now, we export the data from the EMPLOYEES table into a CSV file named "EMPLOYEES_BACKUP" using the following query −
SELECT * FROM EMPLOYEES
INTO OUTFILE 'C:/ProgramData/MySQL/MySQL Server 8.0/Uploads/EMPLOYEES_BACKUP.csv'
FIELDS TERMINATED BY ','
OPTIONALLY ENCLOSED BY '"'
LINES TERMINATED BY '\r\n';
After executing the above query, the CSV format file will be created at the specified path. Following is the output obtained after executing the above query −
Query OK, 7 rows affected (0.00 sec)
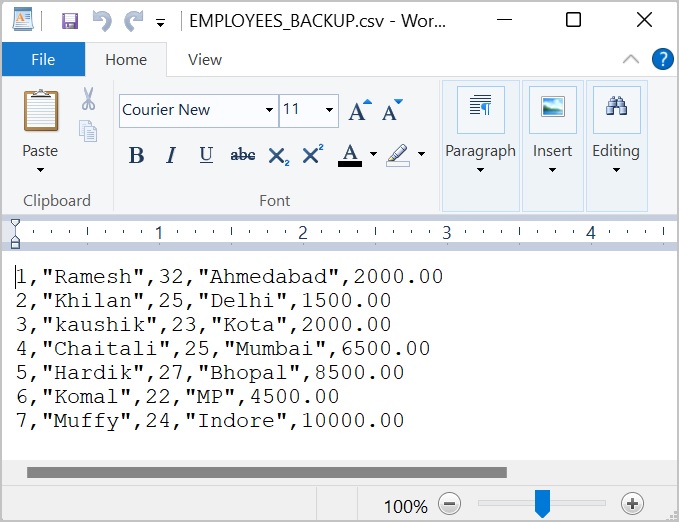
Following is the image of "EMPLOYEES_BACKUP.csv" file when we opened it −
Create Another Table −
Now, let us create another table named "CUSTOMERS" with the same columns and data types as EMPLOYEES table −
CREATE TABLE CUSTOMERS(
   ID INT NOT NULL,
   NAME VARCHAR(20) NOT NULL,
   AGE INT NOT NULL,
   ADDRESS CHAR(25) NOT NULL,
   SALARY DECIMAL(18, 2),
   PRIMARY KEY(ID)
);
Following is the output of the above code −
Query OK, 0 rows affected (0.03 sec)
Import Data from CSV −
Now, we import all the data from "EMPLOYEES_BACKUP.csv" file into the CUSTOMERS table using the following query −
LOAD DATA INFILE 'C:/ProgramData/MySQL/MySQL Server 8.0/Uploads/EMPLOYEES_BACKUP.csv'
INTO TABLE CUSTOMERS
FIELDS TERMINATED BY ','
OPTIONALLY ENCLOSED BY '"'
LINES TERMINATED BY '\n';
The result obtained is as follows −
Query OK, 7 rows affected (0.01 sec)
Records: 7  Deleted: 0  Skipped: 0  Warnings: 0
Verify Data Import −
To verify that the data has been successfully imported into the CUSTOMERS table, we can use the following SELECT statement −
SELECT * FROM CUSTOMERS;
As we can see the output below, the CUSTOMERS table contains the same data as the EMPLOYEES table, as the CSV data has been imported successfully −
| ID | NAME | AGE | ADDRESS | SALARY |
|---|---|---|---|---|
| 1 | Ramesh | 32 | Ahmedabad | 2000.00 |
| 2 | Khilan | 25 | Delhi | 1500.00 |
| 3 | Kaushik | 23 | Kota | 2000.00 |
| 4 | Chaitali | 25 | Mumbai | 6500.00 |
| 5 | Hardik | 27 | Bhopal | 8500.00 |
| 6 | Komal | 22 | MP | 4500.00 |
| 7 | Muffy | 24 | Indore | 10000.00 |
Importing a CSV File Using Client Program
We can also import CSV file into database using Client Program.
Syntax
To import CSV file into database through a PHP program, we need to execute the "LOAD DATA INFILE" statement using the mysqli function query() as follows −
$sql = "LOAD DATA INFILE 'C:/ProgramData/MySQL/MySQL Server 8.0/Uploads/EMPLOYEES_BACKUP.csv' INTO TABLE CUSTOMERS FIELDS TERMINATED BY ';' OPTIONALLY ENCLOSED BY '' LINES TERMINATED BY '\n'";
$mysqli->query($sql);
To import CSV file into database through a JavaScript program, we need to execute the "LOAD DATA INFILE" statement using the query() function of mysql2 library as follows −
sql = `LOAD DATA INFILE 'C:/ProgramData/MySQL/MySQL Server 8.0/Uploads/EMPLOYEES_BACKUP.csv' INTO TABLE CUSTOMERS FIELDS TERMINATED BY ';' OPTIONALLY ENCLOSED BY '' LINES TERMINATED BY '\n'`;
con.query(sql);
To import CSV file into database through a Java program, we need to execute the "LOAD DATA INFILE" statement using the JDBC function execute() as follows −
String sql = "LOAD DATA INFILE 'C:/ProgramData/MySQL/MySQL Server 8.0/Uploads/EMPLOYEES_BACKUP.csv' INTO TABLE CUSTOMERS FIELDS TERMINATED BY ';' OPTIONALLY ENCLOSED BY '' LINES TERMINATED BY '\\n'";
statement.execute(sql);
To import CSV file into database through a Python program, we need to execute the "LOAD DATA INFILE" statement using the execute() function of the MySQL Connector/Python as follows −
import_sql = "LOAD DATA INFILE 'C:/ProgramData/MySQL/MySQL Server 8.0/Uploads/EMPLOYEE_BACKUP.csv' INTO TABLE CUSTOMERS FIELDS TERMINATED BY ','
OPTIONALLY ENCLOSED BY '"' LINES TERMINATED BY '\r\n'"
cursorObj.execute(import_sql)
Example
Following are the programs −
$dbhost = 'localhost';
$dbuser = 'root';
$dbpass = 'password';
$db = 'TUTORIALS';
$mysqli = new mysqli($dbhost, $dbuser, $dbpass, $db);
if ($mysqli->connect_errno) {
    printf("Connect failed: %s
", $mysqli->connect_error);
    exit();
}
//printf('Connected successfully.
');
$sql = "CREATE TABLE EMPLOYEES( ID INT NOT NULL, NAME VARCHAR(20) NOT NULL, AGE INT NOT NULL, ADDRESS CHAR(25) NOT NULL, SALARY DECIMAL(18, 2), PRIMARY KEY(ID) )";
if($mysqli->query($sql)){
    printf("Employees table created successfully...!\n");
}
//now lets insert some data into it..
$sql = "INSERT INTO EMPLOYEES (ID,NAME,AGE,ADDRESS,SALARY) VALUES (1, 'Ramesh',
32, 'Ahmedabad', 2000.00 )";
if($mysqli->query($sql)){
    printf("First record inserted successfully...!\n");
}
$sql = "INSERT INTO EMPLOYEES (ID,NAME,AGE,ADDRESS,SALARY) VALUES (2, 'Khilan',
25, 'Delhi', 1500.00 )";
 if($mysqli->query($sql)){
    printf("Second record inserted successfully...!\n");
}
$sql = "INSERT INTO EMPLOYEES (ID,NAME,AGE,ADDRESS,SALARY) VALUES (3, 'kaushik',
23, 'Kota', 2000.00 )";
if($mysqli->query($sql)){
    printf("Third record inserted successfully...!\n");
}
//display table record
$sql = "SELECT * FROM EMPLOYEES";
if($result = $mysqli->query($sql)){
    printf("Table records: \n");
    while($row = mysqli_fetch_array($result)){
        printf("ID: %d, NAME: %s, AGE: %d, ADDRESS: %s, SALARY: %f",
            $row['ID'],
            $row['NAME'],
            $row['AGE'],
            $row['ADDRESS'],
            $row['SALARY']);
            printf("\n");
    }
}
//now let's export the table data into csv file
$sql = "SELECT ID, NAME, AGE, ADDRESS, SALARY FROM EMPLOYEES INTO OUTFILE 'C:/ProgramData/MySQL/MySQL Server 8.0/Uploads/EMPLOYEES_BACKUP.csv' FIELDS ENCLOSED BY '' TERMINATED BY ';' ESCAPED BY '' LINES TERMINATED BY '\r\n'";
if($result = $mysqli->query($sql)){
   printf("Table data exported successfully....!\n");
   print_r($result , "\n");
}
//now let's create a customers table
$sql = "CREATE TABLE CUSTOMERS( ID INT NOT NULL, NAME VARCHAR(20) NOT NULL, AGE INT NOT NULL, ADDRESS CHAR(25) NOT NULL, SALARY DECIMAL(18, 2), PRIMARY KEY(ID) )";
if($mysqli->query($sql)){
    printf("Customers table created successfully...!\n");
}
//now lets import employees table data csv file into customers table
$sql = "LOAD DATA INFILE 'C:/ProgramData/MySQL/MySQL Server 8.0/Uploads/EMPLOYEES_BACKUP.csv' INTO TABLE CUSTOMERS FIELDS TERMINATED BY ';' OPTIONALLY ENCLOSED BY '' LINES TERMINATED BY '\n'";
if($mysqli->query($sql)){
    printf("CSV file data imported successfully into Customers table....!\n");
}
//print customers table records
$sql = "SELECT * FROM CUSTOMERS";
if($result = $mysqli->query($sql)){
    printf("Customers table records after importing csv file data into it: \n");
    while($row = mysqli_fetch_array($result)){
        printf("ID: %d, NAME: %s, AGE: %d, ADDRESS: %s, SALARY: %f",
            $row['ID'],
            $row['NAME'],
            $row['AGE'],
            $row['ADDRESS'],
            $row['SALARY']);
            printf("\n");
    }
}
if($mysqli->error){
    printf("Error message: ", $mysqli->error);
}
$mysqli->close();
Output
The output obtained is as shown below −
Employees table created successfully...!
First record inserted successfully...!
Second record inserted successfully...!
Third record inserted successfully...!
Table records:
ID: 1, NAME: Ramesh, AGE: 32, ADDRESS: Ahmedabad, SALARY: 2000.000000
ID: 2, NAME: Khilan, AGE: 25, ADDRESS: Delhi, SALARY: 1500.000000
ID: 3, NAME: kaushik, AGE: 23, ADDRESS: Kota, SALARY: 2000.000000
Table data exported successfully....!
Customers table created successfully...!
CSV file data imported successfully into Customers table....!
Customers table records after importing csv file data into it:
ID: 1, NAME: Ramesh, AGE: 32, ADDRESS: Ahmedabad, SALARY: 2000.000000
ID: 2, NAME: Khilan, AGE: 25, ADDRESS: Delhi, SALARY: 1500.000000
ID: 3, NAME: kaushik, AGE: 23, ADDRESS: Kota, SALARY: 2000.000000
var mysql = require('mysql2');
var con = mysql.createConnection({
host:"localhost",
user:"root",
password:"password"
});

 //Connecting to MySQL
 con.connect(function(err) {
 if (err) throw err;
//   console.log("Connected successfully...!");
//   console.log("--------------------------");
 sql = "USE TUTORIALS";
 con.query(sql);
 //create employees table
 sql = "CREATE TABLE EMPLOYEES( ID INT NOT NULL, NAME VARCHAR(20) NOT NULL, AGE INT NOT NULL, ADDRESS CHAR(25) NOT NULL, SALARY DECIMAL(18, 2), PRIMARY KEY(ID) )";
 if(con.query(sql)){
    console.log("Employees table created successfully...!");
 }
//now let's insert some values
sql = `INSERT INTO EMPLOYEES (ID,NAME,AGE,ADDRESS,SALARY) VALUES (1, 'Ramesh',
32, 'Ahmedabad', 2000.00 )`;
if(con.query(sql)){
    console.log("First record inserted successfully...!");
}
sql = `INSERT INTO EMPLOYEES (ID,NAME,AGE,ADDRESS,SALARY) VALUES (2, 'Khilan',
    25, 'Delhi', 1500.00 )`;
if(con.query(sql)){
    console.log("Second record inserted successfully...!");
}
sql = `INSERT INTO EMPLOYEES (ID,NAME,AGE,ADDRESS,SALARY) VALUES (3, 'kaushik',
    23, 'Kota', 2000.00 )`;
if(con.query(sql)){
    console.log("Third record inserted successfully...!");
}
sql = "SELECT * FROM EMPLOYEES";
con.query(sql, function(err, result){
    console.log("Employees table records: ");
    if (err) throw err;
    console.log(result);
    });
sql = `SELECT ID, NAME, AGE, ADDRESS, SALARY FROM EMPLOYEES INTO OUTFILE 'C:/ProgramData/MySQL/MySQL Server 8.0/Uploads/EMPLOYEES_BACKUP.csv' FIELDS ENCLOSED BY '' TERMINATED BY ';' ESCAPED BY '' LINES TERMINATED BY '\r\n'`;
con.query(sql, function(err, result){
    if (err) throw err;
    console.log("Table data exported successfully....!");
    });
sql = `CREATE TABLE CUSTOMERS( ID INT NOT NULL, NAME VARCHAR(20) NOT NULL, AGE INT NOT NULL, ADDRESS CHAR(25) NOT NULL, SALARY DECIMAL(18, 2), PRIMARY KEY(ID) )`;
con.query(sql, function(err, result){
    if (err) throw err;
    console.log("Customers table created successfully...!");
    });
sql = `LOAD DATA INFILE 'C:/ProgramData/MySQL/MySQL Server 8.0/Uploads/EMPLOYEES_BACKUP.csv' INTO TABLE CUSTOMERS FIELDS TERMINATED BY ';' OPTIONALLY ENCLOSED BY '' LINES TERMINATED BY '\n'`;
con.query(sql, function(err, result){
    if (err) throw err;
    console.log("CSV file data imported successfully into Customers table....!");
    });
sql = "SELECT * FROM CUSTOMERS";
con.query(sql, function(err, result){
    console.log("Customers table records after importing csv file data into it: ")
    if (err) throw err;
    console.log(result);
});
});
Output
The output obtained is as shown below −
Employees table created successfully...!
First record inserted successfully...!
Second record inserted successfully...!
Third record inserted successfully...!
Employees table records:
[
  {
    ID: 1,
    NAME: 'Ramesh',
    AGE: 32,
    ADDRESS: 'Ahmedabad',
    SALARY: '2000.00'
  },
  {
    ID: 2,
    NAME: 'Khilan',
    AGE: 25,
    ADDRESS: 'Delhi',
    SALARY: '1500.00'
  },
  {
    ID: 3,
    NAME: 'kaushik',
    AGE: 23,
    ADDRESS: 'Kota',
    SALARY: '2000.00'
  }
]
Table data exported successfully....!
Customers table created successfully...!
CSV file data imported successfully into Customers table....!
Customers table records after importing csv file data into it:
[
  {
    ID: 1,
    NAME: 'Ramesh',
    AGE: 32,
    ADDRESS: 'Ahmedabad',
    SALARY: '2000.00'
  },
  {
    ID: 2,
    NAME: 'Khilan',
    AGE: 25,
    ADDRESS: 'Delhi',
    SALARY: '1500.00'
  },
  {
    ID: 3,
    NAME: 'kaushik',
    AGE: 23,
    ADDRESS: 'Kota',
    SALARY: '2000.00'
  }
]
import java.sql.Connection;
import java.sql.DriverManager;
import java.sql.ResultSet;
import java.sql.Statement;
public class ImportCSVToDatabase {
  public static void main(String[] args) {
    String url = "jdbc:mysql://localhost:3306/TUTORIALS";
    String user = "root";
    String password = "password";
    ResultSet rs;
    try {
      Class.forName("com.mysql.cj.jdbc.Driver");
            Connection con = DriverManager.getConnection(url, user, password);
            Statement st = con.createStatement();
            //System.out.println("Database connected successfully...!");
            String sql = "CREATE TABLE EMPLOYEES( ID INT NOT NULL, NAME VARCHAR(20) NOT NULL, AGE INT NOT NULL, ADDRESS CHAR(25) NOT NULL, SALARY DECIMAL(18, 2), PRIMARY KEY(ID))";
            st.execute(sql);
            System.out.println("Table EMPLOYEES created successfully....!");
            //let's insert some records into it...
            String sql1 = "INSERT INTO EMPLOYEES (ID,NAME,AGE,ADDRESS,SALARY) VALUES (1, 'Ramesh', 32, 'Ahmedabad', 2000.00 ), (2, 'Khilan', 25, 'Delhi', 1500.00 ), (3, 'kaushik', 23, 'Kota', 2000.00 )";
            st.execute(sql1);
            System.out.println("Records inserted successfully...!");
            //lets print table records
            String sql2 = "SELECT * FROM  EMPLOYEES";
            rs = st.executeQuery(sql2);
            System.out.println("Table records: ");
            while(rs.next()) {
              String id = rs.getString("id");
              String name = rs.getString("name");
              String age = rs.getString("age");
              String address = rs.getString("address");
              String salary = rs.getString("salary");
              System.out.println("Id: " + id + ", Name: " + name + ", Age: " + age + ", Address: " + address + ", Salary: " + salary);
            }
            //lets export the table records into csv file
            String sql3 = "SELECT ID, NAME, AGE, ADDRESS, SALARY FROM EMPLOYEES INTO OUTFILE 'C:/ProgramData/MySQL/MySQL Server 8.0/Uploads/EMPLOYEES_BACKUP.csv' FIELDS ENCLOSED BY '' TERMINATED BY ';' ESCAPED BY '' LINES TERMINATED BY '\\r\\n'";
            st.execute(sql3);
            System.out.println("Table records exported successfully into CSV file....!");
            //let's create one more table name Customers;
            String sql4 = "CREATE TABLE CUSTOMERS( ID INT NOT NULL, NAME VARCHAR(20) NOT NULL, AGE INT NOT NULL, ADDRESS CHAR(25) NOT NULL, SALARY DECIMAL(18, 2), PRIMARY KEY(ID))";
            st.execute(sql4);
            System.out.println("Table Customers created successfully...!");
            //lets import csv file into database
            String sql5 = "LOAD DATA INFILE 'C:/ProgramData/MySQL/MySQL Server 8.0/Uploads/EMPLOYEES_BACKUP.csv' INTO TABLE CUSTOMERS FIELDS TERMINATED BY ';' OPTIONALLY ENCLOSED BY '' LINES TERMINATED BY '\\n'";
            st.execute(sql5);
            System.out.println("Data imported successfully...!");
            //now lets print customers table records
            String sql6 = "SELECT * FROM  CUSTOMERS";
            rs = st.executeQuery(sql6);
            System.out.println("Table records: ");
            while(rs.next()) {
              String id = rs.getString("id");
              String name = rs.getString("name");
              String age = rs.getString("age");
              String address = rs.getString("address");
              String salary = rs.getString("salary");
              System.out.println("Id: " + id + ", Name: " + name + ", Age: " + age + ", Address: " + address + ", Salary: " + salary);
            }
    }catch(Exception e) {
      e.printStackTrace();
    }
  }
}
Output
The output obtained is as shown below −
Table EMPLOYEES created successfully....!
Records inserted successfully...!
Table records:
Id: 1, Name: Ramesh, Age: 32, Address: Ahmedabad, Salary: 2000.00
Id: 2, Name: Khilan, Age: 25, Address: Delhi, Salary: 1500.00
Id: 3, Name: kaushik, Age: 23, Address: Kota, Salary: 2000.00
Table records exported successfully into CSV file....!
Table Customers created successfully...!
Data imported successfully...!
Table records:
Id: 1, Name: Ramesh, Age: 32, Address: Ahmedabad, Salary: 2000.00
Id: 2, Name: Khilan, Age: 25, Address: Delhi, Salary: 1500.00
Id: 3, Name: kaushik, Age: 23, Address: Kota, Salary: 2000.00
import mysql.connector
# Establishing the connection
connection = mysql.connector.connect(
    host='localhost',
    user='root',
    password='password',
    database='tut'
)
# Creating a cursor object
cursorObj = connection.cursor()
# Creating the table 'EMPLOYEES'
create_table_query = '''
CREATE TABLE EMPLOYEES(
ID INT NOT NULL,
NAME VARCHAR(20) NOT NULL,
AGE INT NOT NULL,
ADDRESS CHAR(25) NOT NULL,
SALARY DECIMAL(18, 2),
PRIMARY KEY(ID)
);
'''
cursorObj.execute(create_table_query)
print("Table 'EMPLOYEES' is created successfully!")
# Inserting records into 'EMPLOYEES' table
sql = "INSERT INTO EMPLOYEES (ID, NAME, AGE, ADDRESS, SALARY) VALUES (%s, %s, %s, %s, %s);"
values = [
    (1, 'Ramesh', 32, 'Ahmedabad', 2000.00),
    (2, 'Khilan', 25, 'Delhi', 1500.00),
    (3, 'Kaushik', 23, 'Kota', 2000.00),
    (4, 'Chaitali', 25, 'Mumbai', 6500.00),
    (5, 'Hardik', 27, 'Bhopal', 8500.00),
    (6, 'Komal', 22, 'MP', 4500.00),
    (7, 'Muffy', 24, 'Indore', 10000.00)
]
cursorObj.executemany(sql, values)
print("Data inserted into the 'EMPLOYEES' table.")
# Export the table data into a CSV file
export_sql = """
SELECT ID, NAME, AGE, ADDRESS, SALARY FROM EMPLOYEES
INTO OUTFILE 'C:/ProgramData/MySQL/MySQL Server 8.0/Uploads/EMPLOYEE_BACKUP.csv'
FIELDS ENCLOSED BY '"'
TERMINATED BY ','
ESCAPED BY '"'
LINES TERMINATED BY '\r\n';
"""
cursorObj.execute(export_sql)
print("Table data exported successfully!")
# Now let's create a 'CUSTOMERS' table
create_another_table = '''
CREATE TABLE CUSTOMERS(
ID INT NOT NULL,
NAME VARCHAR(20) NOT NULL,
AGE INT NOT NULL,
ADDRESS CHAR(25) NOT NULL,
SALARY DECIMAL(18, 2),
PRIMARY KEY(ID)
);
'''
cursorObj.execute(create_another_table)
print("Table 'CUSTOMERS' is created successfully!")
# Now let's import 'EMPLOYEES' table data from the CSV file into 'CUSTOMERS' table
import_sql = """
LOAD DATA INFILE 'C:/ProgramData/MySQL/MySQL Server 8.0/Uploads/EMPLOYEE_BACKUP.csv'
INTO TABLE CUSTOMERS
FIELDS TERMINATED BY ','
OPTIONALLY ENCLOSED BY '"'
LINES TERMINATED BY '\r\n'
"""
cursorObj.execute(import_sql)
print("CSV file data imported successfully into Customers table....!\n")
# Print 'CUSTOMERS' table records
cursorObj.execute("SELECT * FROM CUSTOMERS")
records = cursorObj.fetchall()
# Printing the records
print("Customers table records after importing CSV file data into it: \n")
for record in records:
    print(record)

# Closing the cursor and connection
cursorObj.close()
connection.close()
Output
The output obtained is as shown below −
Table 'EMPLOYEES' is created successfully!
Data inserted into the 'EMPLOYEES' table.
Table data exported successfully!
Table 'CUSTOMERS' is created successfully!
CSV file data imported successfully into Customers table...!

Customers table records after importing CSV file data into it:

(1, 'Ramesh', 32, 'Ahmedabad', Decimal('2000.00'))
(2, 'Khilan', 25, 'Delhi', Decimal('1500.00'))
(3, 'Kaushik', 23, 'Kota', Decimal('2000.00'))
(4, 'Chaitali', 25, 'Mumbai', Decimal('6500.00'))
(5, 'Hardik', 27, 'Bhopal', Decimal('8500.00'))
(6, 'Komal', 22, 'MP', Decimal('4500.00'))
(7, 'Muffy', 24, 'Indore', Decimal('10000.00'))