
Article Categories
- All Categories
-
 Data Structure
-
 Networking
-
 RDBMS
RDBMS
-
 Operating System
-
 Java
Java
-
 MS Excel
-
 iOS
iOS
-
 HTML
HTML
-
 CSS
CSS
-
 Android
-
 Python
-
 C Programming
-
 C++
C++
-
 C#
C#
-
 MongoDB
-
 MySQL
MySQL
-
 Javascript
-
 PHP
PHP
-
 Economics & Finance
How to Implementing an Autoencoder in PyTorch?
An autoencoder is a method of unsupervised learning for neural networks that train the network to disregard signal "noise" in order to develop effective data representations (encoding). It is a kind of neural network where the output layer has the same number of dimensions as the input layer. In other words, the number of input units in the input layer equals the number of output units in the output layer. An autoencoder, also known as a replicator neural network, duplicates data from the input to the output in an unsupervised fashion.
By sending the input across the network, the autoencoders rebuild each dimension of the input. It would appear simple to utilize a neural network to replicate the input, however during replication, the input's size is reduced to its smaller representation. In comparison to the input or output layers, the intermediate layers of the neural network have fewer units. As a result, the intermediary layers contain a condensed version of the input. From this condensed representation of the input, the output is constructed.
Components of Autoencoder
Encoder ? Where the model learns how to encode the input data and minimize the input dimensions.
Decoder ? Where the model learns how to rebuild the data from the encoded representation to be as near to the original input as feasible.
Implementing Autoencoder in PyTorch
1. Installation
Torch ? High-level tensor computation and deep neural networks based on the autograd framework are provided by this Python package.
Torchvision ? A variety of databases, picture structures, and computer vision transformations are included in this module.
<span class="pln">pip install torch
pip install torchvision</span>
2. Bringing in the necessary modules and packages
We must first import the desired modules that are necessary. The torch. optim and torch.nn modules from the light bundle as well as datasets and updates from the torchvision bundle will be used. In this post, we'll make use of the well-known MNIST dataset, which has grayscale images of hand-typed single digits between 0 and 9.
<div class="code-mirror  language-python" contenteditable="plaintext-only" spellcheck="false" style="outline: none; overflow-wrap: break-word; overflow-y: auto; white-space: pre-wrap;"><span class="token keyword">import</span> torch
<span class="token keyword">from</span> torchvision <span class="token keyword">import</span> datasets
<span class="token keyword">from</span> torchvision <span class="token keyword">import</span> transforms
<span class="token keyword">import</span> matplotlib<span class="token punctuation">.</span>pyplot <span class="token keyword">as</span> plt
</div>
3. Add the dataset
Using the DataLoader module, we must load the necessary dataset into the loader in this phase. The downloaded dataset can be used to transform images. The tensors are stacked and prepared for use with the help of the DataLoader module.
<div class="code-mirror  language-python" contenteditable="plaintext-only" spellcheck="false" style="outline: none; overflow-wrap: break-word; overflow-y: auto; white-space: pre-wrap;">tensor_transform <span class="token operator">=</span> transforms<span class="token punctuation">.</span>ToTensor<span class="token punctuation">(</span><span class="token punctuation">)</span>

dataset <span class="token operator">=</span> datasets<span class="token punctuation">.</span>MNIST<span class="token punctuation">(</span>root <span class="token operator">=</span> <span class="token string">"./data"</span><span class="token punctuation">,</span> train <span class="token operator">=</span> <span class="token boolean">True</span><span class="token punctuation">,</span>
   download <span class="token operator">=</span> <span class="token boolean">True</span><span class="token punctuation">,</span> transform <span class="token operator">=</span> tensor_transform<span class="token punctuation">)</span>

loader <span class="token operator">=</span> torch<span class="token punctuation">.</span>utils<span class="token punctuation">.</span>data<span class="token punctuation">.</span>DataLoader<span class="token punctuation">(</span>dataset <span class="token operator">=</span> dataset<span class="token punctuation">,</span> batch_size <span class="token operator">=</span> <span class="token number">64</span><span class="token punctuation">,</span>
   shuffle <span class="token operator">=</span> <span class="token boolean">True</span><span class="token punctuation">)</span>
</div>
4. The Autoencoder class should now be created
Data dimensions are gradually decreased by the encoder portion. The encoder starts off with 28*28 nodes in a Linear layer, followed by a ReLU layer, and it continues until the dimensionality is decreased to 9 nodes. By adopting the encoder architecture's opposite, the decryptor employs these 9 data representations to restore the original picture. To only range the values between 0 and 1, the decryptor design employs a Sigmoid Layer.
<div class="code-mirror  language-python" contenteditable="plaintext-only" spellcheck="false" style="outline: none; overflow-wrap: break-word; overflow-y: auto; white-space: pre-wrap;"><span class="token keyword">class</span> <span class="token class-name">Autoenc</span><span class="token punctuation">(</span>torch<span class="token punctuation">.</span>nn<span class="token punctuation">.</span>Module<span class="token punctuation">)</span><span class="token punctuation">:</span>
   <span class="token keyword">def</span> <span class="token function">__init__</span><span class="token punctuation">(</span>self<span class="token punctuation">)</span><span class="token punctuation">:</span>
      <span class="token builtin">super</span><span class="token punctuation">(</span><span class="token punctuation">)</span><span class="token punctuation">.</span>__init__<span class="token punctuation">(</span><span class="token punctuation">)</span>

      self<span class="token punctuation">.</span>encoder <span class="token operator">=</span> torch<span class="token punctuation">.</span>nn<span class="token punctuation">.</span>Sequential<span class="token punctuation">(</span>
         torch<span class="token punctuation">.</span>nn<span class="token punctuation">.</span>Linear<span class="token punctuation">(</span><span class="token number">28</span> <span class="token operator">*</span> <span class="token number">28</span><span class="token punctuation">,</span> <span class="token number">128</span><span class="token punctuation">)</span><span class="token punctuation">,</span>
         torch<span class="token punctuation">.</span>nn<span class="token punctuation">.</span>ReLU<span class="token punctuation">(</span><span class="token punctuation">)</span><span class="token punctuation">,</span>
         torch<span class="token punctuation">.</span>nn<span class="token punctuation">.</span>Linear<span class="token punctuation">(</span><span class="token number">128</span><span class="token punctuation">,</span> <span class="token number">64</span><span class="token punctuation">)</span><span class="token punctuation">,</span>
         torch<span class="token punctuation">.</span>nn<span class="token punctuation">.</span>ReLU<span class="token punctuation">(</span><span class="token punctuation">)</span><span class="token punctuation">,</span>
         torch<span class="token punctuation">.</span>nn<span class="token punctuation">.</span>Linear<span class="token punctuation">(</span><span class="token number">64</span><span class="token punctuation">,</span> <span class="token number">36</span><span class="token punctuation">)</span><span class="token punctuation">,</span>
         torch<span class="token punctuation">.</span>nn<span class="token punctuation">.</span>ReLU<span class="token punctuation">(</span><span class="token punctuation">)</span><span class="token punctuation">,</span>
         torch<span class="token punctuation">.</span>nn<span class="token punctuation">.</span>Linear<span class="token punctuation">(</span><span class="token number">36</span><span class="token punctuation">,</span> <span class="token number">18</span><span class="token punctuation">)</span><span class="token punctuation">,</span>
         torch<span class="token punctuation">.</span>nn<span class="token punctuation">.</span>ReLU<span class="token punctuation">(</span><span class="token punctuation">)</span><span class="token punctuation">,</span>
         torch<span class="token punctuation">.</span>nn<span class="token punctuation">.</span>Linear<span class="token punctuation">(</span><span class="token number">18</span><span class="token punctuation">,</span> <span class="token number">9</span><span class="token punctuation">)</span>
      <span class="token punctuation">)</span>

      self<span class="token punctuation">.</span>decoder <span class="token operator">=</span> torch<span class="token punctuation">.</span>nn<span class="token punctuation">.</span>Sequential<span class="token punctuation">(</span>
         torch<span class="token punctuation">.</span>nn<span class="token punctuation">.</span>Linear<span class="token punctuation">(</span><span class="token number">9</span><span class="token punctuation">,</span> <span class="token number">18</span><span class="token punctuation">)</span><span class="token punctuation">,</span>
         torch<span class="token punctuation">.</span>nn<span class="token punctuation">.</span>ReLU<span class="token punctuation">(</span><span class="token punctuation">)</span><span class="token punctuation">,</span>
         torch<span class="token punctuation">.</span>nn<span class="token punctuation">.</span>Linear<span class="token punctuation">(</span><span class="token number">18</span><span class="token punctuation">,</span> <span class="token number">36</span><span class="token punctuation">)</span><span class="token punctuation">,</span>
         torch<span class="token punctuation">.</span>nn<span class="token punctuation">.</span>ReLU<span class="token punctuation">(</span><span class="token punctuation">)</span><span class="token punctuation">,</span>
         torch<span class="token punctuation">.</span>nn<span class="token punctuation">.</span>Linear<span class="token punctuation">(</span><span class="token number">36</span><span class="token punctuation">,</span> <span class="token number">64</span><span class="token punctuation">)</span><span class="token punctuation">,</span>
         torch<span class="token punctuation">.</span>nn<span class="token punctuation">.</span>ReLU<span class="token punctuation">(</span><span class="token punctuation">)</span><span class="token punctuation">,</span>
         torch<span class="token punctuation">.</span>nn<span class="token punctuation">.</span>Linear<span class="token punctuation">(</span><span class="token number">64</span><span class="token punctuation">,</span> <span class="token number">128</span><span class="token punctuation">)</span><span class="token punctuation">,</span>
         torch<span class="token punctuation">.</span>nn<span class="token punctuation">.</span>ReLU<span class="token punctuation">(</span><span class="token punctuation">)</span><span class="token punctuation">,</span>
         torch<span class="token punctuation">.</span>nn<span class="token punctuation">.</span>Linear<span class="token punctuation">(</span><span class="token number">128</span><span class="token punctuation">,</span> <span class="token number">28</span> <span class="token operator">*</span> <span class="token number">28</span><span class="token punctuation">)</span><span class="token punctuation">,</span>
         torch<span class="token punctuation">.</span>nn<span class="token punctuation">.</span>Sigmoid<span class="token punctuation">(</span><span class="token punctuation">)</span>
      <span class="token punctuation">)</span>
   <span class="token keyword">def</span> <span class="token function">forward</span><span class="token punctuation">(</span>self<span class="token punctuation">,</span> x<span class="token punctuation">)</span><span class="token punctuation">:</span>
      encoded <span class="token operator">=</span> self<span class="token punctuation">.</span>encoder<span class="token punctuation">(</span>x<span class="token punctuation">)</span>
      decoded <span class="token operator">=</span> self<span class="token punctuation">.</span>decoder<span class="token punctuation">(</span>encoded<span class="token punctuation">)</span>
      <span class="token keyword">return</span> decoded
</div>
5. Starting the model
Depending entirely on the kind of need we have, which we refer to as model initialization, we need to specify the model that we want to incorporate into our project here. We utilize an Adam Optimizer with a learning rate of 0.1 and a weight decay of 10-8 to evaluate the model. We also employ the Mean Squared Error function.
<div class="code-mirror  language-python" contenteditable="plaintext-only" spellcheck="false" style="outline: none; overflow-wrap: break-word; overflow-y: auto; white-space: pre-wrap;">model <span class="token operator">=</span> Autoenc<span class="token punctuation">(</span><span class="token punctuation">)</span>
loss_function <span class="token operator">=</span> torch<span class="token punctuation">.</span>nn<span class="token punctuation">.</span>MSELoss<span class="token punctuation">(</span><span class="token punctuation">)</span>
optimizer <span class="token operator">=</span> torch<span class="token punctuation">.</span>optim<span class="token punctuation">.</span>Adam<span class="token punctuation">(</span>model<span class="token punctuation">.</span>parameters<span class="token punctuation">(</span><span class="token punctuation">)</span><span class="token punctuation">,</span> lr <span class="token operator">=</span> <span class="token number">1e-1</span><span class="token punctuation">,</span> weight_decay <span class="token operator">=</span> <span class="token number">1e8</span><span class="token punctuation">)</span>
</div>
6. Result Generation
The final tensor is saved in an output list once the output against each epoch has been computed using the argument given to the Model() class. The MSELoss function is used to compute and illustrate the loss function.
With the aid of zero grad, the optimizer's starting gradient values are set to zero (). Loss.backward() calculates and stores the grade values. The optimizer is updated using the step() method. To plot the pictures, the detached original image and the rebuilt image from the outputs list are both converted into a NumPy Array.
Example
<div class="code-mirror  language-python" contenteditable="plaintext-only" spellcheck="false" style="outline: none; overflow-wrap: break-word; overflow-y: auto; white-space: pre-wrap;">epochs <span class="token operator">=</span> <span class="token number">10</span>
outputs <span class="token operator">=</span> <span class="token punctuation">[</span><span class="token punctuation">]</span>
losses <span class="token operator">=</span> <span class="token punctuation">[</span><span class="token punctuation">]</span>
<span class="token keyword">for</span> epoch <span class="token keyword">in</span> <span class="token builtin">range</span><span class="token punctuation">(</span>epochs<span class="token punctuation">)</span><span class="token punctuation">:</span>
   <span class="token keyword">for</span> <span class="token punctuation">(</span>image<span class="token punctuation">,</span> _<span class="token punctuation">)</span> <span class="token keyword">in</span> loader<span class="token punctuation">:</span>

      image <span class="token operator">=</span> image<span class="token punctuation">.</span>reshape<span class="token punctuation">(</span><span class="token operator">-</span><span class="token number">1</span><span class="token punctuation">,</span> <span class="token number">28</span><span class="token operator">*</span><span class="token number">28</span><span class="token punctuation">)</span>

      reconstructed <span class="token operator">=</span> model<span class="token punctuation">(</span>image<span class="token punctuation">)</span>

      loss <span class="token operator">=</span> loss_function<span class="token punctuation">(</span>reconstructed<span class="token punctuation">,</span> image<span class="token punctuation">)</span>

      optimizer<span class="token punctuation">.</span>zero_grad<span class="token punctuation">(</span><span class="token punctuation">)</span>
      loss<span class="token punctuation">.</span>backward<span class="token punctuation">(</span><span class="token punctuation">)</span>
      optimizer<span class="token punctuation">.</span>step<span class="token punctuation">(</span><span class="token punctuation">)</span>

      losses<span class="token punctuation">.</span>append<span class="token punctuation">(</span>loss<span class="token punctuation">)</span>
   outputs<span class="token punctuation">.</span>append<span class="token punctuation">(</span><span class="token punctuation">(</span>epochs<span class="token punctuation">,</span> image<span class="token punctuation">,</span> reconstructed<span class="token punctuation">)</span><span class="token punctuation">)</span>
plt<span class="token punctuation">.</span>style<span class="token punctuation">.</span>use<span class="token punctuation">(</span><span class="token string">'fivethirtyeight'</span><span class="token punctuation">)</span>
plt<span class="token punctuation">.</span>xlabel<span class="token punctuation">(</span><span class="token string">'Iterations'</span><span class="token punctuation">)</span>
plt<span class="token punctuation">.</span>ylabel<span class="token punctuation">(</span><span class="token string">'Loss'</span><span class="token punctuation">)</span>
plt<span class="token punctuation">.</span>plot<span class="token punctuation">(</span>losses<span class="token punctuation">[</span><span class="token operator">-</span><span class="token number">100</span><span class="token punctuation">:</span><span class="token punctuation">]</span><span class="token punctuation">)</span>
</div>
Output of plot
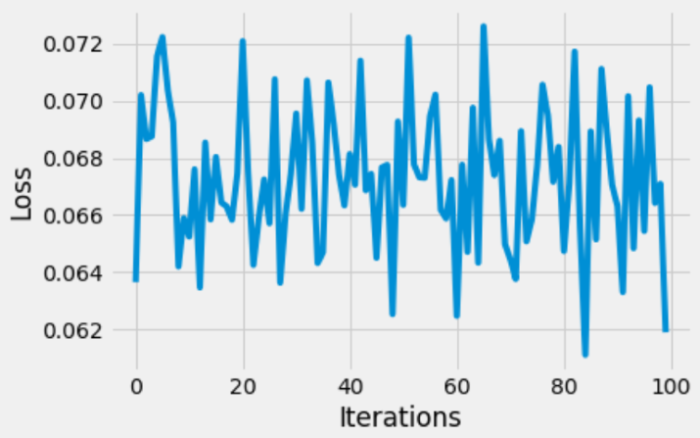
Loss function graph
7. Creating a New Input
The initial input picture array and the first reconstructed input image array were plotted using plt.imshow.
Example
<div class="code-mirror  language-python" contenteditable="plaintext-only" spellcheck="false" style="outline: none; overflow-wrap: break-word; overflow-y: auto; white-space: pre-wrap;"><span class="token keyword">for</span> i<span class="token punctuation">,</span> item <span class="token keyword">in</span> <span class="token builtin">enumerate</span><span class="token punctuation">(</span>image<span class="token punctuation">)</span><span class="token punctuation">:</span>

   item <span class="token operator">=</span> item<span class="token punctuation">.</span>reshape<span class="token punctuation">(</span><span class="token operator">-</span><span class="token number">1</span><span class="token punctuation">,</span> <span class="token number">28</span><span class="token punctuation">,</span> <span class="token number">28</span><span class="token punctuation">)</span>
   plt<span class="token punctuation">.</span>imshow<span class="token punctuation">(</span>item<span class="token punctuation">[</span><span class="token number">0</span><span class="token punctuation">]</span><span class="token punctuation">)</span>
<span class="token keyword">for</span> i<span class="token punctuation">,</span> item <span class="token keyword">in</span> <span class="token builtin">enumerate</span><span class="token punctuation">(</span>reconstructed<span class="token punctuation">)</span><span class="token punctuation">:</span>
   item <span class="token operator">=</span> item<span class="token punctuation">.</span>reshape<span class="token punctuation">(</span><span class="token operator">-</span><span class="token number">1</span><span class="token punctuation">,</span> <span class="token number">28</span><span class="token punctuation">,</span> <span class="token number">28</span><span class="token punctuation">)</span>
   plt<span class="token punctuation">.</span>imshow<span class="token punctuation">(</span>item<span class="token punctuation">[</span><span class="token number">0</span><span class="token punctuation">]</span><span class="token punctuation">)</span>
</div>
Output

Model reconstructed image on the right
Conclusion
The reconstructed images seem ok, but they are rather grainy. The autoencoder model might be constructed using the architecture of a convolution neural network, or more layers and/or neurons could be added to improve this result. Autoencoders have many advantages for dimensionality reduction. It might also be used to understand the distribution of a dataset and denoise data, though. The Pytorch autoencoder is covered in more detail in this paper, we hope. The aforementioned article taught us the Pytorch autoencoder's fundamental idea and syntax, as well as how and when to utilize it.

7K+ Views
