- OpenCV Python - Home
- OpenCV Python - Overview
- OpenCV Python - Environment
- OpenCV Python - Reading Image
- OpenCV Python - Write Image
- OpenCV Python - Using Matplotlib
- OpenCV Python - Image Properties
- OpenCV Python - Bitwise Operations
- OpenCV Python - Shapes and Text
- OpenCV Python - Mouse Events
- OpenCV Python - Add Trackbar
- OpenCV Python - Resize and Rotate
- OpenCV Python - Image Threshold
- OpenCV Python - Image Filtering
- OpenCV Python - Edge Detection
- OpenCV Python - Histogram
- OpenCV Python - Color Spaces
- OpenCV Python - Transformations
- OpenCV Python - Image Contours
- OpenCV Python - Template Matching
- OpenCV Python - Image Pyramids
- OpenCV Python - Image Addition
- OpenCV Python - Image Blending
- OpenCV Python - Fourier Transform
- OpenCV Python - Capture Videos
- OpenCV Python - Play Videos
- OpenCV Python - Images From Video
- OpenCV Python - Video from Images
- OpenCV Python - Face Detection
- OpenCV Python - Meanshift/Camshift
- OpenCV Python - Feature Detection
- OpenCV Python - Feature Matching
- OpenCV Python - Digit Recognition
- OpenCV Python Resources
- OpenCV Python - Quick Guide
- OpenCV Python - Resources
- OpenCV Python - Discussion
OpenCV Python - Image Pyramids
Occasionally, we may need to convert an image to a size different than its original. For this, you either Upsize the image (zoom in) or Downsize it (zoom out).
An image pyramid is a collection of images (constructed from a single original image) successively down sampled a specified number of times.
The Gaussian pyramid is used to down sample images while the Laplacian pyramid reconstructs an up sampled image from an image lower in the pyramid with less resolution.
Consider the pyramid as a set of layers. The image is shown below −
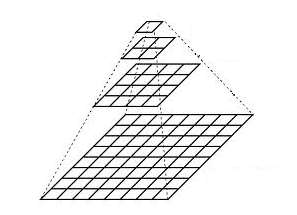
Image at the higher layer of the pyramid is smaller in size. To produce an image at the next layer in the Gaussian pyramid, we convolve a lower level image with a Gaussian kernel.
$$\frac{1}{16}\begin{bmatrix}1 & 4 & 6 & 4 & 1 \\4 & 16 & 24 & 16 & 4 \\6 & 24 & 36 & 24 & 6 \\4 & 16 & 24 & 16 & 4 \\1 & 4 & 6 & 4 & 1\end{bmatrix}$$
Now remove every even-numbered row and column. Resulting image will be 1/4th the area of its predecessor. Iterating this process on the original image produces the entire pyramid.
To make the images bigger, the columns filled with zeros. First, upsize the image to double the original in each dimension, with the new even rows and then perform a convolution with the kernel to approximate the values of the missing pixels.
The cv.pyrUp() function doubles the original size and cv.pyrDown() function decreases it to half.
Example
Following program calls pyrUp() and pyrDown() functions depending on user input I or o respectively.
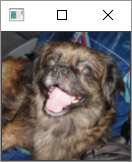
Note that when we reduce the size of an image, information of the image is lost. Once, we scale down and if we rescale it to the original size, we lose some information and the resolution of the new image is much lower than the original one.
import sys
import cv2 as cv
filename = 'chicky_512.png'
src = cv.imread(filename)
while 1:
print ("press 'i' for zoom in 'o' for zoom out esc to stop")
rows, cols, _channels = map(int, src.shape)
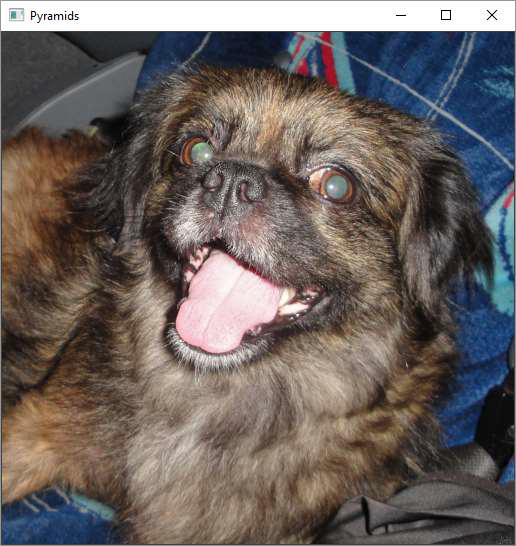
cv.imshow('Pyramids', src)
k = cv.waitKey(0)
if k == 27:
break
elif chr(k) == 'i':
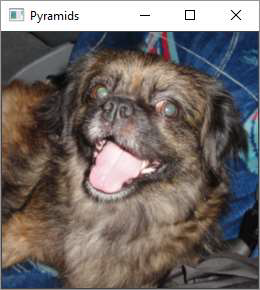
src = cv.pyrUp(src, dstsize=(2 * cols, 2 * rows))
elif chr(k) == 'o':
src = cv.pyrDown(src, dstsize=(cols // 2, rows // 2))
cv.destroyAllWindows()
Output