 Data Structure
 Networking
 RDBMS
RDBMS Operating System
 Java
Java MS Excel
 iOS
iOS HTML
HTML CSS
CSS Android
 Python
 C Programming
 C++
C++ C#
C# MongoDB
 MySQL
MySQL Javascript
 PHP
PHP
- Selected Reading
- UPSC IAS Exams Notes
- Developer's Best Practices
- Questions and Answers
- Effective Resume Writing
- HR Interview Questions
- Computer Glossary
- Who is Who
How to detect and draw FAST feature points in OpenCV Python?
FAST (Features from Accelerated Segment Test) is a high speed corner detection algorithm. We use the FAST algorithm to detect features in the image. We first create a FAST object with cv2.FastFeatureDetector_create(). Then detect the feature points using fast.detect() where fast is the created FAST object. To draw featurepoints, we use cv2.drawKeypoints().
Steps
To detect and draw feature points in the input image using the FAST feature detector, you could follow the steps given below
Import the required libraries OpenCV and NumPy. Make sure you have already installed them.
Read the input image using cv2.imread() method. Specify the full path of the image. Convert the input image to grayscale image using cv2.cvtColor() method.
Initiate FAST object with default values as fast=cv2.FastFeatureDetector_create(). You can optionally set Non Max Suppression as False using fast.setNonmaxSuppression(0).
Detect the feature points in the grayscale image. Use fast.detect(gray, None). It returns keypoints kp.
Draw the detected keypoints kp on the image cv2.drawKeypoints() function.
Display the image with drawn keypoints on it.
Let's see the examples to detect and draw feature points in the input image using the FAST feature detector.
Input Image
We will use the following image as the input file in the examples below.

Example
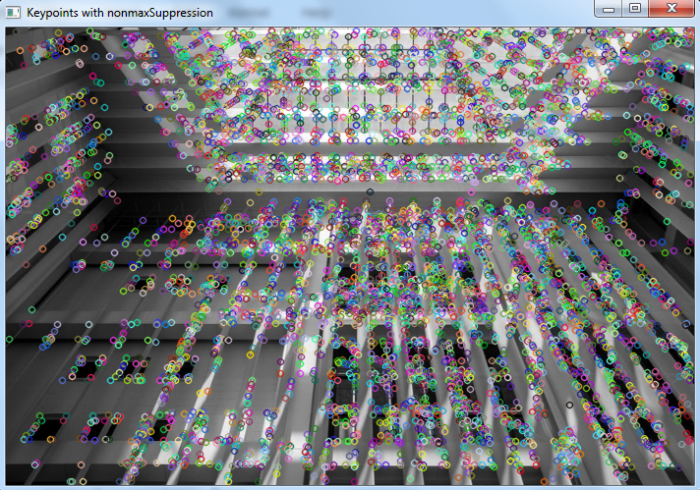
In this program, we detect and draw feature points using the FAST algorithm. The default nonmaxSuppression is set to True.
# import required libraries
import cv2

# read input image
img = cv2.imread('architecture.jpg')

# convert the image to grayscale
gray = cv2.cvtColor(img, cv2.COLOR_BGR2GRAY)

# Initiate FAST object with default values
fast = cv2.FastFeatureDetector_create()

# find the keypoints on image (grayscale)
kp = fast.detect(gray,None)

# draw keypoints in image
img2 = cv2.drawKeypoints(img, kp, None)

# Print all default params
print("Threshold: ", fast.getThreshold())
print("nonmaxSuppression: ", fast.getNonmaxSuppression())
print("neighborhood: ", fast.getType())
print("Total Keypoints with nonmaxSuppression: ", len(kp))

# display the image with keypoints drawn on it
cv2.imshow("Keypoints with nonmaxSuppression", img2)
cv2.waitKey(0)
cv2.destroyAllWindows()
Output
On execution, it will produce the following output ?
Threshold: 10
nonmaxSuppression: True
neighborhood: 2
Total Keypoints with nonmaxSuppression: 5791
And we get the following window, showing the image with drawn keypoints on it ?

Example
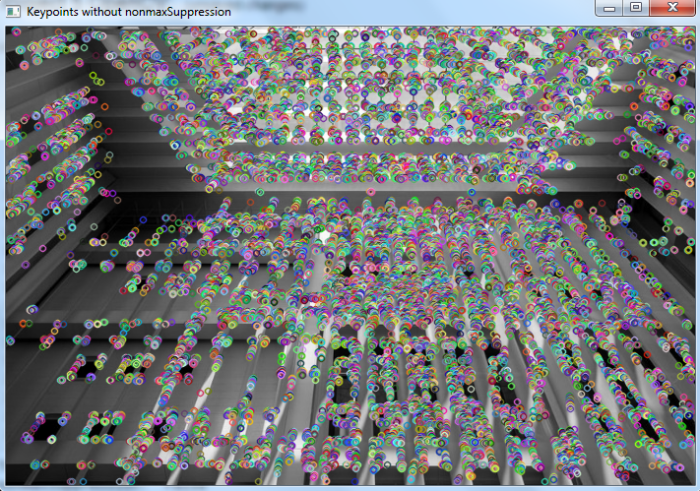
In this program, we detect and draw feature points using the FAST algorithm. We set nonmaxSuppression as False.
# import required libraries
import cv2

# read input image
img = cv2.imread('architecture.jpg')

# convert the image to grayscale
gray = cv2.cvtColor(img, cv2.COLOR_BGR2GRAY)

# Initiate FAST object with default values
fast = cv2.FastFeatureDetector_create()

# Disable nonmaxSuppression
fast.setNonmaxSuppression(0)

# find the keypoints on image (grayscale)
kp = fast.detect(gray,None)

# Print all default params
print("Threshold: ", fast.getThreshold())
print("nonmaxSuppression: ", fast.getNonmaxSuppression())
print("neighborhood: ", fast.getType())
print("Total Keypoints without nonmaxSuppression: ", len(kp))
img2 = img.copy()
img2 = cv2.drawKeypoints(img2, kp, None)

# display the image with keypoints drawn on it
cv2.imshow('Keypoints without nonmaxSuppression',img2)
cv2.waitKey(0)
cv2.destroyAllWindows()
Output
On execution, it will produce the following output:
Threshold: 10
nonmaxSuppression: False
neighborhood: 2
Total Keypoints without nonmaxSuppression: 27101
And we get the following window showing the image with drawn keypoints on it ?

We notice that when nonmaxSuppression is False the number of total detected keypoints are more in comparison to when nonmaxSuppression is True.

