 Data Structure
 Networking
 RDBMS
RDBMS Operating System
 Java
Java MS Excel
 iOS
iOS HTML
HTML CSS
CSS Android
 Python
 C Programming
 C++
C++ C#
C# MongoDB
 MySQL
MySQL Javascript
 PHP
PHP
- Selected Reading
- UPSC IAS Exams Notes
- Developer's Best Practices
- Questions and Answers
- Effective Resume Writing
- HR Interview Questions
- Computer Glossary
- Who is Who
How to crop and save the detected faces in OpenCV Python?
We can use the already trained haar cascade classifier to detect the faces in the image. To detect faces OpenCV provides us with different haar cascades as xml files. We will use haarcascade_frontalface_alt.xml for human face detection in the image. The detected face coordinates are in (x,y,w,h). To crop and save the detected face we save the image[y:y+h, x:x+w].
How to Download Haarcascades?
You can find different haarcascades following the GitHub website address ?
https://github.com/opencv/opencv/tree/master/data/haarcascadesTo download the haar cascade for human face detection click on the haarcascade_frontalface_alt.xml file. Open it in raw format, right click and save the file.
Note ? save all haar cascade xml files in the haarcascade folder.
Steps
To crop and save the detect faces in an image, you can follow the steps given below ?
Import the required library. In all the following examples, the required Python library is OpenCV. Make sure you have already installed it.
Read the input image using cv2.imread(). Specify the full image path. Convert the input image to grayscale.
Initiate a Haar cascade classifier object face_cascade = cv2.CascadeClassifier() for face detection. Pass the full path of the haar cascade xml file. You can use the haar cascade file haarcascade_frontalface_alt.xml to detect faces in the image.
Detect faces in the input image using face_cascade.detectMultiScale(). It returns the coordinates of detected faces in (x,y,w,h) format.
Loop over all detected faces. Find image[y:y+h, x:x+w] as the cropped face and assign it to a new variable, say face. Save the cropped face using cv2.imwrite().
Optionally, display the cropped faces for visualization purposes.
Let's have a look at some examples for more clear understanding.
Example
In this example, we crop and save the face detected in the input image using a haar cascade.
# import required libraries
import cv2

# read the input image
img = cv2.imread('woman.jpg')

# convert to grayscale of each frames
gray = cv2.cvtColor(img, cv2.COLOR_BGR2GRAY)

# read the haarcascade to detect the faces in an image
face_cascade = cv2.CascadeClassifier('haarcascades\haarcascade_frontalface_default.xml')

# detects faces in the input image
faces = face_cascade.detectMultiScale(gray, 1.3, 4)
print('Number of detected faces:', len(faces))

# loop over all detected faces
if len(faces) > 0:
   for i, (x, y, w, h) in enumerate(faces):

      # To draw a rectangle in a face
      cv2.rectangle(img, (x, y), (x + w, y + h), (0, 255, 255), 2)
      face = img[y:y + h, x:x + w]
      cv2.imshow("Cropped Face", face)
      cv2.imwrite(f'face{i}.jpg', face)
      print(f"face{i}.jpg is saved")

# display the image with detected faces
cv2.imshow("image", img)
cv2.waitKey(0)
cv2.destroyAllWindows()
We will use the following image as the Input File for this program ?

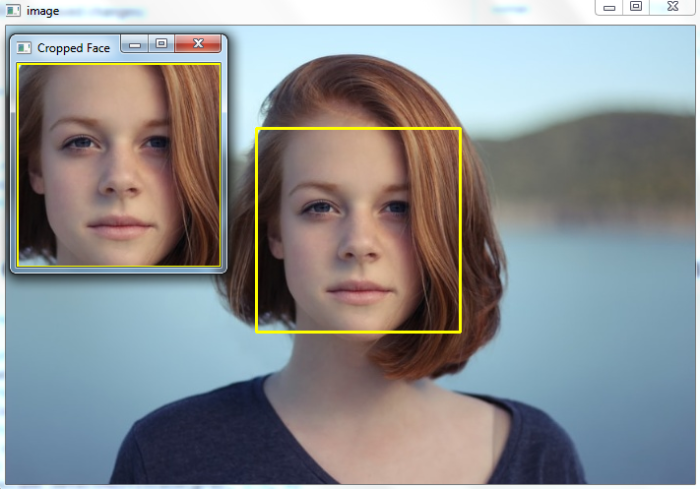
When you run the above Python program, it will produce the following output ?
Number of detected faces: 1
face0.jpg is saved
And we get the following output window ?

Example
In this Python example, we crop and save the faces detected in the input image using a haar cascade.
# import required libraries
import cv2

# read the input image
img = cv2.imread('two-men.jpg')

# convert to grayscale of each frames
gray = cv2.cvtColor(img, cv2.COLOR_BGR2GRAY)

# read the haarcascade to detect the faces in an image
face_cascade = cv2.CascadeClassifier('haarcascades\haarcascade_frontalface_alt.xml')

# detects faces in the input image
faces = face_cascade.detectMultiScale(gray, 1.1, 4)
print('Number of detected faces:', len(faces))

# loop over all detected faces
if len(faces) > 0:
   for i, (x,y,w,h) in enumerate(faces):

      # To draw a rectangle in a face
      cv2.rectangle(img,(x,y),(x+w,y+h),(0,255,255),2)
      face = img[y:y+h, x:x+w]
      cv2.imshow(f"Cropped Face {i}", face)
      cv2.imwrite(f'face{i}.jpg', face)
      print(f"face{i}.jpg is saved")

# display the image with detected faces
cv2.imshow("image", img)
cv2.waitKey(0)
cv2.destroyAllWindows()
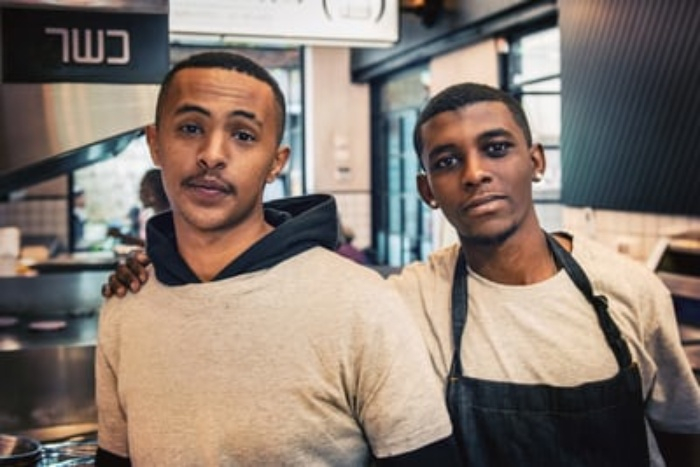
We will use this image as the Input File for this program ?

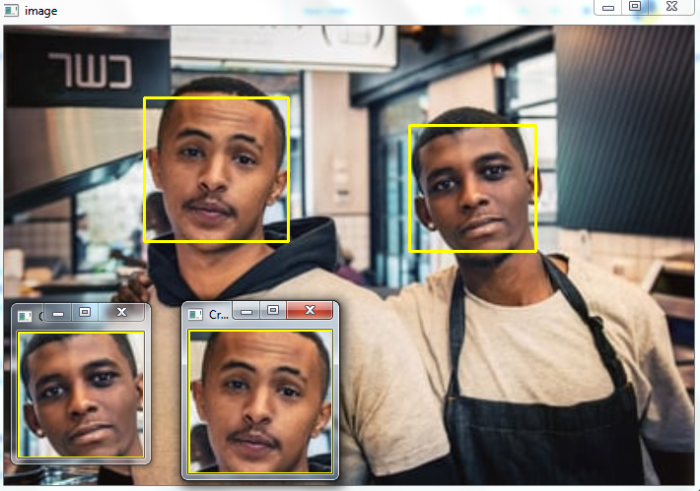
When you execute the program, it will produce the following output ?
Number of detected faces: 2
face0.jpg is saved
face1.jpg is saved
And we get the following output window ?


