 Data Structure
 Networking
 RDBMS
RDBMS Operating System
 Java
Java MS Excel
 iOS
iOS HTML
HTML CSS
CSS Android
 Python
 C Programming
 C++
C++ C#
C# MongoDB
 MySQL
MySQL Javascript
 PHP
PHP
- Selected Reading
- UPSC IAS Exams Notes
- Developer's Best Practices
- Questions and Answers
- Effective Resume Writing
- HR Interview Questions
- Computer Glossary
- Who is Who
How to create a Responsive Admin Dashboard using HTML CSS & JavaScript ?
An admin dashboard provides important data insights and controls for managing various aspects of an application or website. In this article, we will explore the process of creating a responsive admin dashboard using the three pillars of web development: HTML, CSS, and JavaScript.
Prerequisites
To follow this article, you should have a basic understanding of HTML, CSS, and JavaScript. Familiarity with concepts like responsive design, CSS Flexbox, and CSS Grid will also be helpful.
Step 1: Setting Up the HTML Structure
We'll start by setting up the basic HTML structure for our admin dashboard. Create a new HTML file and include the necessary boilerplate code
Example
In the below code structure, we have defined four main sections: the header, sidebar (or aside), main content area, and footer. These sections will hold the respective components of our admin dashboard.
<!DOCTYPE html>
<html lang="en">
<head>
    <meta charset="UTF-8">
    <meta name="viewport" content="width=device-width, initial-scale=1.0">
    <title>Admin Dashboard</title>
    <link rel="stylesheet" href="style.css">
</head>
<body>
    <header>
        <!-- Header content goes here -->
    </header>
    <aside>
        <!-- Sidebar content goes here -->
    </aside>
    <main>
        <!-- Main content goes here -->
    </main>
    <footer>
        <!-- Footer content goes here -->
    </footer>
    <script src="script.js"></script>
</body>
</html>
Step 2: Styling with CSS
Now, let's create the CSS file (style.css) and add styles to our admin dashboard. We'll use a mobile?first approach and gradually enhance the layout for larger screens using media queries.
Example
/* General styles */
body {
    font-family: Arial, sans-serif;
    margin: 0;
    padding: 0;
}

.container {
    display: flex; /* Added */
}

/* Sidebar styles */
aside {
    background-color: #555;
    color: #fff;
    width: 250px;
    min-height: 100vh; /* Updated */
    display: flex;
    flex-direction: column;
    align-items: flex-start;
    padding: 20px;
    transition: width 0.3s;
}

aside.collapsed {
    width: 80px;
}

aside button {
    background-color: transparent;
    border: none;
    color: #fff;
    cursor: pointer;
    font-size: 18px;
    outline: none;
    padding: 5px;
}

aside nav ul {
    list-style: none;
    margin: 0;
    padding: 0;
}

aside nav ul li {
    margin-bottom: 10px;
}

aside nav ul li a {
    color: #fff;
    text-decoration: none;
    transition: color 0.3s;
}

aside nav ul li a:hover {
    color: #bbb;
}

/* Main content styles */
main {
    flex: 1;
    padding: 20px;
}

h1 {
    color: #333;
    font-size: 24px;
    margin-bottom: 20px;
}

.cards {
    display: flex;
    flex-wrap: wrap;
    gap: 20px;
}

.card {
    background-color: #fff;
    border-radius: 8px;
    box-shadow: 0 2px 4px rgba(0, 0, 0, 0.1);
    padding: 20px;
    flex: 0 0 calc(50% - 10px);
}

.card h2 {
    color: #333;
    font-size: 18px;
    margin-bottom: 10px;
}

.card p {
    color: #777;
    font-size: 14px;
}

/* Footer styles */
footer {
    background-color: #333;
    color: #fff;
    padding: 20px;
    text-align: center;
}
Step 3: Adding Responsive Behavior with JavaScript
To make our admin dashboard responsive, we'll use JavaScript to handle the sidebar's collapsible functionality. We'll use an event listener to toggle a CSS class when a button is clicked.
function toggleSidebar() {
    const sidebar = document.querySelector('aside');
    sidebar.classList.toggle('collapsed');
}
Step 4: Creating Sidebar Navigation
In an admin dashboard, sidebar navigation is crucial for easy access to different sections. Let's add an unordered list with navigation links inside the aside section.
<aside>
    <button id="sidebar-toggle">Toggle Sidebar</button>
    <nav>
        <ul>
            <li><a href="#">Dashboard</a></li>
            <li><a href="#">Orders</a></li>
            <li><a href="#">Customers</a></li>
            <li><a href="#">Products</a></li>
            <li><a href="#">Settings</a></li>
        </ul>
    </nav>
</aside>
Step 5: Enhancing Styles for Collapsible Sidebar
Let's add some additional styles to the CSS file to accommodate the collapsible behavior of the sidebar.
/* Collapsed sidebar styles */
aside.collapsed nav ul li a {
    display: none;
}

aside.collapsed #sidebar-toggle::after {
    content: '\2261';
}

aside #sidebar-toggle {
    background-color: transparent;
    border: none;
    color: #fff;
    cursor: pointer;
    font-size: 24px;
    outline: none;
    padding: 5px;
}
Step 6: Populate the main content
Next, we'll add some content to the main section of our admin dashboard. You can add cards, charts, tables, or any other elements depending on your requirements.
<main>
  <h1>Admin Dashboard</h1>
            <div class="cards">
                <div class="card">
                    <h2>Card 1</h2>
                    <p>Lorem ipsum dolor sit amet, consectetur adipiscing elit.</p>
                </div>
                <div class="card">
                    <h2>Card 2</h2>
                    <p>Lorem ipsum dolor sit amet, consectetur adipiscing elit.</p>
                </div>
                <div class="card">
                    <h2>Card 3</h2>
                    <p>Lorem ipsum dolor sit amet, consectetur adipiscing elit.</p>
                </div>
                <div class="card">
                    <h2>Card 4</h2>
                    <p>Lorem ipsum dolor sit amet, consectetur adipiscing elit.</p>
                </div>
            </div>
</main>
Step 7: Fine?Tuning the Responsive Behavior
To enhance the responsiveness further, we can utilize CSS media queries to adjust the layout for different screen sizes. Let's modify the CSS code to stack the cards vertically on smaller screens.
@media (max-width: 768px) {
    aside {
        width: 80px;
    }

    aside.collapsed {
        width: 80px;
    }

    aside.collapsed #sidebar-toggle::after {
        content: '\2261';
    }
}
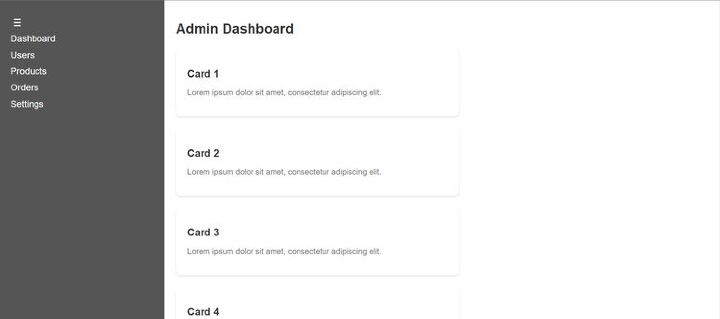
Final Dashboard Output
Conclusion
In this article we discussed and created a responsive admin dashboard using HTML, CSS, and Javascript. By following this guide, you can build a powerful and user?friendly admin dashboard to effectively manage your application or website. We can customize the Dashboard according to our needs by adding custom styles to CSS and JS files.


