
Article Categories
- All Categories
-
 Data Structure
-
 Networking
-
 RDBMS
RDBMS
-
 Operating System
-
 Java
Java
-
 MS Excel
-
 iOS
iOS
-
 HTML
HTML
-
 CSS
CSS
-
 Android
-
 Python
-
 C Programming
-
 C++
C++
-
 C#
C#
-
 MongoDB
-
 MySQL
MySQL
-
 Javascript
-
 PHP
PHP
-
 Economics & Finance
How to create a depth map from stereo images in OpenCV Python?
A depth map represents the distance of objects from the camera in a 3D scene. OpenCV Python provides stereo vision capabilities to create depth maps from two images taken from slightly different viewpoints. The process involves computing disparities between corresponding pixels in stereo image pairs using the StereoBM class.
Understanding Stereo Vision
Stereo vision mimics human binocular vision by using two cameras positioned horizontally apart. The disparity (difference in pixel positions) between corresponding points in the left and right images is inversely proportional to the depth closer objects have larger disparities.
Steps to Create a Depth Map
To create a depth map from stereo images, follow these steps
Import the required libraries OpenCV, Matplotlib and NumPy. Make sure you have already installed them.
Read two input images using cv2.imread() method as grayscale images. Specify the full path of the image.
Create a StereoBM object using cv2.StereoBM_create() with desired numDisparities and blockSize parameters.
Compute the disparity map between the input images using stereo.compute(). Adjust the values of numDisparities and blockSize for better results.
Visualize the disparity map (depth map) using matplotlib.
Example 1: Basic Depth Map Creation
In this example, we create a depth map using stereo images with basic parameters
# import required libraries
import numpy as np
import cv2
from matplotlib import pyplot as plt

# read two input images as grayscale images
imgL = cv2.imread('L.png', 0)
imgR = cv2.imread('R.png', 0)

# create StereoBM object
stereo = cv2.StereoBM_create(numDisparities=16, blockSize=15)

# compute the disparity map
disparity = stereo.compute(imgL, imgR)

# display the depth map
plt.imshow(disparity, 'gray')
plt.title('Depth Map')
plt.colorbar()
plt.show()

print(f"Disparity map shape: {disparity.shape}")
The input stereo images used


When you run the above Python program, it produces the following depth map

Example 2: Enhanced Depth Map with Higher Disparities
In this example, we use higher numDisparities value for better depth resolution
# import required libraries
import numpy as np
import cv2
from matplotlib import pyplot as plt
# read two input images as grayscale
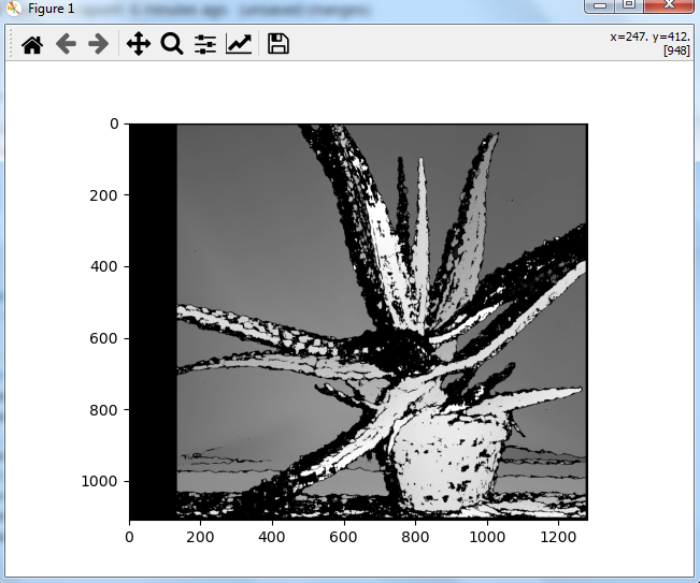
imgL = cv2.imread('aloeL.jpg', 0)
imgR = cv2.imread('aloeR.jpg', 0)
# create StereoBM object with higher numDisparities
stereo = cv2.StereoBM_create(numDisparities=128, blockSize=15)
# compute the disparity map
disparity = cv2.stereo.compute(imgL, imgR)
# display the depth map
plt.figure(figsize=(10, 6))
plt.imshow(disparity, cmap='plasma')
plt.title('Enhanced Depth Map')
plt.colorbar(label='Disparity')
plt.show()
The stereo images used in this example


The output depth map with enhanced parameters
Key Parameters
The StereoBM_create() function accepts important parameters
numDisparities Maximum disparity range (must be divisible by 16). Higher values capture more depth levels.
blockSize Size of the matching block (odd number, typically 5-25). Larger blocks are more robust but less precise.
Conclusion
Creating depth maps from stereo images in OpenCV involves using the StereoBM class to compute pixel disparities between left and right images. The quality of the depth map depends on proper calibration and parameter tuning for numDisparities and blockSize values.

10K+ Views
