- Pygame - Home
- Pygame - Overview
- Pygame - Hello World
- Pygame - Display modes
- Pygame - Locals module
- Pygame - Color object
- Pygame - Event objects
- Pygame - Keyboard events
- Pygame - Mouse events
- Pygame - Drawing shapes
- Pygame - Loading image
- Pygame - Displaying Text in Window
- Pygame - Moving an image
- Pygame - Moving with Numeric pad keys
- Pygame - Moving with mouse
- Pygame - Moving Rectangular objects
- Pygame - Use Text as Buttons
- Pygame - Transforming Images
- Pygame - Sound objects
- Pygame - Mixer channels
- Pygame - Playing music
- Pygame - Playing Movie
- Pygame - Using Camera module
- Pygame - Load cursor
- Pygame - Access CDROM
- Pygame - The Sprite Module
- Pygame - PyOpenGL
- Pygame - Errors and Exception
Pygame Useful Resources
PyGame - Transforming Images
The pygame.ransform module contains definitions of a number of functions for manipulation of Surface objects obtained out of image or text blocks. Manipulation of a surface include flipping, rotation, scaling, resizing and zooming the object.
Following functions are found in pygame.transform module.
| flip() | flip vertically and horizontally |
| scale() | resize to new resolution |
| rotate() | rotate an image |
| rotozoom() | filtered scale and rotation |
| scale2x() | specialized image doubler |
| smoothscale() | scale a surface to an arbitrary size smoothly |
| get_smoothscale_backend() | return smoothscale filter version in use - 'GENERIC', 'MMX', or 'SSE' |
| set_smoothscale_backend() | set smoothscale filter version to one of - 'GENERIC', 'MMX', or 'SSE' |
| chop() | gets a copy of an image with an interior area removed |
| laplacian() | find edges in a surface |
| average_surfaces() | find the average surface from many surfaces. |
| average_color() | finds the average color of a surface |
| threshold() | finds which, and how many pixels in a surface are within a threshold of a 'search_color' or a 'search_surf'. |
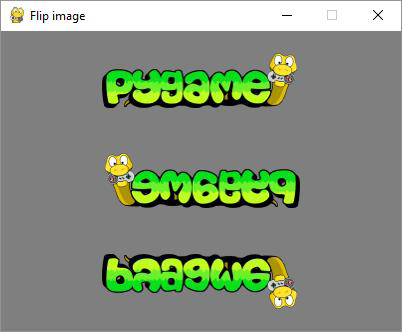
Let us first use the flip() function whose syntax is as follows −
flip(Surface, xbool, ybool)
This function can flip the surface object either horizontally, vertically or both. The orientation is decided by two bool parameters.
To flip the image horizontally, use the following command −
pygame.transform.flip(img2,True, False)
To flip vertically, use the following command −
pygame.transform.flip(img2,False, True)
In the following example, pygame logo image is displayed normally and flipping in both directions. First obtained flipped surface from original image object, fetch its Rect object and then built it. To render horizontally flipped image,
img1 = pygame.image.load('pygame.png')
img2=img1
img2=pygame.transform.flip(img2,True, False)
#inside event loop
rect2 = img2.get_rect()
   rect2.center = 200, 150
   screen.blit(img2, rect2)
Example - Flipping an Image
The complete code for rendering original Pygame logo and its flipped images is as follows −
main.py
import pygame

pygame.init()
screen = pygame.display.set_mode((400, 300))
pygame.display.set_caption("Flip image")
img1 = pygame.image.load('pygame.png')
img2=img1
img3=img1
img2=pygame.transform.flip(img2,True, False)
img3=pygame.transform.flip(img3, False, True)
done = False
bg = (127,127,127)
while not done:
   for event in pygame.event.get():
      screen.fill(bg)
      rect1 = img1.get_rect()
      rect1.center = 200, 50
      screen.blit(img1, rect1)
      rect2 = img2.get_rect()
      rect2.center = 200, 150
      screen.blit(img2, rect2)
      rect3 = img3.get_rect()
      rect3.center = 200, 250
      screen.blit(img3, rect3)
      if event.type == pygame.QUIT:
         done = True
   pygame.display.update()
Output
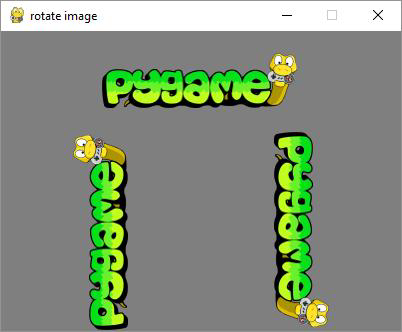
The rotate() function takes following arguments −
rotate(Surface, angle)
Example - Rotating Image
Negative value of angle rotates the surface in clockwise direction.
main.py
import pygame

pygame.init()
screen = pygame.display.set_mode((400, 300))
pygame.display.set_caption("rotate image")
img1 = pygame.image.load('pygame.png')
img2=img1
img3=img1
img2=pygame.transform.rotate(img2,90)
img3=pygame.transform.rotate(img3, -90)
done = False
bg = (127,127,127)
while not done:
   for event in pygame.event.get():
      screen.fill(bg)
      rect1 = img1.get_rect()
      rect1.center = 200, 50
      screen.blit(img1, rect1)
      rect2 = img2.get_rect()
      rect2.center = 100, 200
      screen.blit(img2, rect2)
      rect3 = img3.get_rect()
      rect3.center = 300,200
      screen.blit(img3, rect3)
      if event.type == pygame.QUIT:
         done = True
   pygame.display.update()
Output
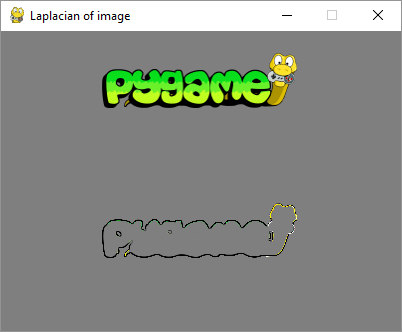
Example - Extracting Outline of an Image
The laplacian() function extracts outline of the surface object. The function just takes one argument, the image object itself.
main.py
import pygame
pygame.init()
screen = pygame.display.set_mode((400, 300))
pygame.display.set_caption("Laplacian of image")
img1 = pygame.image.load('pygame.png')
img2=img1
img2=pygame.transform.laplacian(img2)
done = False
bg = (127,127,127)
while not done:
   for event in pygame.event.get():
      screen.fill(bg)
      rect1 = img1.get_rect()
      rect1.center = 200, 50
      screen.blit(img1, rect1)
      rect2 = img2.get_rect()
      rect2.center = 200, 200
      screen.blit(img2, rect2)

      if event.type == pygame.QUIT:
         done = True
   pygame.display.update()
Output
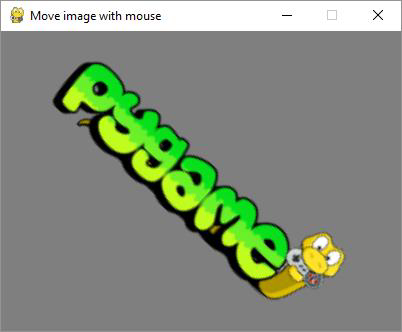
To make the Surface object move along with mouse movement, calculate the x, y coordinates from the center of the image. We also calculate the center-mouse distance d. The atan2(y, x) math function allows to find the rotation angle. We need to transform radians in degrees. From the distance mouse-center we calculate the scale argument.
mouse = event.pos
x = mouse[0] - 200
y = mouse[1] - 150
d = math.sqrt(x ** 2 + y ** 2)
angle = math.degrees(-math.atan2(y, x))
scale = abs(5 * d / 400)
Finally, we use rotzoom() function which performs combined rotation and scaling transform.
rotozoom(Surface, angle, scale)
Example - Transforming Image with Mouse Movement
Following code renders Pygame logo image that can be rotated in accordance with mouse movement.
main.py
import pygame , math
from pygame.locals import *
pygame.init()
screen = pygame.display.set_mode((400, 300))
pygame.display.set_caption("Move image with mouse")
img1 = pygame.image.load('pygame.png')
done = False
bg = (127,127,127)
while not done:
   for event in pygame.event.get():
      screen.fill(bg)

      if event.type == pygame.QUIT:
         done = True
      if event.type == MOUSEMOTION:
         mouse = event.pos
         x = mouse[0] - 200
         y = mouse[1] - 150
         d = math.sqrt(x ** 2 + y ** 2)
         angle = math.degrees(-math.atan2(y, x))
         scale = abs(5 * d / 400)
         img2 = pygame.transform.rotozoom(img1, angle, scale)
         rect = img2.get_rect()
         rect.center = (200,150)
         screen.blit(img2, rect)
   pygame.display.update()
Output
Run above code, try and move mouse cursor along display window. The image shall rotate and either shrink or grow accordingly.