
Article Categories
- All Categories
-
 Data Structure
-
 Networking
-
 RDBMS
RDBMS
-
 Operating System
-
 Java
Java
-
 MS Excel
-
 iOS
iOS
-
 HTML
HTML
-
 CSS
CSS
-
 Android
-
 Python
-
 C Programming
-
 C++
C++
-
 C#
C#
-
 MongoDB
-
 MySQL
MySQL
-
 Javascript
-
 PHP
PHP
-
 Economics & Finance
How Region of Interest (ROI) works in OpenCV using C++?
To separate a particular portion from the image, we have to locate the area first. Then we have to copy that area from the main image to another matrix. This is how the ROI in OpenCV works.
In this example, two matrices have been declared at the beginning. After that, an image named 'image_name.jpg' has been loaded into the 'image1' matrix. The next line 'image2=image1 (Rect(100, 100, 120, 120));' requires special attention. This line is cropping out the defined region of the image and storing it in the 'image2' matrix.

The figure shows what we have done here with the 'Rect(100,100,120,120)' code. The basic form of this line of code is 'Rect(x, y,x1,y1)'. Here x and y defines the rectangle's starting point and x1 and y1represents the endpoint of the rectangle. By changing these values, we can change the size of the rectangle.
Example
The following program demonstrates the working of Region of Interest in OpenCV:
#include
#include
#include
using namespace std;
using namespace cv;
int main() {
   Mat image1; //Declaring a matrix named 'image1'//
   Mat image2; //Declaring a matrix named 'image2'//
   image1 = imread("RGB.png"); //Loading an image name 'image_name.png into image1 matrix//
   image2 = image1(Rect(100, 100, 120, 120)); //imposing a rectangle on
   image1//
   namedWindow("Image_Window1"); //Declaring an window to show actual image//
   namedWindow("Image_Window2"); //Declaring an window to show ROI//
   imshow("Image_Window1", image1); //Showing actual image//
   imshow("Image_Window2", image2);
   waitKey(0);
   return 0;
}
Output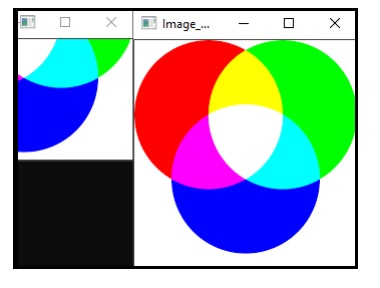

3K+ Views
