- GCA - Home
- GCA - Introduction
- GCA - Features
- GCA - How It Works?
- GCA - Getting Started
- GCA - Supported Languages
- GCA - Integration IDEs
- GCA - Best Prompts
- GCA - Code Customization
- GCA - Code Refactoring
- GCA - Collaborative Coding
- GCA for API Development
- GCA with Big Query
- GCA with Database
- GCA for Google Cloud
- GCA for Google Workspace
Gemini Code Assist - Integration with IDEs
Using Gemini Code Assist and its amazing ability for code prediction is really helpful for all the developers out there. They can use different languages like Python, Java, JavaScript, and C++ and can code along with Gemini to write better code faster.
In this chapter, you will see a step-by-step guide for integrating Gemini Code Assist into some of the popular IDEs, including Visual Studio Code (VS Code), IntelliJ IDEA, PyCharm, Eclipse, JetBrains Rider, CLion and NetBeans. Hence, you can choose any of your favourite coding environments and the integration will enable smooth coding assistance, reducing time spent on repetitive tasks and improving your overall development flow.
Prerequisites and Setup Checklist
Before integrating Gemini Code Assist, ensure you meet the following prerequisites −
Create a Gemini Account
- Head over to the Gemini Assist website and register for an account if you dont have one.
- Upon registration, navigate to your user dashboard to generate your API key/token. This token is essential for authentication across different IDEs.
IDE Versions & Compatibility
Ensure you have the latest version of your IDE installed. Some features of Gemini might not work with older versions. Below are the recommended versions −
- VS Code − Version 1.80+
- IntelliJ IDEA/PyCharm − Version 2023.2+
- Eclipse − Version 4.25+
- CLion − Version 2023.2+
- NetBeans − 15+ (New IDE covered in this article)
Hardware & System Requirements
- A reliable internet connection is necessary for real-time suggestions from Gemini.
- Recommended specs: 8GB RAM, a quad-core CPU, and you must have at least 10GB free storage for optimal performance.
Visual Studio Code: Step-by-Step Integration

Step 1: Download and Install Visual Studio Code
- Visit VS Codes download page and select the installer appropriate for your operating system. Follow the instructions to install it.
- Tip − During installation, check the option to Add to PATH to simplify command-line operations with VS Code.
Step 2: Install the Gemini Code Assist Extension
- Open VS Code.
- Then you just have to navigate to the Extensions Marketplace by clicking the Extensions icon on the sidebar or using the shortcut Ctrl + Shift + X.
- Type Gemini Code Assist in the search bar.
- Click Install to integrate the extension into your workspace.
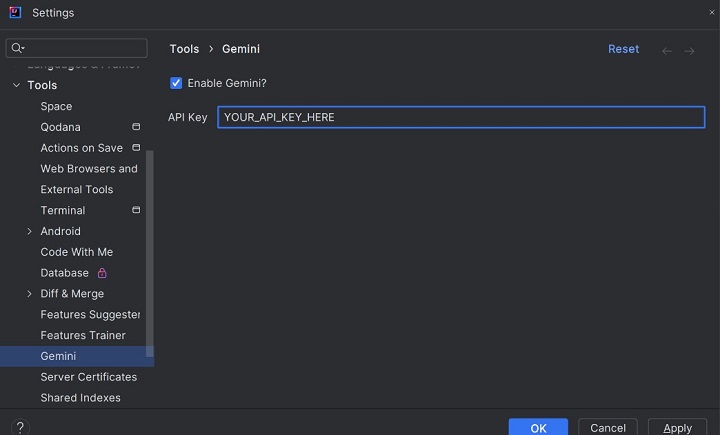
Step 3: Configure Gemini Code Assist in VS Code
- Open Settings (File -> Preferences -> Settings).
- Search for Gemini Configuration in the settings menu.
- Enter your API key/token in the designated field to authenticate your Gemini account.
- Adjust the language preferences (e.g., Python, JavaScript) by enabling or disabling specific languages as needed for your project.
Step 4: Test Gemini Code Assist in VS Code
Create a new JavaScript file and type −
function add(a, b) {
Gemini will suggest −
return a + b;
You can also test auto-import by typing −
fs.readFile(
And Gemini will import the missing module automatically −
const fs = require('fs');
Custom Key Bindings for VS Code
Gemini Code Assist allows developers to create custom key bindings to speed up code suggestions, completions, and refactorings. Below are the steps for you to set and modify any key preferences.
- Open VS Code and navigate to File -> Preferences -> Keyboard Shortcuts (or press Ctrl + K, Ctrl + S).
- In the search bar, type Gemini to filter the key bindings related to Geminis functionalities.
- To modify a key binding:
- Select a command, such as Trigger Code Completion.
- Click on the pencil icon next to it.
- Press the desired key combination (e.g., Ctrl + Alt + G for manual suggestions).
- Click Enter to save your changes.
Tip − You can assign different key bindings for accepting Geminis inline suggestions, such as Tab for code snippets and Shift + Enter for auto-imports. This makes workflows smoother when switching between multiple languages.
IntelliJ IDEA & PyCharm: Installation and Setup
Step 1: Install IntelliJ IDEA or PyCharm
- Download IntelliJ IDEA from here or PyCharm from here.
- Follow the installation prompts for your operating system and ensure that you allocate at least 2GB of RAM for Java-based IDEs during installation.
Step 2: Add the Gemini Plugin
- Launch IntelliJ IDEA or PyCharm.
- Navigate to File -> Settings -> Plugins.
- In the Marketplace tab, search for Gemini Code Assist. Or you can visit directly to the plugin.
- Click Install and restart the IDE for the plugin to activate.
Step 3: Configure Gemini Plugin
- Go to Settings -> Tools -> Gemini Configuration.
- Paste your API key/token to authenticate your account.
- Fine-tune Geminis performance by enabling real-time suggestions or setting custom delay times for prompts.
Step 4: Test Gemini in IntelliJ IDEA / PyCharm
Open a Java project and start typing −
public static void main(String[] args) {

Gemini will suggest:
System.out.println("Hello from Gemini!");
Custom Configurations in IntelliJ IDEA & PyCharm
IntelliJ IDEA and PyCharm offer extensive configuration options for Gemini Code Assist through plugin settings.
Access Custom Settings −
Go to File -> Settings -> Tools -> Gemini Configuration.
Modify Real-time Assistance Behaviour −
Enable Show Suggestions Only After Delays if you prefer fewer distractions while typing.
Adjust the suggestion timeout to control how long Gemini waits before showing recommendations.
Change Theme-based Suggestions −
In the Appearance & Behavior -> Themes section, toggle Gemini to align suggestions with the light or dark mode of your IDE.
Set Language-specific Preferences −
Disable Gemini for certain languages like HTML or JSON if you only want suggestions for primary languages (e.g., Python or Java).
Gemini in Eclipse IDE: Installation Guide
Step 1: Download and Install Eclipse
Go to the Eclipse download page and install the latest version based on your operating system.
Step 2: Install the Gemini Code Assist Plugin
- Open Eclipse and go to Help -> Eclipse Marketplace.
- Search for Gemini Code Assist in the marketplace.
- Click Install and follow the installation prompts.
Step 3: Configure Gemini in Eclipse
- Navigate to Window -> Preferences -> Gemini Configuration.
- Enter your API key/token to activate the plugin.
- Enable suggestions for relevant languages (e.g., Java, Kotlin).
Creating Custom Shortcuts for Eclipse
Eclipse also supports custom shortcut keys to invoke Geminis features.
- Open Eclipse and go to Window -> Preferences -> General -> Keys.
- Use the search box to locate Gemini Assist commands, such as Trigger Completion or Refactor with Gemini.
- Click on a command and assign a new key binding by pressing your desired key combination (e.g., Alt + G).
- Ensure there are no conflicting shortcutsEclipse will notify you if the key combination is already in use.
Use Case Example: You can bind Ctrl + Alt + G to generate boilerplate code snippets, making it faster to write code templates for repetitive tasks.
Setting Up and Using Gemini in CLion IDE
Step 1: Install CLion
Download CLion from here and follow the setup wizard. Ensure you have GCC or Clang installed for C++ development.
Step 2: Add the Gemini Plugin
- Open CLion and navigate to File -> Settings -> Plugins.
- Search for Gemini Code Assist in the plugin marketplace and install it.
Step 3: Test Gemini with C++ Code
Create a new C++ project and type −
#include <iostream>
using namespace std;
As you begin typing int main(), Gemini will auto-complete −
int main() {
   cout << "Hello from CLion!" << endl;
   return 0;
}
CLion offers robust customisation options to set custom key bindings for Gemini Code Assist, allowing developers to fine-tune shortcuts for code suggestions, completions, and refactoring according to their workflow preferences. Below are steps to set up key bindings −
How to Set Custom Key Bindings in CLion?
Step 1: Access Keymap Settings
Open CLion and navigate to File -> Settings -> Keymap (on Mac: CLion -> Preferences -> Keymap).
Step2: Search for Gemini Commands
In the Keymap settings, use the search bar to look for commands associated with Gemini Code Assist, such as −
- Trigger Code Suggestion
- Quick Fix with Gemini
- Refactor Using Gemini Assist
Step 3: Create a Custom Key Binding
- Right-click on a command (e.g., Trigger Code Suggestion).
- Select Add Keyboard Shortcut from the context menu.
- Press the desired key combination (e.g., Alt + Shift + G).
Step 4: Resolve Conflicts
- If the shortcut conflicts with an existing CLion key binding, youll see a warning. You can choose to override the current binding or select a different combination.
- Example − If Alt + Shift + G conflicts with the Git integration shortcut, you can try Ctrl + Alt + S for Gemini triggers instead.
Step 5: Enable Alternative Keymaps (Optional)
- CLion supports predefined keymaps like Visual Studio or Eclipse keymaps.
- If you prefer those, navigate to File -> Settings -> Keymap -> Choose Keymap, and select your preferred scheme.
- Once switched, add Geminis custom shortcuts under the new keymap configuration.
- Example − Use Alt + Shift + G in a C++ file to invoke Geminis completion suggestions or Ctrl + Alt + M to refactor code with a single keystroke.
Pro Tip: Configure Gemini Shortcuts per Language
- In CLion, you can set language-specific key bindings under Settings -> Keymap -> Code Completion. This allows you to fine-tune Geminis shortcuts to behave differently for C++, Python, or embedded languages based on your project needs.
- Example − You can bind Alt + G for suggestions in C++ but use Ctrl + G for Gemini actions in Python to avoid overlap.
These custom key bindings in CLion ensure the reduction in the need for mouse clicks and enable faster, more efficient code development.
Gemini in NetBeans IDE: New Addition
Step 1: Install NetBeans
Download NetBeans from here and complete the installation process.
Step 2: Add Gemini Code Assist
- Launch NetBeans and navigate to Tools -> Plugins.
- In the Available Plugins tab, search for Gemini Code Assist.
- Install the plugin and restart NetBeans.
Troubleshooting Common Issues
Authentication Failure
Double-check your API token and ensure it matches the one on your Gemini dashboard.
IDE Crashes
Disable unnecessary plugins and allocate more heap memory in Java-based IDEs for smooth performance.
The integration allows all developers like you to enhance workflow with real-time code suggestions across different programming languages and multiple IDEs. With this detailed guide, you can easily set up Gemini and enjoy the benefits of faster, more efficient coding.
