- Home
- Brief Overview of IoT
- Introduction to ESP32
- Installing the ESP32 Board in Arduino IDE
- Setting up RTOS for dual-core and multi-threaded operation
- Interfacing ESP32 with MPU6050
- Interfacing ESP32 with Analog sensors
- ESP32 Preferences
- ESP32 SPIFFS storage (A mini-SD Card in the chip itself)
- Interfacing OLED Display with ESP32
- WiFi on ESP32
- Transmitting data over WiFi using HTTP
- Transmitting data over WiFi using HTTPS
- Transmitting data over WiFi using MQTT
- Transmitting data over Bluetooth
- Getting current time using NTP Client
- Performing the (OTA) update of ESP32 firmware
- Applications of ESP32
- Next steps for you as a developer
- ESP32 for IoT Useful Resources
- Quick Guide
- Useful Resources
- Discussion
Transmitting data over WiFi using HTTPS
We looked at transmitting data over HTTP using ESP32 in the previous chapter. In this one, we will transmit data over HTTPS. The S in HTTPS stands for 'Secure'. Basically, whatever data you transmit is encrypted using Transport Layer Security (TLS). This means that if someone is eavesdropping on your communication, they won't understand what you've transmitted. Instead, what they'll get is some gibberish. Covering how HTTPS works is beyond the scope of this chapter. But a simple Google search will provide several useful resources for you to get started. In this chapter, we will see how to implement HTTPS on ESP32.
Converting any HTTP request to HTTPS on ESP32
In general, if you have a code written for sending an HTTP request to the server, you can convert it to HTTPS following these simple steps −
Change the library from WiFiClient to WiFiClientSecure (you need to include WiFiClientSecure.h)
Change the port from 80 to 443
There is an optional fourth step: Add CA Certificate for the server. This step is optional because it doesn't affect the security of the communication. It just assures you that you are communicating with the correct server. If you don't provide the CA Certificate, your communication will still be secure.
Code Walkthrough
The code you see below is very similar to the one used for the HTTP communication. You are strongly advised to revisit that chapter. In this walkthrough, we will simply highlight the parts that are different from the HTTP code.
The code can be found on GitHub
We begin with the inclusion of the WiFi library. We also need to include the WiFiClientSecure library here.
#include <WiFi.h>
#include <WiFiClientSecure.h>
Next, we will define the constants. Note that the port is now 443 instead of 80.
const char* ssid = "YOUR_SSID";
const char* password = "YOUR_PASSWORD";

const char* server = "httpbin.org";
const int port = 443;
Next, instead of the WiFiClient object, we create the WiFiClientSecure object.
WiFiClientSecure client;
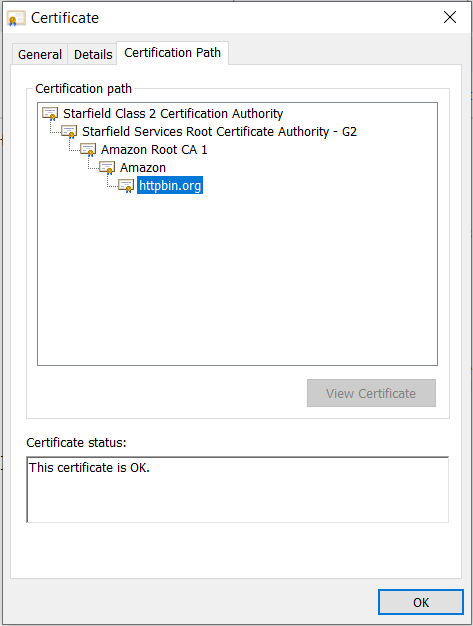
Next, we define the CA certificate for our server (httpbin.org). Now, you may be wondering how to get the CA certificate for our server. Detailed steps are given here to get the CA certificate of any server using Google Chrome. In that same post, a note on the validity of CA certificates has been provided, and it is recommended to use the certificate of the Certification Authority, instead of the certificate of the server, especially for applications where you just program the device once and send it out in the field for years. The Certification Authority's certificate has a much longer validity (15+ years), compared to the server's certificate validity (1−2 years). Therefore, we are using the certificate of the Starfield Class 2 Certification Authority (valid till 2034), instead of the certificate of httpbin.org (valid till Feb 2021).
const char* ca_cert = \
"-----BEGIN CERTIFICATE-----\n" \
"MIIEDzCCAvegAwIBAgIBADANBgkqhkiG9w0BAQUFADBoMQswCQYDVQQGEwJVUzEl\n"\
"MCMGA1UEChMcU3RhcmZpZWxkIFRlY2hub2xvZ2llcywgSW5jLjEyMDAGA1UECxMp\n"\
"U3RhcmZpZWxkIENsYXNzIDIgQ2VydGlmaWNhdGlvbiBBdXRob3JpdHkwHhcNMDQw\n"\
"NjI5MTczOTE2WhcNMzQwNjI5MTczOTE2WjBoMQswCQYDVQQGEwJVUzElMCMGA1UE\n"\
"ChMcU3RhcmZpZWxkIFRlY2hub2xvZ2llcywgSW5jLjEyMDAGA1UECxMpU3RhcmZp\n"\
"ZWxkIENsYXNzIDIgQ2VydGlmaWNhdGlvbiBBdXRob3JpdHkwggEgMA0GCSqGSIb3\n"\
"DQEBAQUAA4IBDQAwggEIAoIBAQC3Msj+6XGmBIWtDBFk385N78gDGIc/oav7PKaf\n"\
"8MOh2tTYbitTkPskpD6E8J7oX+zlJ0T1KKY/e97gKvDIr1MvnsoFAZMej2YcOadN\n"\
"+lq2cwQlZut3f+dZxkqZJRRU6ybH838Z1TBwj6+wRir/resp7defqgSHo9T5iaU0\n"\
"X9tDkYI22WY8sbi5gv2cOj4QyDvvBmVmepsZGD3/cVE8MC5fvj13c7JdBmzDI1aa\n"\
"K4UmkhynArPkPw2vCHmCuDY96pzTNbO8acr1zJ3o/WSNF4Azbl5KXZnJHoe0nRrA\n"\
"1W4TNSNe35tfPe/W93bC6j67eA0cQmdrBNj41tpvi/JEoAGrAgEDo4HFMIHCMB0G\n"\
"A1UdDgQWBBS/X7fRzt0fhvRbVazc1xDCDqmI5zCBkgYDVR0jBIGKMIGHgBS/X7fR\n"\
"zt0fhvRbVazc1xDCDqmI56FspGowaDELMAkGA1UEBhMCVVMxJTAjBgNVBAoTHFN0\n"\
"YXJmaWVsZCBUZWNobm9sb2dpZXMsIEluYy4xMjAwBgNVBAsTKVN0YXJmaWVsZCBD\n"\
"bGFzcyAyIENlcnRpZmljYXRpb24gQXV0aG9yaXR5ggEAMAwGA1UdEwQFMAMBAf8w\n"\
"DQYJKoZIhvcNAQEFBQADggEBAAWdP4id0ckaVaGsafPzWdqbAYcaT1epoXkJKtv3\n"\
"L7IezMdeatiDh6GX70k1PncGQVhiv45YuApnP+yz3SFmH8lU+nLMPUxA2IGvd56D\n"\
"eruix/U0F47ZEUD0/CwqTRV/p2JdLiXTAAsgGh1o+Re49L2L7ShZ3U0WixeDyLJl\n"\
"xy16paq8U4Zt3VekyvggQQto8PT7dL5WXXp59fkdheMtlb71cZBDzI0fmgAKhynp\n"\
"VSJYACPq4xJDKVtHCN2MQWplBqjlIapBtJUhlbl90TSrE9atvNziPTnNvT51cKEY\n"\
"WQPJIrSPnNVeKtelttQKbfi3QBFGmh95DmK/D5fs4C8fF5Q=\n"\
"-----END CERTIFICATE-----\n";
In the setup, we connect to the WiFi in the station mode using the credentials provided, like before. Here, we have the additional step of setting the CA Certificate for our WiFiSecureClient. By doing this, we are telling the client that only communicate with the server if its CA certificate matches the one provided.
void setup() {
   Serial.begin(115200);
   WiFi.mode(WIFI_STA);                    //The WiFi is in station mode. The    other is the softAP mode
   WiFi.begin(ssid, password);
   while (WiFi.status() != WL_CONNECTED) {
      delay(500);
      Serial.print(".");
   }
   Serial.println("");  Serial.print("WiFi connected to: "); Serial.println(ssid);  Serial.println("IP address: ");  Serial.println(WiFi.localIP());
   client.setCACert(ca_cert);            //Only communicate with the server if the CA certificates match
   delay(2000);
}
The loop is exactly the same as the one used in the HTTP example.
void loop() {
   int  conn;
   int chip_id = ESP.getEfuseMac();;
   Serial.printf("  Flash Chip id = %08X\t", chip_id);
   Serial.println();
   Serial.println();
   String body = "ChipId=" + String(chip_id) + "&SentBy=" + "your_name";
   int body_len = body.length();

   Serial.println(".....");
   Serial.println(); Serial.print("For sending parameters, connecting to "); Serial.println(server);
   conn = client.connect(server, port);

   if (conn == 1) {
      Serial.println(); Serial.print("Sending Parameters...");
      //Request
      client.println("POST /post HTTP/1.1");
      //Headers
      client.print("Host: "); client.println(server);
      client.println("Content-Type: application/x−www−form−urlencoded");
      client.print("Content-Length: "); client.println(body_len);
      client.println("Connection: Close");
      client.println();
      //Body
      client.println(body);
      client.println();

      //Wait for server response
      while (client.available() == 0);

      //Print Server Response
      while (client.available()) {
         char c = client.read();
         Serial.write(c);
      }
   } else {
      client.stop();
      Serial.println("Connection Failed");
   }
   delay(5000);
}
The response to be expected from the server is also similar to the HTTP example. The only difference is that the response received will also be secure. But we won't have to worry about decrypting the encrypted message. ESP32 does that for us.
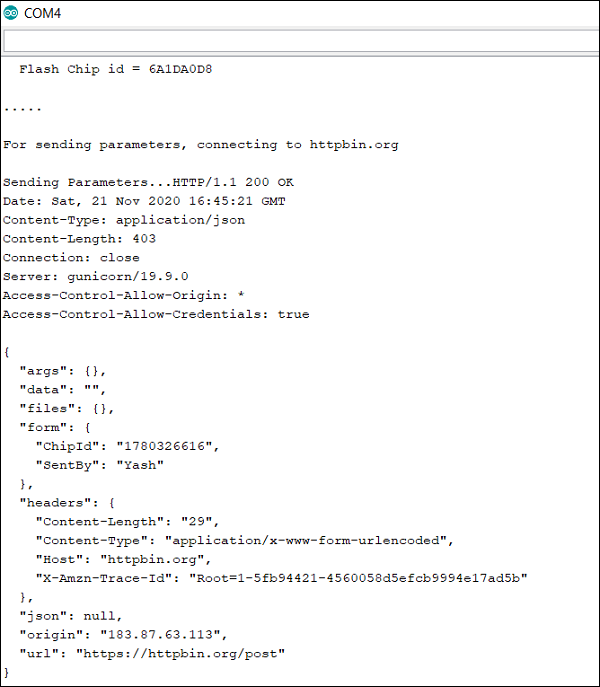
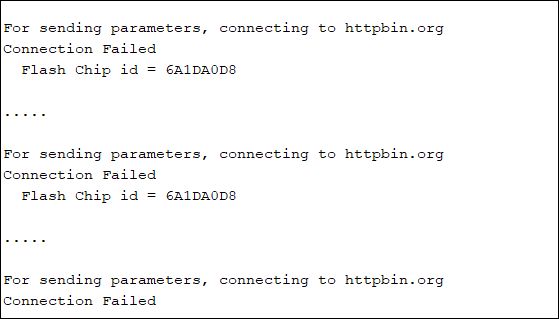
Notice the URL field in the server response. It contains https instead of http, confirming that our transmission was secure. In fact, if you edit the CA certificate slightly, say you just delete one character, and then try to run the sketch, you will see the connection getting failed.
However, if you remove the client.setCACert() line from the setup, the connection will get established again securely, even with the faulty CA Certificate. This proves that setting the CA Certificate doesn't affect the security of our communication. It just helps us verify that we are communicating with the right server. If we do set the certificate, then the ESP32 won't communicate with the server unless the provided CA Certificate matches the server's CA Certificate. If we don't set the certificate, the ESP32 will still communicate with the server securely.
Congratulations!! You've successfully sent your HTTPS requests using ESP32.
Note − The hardware accelerator on ESP32 that performs the encryption of messages for HTTPS, can support a maximum of 16384 bytes (16 KB) of data. Therefore, if your message size exceeds 16 KB, you may need to break it down into chunks.
References
