- ES6 - Home
- ES6 - Overview
- ES6 - Environment
- ES6 - Syntax
- ES6 - Variables
- ES6 - Operators
- ES6 - Decision Making
- ES6 - Loops
- ES6 - Functions
- ES6 - Events
- ES6 - Cookies
- ES6 - Page Redirect
- ES6 - Dialog Boxes
- ES6 - Void Keyword
- ES6 - Page Printing
- ES6 - Objects
- ES6 - Number
- ES6 - Boolean
- ES6 - Strings
- ES6 - Symbol
- ES6 - New String Methods
- ES6 - Arrays
- ES6 - Date
- ES6 - Math
- ES6 - RegExp
- ES6 - HTML DOM
- ES6 - Iterator
- ES6 - Collections
- ES6 - Classes
- ES6 - Maps And Sets
- ES6 - Promises
- ES6 - Modules
- ES6 - Error Handling
- ES6 - Object Extensions
- ES6 - Reflect API
- ES6 - Proxy API
- ES6 - Validations
- ES6 - Animation
- ES6 - Multimedia
- ES6 - Debugging
- ES6 - Image Map
- ES6 - Browsers
- ES7 - New Features
- ES8 - New Features
- ES9 - New Features
- ES6 Useful Resources
- ES6 - Quick Guide
- ES6 - Useful Resources
- ES6 - Discussion
ES6 - Multimedia
The JavaScript navigator object includes a child object called plugins. This object is an array, with one entry for each plug-in installed on the browser. The navigator.plugins object is supported only by Netscape, Firefox, and Mozilla.
Example
The following example shows how to list down all the plug-ins installed in your browser.
<html>
   <head>
      <title>List of Plug-Ins</title>
   </head>
   <body>
      <table border = "1">
         <tr>
            <th>Plug-in Name</th>
            <th>Filename</th>
            <th>Description</th>
         </tr>
         <script LANGUAGE = "JavaScript" type = "text/javascript">
            for (i = 0; i<navigator.plugins.length; i++) {
               document.write("<tr><td>");
               document.write(navigator.plugins[i].name);
               document.write("</td><td>");
               document.write(navigator.plugins[i].filename);
               document.write("</td><td>");
               document.write(navigator.plugins[i].description);
               document.write("</td></tr>");
            }
         </script>
      </table>
   </body>

</html>
Output
The following output is displayed on successful execution of the above code.
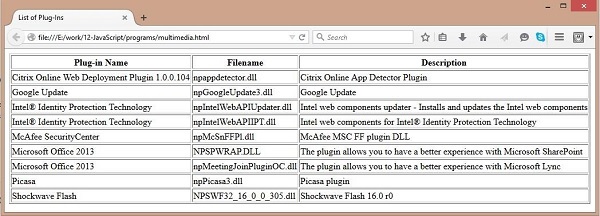
Checking for Plugins
Each plug-in has an entry in the array. Each entry has the following properties −
name − The name of the plug-in.
filename − The executable file that was loaded to install the plug-in.
description − A description of the plug-in, supplied by the developer.
mimeTypes − An array with one entry for each MIME type supported by the plugin.
You can use these properties in a script to find out the installed plug-ins, and then using JavaScript, you can play the appropriate multimedia file. Take a look at the following code.
<html>
   <head>
      <title>Using Plug-Ins</title>
   </head>

   <body>
      <script language = "JavaScript" type = "text/javascript">
         media  =  navigator.mimeTypes["video/quicktime"]; if (media) {
            document.write("<embed src = 'quick.mov' height = 100 width = 100>");
         } else {
            document.write("<img src = 'quick.gif' height = 100 width = 100>");
         }
      </script>
   </body>
</html>
Note − Here we are using HTML <embed> tag to embed a multimedia file.
Controlling Multimedia
Let us take a real example which works in almost all the browsers.
<html>
   <head>
      <title>Using Embeded Object</title>

      <script type = "text/javascript">
         <!--
            function play() {
               if (!document.demo.IsPlaying()) {
                  document.demo.Play();
               }
            }
            function stop() {
               if (document.demo.IsPlaying()){
                  document.demo.StopPlay();
               }
            }
            function rewind() {
               if (document.demo.IsPlaying()){
                  document.demo.StopPlay();
               }
               document.demo.Rewind();
            }
            //
         -->
      </script>
   </head>
   <body>
      <embed id = "demo" name = "demo"
         src = "http://www.amrood.com/games/kumite.swf"
         width = "318" height = "300" play = "false" loop = "false"
         pluginspage = "http://www.macromedia.com/go/getflashplayer"
         swliveconnect = "true">
      </embed>

      <form name = "form" id = "form" action = "#" method = "get">
         <input type = "button" value = "Start" onclick = "play();" />
         <input type = "button" value = "Stop" onclick = "stop();" />
         <input type = "button" value = "Rewind" onclick = "rewind();" />
      </form>
   </body>
</html>
