- EmberJS - Home
- EmberJS - Overview
- EmberJS - Installation
- EmberJS - Core Concepts
- Creating and Running Application
- EmberJS - Object Model
- EmberJS - Router
- EmberJS - Templates
- EmberJS - Components
- EmberJS - Models
- EmberJS - Managing Dependencies
- EmberJS - Application Concerns
- EmberJS - Configuring Ember.js
- EmberJS - Ember Inspector
EmberJS - Router Multiple Models
You can define the multiple models by using RSVP.hash, which uses the objects to return the promises.
Syntax
Ember.Route.extend ({
   model() {
      return Ember.RSVP.hash({
         //code here
      })
   }
});
Example
The example below shows how to specify multiple models for displaying data by using RSVP.hash. Create a new model as specified in the previous chapters. Here we have created two models as rental and review under app/models/.
Now open the rental.js file and provide its attributes −
import DS from 'ember-data';

export default DS.Model.extend ({
   owner: DS.attr(),
   city: DS.attr()
});
Now open the review.js file and provide its attributes −
import DS from 'ember-data';

export default DS.Model.extend ({
   author: DS.attr(),
   rating: DS.attr(),
   content: DS.attr()
});
You can return both the rentals and review models in one model hook and display them on index page(app/routes/index.js) by using the code given below −
import Ember from 'ember';

export default Ember.Route.extend ({
   model() {

      //The RSVP.hash methos is built with RSVP.js library that allows to load
         multiple JavaScript promises
      return Ember.RSVP.hash ({

         //Find the records for the given type and returns all the records of this type
            present in the store
         rentals: this.store.findAll('rental'),
         reviews: this.store.findAll('review')
      });
   },
});
Now you can access the model data in RSVP hash referenced in the index template, i.e., in the app/templates/index.hbs file −
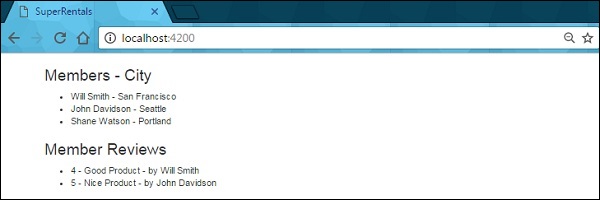
<h3>Members - City </h3>
<ul>
   {{#each model.rentals as |rental|}}
      <li>{{rental.owner}} - {{rental.city}}</li>
   {{/each}}
</ul>

<h3>Member Reviews </h3>
<ul>
   {{#each model.reviews as |review|}}
      <li>{{review.rating}} - {{review.content}} - by {{review.author}}</li>
   {{/each}}
</ul>
The code displays data from Firebase database which is a cloud database that stores information in JSON format. Therefore to make use of this database, create an account by using the Firebase's website.
Install the EmberFire to interface with the Firebase by Ember data.
ember install emberfire
It adds the EmberFire to package.json and firebase to bower.json.
Configuring Firebase
Login to the Firebase account and click on the CREATE NEW PROJECT button. Provide the same name to Firebase project which is given to Ember the application.
Open the config/environment.js file to add the configuration info for the Ember application from the project which has been created on Firebase website.
module.exports = function(environment) {
   var ENV = {
      modulePrefix: 'super-rentals',
      environment: environment,
      rootURL: '/',
      locationType: 'auto',
      EmberENV: {
         FEATURES: {
            // Here you can enable experimental features on an ember canary build
            // e.g. 'with-controller': true
         }
      },

      firebase: {
         apiKey: "AIzaSyAqxzlKErYeg64iN_uROKA5eN40locJSXY",
         authDomain: "multiple-models.firebaseapp.com",
         databaseURL: "https://multiple-models.firebaseio.com",
         storageBucket: "multiple-models.appspot.com"
      },

      APP: {
         // Here you can pass flags/options to your application instance
         // when it is created
      }
   };

//other code here
You need to change the firebase section defined under the ENV section. Click on the Firebase project and click the Add Firebase to your web app button to include apiKey, authDomain, databaseURL and storageBucket fields from the firebase project to firebase section provided in the environment.js file. After configuring the EmberFire, restart the server to apply changes.
Now import the data to Firebase by using the json file. In this app, we have created a file called rentals.json which contains the data in JSON format.
{ "rentals": [{
   "owner": "Will Smith",
   "city": "San Francisco"
   }, {
      "owner": "John Davidson",
      "city": "Seattle"
   }, {
      "owner": "Shane Watson",
      "city": "Portland"
   }],

   "reviews": [{
      "author": "Will Smith",
      "rating": 4,
      "content": "Good Product"
   }, {
      "author": "John Davidson",
      "rating": 5,
      "content": "Nice Product"
   }]
}
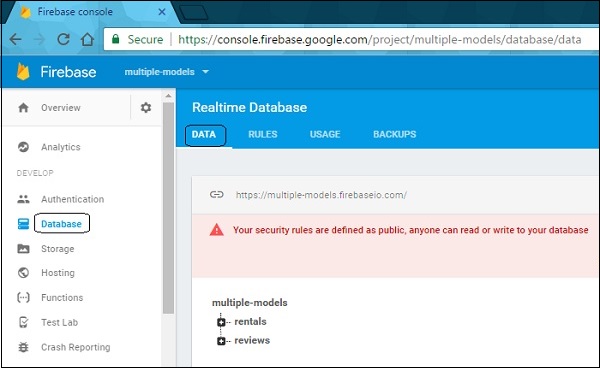
Go to the Firebase console, click on the Database section and select the Data tab.
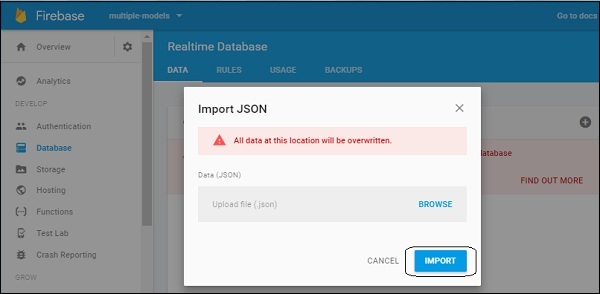
Click on the three dots on the right-hand side and select the Import JSON option. Next, browse the json file which you have created and click on the IMPORT button.
Now set the Firebase permissions to the new database. Go to the Rules tab and click on PUBLISH button to update json.
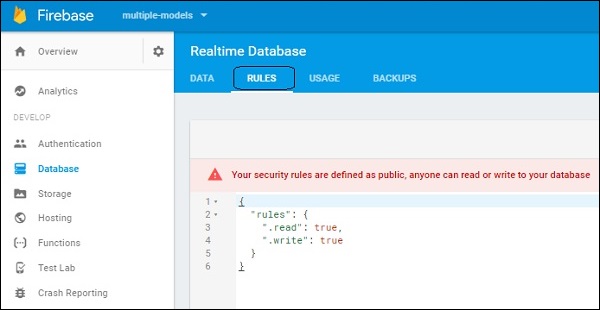
By changing the rules, anyone can read or write to your database.
Output
Run the ember server you will receive the following output −