
Article Categories
- All Categories
-
 Data Structure
-
 Networking
-
 RDBMS
RDBMS
-
 Operating System
-
 Java
Java
-
 MS Excel
-
 iOS
iOS
-
 HTML
HTML
-
 CSS
CSS
-
 Android
-
 Python
-
 C Programming
-
 C++
C++
-
 C#
C#
-
 MongoDB
-
 MySQL
MySQL
-
 Javascript
-
 PHP
PHP
-
 Economics & Finance
How to Debug a Node.js app in a Docker Container?
Introduction
Bugs are bugging mankind since ancient times. At that time they produced different diseases but today?s bugs are logical errors in the program. Sometimes these are also a nightmare for developers. Here in this article, we will learn to create a Node.js app on a Docker container and also how to attach a debugger to the node application.
What is debugging?
Debugging is nothing but resolving the issues or errors in the code of the Node.js application. This application might be going through a rough time implementing all the tasks given to it. Debugging helps in smoothing all these paths for the Node.js application. This ultimately benefits the end user and also the company.
Install Node.js on Ubuntu Linux
Follow the below step to install Node.js on the Ubuntu machine.
<div class="code-mirror  language-docker" contenteditable="plaintext-only" spellcheck="false" style="outline: none; overflow-wrap: break-word; overflow-y: auto; white-space: pre-wrap;">$sudo apt update
$sudo apt upgrade
</div>
Now install the nodejs
<div class="code-mirror  language-docker" contenteditable="plaintext-only" spellcheck="false" style="outline: none; overflow-wrap: break-word; overflow-y: auto; white-space: pre-wrap;">$sudo apt install nodejs
</div>
To install the node package manager use the below command.
<div class="code-mirror  language-docker" contenteditable="plaintext-only" spellcheck="false" style="outline: none; overflow-wrap: break-word; overflow-y: auto; white-space: pre-wrap;">$sudo apt install npm
</div>
Create a NodeJS application using npx
Below we have a stepwise guide for creating a node application. Some prerequisites are mentioned to let you know the environment we are running into.
Ubuntu Linux
Node installed
Step 1: Create a Directory
Create a directory named "debug" and change the directory to it.
<div class="code-mirror  language-docker" contenteditable="plaintext-only" spellcheck="false" style="outline: none; overflow-wrap: break-word; overflow-y: auto; white-space: pre-wrap;">$mkdir debug
$cd debug
</div>
Check if you are inside the correct directory.
<div class="code-mirror  language-docker" contenteditable="plaintext-only" spellcheck="false" style="outline: none; overflow-wrap: break-word; overflow-y: auto; white-space: pre-wrap;">$pwd
</div>
Output
/home/hemant/debug
Step 2: Create the node application
Here we will use npx to create a full-functioning Node.js app for us.
Example
<div class="code-mirror  language-docker" contenteditable="plaintext-only" spellcheck="false" style="outline: none; overflow-wrap: break-word; overflow-y: auto; white-space: pre-wrap;">$npx create-react-app my_react_app
</div>
Output
npx: installed 16 in 294.361s

Creating a new React + Express app in /home/hemant/debug/my_react_app.

Installing packages. This might take a couple of minutes.

> core-js@2.6.12 postinstall
/home/hemant/debug/my_react_app/node_modules/babelruntime/node_modules/core-js

> node -e "try{require('./postinstall')}catch(e){}"

Thank you for using core-js ( https://github.com/zloirock/core-js ) for polyfilling JavaScript standard library!
> nodemon@1.19.4 postinstall
/home/hemant/debug/my_react_app/node_modules/nodemon

> node bin/postinstall || exit 0
 ?????????????????????????????????????????????????????????????????
 ?                                                               ?
 ? New major version of npm available! 6.14.17 -> 9.2.0          ?
 ? Changelog: https://github.com/npm/cli/releases/tag/v9.2.0     ?
 ? Run npm install -g npm to update!                             ?
 ?                                                               ?
 ?????????????????????????????????????????????????????????????
Create a NodeJS application using npm
For this task to be implemented on your system, NodeJS and npm must be installed on the machine. Follow the below steps and prepare the directory structure. All the data is created inside a directory named "debug_node".
Step 1: Create a file app.js
Paste the below code into the app.js file.
<div class="code-mirror  language-docker" contenteditable="plaintext-only" spellcheck="false" style="outline: none; overflow-wrap: break-word; overflow-y: auto; white-space: pre-wrap;">const express = require('express');
const app = express()
app.get('/', (req, res) => res.send('HELLO TUTORIALSPOINT'));
app.listen(3000, () => {
   console.log('THE LOG OUTUPUT: PORT 3000')
})
</div>
Step 2: Initialize using the npm
<div class="code-mirror  language-docker" contenteditable="plaintext-only" spellcheck="false" style="outline: none; overflow-wrap: break-word; overflow-y: auto; white-space: pre-wrap;">$npm init
</div>
This will create the package.json file.
Step 3: Install express
Now we need the express installation.
Example
<div class="code-mirror  language-docker" contenteditable="plaintext-only" spellcheck="false" style="outline: none; overflow-wrap: break-word; overflow-y: auto; white-space: pre-wrap;">$npm install --save express
</div>
Output
<div class="code-mirror  language-docker" contenteditable="plaintext-only" spellcheck="false" style="outline: none; overflow-wrap: break-word; overflow-y: auto; white-space: pre-wrap;">npm WARN config global `--global`, `--local` are deprecated. Use `-- location=global` instead.
added 57 packages in 8m
7 packages are looking for funding
   <span class="token instruction"><span class="token keyword">run</span> `npm fund` for details</span>
</div>
Add the start command inside the scripts section of the package.json file. After the edit, the package.json code looks like this.
<div class="code-mirror  language-docker" contenteditable="plaintext-only" spellcheck="false" style="outline: none; overflow-wrap: break-word; overflow-y: auto; white-space: pre-wrap;">{
   "name": "node_docker",
   "version": "1.0.0",
   "description": "",
   "main": "app.js",
   "scripts": {
      "start": "node app.js",
      "test": "echo "Error: no test specified" && exit 1"
   },
   "author": "",
   "license": "ISC",
   "dependencies": {
      "express": "^4.18.1"
   }
}
</div>
Step 4: Run the application
Example
<div class="code-mirror  language-docker" contenteditable="plaintext-only" spellcheck="false" style="outline: none; overflow-wrap: break-word; overflow-y: auto; white-space: pre-wrap;">$npm run start
</div>
Output
npm WARN config global `--global`, `--local` are deprecated. Use `-- location=global` instead.
> node_docker@1.0.0 start
> node app.js
THE LOG OUTUPUT: PORT 3000
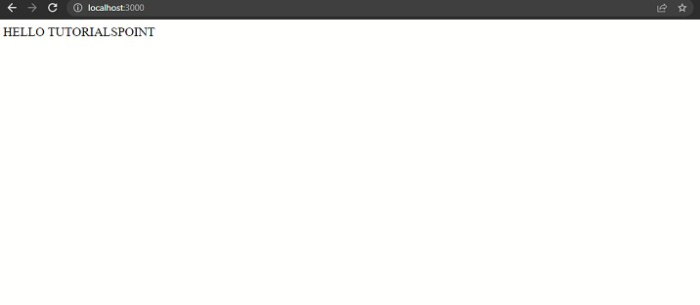
The application is successfully running on the localhost:3000.
Containerize the node application
Step 1: Create a Dockerfile
The below dockerfile will be used to build a node container with the node application. Name this file as Dockerfile and it should be present on the same level as the package.json.
<div class="code-mirror  language-docker" contenteditable="plaintext-only" spellcheck="false" style="outline: none; overflow-wrap: break-word; overflow-y: auto; white-space: pre-wrap;"><span class="token comment">#use the node:9-slim as the base image.</span>
<span class="token instruction"><span class="token keyword">FROM</span> node:9-slim</span>
<span class="token comment">#set the working directory inside the container.</span>
<span class="token instruction"><span class="token keyword">WORKDIR</span> /app</span>
<span class="token comment">#copy all the requirements to the working directory.</span>
<span class="token instruction"><span class="token keyword">COPY</span> package.json /app</span>
<span class="token comment">#install the dependencies</span>
<span class="token instruction"><span class="token keyword">RUN</span> npm install</span>
<span class="token instruction"><span class="token keyword">COPY</span> . /app/</span>
<span class="token comment">#start the server.</span>
<span class="token instruction"><span class="token keyword">CMD</span> [<span class="token string">"npm"</span>, <span class="token string">"start"</span>]</span>
</div>
Step 2: Build the image
Example
<div class="code-mirror  language-docker" contenteditable="plaintext-only" spellcheck="false" style="outline: none; overflow-wrap: break-word; overflow-y: auto; white-space: pre-wrap;">$docker build -t node-test .
</div>
Output
[+] Building 2.5s (10/10) FINISHED
=> [internal] load build definition from Dockerfile
0.0s
=> => transferring dockerfile: 339B
0.0s
=> [internal] load .dockerignore
0.0s
=> => transferring context: 2B
0.0s
=> [internal] load metadata for docker.io/library/node:9-slim
1.9s
=> [internal] load build context
0.2s
=> => transferring context: 27.97kB
0.1s
=> [1/5] FROM docker.io/library/node:9-
slim@sha256:288b29c1925d65b2d7d8701f8ada201 0.0s
=> CACHED [2/5] WORKDIR /app
0.0s
=> CACHED [3/5] COPY package.json /app
0.0s
=> CACHED [4/5] RUN npm install
0.0s
=> [5/5] COPY . /app/
0.1s
=> exporting to image
0.1s
=> => exporting layers
0.1s
=> => writing image
sha256:4614d7eb74e7d5e6a1aa1ef5bf7953b53102ee4969d72a0f8d6d12c 0.0s
=> => naming to docker.io/library/node-test
0.0s
Step 3: Run the container
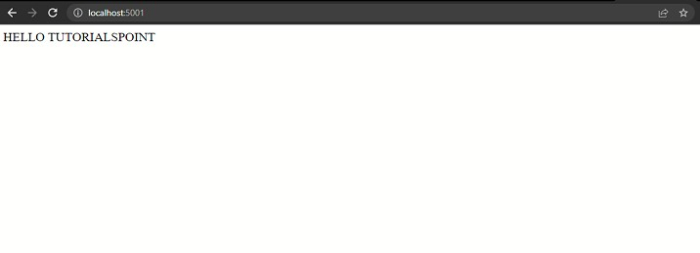
<div class="code-mirror  language-docker" contenteditable="plaintext-only" spellcheck="false" style="outline: none; overflow-wrap: break-word; overflow-y: auto; white-space: pre-wrap;">$docker run -itd -p 5001:3000 --name node_container node-test
Output:
b87849ca86fb490e1e2209b1112f6dc6c4a9158bc2c352239ea0127effddf284
</div>
Check if the container is running on localhost:5001.
Attach VScode Debugger to the container
To implement a debugger for the NodeJS application we need to create a docker-compose file in the same folder as our node application.
Step 1: Create the docker-compose file
Create a file docker-compose.yml and paste the below code.
<div class="code-mirror  language-docker" contenteditable="plaintext-only" spellcheck="false" style="outline: none; overflow-wrap: break-word; overflow-y: auto; white-space: pre-wrap;">version: '3'
services:
   node_app:
      build: .
      ports:
         - 5003:3000
         - 9229:9229
      volumes:
         - .:/app
      command: node --inspect=0.0.0.0 app.js
</div>
Step 2: Compose up
<div class="code-mirror  language-docker" contenteditable="plaintext-only" spellcheck="false" style="outline: none; overflow-wrap: break-word; overflow-y: auto; white-space: pre-wrap;">docker-compose -f "docker-compose.yml" up
</div>
Output
[+] Building 7.4s (11/11) FINISHED
=> [internal] load build definition from Dockerfile
0.1s
=> => transferring dockerfile: 339B
0.0s
=> [internal] load .dockerignore
0.0s
=> => transferring context: 2B
0.0s
=> [internal] load metadata for docker.io/library/node:9-slim
6.1s
=> [auth] library/node:pull token for registry-1.docker.io
0.0s
=> [1/5] FROM docker.io/library/node:9-
slim@sha256:288b29c1925d65b2d7d8701f8ada201e7dcd066438c0fb4299c35dff129b893
f 0.0s
=> [internal] load build context
0.4s
=> => transferring context: 2.06MB
0.4s
=> CACHED [2/5] WORKDIR /app
0.0s
=> CACHED [3/5] COPY package.json /app
0.0s
=> CACHED [4/5] RUN npm install
0.0s
=> [5/5] COPY . /app/
0.4s
=> exporting to image
0.2s
=> => exporting layers
0.2s
=> => writing image
sha256:9b4397fe271d2de609d46e44f73ff741bd8d736083b171e8c969d81f88ab9778
0.0s
=> => naming to docker.io/library/test_node-node_app
0.0s
Use 'docker scan' to run Snyk tests against images to find vulnerabilities
and learn how to fix them
[+] Running 1/2
- Network test_node_default Created
0.2s
- Container test_node-node_app-1 Creating
0.1s
Error response from daemon: invalid volume specification:
'/run/desktop/mnt/host/c/Users/HP/Desktop/debug_node/TEST_NODE:app:rw':
invalid mount config for type "bind": invalid mount path: 'app' mount path
must be absolute
C:\Users\HP\Desktop\debug_node\TEST_NODE>docker-compose -f "dockercompose.yml" up
[+] Running 1/1
- Container test_node-node_app-1 Created
0.1s
Attaching to test_node-node_app-1
test_node-node_app-1 | Debugger listening on ws://0.0.0.0:9229/d1ede9a1-
85f4-44a7-a7ce-49217508c6ac
test_node-node_app-1 | For help see https://nodejs.org/en/docs/inspector
test_node-node_app-1 | THE LOG OUTUPUT: PORT 3000
Step 3: Attach the debugger
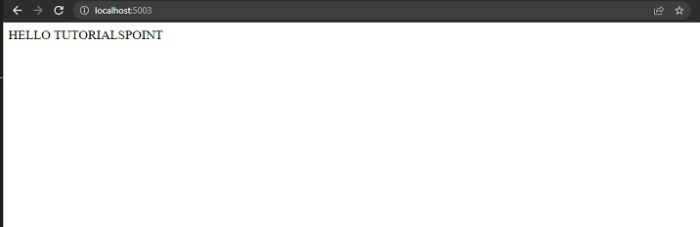
Now check if both are listening on the ports. The application will be on port 5003 and debugger on the port 9229 according to the docker-compose file.
For node application localhost:5003
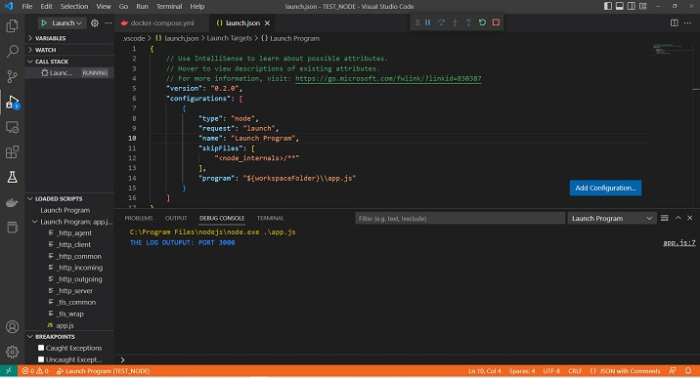
For debugging we will use vscode. Open it and select the debugger extension section and choose to create launch.json.Click on the play button in the leftmost corner and the debugger is ready and listening successfully.
Conclusion
Hence we were successfully able to connect to the debugger inside the visual studio code. We can also directly inspect the container by using the exec command.

1K+ Views
