- MySQL - Home
- MySQL - Introduction
- MySQL - Features
- MySQL - Versions
- MySQL - Variables
- MySQL - Installation
- MySQL - Administration
- MySQL - PHP Syntax
- MySQL - Node.js Syntax
- MySQL - Java Syntax
- MySQL - Python Syntax
- MySQL - Connection
- MySQL - Workbench
- MySQL Databases
- MySQL - Create Database
- MySQL - Drop Database
- MySQL - Select Database
- MySQL - Show Database
- MySQL - Copy Database
- MySQL - Database Export
- MySQL - Database Import
- MySQL - Database Info
- MySQL Users
- MySQL - Create Users
- MySQL - Drop Users
- MySQL - Show Users
- MySQL - Change Password
- MySQL - Grant Privileges
- MySQL - Show Privileges
- MySQL - Revoke Privileges
- MySQL - Lock User Account
- MySQL - Unlock User Account
- MySQL Tables
- MySQL - Create Tables
- MySQL - Show Tables
- MySQL - Alter Tables
- MySQL - Rename Tables
- MySQL - Clone Tables
- MySQL - Truncate Tables
- MySQL - Temporary Tables
- MySQL - Repair Tables
- MySQL - Describe Tables
- MySQL - Add/Delete Columns
- MySQL - Show Columns
- MySQL - Rename Columns
- MySQL - Table Locking
- MySQL - Drop Tables
- MySQL - Derived Tables
- MySQL Queries
- MySQL - Queries
- MySQL - Constraints
- MySQL - Insert Query
- MySQL - Select Query
- MySQL - Update Query
- MySQL - Delete Query
- MySQL - Replace Query
- MySQL - Insert Ignore
- MySQL - Insert on Duplicate Key Update
- MySQL - Insert Into Select
- MySQL Indexes
- MySQL - Indexes
- MySQL - Create Index
- MySQL - Drop Index
- MySQL - Show Indexes
- MySQL - Unique Index
- MySQL - Clustered Index
- MySQL - Non-Clustered Index
- MySQL Operators and Clauses
- MySQL - Where Clause
- MySQL - Limit Clause
- MySQL - Distinct Clause
- MySQL - Order By Clause
- MySQL - Group By Clause
- MySQL - Having Clause
- MySQL - AND Operator
- MySQL - OR Operator
- MySQL - Like Operator
- MySQL - IN Operator
- MySQL - ANY Operator
- MySQL - EXISTS Operator
- MySQL - NOT Operator
- MySQL - NOT EQUAL Operator
- MySQL - IS NULL Operator
- MySQL - IS NOT NULL Operator
- MySQL - Between Operator
- MySQL - UNION Operator
- MySQL - UNION vs UNION ALL
- MySQL - MINUS Operator
- MySQL - INTERSECT Operator
- MySQL - INTERVAL Operator
- MySQL Joins
- MySQL - Using Joins
- MySQL - Inner Join
- MySQL - Left Join
- MySQL - Right Join
- MySQL - Cross Join
- MySQL - Full Join
- MySQL - Self Join
- MySQL - Delete Join
- MySQL - Update Join
- MySQL - Union vs Join
- MySQL Keys
- MySQL - Unique Key
- MySQL - Primary Key
- MySQL - Foreign Key
- MySQL - Composite Key
- MySQL - Alternate Key
- MySQL Triggers
- MySQL - Triggers
- MySQL - Create Trigger
- MySQL - Show Trigger
- MySQL - Drop Trigger
- MySQL - Before Insert Trigger
- MySQL - After Insert Trigger
- MySQL - Before Update Trigger
- MySQL - After Update Trigger
- MySQL - Before Delete Trigger
- MySQL - After Delete Trigger
- MySQL Data Types
- MySQL - Data Types
- MySQL - VARCHAR
- MySQL - BOOLEAN
- MySQL - ENUM
- MySQL - DECIMAL
- MySQL - INT
- MySQL - FLOAT
- MySQL - BIT
- MySQL - TINYINT
- MySQL - BLOB
- MySQL - SET
- MySQL Regular Expressions
- MySQL - Regular Expressions
- MySQL - RLIKE Operator
- MySQL - NOT LIKE Operator
- MySQL - NOT REGEXP Operator
- MySQL - regexp_instr() Function
- MySQL - regexp_like() Function
- MySQL - regexp_replace() Function
- MySQL - regexp_substr() Function
- MySQL Fulltext Search
- MySQL - Fulltext Search
- MySQL - Natural Language Fulltext Search
- MySQL - Boolean Fulltext Search
- MySQL - Query Expansion Fulltext Search
- MySQL - ngram Fulltext Parser
- MySQL Functions & Operators
- MySQL - Date and Time Functions
- MySQL - Arithmetic Operators
- MySQL - Numeric Functions
- MySQL - String Functions
- MySQL - Aggregate Functions
- MySQL Misc Concepts
- MySQL - NULL Values
- MySQL - Transactions
- MySQL - Using Sequences
- MySQL - Handling Duplicates
- MySQL - SQL Injection
- MySQL - SubQuery
- MySQL - Comments
- MySQL - Check Constraints
- MySQL - Storage Engines
- MySQL - Export Table into CSV File
- MySQL - Import CSV File into Database
- MySQL - UUID
- MySQL - Common Table Expressions
- MySQL - On Delete Cascade
- MySQL - Upsert
- MySQL - Horizontal Partitioning
- MySQL - Vertical Partitioning
- MySQL - Cursor
- MySQL - Stored Functions
- MySQL - Signal
- MySQL - Resignal
- MySQL - Character Set
- MySQL - Collation
- MySQL - Wildcards
- MySQL - Alias
- MySQL - ROLLUP
- MySQL - Today Date
- MySQL - Literals
- MySQL - Stored Procedure
- MySQL - Explain
- MySQL - JSON
- MySQL - Standard Deviation
- MySQL - Find Duplicate Records
- MySQL - Delete Duplicate Records
- MySQL - Select Random Records
- MySQL - Show Processlist
- MySQL - Change Column Type
- MySQL - Reset Auto-Increment
- MySQL - Coalesce() Function
- MySQL Useful Resources
- MySQL - Useful Functions
- MySQL - Statements Reference
- MySQL - Quick Guide
- MySQL - Useful Resources
- MySQL - Discussion
MySQL - Workbench

The MySQL workbench is a graphical tool for working with MySQL servers and databases. It is developed and maintained by Oracle. This application includes various features such as data modelling, data migration, SQL development, server administration, database backup, database recovery and many more. MySQL Workbench supports the MySQL versions 5.7 and above.
The versions of MySQL prior to version 5.7 are deprecated and they are incompatible with MySQL workbench. Therefore, we need to ensure that they should be upgraded before we make a connection.
MySQL Workbench is a recommended application for database developers and administrators. We can download this application on Windows, macOS, and Linux operating systems.
Functionalities of MySQL Workbench
Following are the five main functionalities of MySQL workbench −
SQL Development − This functionality allows to create and manage connections to database servers. SQL queries can be executed on the database connections using the built-in SQL editor in MySQL workbench.
Data Modelling (Design) − This functionality allows to create models of our database schema graphically, reverse and forward engineer between a schema and a live database, and edits all aspects of the database using the comprehensive table. The table editor provides facilities to edit Tables, Columns, Indexes, Triggers, Partitioning, Options, Inserts, Privileges, Routines and Views.
Server Administration − It allows us to administer the MySQL sever instances by administering users, viewing database health, performing backup and recovery, inspecting audit data, and monitoring the MySQL server performance.
Data Migration − It allows us to migrate from the Microsoft SQL server, Microsoft Access, Sybase ASE, SQLite, SQL Anywhere PostreSQL, and other RDBMS tables, objects and data to MySQL. Migration also allows us to migrate from prior versions of MySQL to the latest releases.
MySQL Enterprise support − This functionality provides the support for Enterprise products such as MySQL Enterprise backup, MySQL Firewall and MySQL Audit.
MySQL Workbench Editions
The MySQL Workbench is offered in three editions. The same is described below −
MySQL Workbench Community Edition - Open Source (GPL License)
MySQL Workbench Standard Edition - Commercial
MySQL Workbench Enterprise Edition - Commercial
Community Edition
This is an open-source and freely downloadable version of the database system. It comes under the GPL (General public license) and it is supported by a large community of developers.
Standard Edition
This is the commercial edition that gives the capability to deliver high-performance and scalable OLT (online transaction processing) applications.
Enterprise Edition
The Enterprise edition includes a set of advanced features, management tools, and technical support to achieve the highest scalability, security, uptime and reliability. This edition will reduce the risk, cost, complexity in the development, deployment, and managing MySQL applications.
Comparison Chart
The following is the comparison chart of the above discussed functionalities −
| Functionality | Community Edition | Standard Edition | Enterprise Edition |
|---|---|---|---|
| Visual SQL Development | Yes | Yes | Yes |
| Visual Database Administration | Yes | Yes | Yes |
| Performance Tuning | Yes | Yes | Yes |
| User and Session Management | Yes | Yes | Yes |
| Connection Management | Yes | Yes | Yes |
| Object Management | Yes | Yes | Yes |
| Data Management | Yes | Yes | Yes |
| Visual Data Modelling | Yes | Yes | Yes |
| Reverse Engineering | Yes | Yes | Yes |
| Forward Engineering | Yes | Yes | Yes |
| Schema Synchronization | Yes | Yes | Yes |
| Schema & Model Validation | No | Yes | Yes |
| DBDoc | No | Yes | Yes |
| GUI for MySQL Enterprise Backup | No | Yes | Yes |
| GUI for MySQL Enterprise Audit | No | Yes | Yes |
| GUI for MySQL Enterprise Firewall | No | Yes | Yes |
| Scripting & Plugins | No | Yes | Yes |
| Database Migration | No | Yes | Yes |
MySQL Workbench Administration Tool
The administration tool in MySQL workbench plays a vital role in securing the data. Following are some administration tools provided by MySQL workbench −
User Administration
This tool allows to create, modify and delete the user related accounts. Using this we can manage the user's privileges and permissions.
Server Configuration
It allows us to configure the server paramerters. It shows various details about the sever and status variable, number of threads, buffer allocation size, fine-tuning for optimal performance, etc.
Database Backup and Restorations
This tools is used for importing and exporting the MySQL dump files. These dump files contains the SQL script for table creation, view creation, stored procedure creation etc.
Server Logs
This tool shows log information for the MySQL server by each connection tab. For every tab connection, it includes an additional tab for the general error logs.
Performance Dashboard
This tab provides real-time statistical view and analysis of server performance such as CPU usage, memory usage, query execution time, etc.
Create Database in MySQL Workbench
We can create a database in MySQL Workbench, without explicitly using SQL statements. Following steps show how to create a database in MySQl Workbench −
Step 1 − Open the MySQL workbench application and log in using the username and password.
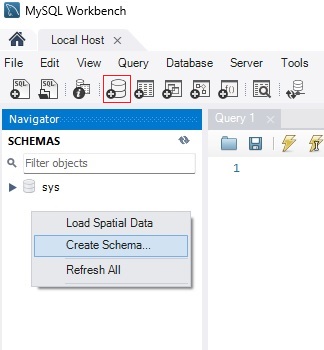
Step 2 − Now, to create a database, right click on schemas menu and select the create schema option. Another way to create a schema is by clicking on the schema button which is highlighted with a red outline in the following picture.
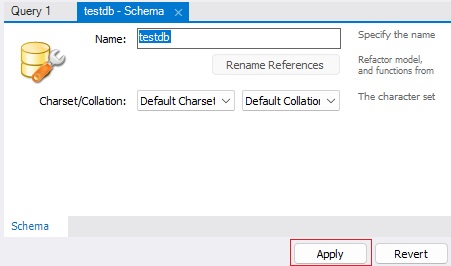
Step 3 − After selecting the create schema option, a new schema window will be opened as shown in the following figure. We can now enter the database name (say testdb) and use the default collation. Then click on the apply button.
Step 4 − A new window will be opened after clicking the apply button. Now click on the Apply button and then click on Finish button.
Step 5 − Now, we can see the above-created testdb database in the schema menu. If it is not visible, click on the refresh button on top-right corner in schemas menu.
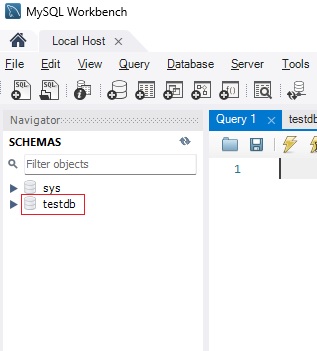
Note − If we want to see more information about the testdb database, click on the testdb database and then click on the i icon. The information window displays various options such as Table, Column, Indexes, Triggers and many more.
Drop Database in MySQL Workbench
Similarly, we can also drop a database using workbench. Following are the steps to drop a database using MySQL workbench −
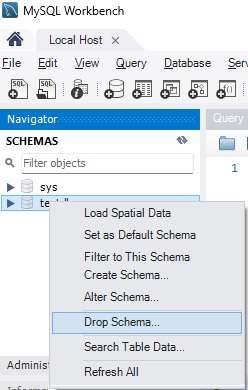
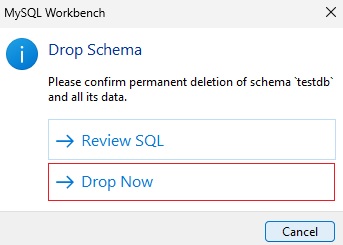
Step 1 − To drop a database in MySQL workbench, right click on the particular database that we want to delete and click on drop schema option as shown in the following figure.
Here, we are trying to delete the previously created database, testdb.
Step 2 − Now, a new window will be opened and click on the drop now option as shown in the below picture.
MySQL Workbench Create, Alter, and Drop Table
We can create, alter, and drop a table using the MySQL workbench application. Let us look into them in a step by step process.
Create Table
Following are the steps to create a table using MySQL workbench −
Step 1 − Open MySQL workbench, login with the username and password. Then, click on the schemas menu on left-corner of the window. Here, we can find all the databases which exist in the MySQL server.
Step 2 − Now, double click on the previously created testdb database, and we can see sub-menu under the database such as Tables, Views, Functions and Stored procedures as shown in the picture below.
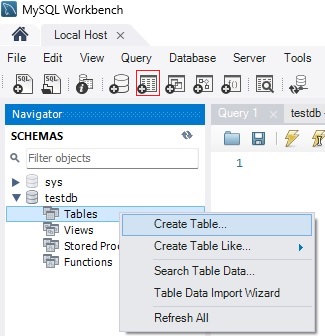
Step 3 − Now, right click on the Tables and click on create table option. Else, we can create a table by clicking the table button which is highlighted with a red outline in the above picture.
Step 4 − After clicking the create table option, the following will be displayed. Then we need to enter the name of the table (say employees) and use the default collation and engine.
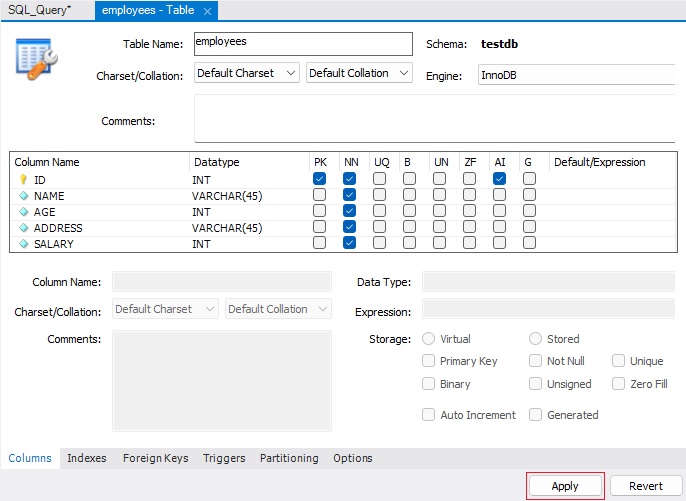
Step 5 − Now, click on the table fields and enter the column names. We can also select attributes to the columns such as Primary Key (PK), Not Null (NN), Unique Key (UQ) and so on. After providing all the details click on the apply button.
Step 6 − After we click the apply button, an SQL statement window will be opened and then we need to click on apply button and finish button to save the changes.
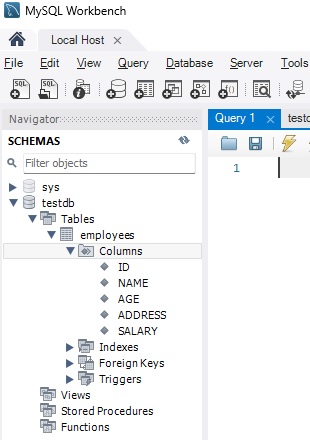
Step 7 − Now, go back to the schema menu and select the database that contains the newly created employees table. There we can find all the data that we provided to the table.
Alter Table
Following are the steps to alter a table using MySQL workbench −
Step 1 − Select the table which we want to modify and click on the i icon. Here, we are modifying the previously created employees table.
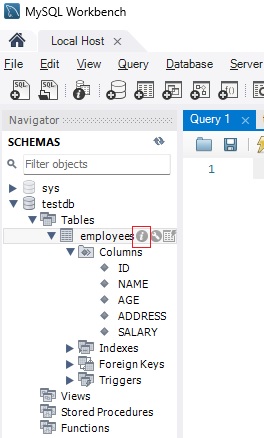
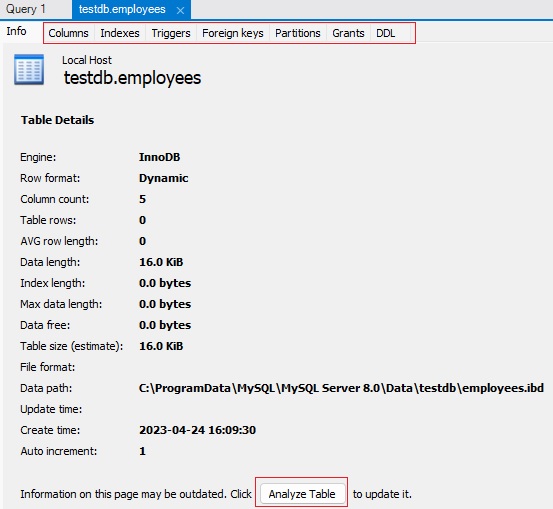
Step 2 − After clicking on the i icon, the following will be displayed where we can find the options to modify the table's columns, indexes and other datatypes etc. After modifying, click on the analyze table button to save the changes.
Drop Table
Following are the steps to drop a table using MySQL workbench −
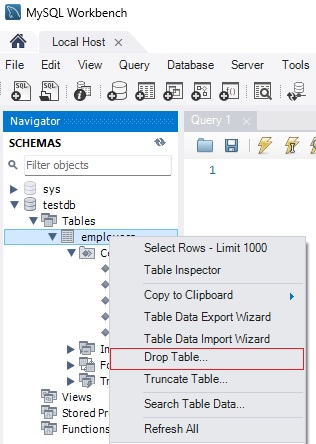
Step 1 − To drop a table, we need to select the particular table which we want to delete. Then, right click on it and select the drop table option. Here, we are deleting the employees table.
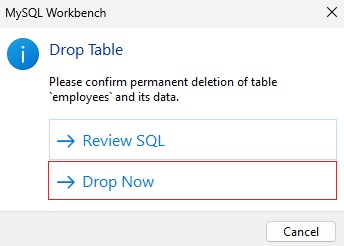
Step 2 − A new window will be opened and click on drop now option to remove the table from the database.
MySQL Workbench Insert and Delete Table Rows
Let's have a look on how to inset and delete table rows using the MySQL Workbench application.
Insert Rows
Following are the steps to insert rows into a table using MySQL workbench −
Step 1 − Open MySQL workbench. Then click on schemas menu on left corner of the window. Here, we can see that our previously created database (testdb) and table (employees).
Step 2 − First double click on testdb database, then double click on tables. Now, if we hover the mouse on the employees table, a table icon will appear. Click on that table icon.

Step 3 − Now, click on the respected column or row to insert the values.
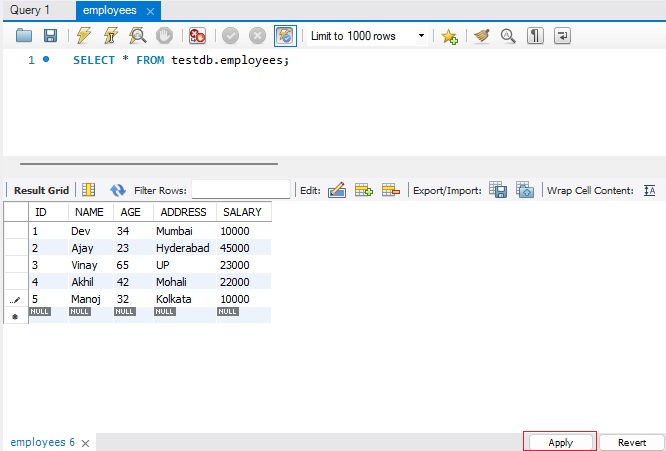
Step 4 − After inserting the values, click on the apply button. Then a new SQL statement window will be opened, click on apply and finish buttons to save the records. If we want to modify the records, we can follow the same procedure as discussed.
Delete Rows
Following are the steps to delete rows into a table using MySQL workbench −
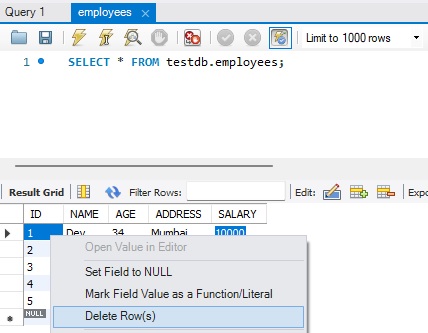
Step 1 − To delete an individual row from the table, we can simply right click on that particular row and click on the Delete row(s) option as shown below. Here, we have deleted the first row (i.e ID = 1).
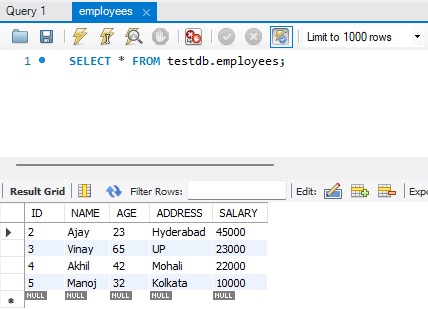
Step 2 − After selecting the delete row(s) option a new window will be opened. Then, click on apply and finish buttons to save the changes. In the following picture, we can see that the row1 (i.e. ID =1) got deleted.
MySQL Workbench Export and Import Database
Let's have a look on how to export and import database using the MySQL Workbench application.
Export Database
Following are the steps to export a database using MySQL workbench −
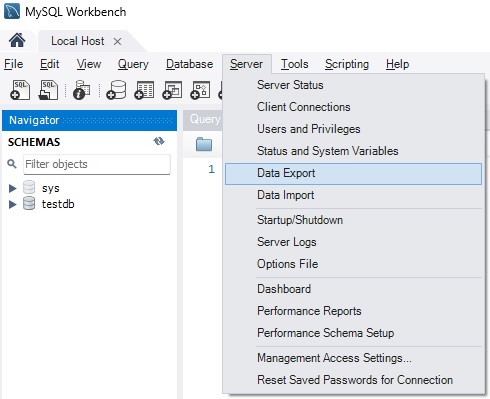
Step 1 − To export a database, go to menu bar at the top of the window and click on the Server option. After clicking that, select the data export option.
Step 2 − A new data export window will be opened. Now, select the database (testdb), it will display all the corresponding tables exist in that.
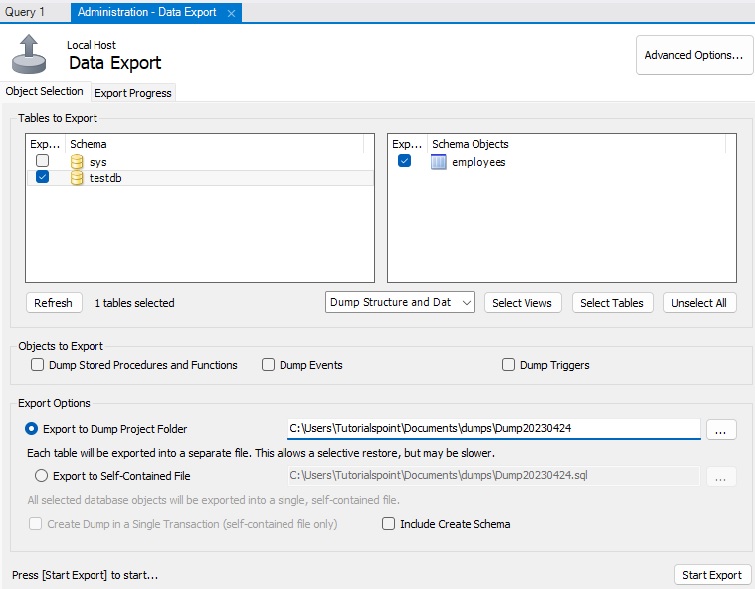
Step 3 − Now, click on the drop-down setting, there we will be having three options such as Dump Structure and Data, Dump Data Only, and Dump Structure Only.
Dump Structure and Data − This option will export both the table structure and data records.
Dump Data Only − This will export only the records in the table.
Dump Structure Only − This will export only the table structure, which are columns and datatypes defined by us.
Step 4 − Select the Dump Structure and Data option. Then in the Export options, we can see two options to select the export path as follows −
Export to Dump Project Folder − This option will export all the tables as separate SQL files under one folder. It is recommended when we import the exported file one by one.
Export to Self-Contained File − This options will export all the databases and tables in a single SQL file. It is recommended when we import all the databases, tables, and data rows using a single SQL file.
Step 5 − Select the "Export to Dump Project Folder" option and click on the start export button. Then it displays a process bar as shown in the figure below.
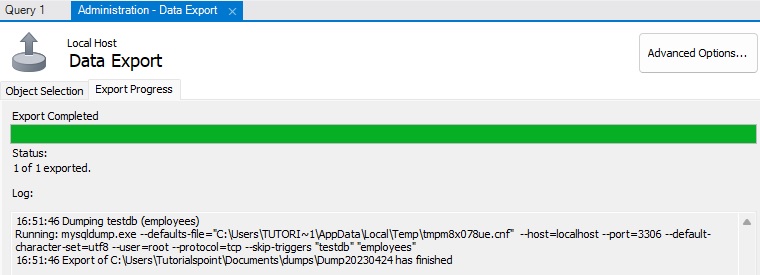
Step 6 − Now, we can find the exported file in the provided path while exporting.
Import Database
Following are the steps to import a database using MySQL workbench −
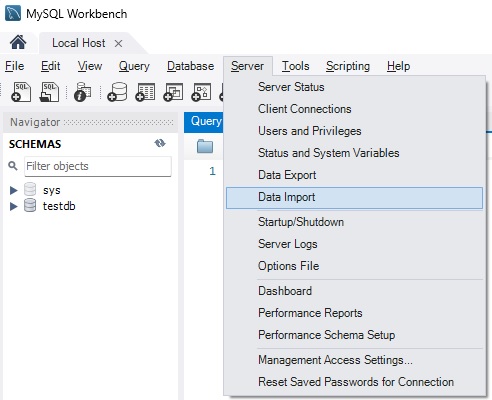
Step 1 − To export a database, go to menu bar at the top of the window and click on the Server option. After clicking that, select the data import option.
Step 2 − A new data import window will be opened. Here, we can find two options such as "Import from Dump Project Folder" and "Import from Self-Contained File".
Step 3 − Now, we are going to select the "Import from Dump Project Folder" option and click on the "Load Folder Contents" to show all the available databases in the project folder.
Step 4 − Now, select the testdb database from the Data import option and select the respective employees table.
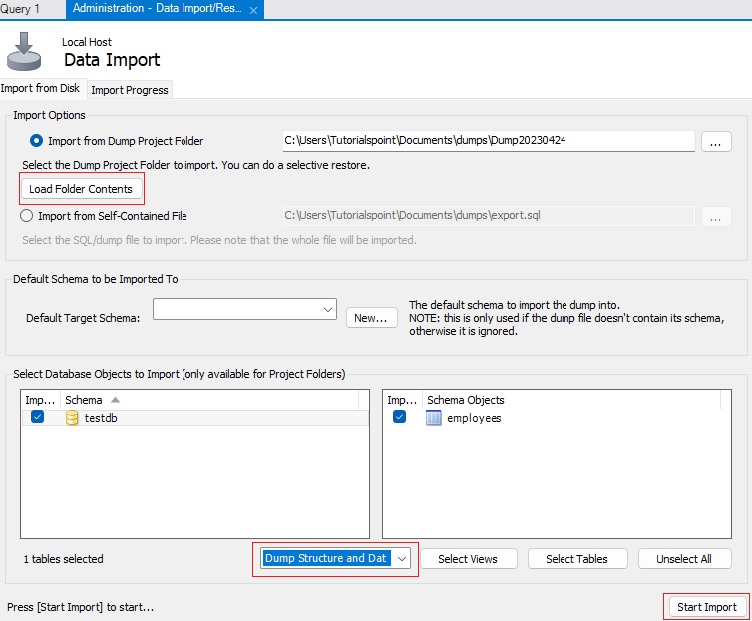
Step 5 − Select the "Dump Structure and Data" option and click on the "start import" button to import the database from the exported file.
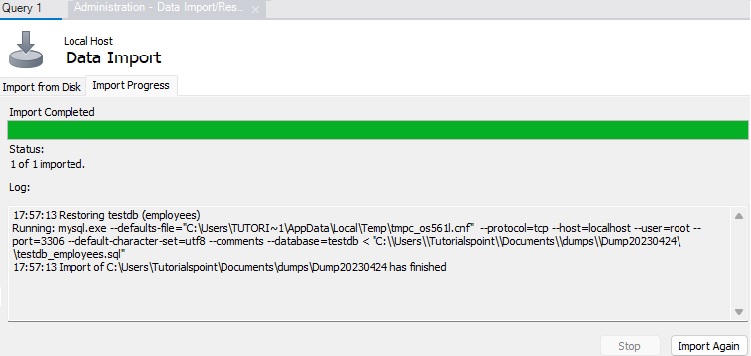
Step 6 − Now, go the schema menu and click on the employees and again click on the table to see the imported table.
