- C++ Home
- C++ Overview
- C++ Environment Setup
- C++ Basic Syntax
- C++ Comments
- C++ Hello World
- C++ Omitting Namespace
- C++ Tokens
- C++ Constants/Literals
- C++ Keywords
- C++ Identifiers
- C++ Data Types
- C++ Numeric Data Types
- C++ Character Data Type
- C++ Boolean Data Type
- C++ Variable Types
- C++ Variable Scope
- C++ Multiple Variables
- C++ Input Output Operations
- C++ Basic Input/Output
- C++ Cin
- C++ Cout
- C++ Manipulators
- Type System & Data Representation
- C++ Modifier Types
- C++ Storage Classes
- C++ Constexpr Specifier
- C++ Numbers
- C++ Enumeration
- C++ Enum Class
- C++ References
- C++ Date & Time
- C++ Operators
- C++ Operators
- C++ Arithmetic Operators
- C++ Relational Operators
- C++ Logical Operators
- C++ Bitwise Operators
- C++ Assignment Operators
- C++ sizeof Operator
- C++ Conditional Operator
- C++ Comma Operator
- C++ Member Operators
- C++ Casting Operators
- C++ Pointer Operators
- C++ Operators Precedence
- C++ Unary Operators
- C++ Scope Resolution Operator
- C++ Control Statements
- C++ Decision Making
- C++ if Statement
- C++ if else Statement
- C++ Nested if Statements
- C++ switch Statement
- C++ Nested switch Statements
- C++ Loop Types
- C++ while Loop
- C++ for Loop
- C++ do while Loop
- C++ Foreach Loop
- C++ Nested Loops
- C++ Jump Statements
- C++ break Statement
- C++ continue Statement
- C++ goto Statement
- C++ Return Values
- C++ Strings
- C++ Strings
- C++ Loop Through a String
- C++ String Length
- C++ String Concatenation
- C++ String Comparison
- C++ Functions
- C++ Functions
- C++ Multiple Function Parameters
- C++ Recursive Function
- C++ Function Overloading
- C++ Function Overriding
- C++ Default Arguments
- C++ Arrays
- C++ Arrays
- C++ Multidimensional Arrays
- C++ Pointer to an Array
- C++ Passing Arrays to Functions
- C++ Return Array from Functions
- C++ Array Decay
- C++ Structure & Union
- C++ Structures
- C++ Unions
- C++ Class and Objects
- C++ Object Oriented
- C++ Classes & Objects
- C++ Class Member Functions
- C++ Class Access Modifiers
- C++ Static Class Members
- C++ Static Data Members
- C++ Static Member Function
- C++ Inline Functions
- C++ this Pointer
- C++ Friend Functions
- C++ Pointer to Classes
- C++ Constructors
- C++ Constructor & Destructor
- C++ Default Constructors
- C++ Parameterized Constructors
- C++ Copy Constructor
- C++ Constructor Overloading
- C++ Constructor with Default Arguments
- C++ Delegating Constructors
- C++ Constructor Initialization List
- C++ Dynamic Initialization Using Constructors
- C++ Destructors
- C++ Virtual Destructor
- C++ Inheritance
- C++ Inheritance
- C++ Multiple Inheritance
- C++ Multilevel Inheritance
- C++ Object-oriented
- C++ Overloading
- C++ Polymorphism
- C++ Abstraction
- C++ Encapsulation
- C++ Interfaces
- C++ Virtual Function
- C++ Pure Virtual Functions & Abstract Classes
- C++ Override Specifiers
- C++ Final Specifiers
- C++ Design Patterns
- C++ Creational Design Patterns
- C++ Singleton Design Pattern
- C++ Factory Method Design Pattern
- C++ Abstract Factory Pattern
- C++ Prototype Design Pattern
- C++ Structural Design Patterns
- C++ Facade Design Pattern
- C++ Iterator Design Pattern
- C++ Mediator Design Pattern
- C++ Memento Design Pattern
- C++ Observer Design Pattern
- C++ State Design Pattern
- C++ Strategy Design Pattern
- C++ Template Method Design Pattern
- C++ Visitor Design Pattern
- C++ Behavioural Design Pattern
- C++ File Handling
- C++ Files and Streams
- C++ Reading From File
- C++ Advanced
- C++ Exception Handling
- C++ Dynamic Memory
- C++ Move Semantics
- C++ Namespaces
- C++ Templates
- C++ Preprocessor
- C++ Signal Handling
- C++ Multithreading
- C++ Web Programming
- C++ Socket Programming
- C++ Concurrency
- C++ Advanced Concepts
- C++ Lambda Expression
- C++ nullptr
- C++ unordered_multiset
- C++ Chain of Responsibility
- C++ Structural Design Patterns
- C++ Adapter Pattern
- C++ Bridge Pattern
- C++ Composite Pattern
- C++ Decorator Pattern
- C++ Command Pattern
- C++ Proxy Pattern
- C++ Useful Resources
- C++ Questions and Answers
- C++ Quick Guide
- C++ Cheatsheet
- C++ STL Tutorial
- C++ Standard Library
- C++ Useful Resources
- C++ Discussion
- C++ Online Compiler
C++ Web Programming
What is CGI?
The Common Gateway Interface, or CGI, is a set of standards that define how information is exchanged between the web server and a custom script.
The CGI specs are currently maintained by the NCSA and NCSA defines CGI is as follows −
The Common Gateway Interface, or CGI, is a standard for external gateway programs to interface with information servers such as HTTP servers.
The current version is CGI/1.1 and CGI/1.2 is under progress.
Web Browsing
To understand the concept of CGI, let's see what happens when we click a hyperlink to browse a particular web page or URL.
Your browser contacts the HTTP web server and demand for the URL ie. filename.
Web Server will parse the URL and will look for the filename. If it finds requested file then web server sends that file back to the browser otherwise sends an error message indicating that you have requested a wrong file.
Web browser takes response from web server and displays either the received file or error message based on the received response.
However, it is possible to set up the HTTP server in such a way that whenever a file in a certain directory is requested, that file is not sent back; instead it is executed as a program, and produced output from the program is sent back to your browser to display.
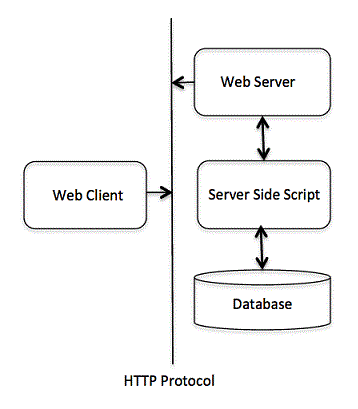
The Common Gateway Interface (CGI) is a standard protocol for enabling applications (called CGI programs or CGI scripts) to interact with Web servers and with clients. These CGI programs can be a written in Python, PERL, Shell, C or C++ etc.
CGI Architecture Diagram
The following simple program shows a simple architecture of CGI −
Web Server Configuration
Before you proceed with CGI Programming, make sure that your Web Server supports CGI and it is configured to handle CGI Programs. All the CGI Programs to be executed by the HTTP server are kept in a pre-configured directory. This directory is called CGI directory and by convention it is named as /var/www/cgi-bin. By convention CGI files will have extension as .cgi, though they are C++ executable.
By default, Apache Web Server is configured to run CGI programs in /var/www/cgi-bin. If you want to specify any other directory to run your CGI scripts, you can modify the following section in the httpd.conf file −
<Directory "/var/www/cgi-bin">
   AllowOverride None
   Options ExecCGI
   Order allow,deny
   Allow from all
</Directory>

<Directory "/var/www/cgi-bin">
   Options All
</Directory>
Here, I assume that you have Web Server up and running successfully and you are able to run any other CGI program like Perl or Shell etc.
First CGI Program
Consider the following C++ Program content −
#include <iostream>
using namespace std;

int main () {
   cout << "Content-type:text/html\r\n\r\n";
   cout << "<html>\n";
   cout << "<head>\n";
   cout << "<title>Hello World - First CGI Program</title>\n";
   cout << "</head>\n";
   cout << "<body>\n";
   cout << "<h2>Hello World! This is my first CGI program</h2>\n";
   cout << "</body>\n";
   cout << "</html>\n";

   return 0;
}
Compile above code and name the executable as cplusplus.cgi. This file is being kept in /var/www/cgi-bin directory and it has following content. Before running your CGI program make sure you have change mode of file using chmod 755 cplusplus.cgi UNIX command to make file executable.
My First CGI program
The above C++ program is a simple program which is writing its output on STDOUT file i.e. screen. There is one important and extra feature available which is first line printing Content-type:text/html\r\n\r\n. This line is sent back to the browser and specify the content type to be displayed on the browser screen. Now you must have understood the basic concept of CGI and you can write many complicated CGI programs using Python. A C++ CGI program can interact with any other external system, such as RDBMS, to exchange information.
HTTP Header
The line Content-type:text/html\r\n\r\n is a part of HTTP header, which is sent to the browser to understand the content. All the HTTP header will be in the following form −
HTTP Field Name: Field Content

For Example
Content-type: text/html\r\n\r\n
There are few other important HTTP headers, which you will use frequently in your CGI Programming.
| Sr.No | Header & Description |
|---|---|
| 1 | Content-type: A MIME string defining the format of the file being returned. Example is Content-type:text/html. |
| 2 | Expires: Date The date the information becomes invalid. This should be used by the browser to decide when a page needs to be refreshed. A valid date string should be in the format 01 Jan 1998 12:00:00 GMT. |
| 3 | Location: URL The URL that should be returned instead of the URL requested. You can use this filed to redirect a request to any file. |
| 4 | Last-modified: Date The date of last modification of the resource. |
| 5 | Content-length: N The length, in bytes, of the data being returned. The browser uses this value to report the estimated download time for a file. |
| 6 | Set-Cookie: String Set the cookie passed through the string. |
CGI Environment Variables
All the CGI program will have access to the following environment variables. These variables play an important role while writing any CGI program.
| Sr.No | Variable Name & Description |
|---|---|
| 1 | CONTENT_TYPE The data type of the content, used when the client is sending attached content to the server. For example file upload etc. |
| 2 | CONTENT_LENGTH The length of the query information that is available only for POST requests. |
| 3 | HTTP_COOKIE Returns the set cookies in the form of key & value pair. |
| 4 | HTTP_USER_AGENT The User-Agent request-header field contains information about the user agent originating the request. It is a name of the web browser. |
| 5 | PATH_INFO The path for the CGI script. |
| 6 | QUERY_STRING The URL-encoded information that is sent with GET method request. |
| 7 | REMOTE_ADDR The IP address of the remote host making the request. This can be useful for logging or for authentication purpose. |
| 8 | REMOTE_HOST The fully qualified name of the host making the request. If this information is not available then REMOTE_ADDR can be used to get IR address. |
| 9 | REQUEST_METHOD The method used to make the request. The most common methods are GET and POST. |
| 10 | SCRIPT_FILENAME The full path to the CGI script. |
| 11 | SCRIPT_NAME The name of the CGI script. |
| 12 | SERVER_NAME The server's hostname or IP Address. |
| 13 | SERVER_SOFTWARE The name and version of the software the server is running. |
Here is small CGI program to list out all the CGI variables.
#include <iostream>
#include <stdlib.h>
using namespace std;

const string ENV[ 24 ] = {
   "COMSPEC", "DOCUMENT_ROOT", "GATEWAY_INTERFACE",
   "HTTP_ACCEPT", "HTTP_ACCEPT_ENCODING",
   "HTTP_ACCEPT_LANGUAGE", "HTTP_CONNECTION",
   "HTTP_HOST", "HTTP_USER_AGENT", "PATH",
   "QUERY_STRING", "REMOTE_ADDR", "REMOTE_PORT",
   "REQUEST_METHOD", "REQUEST_URI", "SCRIPT_FILENAME",
   "SCRIPT_NAME", "SERVER_ADDR", "SERVER_ADMIN",
   "SERVER_NAME","SERVER_PORT","SERVER_PROTOCOL",
   "SERVER_SIGNATURE","SERVER_SOFTWARE" };

int main () {
   cout << "Content-type:text/html\r\n\r\n";
   cout << "<html>\n";
   cout << "<head>\n";
   cout << "<title>CGI Environment Variables</title>\n";
   cout << "</head>\n";
   cout << "<body>\n";
   cout << "<table border = \"0\" cellspacing = \"2\">";

   for ( int i = 0; i < 24; i++ ) {
      cout << "<tr><td>" << ENV[ i ] << "</td><td>";

      // attempt to retrieve value of environment variable
      char *value = getenv( ENV[ i ].c_str() );
      if ( value != 0 ) {
         cout << value;
      } else {
         cout << "Environment variable does not exist.";
      }
      cout << "</td></tr>\n";
   }

   cout << "</table><\n";
   cout << "</body>\n";
   cout << "</html>\n";

   return 0;
}
C++ CGI Library
For real examples, you would need to do many operations by your CGI program. There is a CGI library written for C++ program which you can download from ftp://ftp.gnu.org/gnu/cgicc/ and follow the steps to install the library −
$tar xzf cgicc-X.X.X.tar.gz
$cd cgicc-X.X.X/
$./configure --prefix=/usr
$make
$make install
You can check related documentation available at C++ CGI Lib Documentation.
GET and POST Methods
You must have come across many situations when you need to pass some information from your browser to web server and ultimately to your CGI Program. Most frequently browser uses two methods to pass this information to web server. These methods are GET Method and POST Method.
Passing Information Using GET Method
The GET method sends the encoded user information appended to the page request. The page and the encoded information are separated by the ? character as follows −
http://www.test.com/cgi-bin/cpp.cgi?key1=value1&key2=value2
The GET method is the default method to pass information from browser to web server and it produces a long string that appears in your browser's Location:box. Never use the GET method if you have password or other sensitive information to pass to the server. The GET method has size limitation and you can pass upto 1024 characters in a request string.
When using GET method, information is passed using QUERY_STRING http header and will be accessible in your CGI Program through QUERY_STRING environment variable.
You can pass information by simply concatenating key and value pairs alongwith any URL or you can use HTML <FORM> tags to pass information using GET method.
Simple URL Example: Get Method
Here is a simple URL which will pass two values to hello_get.py program using GET method.
/cgi-bin/cpp_get.cgi?first_name=ZARA&last_name=ALIBelow is a program to generate cpp_get.cgi CGI program to handle input given by web browser. We are going to use C++ CGI library which makes it very easy to access passed information −
#include <iostream>
#include <vector>
#include <string>
#include <stdio.h>
#include <stdlib.h>

#include <cgicc/CgiDefs.h>
#include <cgicc/Cgicc.h>
#include <cgicc/HTTPHTMLHeader.h>
#include <cgicc/HTMLClasses.h>

using namespace std;
using namespace cgicc;

int main () {
   Cgicc formData;

   cout << "Content-type:text/html\r\n\r\n";
   cout << "<html>\n";
   cout << "<head>\n";
   cout << "<title>Using GET and POST Methods</title>\n";
   cout << "</head>\n";
   cout << "<body>\n";

   form_iterator fi = formData.getElement("first_name");
   if( !fi->isEmpty() && fi != (*formData).end()) {
      cout << "First name: " << **fi << endl;
   } else {
      cout << "No text entered for first name" << endl;
   }

   cout << "<br/>\n";
   fi = formData.getElement("last_name");
   if( !fi->isEmpty() &&fi != (*formData).end()) {
      cout << "Last name: " << **fi << endl;
   } else {
      cout << "No text entered for last name" << endl;
   }

   cout << "<br/>\n";
   cout << "</body>\n";
   cout << "</html>\n";

   return 0;
}
Now, compile the above program as follows −
$g++ -o cpp_get.cgi cpp_get.cpp -lcgicc
Generate cpp_get.cgi and put it in your CGI directory and try to access using following link −
/cgi-bin/cpp_get.cgi?first_name=ZARA&last_name=ALIThis would generate following result −
First name: ZARA
Last name: ALI
Simple FORM Example: GET Method
Here is a simple example which passes two values using HTML FORM and submit button. We are going to use same CGI script cpp_get.cgi to handle this input.
<form action = "/cgi-bin/cpp_get.cgi" method = "get">
   First Name: <input type = "text" name = "first_name">  <br />

   Last Name: <input type = "text" name = "last_name" />
   <input type = "submit" value = "Submit" />
</form>
Here is the actual output of the above form. You enter First and Last Name and then click submit button to see the result.
Passing Information Using POST Method
A generally more reliable method of passing information to a CGI program is the POST method. This packages the information in exactly the same way as GET methods, but instead of sending it as a text string after a ? in the URL it sends it as a separate message. This message comes into the CGI script in the form of the standard input.
The same cpp_get.cgi program will handle POST method as well. Let us take same example as above, which passes two values using HTML FORM and submit button but this time with POST method as follows −
<form action = "/cgi-bin/cpp_get.cgi" method = "post">
   First Name: <input type = "text" name = "first_name"><br />
   Last Name: <input type = "text" name = "last_name" />

   <input type = "submit" value = "Submit" />
</form>
Here is the actual output of the above form. You enter First and Last Name and then click submit button to see the result.
Passing Checkbox Data to CGI Program
Checkboxes are used when more than one option is required to be selected.
Here is example HTML code for a form with two checkboxes −
<form action = "/cgi-bin/cpp_checkbox.cgi" method = "POST" target = "_blank">
   <input type = "checkbox" name = "maths" value = "on" /> Maths
   <input type = "checkbox" name = "physics" value = "on" /> Physics
   <input type = "submit" value = "Select Subject" />
</form>
The result of this code is the following form −
Below is C++ program, which will generate cpp_checkbox.cgi script to handle input given by web browser through checkbox button.
#include <iostream>
#include <vector>
#include <string>
#include <stdio.h>
#include <stdlib.h>

#include <cgicc/CgiDefs.h>
#include <cgicc/Cgicc.h>
#include <cgicc/HTTPHTMLHeader.h>
#include <cgicc/HTMLClasses.h>

using namespace std;
using namespace cgicc;

int main () {
   Cgicc formData;
   bool maths_flag, physics_flag;

   cout << "Content-type:text/html\r\n\r\n";
   cout << "<html>\n";
   cout << "<head>\n";
   cout << "<title>Checkbox Data to CGI</title>\n";
   cout << "</head>\n";
   cout << "<body>\n";

   maths_flag = formData.queryCheckbox("maths");
   if( maths_flag ) {
      cout << "Maths Flag: ON " << endl;
   } else {
      cout << "Maths Flag: OFF " << endl;
   }
   cout << "<br/>\n";

   physics_flag = formData.queryCheckbox("physics");
   if( physics_flag ) {
      cout << "Physics Flag: ON " << endl;
   } else {
      cout << "Physics Flag: OFF " << endl;
   }

   cout << "<br/>\n";
   cout << "</body>\n";
   cout << "</html>\n";

   return 0;
}
Passing Radio Button Data to CGI Program
Radio Buttons are used when only one option is required to be selected.
Here is example HTML code for a form with two radio button −
<form action = "/cgi-bin/cpp_radiobutton.cgi" method = "post" target = "_blank">
   <input type = "radio" name = "subject" value = "maths" checked = "checked"/> Maths
   <input type = "radio" name = "subject" value = "physics" /> Physics
   <input type = "submit" value = "Select Subject" />
</form>
The result of this code is the following form −
Below is C++ program, which will generate cpp_radiobutton.cgi script to handle input given by web browser through radio buttons.
#include <iostream>
#include <vector>
#include <string>
#include <stdio.h>
#include <stdlib.h>

#include <cgicc/CgiDefs.h>
#include <cgicc/Cgicc.h>
#include <cgicc/HTTPHTMLHeader.h>
#include <cgicc/HTMLClasses.h>

using namespace std;
using namespace cgicc;

int main () {
   Cgicc formData;

   cout << "Content-type:text/html\r\n\r\n";
   cout << "<html>\n";
   cout << "<head>\n";
   cout << "<title>Radio Button Data to CGI</title>\n";
   cout << "</head>\n";
   cout << "<body>\n";

   form_iterator fi = formData.getElement("subject");
   if( !fi->isEmpty() && fi != (*formData).end()) {
      cout << "Radio box selected: " << **fi << endl;
   }

   cout << "<br/>\n";
   cout << "</body>\n";
   cout << "</html>\n";

   return 0;
}
Passing Text Area Data to CGI Program
TEXTAREA element is used when multiline text has to be passed to the CGI Program.
Here is example HTML code for a form with a TEXTAREA box −
<form action = "/cgi-bin/cpp_textarea.cgi" method = "post" target = "_blank">
   <textarea name = "textcontent" cols = "40" rows = "4">
      Type your text here...
   </textarea>
   <input type = "submit" value = "Submit" />
</form>
The result of this code is the following form −
Below is C++ program, which will generate cpp_textarea.cgi script to handle input given by web browser through text area.
#include <iostream>
#include <vector>
#include <string>
#include <stdio.h>
#include <stdlib.h>

#include <cgicc/CgiDefs.h>
#include <cgicc/Cgicc.h>
#include <cgicc/HTTPHTMLHeader.h>
#include <cgicc/HTMLClasses.h>

using namespace std;
using namespace cgicc;

int main () {
   Cgicc formData;

   cout << "Content-type:text/html\r\n\r\n";
   cout << "<html>\n";
   cout << "<head>\n";
   cout << "<title>Text Area Data to CGI</title>\n";
   cout << "</head>\n";
   cout << "<body>\n";

   form_iterator fi = formData.getElement("textcontent");
   if( !fi->isEmpty() && fi != (*formData).end()) {
      cout << "Text Content: " << **fi << endl;
   } else {
      cout << "No text entered" << endl;
   }

   cout << "<br/>\n";
   cout << "</body>\n";
   cout << "</html>\n";

   return 0;
}
Passing Drop down Box Data to CGI Program
Drop down Box is used when we have many options available but only one or two will be selected.
Here is example HTML code for a form with one drop down box −
<form action = "/cgi-bin/cpp_dropdown.cgi" method = "post" target = "_blank">
   <select name = "dropdown">
      <option value = "Maths" selected>Maths</option>
      <option value = "Physics">Physics</option>
   </select>

   <input type = "submit" value = "Submit"/>
</form>
The result of this code is the following form −
Below is C++ program, which will generate cpp_dropdown.cgi script to handle input given by web browser through drop down box.
#include <iostream>
#include <vector>
#include <string>
#include <stdio.h>
#include <stdlib.h>

#include <cgicc/CgiDefs.h>
#include <cgicc/Cgicc.h>
#include <cgicc/HTTPHTMLHeader.h>
#include <cgicc/HTMLClasses.h>

using namespace std;
using namespace cgicc;

int main () {
   Cgicc formData;

   cout << "Content-type:text/html\r\n\r\n";
   cout << "<html>\n";
   cout << "<head>\n";
   cout << "<title>Drop Down Box Data to CGI</title>\n";
   cout << "</head>\n";
   cout << "<body>\n";

   form_iterator fi = formData.getElement("dropdown");
   if( !fi->isEmpty() && fi != (*formData).end()) {
      cout << "Value Selected: " << **fi << endl;
   }

   cout << "<br/>\n";
   cout << "</body>\n";
   cout << "</html>\n";

   return 0;
}
Using Cookies in CGI
HTTP protocol is a stateless protocol. But for a commercial website it is required to maintain session information among different pages. For example one user registration ends after completing many pages. But how to maintain user's session information across all the web pages.
In many situations, using cookies is the most efficient method of remembering and tracking preferences, purchases, commissions, and other information required for better visitor experience or site statistics.
How It Works
Your server sends some data to the visitor's browser in the form of a cookie. The browser may accept the cookie. If it does, it is stored as a plain text record on the visitor's hard drive. Now, when the visitor arrives at another page on your site, the cookie is available for retrieval. Once retrieved, your server knows/remembers what was stored.
Cookies are a plain text data record of 5 variable-length fields −
Expires − This shows date the cookie will expire. If this is blank, the cookie will expire when the visitor quits the browser.
Domain − This shows domain name of your site.
Path − This shows path to the directory or web page that set the cookie. This may be blank if you want to retrieve the cookie from any directory or page.
Secure − If this field contains the word "secure" then the cookie may only be retrieved with a secure server. If this field is blank, no such restriction exists.
Name = Value − Cookies are set and retrieved in the form of key and value pairs.
Setting up Cookies
It is very easy to send cookies to browser. These cookies will be sent along with HTTP Header before the Content-type filed. Assuming you want to set UserID and Password as cookies. So cookies setting will be done as follows
#include <iostream>
using namespace std;

int main () {
   cout << "Set-Cookie:UserID = XYZ;\r\n";
   cout << "Set-Cookie:Password = XYZ123;\r\n";
   cout << "Set-Cookie:Domain = www.tutorialspoint.com;\r\n";
   cout << "Set-Cookie:Path = /perl;\n";
   cout << "Content-type:text/html\r\n\r\n";

   cout << "<html>\n";
   cout << "<head>\n";
   cout << "<title>Cookies in CGI</title>\n";
   cout << "</head>\n";
   cout << "<body>\n";

   cout << "Setting cookies" << endl;

   cout << "<br/>\n";
   cout << "</body>\n";
   cout << "</html>\n";

   return 0;
}
From this example, you must have understood how to set cookies. We use Set-Cookie HTTP header to set cookies.
Here, it is optional to set cookies attributes like Expires, Domain, and Path. It is notable that cookies are set before sending magic line "Content-type:text/html\r\n\r\n.
Compile above program to produce setcookies.cgi, and try to set cookies using following link. It will set four cookies at your computer −
Retrieving Cookies
It is easy to retrieve all the set cookies. Cookies are stored in CGI environment variable HTTP_COOKIE and they will have following form.
key1 = value1; key2 = value2; key3 = value3....
Here is an example of how to retrieve cookies.
#include <iostream>
#include <vector>
#include <string>
#include <stdio.h>
#include <stdlib.h>

#include <cgicc/CgiDefs.h>
#include <cgicc/Cgicc.h>
#include <cgicc/HTTPHTMLHeader.h>
#include <cgicc/HTMLClasses.h>

using namespace std;
using namespace cgicc;

int main () {
   Cgicc cgi;
   const_cookie_iterator cci;

   cout << "Content-type:text/html\r\n\r\n";
   cout << "<html>\n";
   cout << "<head>\n";
   cout << "<title>Cookies in CGI</title>\n";
   cout << "</head>\n";
   cout << "<body>\n";
   cout << "<table border = \"0\" cellspacing = \"2\">";

   // get environment variables
   const CgiEnvironment& env = cgi.getEnvironment();

   for( cci = env.getCookieList().begin();
   cci != env.getCookieList().end();
   ++cci ) {
      cout << "<tr><td>" << cci->getName() << "</td><td>";
      cout << cci->getValue();
      cout << "</td></tr>\n";
   }

   cout << "</table><\n";
   cout << "<br/>\n";
   cout << "</body>\n";
   cout << "</html>\n";

   return 0;
}
Now, compile above program to produce getcookies.cgi, and try to get a list of all the cookies available at your computer −
This will produce a list of all the four cookies set in previous section and all other cookies set in your computer −
UserID XYZ
Password XYZ123
Domain www.tutorialspoint.com
Path /perl
File Upload Example
To upload a file the HTML form must have the enctype attribute set to multipart/form-data. The input tag with the file type will create a "Browse" button.
<html>
   <body>
      <form enctype = "multipart/form-data" action = "/cgi-bin/cpp_uploadfile.cgi"
         method = "post">
         <p>File: <input type = "file" name = "userfile" /></p>
         <p><input type = "submit" value = "Upload" /></p>
      </form>
   </body>
</html>
The result of this code is the following form −
Note − Above example has been disabled intentionally to stop people uploading files on our server. But you can try above code with your server.
Here is the script cpp_uploadfile.cpp to handle file upload −
#include <iostream>
#include <vector>
#include <string>
#include <stdio.h>
#include <stdlib.h>

#include <cgicc/CgiDefs.h>
#include <cgicc/Cgicc.h>
#include <cgicc/HTTPHTMLHeader.h>
#include <cgicc/HTMLClasses.h>

using namespace std;
using namespace cgicc;

int main () {
   Cgicc cgi;

   cout << "Content-type:text/html\r\n\r\n";
   cout << "<html>\n";
   cout << "<head>\n";
   cout << "<title>File Upload in CGI</title>\n";
   cout << "</head>\n";
   cout << "<body>\n";

   // get list of files to be uploaded
   const_file_iterator file = cgi.getFile("userfile");
   if(file != cgi.getFiles().end()) {
      // send data type at cout.
      cout << HTTPContentHeader(file->getDataType());
      // write content at cout.
      file->writeToStream(cout);
   }
   cout << "<File uploaded successfully>\n";
   cout << "</body>\n";
   cout << "</html>\n";

   return 0;
}
The above example is for writing content at cout stream but you can open your file stream and save the content of uploaded file in a file at desired location.
Hope you have enjoyed this tutorial. If yes, please send us your feedback.
