
Article Categories
- All Categories
-
 Data Structure
-
 Networking
-
 RDBMS
RDBMS
-
 Operating System
-
 Java
Java
-
 MS Excel
-
 iOS
iOS
-
 HTML
HTML
-
 CSS
CSS
-
 Android
-
 Python
-
 C Programming
-
 C++
C++
-
 C#
C#
-
 MongoDB
-
 MySQL
MySQL
-
 Javascript
-
 PHP
PHP
-
 Economics & Finance
Connect SD Card with Arduino and get Card Info
In this tutorial, we will connect our Arduino Uno to an SD Card and extract the card info.
Circuit Diagram
The circuit diagram is shown below −
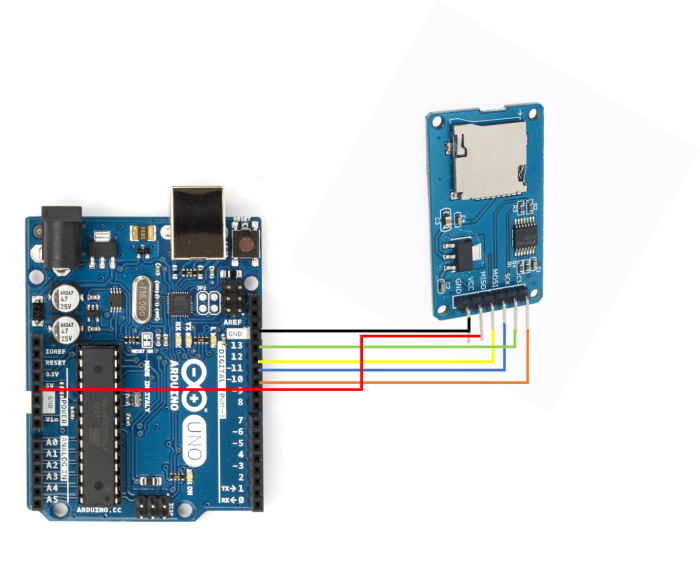
As you can see, you need to make the following connections −
| SD Card Holder | Arduino Uno |
|---|---|
| Vcc | 5V |
| GND | GND |
| MISO | 12 |
| MOSI | 11 |
| SCK | 13 |
| CS | 10 |
Only for the Vcc, make sure that your SD Card Holder takes 5V as input. If it takes in 3.3V, connect it to the 3.3V pin on Arduino Uno.
Code Walkthrough
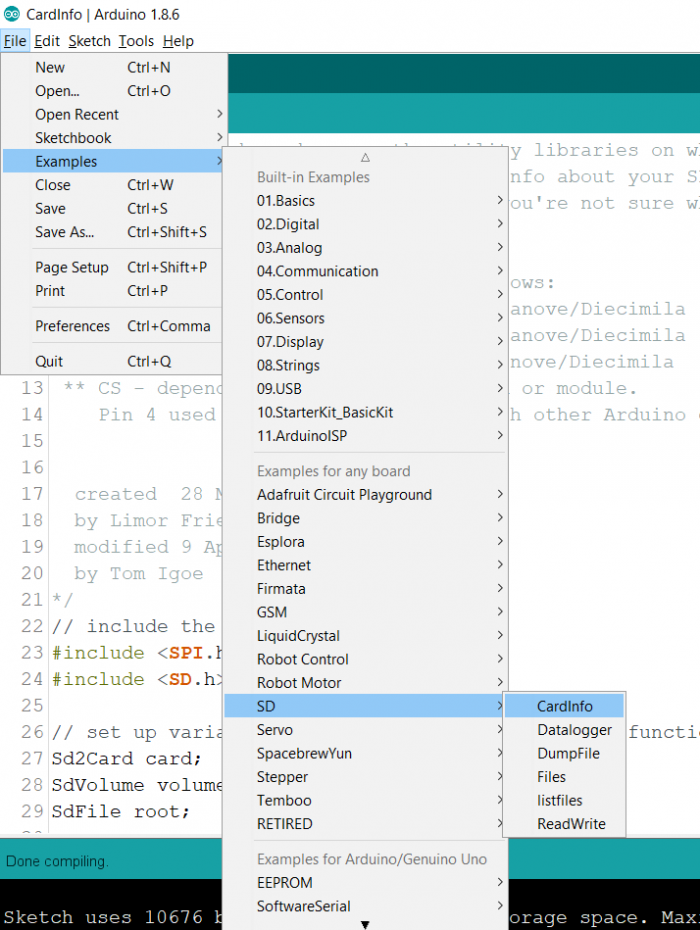
We will be walking through the example code that comes in with the inbuilt SD library. You can access it from File → Examples → SD → CardInfo
We begin with the inclusion of the SPI and SD libraries −
#include <SPI.h>
#include <SD.h>
Next, we define some variables based on objects defined in the SD library.
Sd2Card card;
SdVolume volume;
SdFile root;
Next, we define the chipSelect pin. The example code sets chipSelect at pin 4. However, we have connected the CS pin to pin 10 of Arduino Uno. So, we will change that.
const int chipSelect = 10;
Within the Setup, we first initialize Serial and then initialize the SD Card (using the chipSelect pin and the SPI protocol, the other pins of SPI protocol, MISO, MOSI, SCK, are defined by default in the SPI library).
void setup() {
   // Open serial communications and wait for port to open:
   Serial.begin(9600);
   while (!Serial) {
      ; // wait for serial port to connect. Needed for native USB port only
   }

   Serial.print("\nInitializing SD card...");

   // we'll use the initialization code from the utility libraries
   // since we're just testing if the card is working!
   if (!card.init(SPI_HALF_SPEED, chipSelect)) {
      Serial.println("initialization failed. Things to check:");
      Serial.println("* is a card inserted?");
      Serial.println("* is your wiring correct?");
      Serial.println("* did you change the chipSelect pin to match your
      shield or module?");
      while (1);
   } else {
      Serial.println("Wiring is correct and a card is present.");
}
Next, we obtain and print the type of the card using the .type() function.
   // print the type of card
   Serial.println();
   Serial.print("Card type: ");
   switch (card.type()) {
      case SD_CARD_TYPE_SD1:
         Serial.println("SD1");
         break;
      case SD_CARD_TYPE_SD2:
         Serial.println("SD2");
         break;
      case SD_CARD_TYPE_SDHC:
         Serial.println("SDHC");
         break;
      default:
         Serial.println("Unknown");
}
Next, we initialize the volume of the card, get the total number of clusters in the card, and the number of blocks per cluster, thereby getting the total number of blocks in the card.
// Now we will try to open the 'volume'/'partition' - it should be
FAT16 or FAT32
   if (!volume.init(card)) {
      Serial.println("Could not find FAT16/FAT32 partition.\nMake sure you've formatted the card");
      while (1);
   }

   Serial.print("Clusters: ");
   Serial.println(volume.clusterCount());
   Serial.print("Blocks x Cluster: ");
   Serial.println(volume.blocksPerCluster());

   Serial.print("Total Blocks: ");
   Serial.println(volume.blocksPerCluster() * volume.clusterCount());

   Serial.println();
Later, we print whether the volume is of type FAT 16 or FAT 32. Also, we calculate the totalvolume in kB, using the fact that one block is always 512 bytes large, or 0.5 kB large.
   // print the type and size of the first FAT-type volume
   uint32_t volumesize;
   Serial.print("Volume type is: FAT");
   Serial.println(volume.fatType(), DEC);
   volumesize = volume.blocksPerCluster(); // clusters are collections of blocks
   volumesize *= volume.clusterCount(); // we'll have a lot of clusters
   volumesize /= 2; // SD card blocks are always 512 bytes (2 blocks are 1KB)
   Serial.print("Volume size (Kb): ");
   Serial.println(volumesize);
   Serial.print("Volume size (Mb): ");
   volumesize /= 1024;
   Serial.println(volumesize);
   Serial.print("Volume size (Gb): ");
   Serial.println((float)volumesize / 1024.0);
Finally, we list all the files found on the card, using the openRoot() function, and print the dateand size along with the file names
Serial.println("\nFiles found on the card (name, date and size in bytes): ");
   root.openRoot(volume);

// list all files in the card with date and size
root.ls(LS_R | LS_DATE | LS_SIZE); 
568 Views
