
Article Categories
- All Categories
-
 Data Structure
-
 Networking
-
 RDBMS
RDBMS
-
 Operating System
-
 Java
Java
-
 MS Excel
-
 iOS
iOS
-
 HTML
HTML
-
 CSS
CSS
-
 Android
-
 Python
-
 C Programming
-
 C++
C++
-
 C#
C#
-
 MongoDB
-
 MySQL
MySQL
-
 Javascript
-
 PHP
PHP
-
 Economics & Finance
Read a file from SD Card connected to Arduino
As the title suggests, in this tutorial, we will read a file from an SD Card connected to Arduino.
Circuit Diagram
The circuit diagram is shown below −
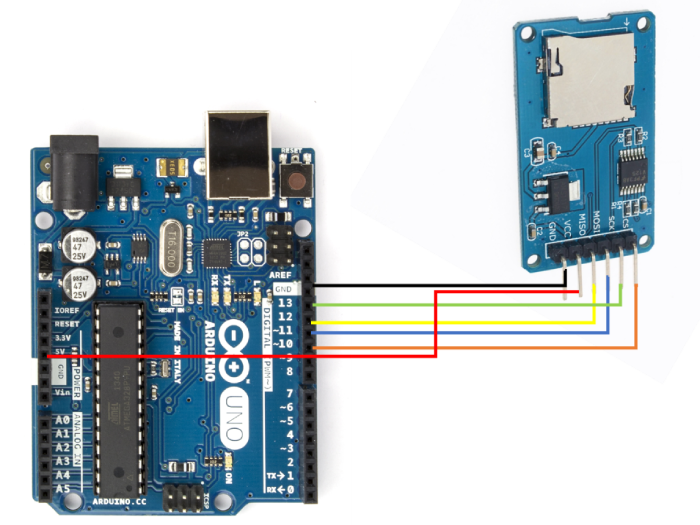
As you can see, you need to make the following connections −
| SD Card Holder | Arduino Uno |
|---|---|
| Vcc | 5V |
| GND | GND |
| MISO | 12 |
| MOSI | 11 |
| SCK | 13 |
| CS | 10 |
Only for the Vcc, make sure that your SD Card Holder takes 5V as input. If it takes in 3.3V, connect it to the 3.3V pin on Arduino Uno.
Code Walkthrough
We will be walking through the example code that comes in with the inbuilt SD library. You can access it from File → Examples → SD → ReadWrite
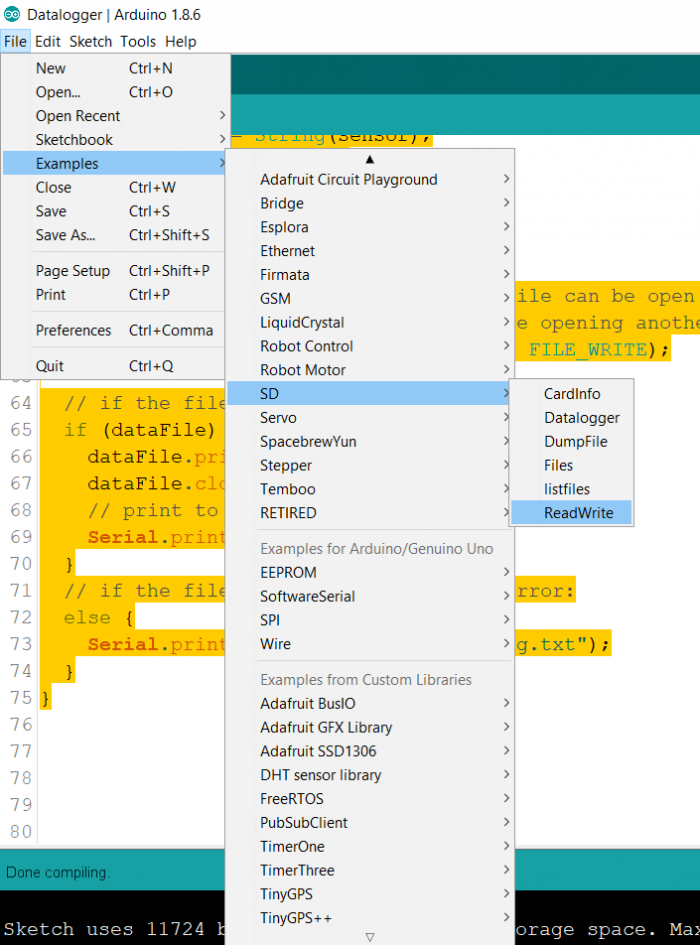
Alternatively, you can find the code on GitHub −https://github.com/adafruit/SD/blob/master/examples/ReadWrite/ReadWrite.ino As you can see, we begin with inclusion of libraries and the creation of a file object.
#include <SPI.h>
#include <SD.h>

File myFile;
Within Setup, we first initialize Serial and then initialize the SD Card. Note that we have connected the chipSelect of the SD Card to pin 10 instead of 4. Therefore, we will initialize SD with 10 as the argument in SD.begin(), instead of 4.
void setup() {
   // Open serial communications and wait for port to open:
   Serial.begin(9600);
   while (!Serial) {
      ; // wait for serial port to connect. Needed for native USB port only
   }

   Serial.print("Initializing SD card...");

   if (!SD.begin(10)) {
      Serial.println("initialization failed!");
      while (1);
   }
Serial.println("initialization done.");
Next, we open a file test.txt in the FILE_WRITE mode. Note that this creates a new file test.txt if such a file doesn’t exist. Then we write one line to test.txt and close the file.
   // open the file. note that only one file can be open at a time,
   // so you have to close this one before opening another.
   myFile = SD.open("test.txt", FILE_WRITE);

   // if the file opened okay, write to it:
   if (myFile) {
      Serial.print("Writing to test.txt...");
      myFile.println("testing 1, 2, 3.");
      // close the file:
      myFile.close();
      Serial.println("done.");
   } else {
      // if the file didn't open, print an error:
      Serial.println("error opening test.txt");
}
Then, we re-open the file, this time for reading (we don’t provide the seconds argument to SD.open(), because the default mode is the read mode. Then we read the file character by character, and print the read content on the Serial Monitor, and then close the file. Note that the important functions here are .available() and .read(). .available() tells us if there is any more content left to be read, while .read() reads the next available character.
   // re-open the file for reading:
   myFile = SD.open("test.txt");
   if (myFile) {
      Serial.println("test.txt:");

      // read from the file until there's nothing else in it:
      while (myFile.available()) {
         Serial.write(myFile.read());
      }
      // close the file:
      myFile.close();
   } else {
      // if the file didn't open, print an error:
      Serial.println("error opening test.txt");
   }
}
Nothing is done in the loop.
void loop() {
   // nothing happens after setup
} 
2K+ Views
