- BabylonJS - Home
- BabylonJS - Introduction
- BabylonJS - Environment Setup
- BabylonJS - Overview
- BabylonJS - Basic Elements
- BabylonJS - Materials
- BabylonJS - Animations
- BabylonJS - Cameras
- BabylonJS - Lights
- BabylonJS - Parametric Shapes
- BabylonJS - Mesh
- VectorPosition and Rotation
- BabylonJS - Decals
- BabylonJS - Curve3
- BabylonJS - Dynamic Texture
- BabylonJS - Parallax Mapping
- BabylonJS - Lens Flares
- BabylonJS - Create ScreenShot
- BabylonJS - Reflection Probes
- Standard Rendering Pipeline
- BabylonJS - ShaderMaterial
- BabylonJS - Bones and Skeletons
- BabylonJS - Physics Engine
- BabylonJS - Playing Sounds & Music
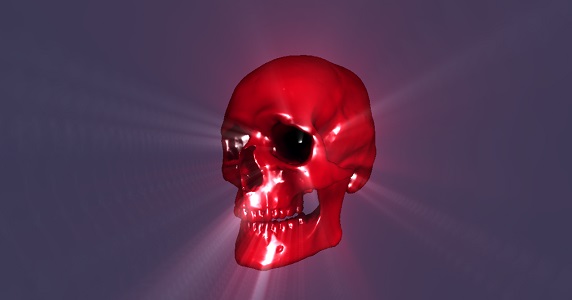
Mesh VolumemetricLightScatteringPost-process
This process scatters the light as shown in the output given below. Test the same in browser and you will see how the light scatters through the mesh.
Syntax
var vls = new BABYLON.VolumetricLightScatteringPostProcess(
   'vls', 1.0, camera, lightSourceMesh, samplesNum,
   BABYLON.Texture.BILINEAR_SAMPLINGMODE,
   engine, false, scene);
Parameters
Consider the following parameters related to the Mesh VolumemetricLightScatteringPost-process −
Name − Name given to the light.
Ratio − The size of the post-process (0.5 means that your postprocess will have a width = canvas.width 0.5 and a height = canvas.height 0.5).
Camera − The camera used in the scene.
Lightsourcemesh − The mesh used to create the light scattering effect.
SamplesNum − The post-process quality, default 100.
SamplingMode − The post-process filtering mode {number}.
Engine − babylonjs engine.
Reusable − Postprocess if reusable
Scene − Scene to which the effect is applied.
Demo
<!doctype html>
<html>
   <head>
      <meta charset = "utf-8">
      <title>BabylonJs - Basic Element-Creating Scene</title>
      <script src = "babylon.js"></script>
      <style>
         canvas {width: 100%; height: 100%;}
      </style>
   </head>

   <body>
      <canvas id = "renderCanvas"></canvas>
      <script type = "text/javascript">
         var canvas = document.getElementById("renderCanvas");
         var engine = new BABYLON.Engine(canvas, true);

         var createScene  = function() {
            var scene = new BABYLON.Scene(engine);

            //Adding a light
            var light = new BABYLON.PointLight("Omni", new BABYLON.Vector3(20, 20, 100), scene);

            //Adding an Arc Rotate Camera
            var camera = new BABYLON.ArcRotateCamera("Camera", 0, 0.8, 100, BABYLON.Vector3.Zero(), scene);
            camera.attachControl(canvas, false);

            // The first parameter can be used to specify which mesh to import. Here we import all meshes
            BABYLON.SceneLoader.ImportMesh(
               "", "scenes/", "skull.babylon", scene, function (newMeshes) {

               // Set the target of the camera to the first imported mesh
               camera.target = newMeshes[0];

               var vrays = new BABYLON.VolumetricLightScatteringPostProcess(
                  'godrays', 0.9, camera, newMeshes[0], 50,
                  BABYLON.Texture.BILINEAR_SAMPLINGMODE, engine, true
               );
               vrays.exposure = 0.15;
               newMeshes[0].material = new BABYLON.StandardMaterial(null, scene);
               newMeshes[0].material.diffuseTexture = new BABYLON.Texture("textures/grass.jpg", scene);
            });

            // Move the light with the camera
            scene.registerBeforeRender(function () {
               light.position = camera.position;
            });
            return scene;
         };
         var scene = createScene();
         engine.runRenderLoop(function() {
            scene.render();
         });
      </script>
   </body>
</html>
In the above demo link, we have used skull.babylon mesh. You can download the json file for skull.babylon from here −
Save the file in scenes folder to get the output shown below.skull.babylon is a json file with all the details of positions to be plotted for the mesh
Output
The above line of code will generate the following output −