- BabylonJS - Home
- BabylonJS - Introduction
- BabylonJS - Environment Setup
- BabylonJS - Overview
- BabylonJS - Basic Elements
- BabylonJS - Materials
- BabylonJS - Animations
- BabylonJS - Cameras
- BabylonJS - Lights
- BabylonJS - Parametric Shapes
- BabylonJS - Mesh
- VectorPosition and Rotation
- BabylonJS - Decals
- BabylonJS - Curve3
- BabylonJS - Dynamic Texture
- BabylonJS - Parallax Mapping
- BabylonJS - Lens Flares
- BabylonJS - Create ScreenShot
- BabylonJS - Reflection Probes
- Standard Rendering Pipeline
- BabylonJS - ShaderMaterial
- BabylonJS - Bones and Skeletons
- BabylonJS - Physics Engine
- BabylonJS - Playing Sounds & Music
BabylonJS - Mesh AssetsManager
With assestsmanager class, you can load meshes, images and binaryfiles in the scene.
Syntax
var assetsManager = new BABYLON.AssetsManager(scene);
Demo
<!doctype html>
<html>
   <head>
      <meta charset = "utf-8">
      <title>BabylonJs - Basic Element-Creating Scene</title>
      <script src = "babylon.js"></script>
      <style>
         canvas {width: 100%; height: 100%;}
      </style>
   </head>

   <body>
      <canvas id = "renderCanvas"></canvas>
      <script type = "text/javascript">
         var canvas = document.getElementById("renderCanvas");
         var engine = new BABYLON.Engine(canvas, true);

         var createScene  = function() {
            var scene = new BABYLON.Scene(engine);

            //Adding a light
            var light = new BABYLON.PointLight("Omni", new BABYLON.Vector3(20, 20, 100), scene);

            //Adding an Arc Rotate Camera
            var camera = new BABYLON.ArcRotateCamera("Camera", 0, 0.8, 100, BABYLON.Vector3.Zero(), scene);
            camera.attachControl(canvas, false);

            var assetsManager = new BABYLON.AssetsManager(scene);

            var meshTask = assetsManager.addMeshTask("skull task", "", "scenes/", "skull.babylon");

            meshTask.onSuccess = function (task) {
               task.loadedMeshes[0].position = BABYLON.Vector3.Zero();
            }

            // Move the light with the camera
            scene.registerBeforeRender(function () {
               light.position = camera.position;
            });

            assetsManager.onFinish = function (tasks) {
               engine.runRenderLoop(function () {
                  scene.render();
               });
            };
            assetsManager.load();
            return scene;
         };
         var scene = createScene();
         engine.runRenderLoop(function() {
            scene.render();
         });
      </script>
   </body>
</html>
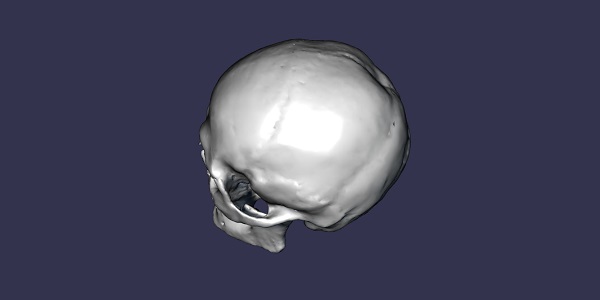
In the above demo link, we have used skull.babylon mesh. You can download the json file for skull.babylon from −
Save the file in the scenes folder to get the output as shown below. skull.babylon is a json file with all the details of positions to be plotted for the mesh.
Output
Explanation
For assetsmanager, the first thing that you need to do is create an object of the same as shown above.
Now, you can add task to the assetsmanager object as follows −
var meshTask = assetsManager.addMeshTask("skull task", "", "scenes/", "skull.babylon");
ThemeshTask created above gives access to 2 callbacks called onSucess and onError.
Syntax
.Following is the syntax for the onSuccess callback −
meshTask.onSuccess = function (task) {
   task.loadedMeshes[0].position = BABYLON.Vector3.Zero();
}
In the above case, the position of the mesh is changed to 0 on success callback.
Demo for loading image and txt file
<!doctype html>
<html>
   <head>
      <meta charset = "utf-8">
      <title>BabylonJs - Basic Element-Creating Scene</title>
      <script src = "babylon.js"></script>
      <style>
         canvas {width: 100%; height: 100%;}
      </style>
   </head>

   <body>
      <canvas id = "renderCanvas"></canvas>
      <script type = "text/javascript">
         var canvas = document.getElementById("renderCanvas");
         var engine = new BABYLON.Engine(canvas, true);

         var createScene  = function() {
            var scene = new BABYLON.Scene(engine);

            //Adding a light
            var light = new BABYLON.PointLight("Omni", new BABYLON.Vector3(20, 20, 100), scene);

            //Adding an Arc Rotate Camera
            var camera = new BABYLON.ArcRotateCamera("Camera", 0, 0.8, 100, BABYLON.Vector3.Zero(), scene);
            camera.attachControl(canvas, false);

            var assetsManager = new BABYLON.AssetsManager(scene);

            var imageTask = assetsManager.addImageTask("image_task", "images/balloon.png");
            imageTask.onSuccess = function(task) {
               console.log(task.image.width);
            }

            var textTask = assetsManager.addTextFileTask("text task", "mesh.txt");
            textTask.onSuccess = function(task) {
               console.log(task.text);
            }

            assetsManager.load();
            return scene;
         };
         var scene = createScene();
         engine.runRenderLoop(function() {
            scene.render();
         });
      </script>
   </body>
</html>
Create a file called mesh.txt and add the text to it This is babylonjs test. The above demo when executed in browser will show in console, the width of the image and the text present in mesh.txt.
Attaching mesh.txt content mesh.txt −
This is babylonjs test
To show loading indicator for the scene, use the following −
If set to true, the loading indicator will be shown. Set it to false to disable.
assetsManager.useDefaultLoadingScreen = true;

There are other ways also to show the loading indicator −
BABYLON.SceneLoader.ShowLoadingScreen = true; //false to disable it
To manually hide and show the loading screen, execute the following.
engine.displayLoadingUI();
engine.hideLoadingUI();
Loading text is controlled using loadingUIText:engine.loadingUIText = "text"; and background using engine.loadingUIBackgroundColor = "red";
