- Aurelia - Home
- Aurelia - Overview
- Aurelia - Environment Setup
- Aurelia - First Application
- Aurelia - Components
- Aurelia - Component Lifecycle
- Aurelia - Custom Elements
- Aurelia - Dependency Injections
- Aurelia - Configuration
- Aurelia - Plugins
- Aurelia - Data Binding
- Aurelia - Binding Behavior
- Aurelia - Converters
- Aurelia - Events
- Aurelia - Event Aggregator
- Aurelia - Forms
- Aurelia - HTTP
- Aurelia - Refs
- Aurelia - Routing
- Aurelia - History
- Aurelia - Animations
- Aurelia - Dialog
- Aurelia - Localization
- Aurelia - Tools
- Aurelia - Bundling
- Aurelia - Debugging
- Aurelia - Community
- Aurelia - Best Practices
Aurelia - Dialog
Aurelia offers a way to implement dialog (modal) window. In this chapter, we will show you how to use it.
Step 1 - Install a Dialog Plugin
Dialog plugin can be installed from the command prompt window.
C:\Users\username\Desktop\aureliaApp>jspm install aurelia-dialog
For this plugin to work, we need to use manual bootstrapping. We covered this in the Configuration chapter. Inside main.js file, we need to add the aurelia-dialog plugin.
main.js
export function configure(aurelia) {
   aurelia.use
   .standardConfiguration()
   .developmentLogging()
   .plugin('aurelia-dialog');

   aurelia.start().then(() => aurelia.setRoot());
}
Step 2 - Create Folders and Files
First, we will make a new directory called modal. Let's place it inside the components folder. Open the command prompt and run the following code.
C:\Users\username\Desktop\aureliaApp\src\components>mkdir modal
In this folder, we will create two new files. These files will represent view and view-model for our modal.
C:\Users\username\Desktop\aureliaApp\src\components\modal>touch my-modal.html
C:\Users\username\Desktop\aureliaApp\src\components\modal>touch my-modal.js
Step 3 - Create a Modal
First, let's add view-model code. We need to import and inject dialog-controller. This controller is used for handling modal specific functionalities. In the following example, we are using it to centralize a modal horizontally.
my-modal.js
import {inject} from 'aurelia-framework';
import {DialogController} from 'aurelia-dialog';

@inject(DialogController)

export class Prompt {
   constructor(controller) {
      this.controller = controller;
      this.answer = null;

      controller.settings.centerHorizontalOnly = true;
   }
   activate(message) {
      this.message = message;
   }
}
The view code will look like this. The buttons when clicked will open or close the modal.
my-modal.html
<template>
   <ai-dialog>
      <ai-dialog-body>
         <h2>${message}</h2>
      </ai-dialog-body>

      <ai-dialog-footer>
         <button click.trigger = "controller.cancel()">Cancel</button>
         <button click.trigger = "controller.ok(message)">Ok</button>
      </ai-dialog-footer>
   </ai-dialog>
</template>
Step 4 - Trigger a Modal
The last step is a function for triggering our modal. We need to import and inject DialogService. This service has method open, where we can pass view-model from my-modal file and model, so we can dynamically bind the data.
app.js
import {DialogService} from 'aurelia-dialog';
import {inject} from 'aurelia-framework';
import {Prompt} from './components/modal/my-modal';

@inject(DialogService)

export class App {
   constructor(dialogService) {
      this.dialogService = dialogService;
   }
   openModal() {
      this.dialogService.open( {viewModel: Prompt, model: 'Are you sure?' }).then(response => {
         console.log(response);

         if (!response.wasCancelled) {
            console.log('OK');
         } else {
            console.log('cancelled');
         }
         console.log(response.output);
      });
   }
};
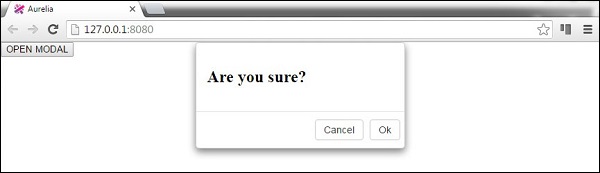
Finally, we will create a button so we can call openModal function.
app.html
<template>
   <button click.trigger = "openModal()">OPEN MODAL</button>
<template>
If we run the app, we can click the OPEN MODAL button to trigger a new modal window.