- Apache Solr - Home
- Apache Solr - Overview
- Apache Solr - Search Engine Basics
- Apache Solr - Windows Environment
- Apache Solr - On Hadoop
- Apache Solr - Architecture
- Apache Solr - Terminology
- Apache Solr - Basic Commands
- Apache Solr - Core
- Apache Solr - Indexing Data
- Apache Solr - Adding Docs (XML)
- Apache Solr - Updating Data
- Apache Solr - Deleting Documents
- Apache Solr - Retrieving Data
- Apache Solr - Querying Data
- Apache Solr - Faceting
Apache Solr - On Windows Environment
In this chapter, we will discuss how to set up Solr in Windows environment. To install Solr on your Windows system, you need to follow the steps given below −
Visit the homepage of Apache Solr and click the download button.
Select one of the mirrors to get an index of Apache Solr. From there download the file named Solr-6.2.0.zip.
Move the file from the downloads folder to the required directory and unzip it.
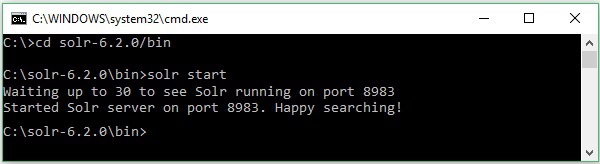
Suppose you downloaded the Solr fie and extracted it in onto the C drive. In such case, you can start Solr as shown in the following screenshot.
To verify the installation, use the following URL in your browser.
http://localhost:8983/
If the installation process is successful, then you will get to see the dashboard of the Apache Solr user interface as shown below.

Setting Java Environment
We can also communicate with Apache Solr using Java libraries; but before accessing Solr using Java API, you need to set the classpath for those libraries.
Setting the Classpath
Set the classpath to Solr libraries in the .bashrc file. Open .bashrc in any of the editors as shown below.
$ gedit ~/.bashrc
Set classpath for Solr libraries (lib folder in HBase) as shown below.
export CLASSPATH = $CLASSPATH://home/hadoop/Solr/lib/*
This is to prevent the class not found exception while accessing the HBase using Java API.
