- Apache IVY - Home
- Apache IVY - Overview
- Apache IVY - Environment Setup
- Apache IVY - Terminology
- Apache IVY - Settings File
- Apache IVY - Eclipse Ivy Plugin
- ANT Ivy Tasks
- Apache IVY - resolve
- Apache IVY - install
- Apache IVY - retrieve
- Apache IVY - cachepath
- Apache IVY - publish
- Apache IVY - info
- Repositories
- Apache IVY - Resolvers
- Apache IVY - Local Repository
- Apache IVY - Shared Repository
- Apache IVY - Public Repository
- Apache IVY Useful Resources
- Apache IVY - Quick Guide
- Apache IVY - Useful Resources
- Apache IVY - Discussion
Apache IVY - Quick Guide
Apache IVY - Overview
Apache Ivy is a very popular and very powerful dependency management tool used to manage dependencies in ANT based projects in the same fashion, how Apache Maven manages dependencies.
Apache Ivy is Apache ANT based, follows same design principles, is a subproject of Apache ANT and is actively managed and supported by Apache ANT Community.
Features
Following are the important features of Apache Ivy.
ANT Based − Apache Ivy provides a dependencies management capability to ANT based projects. It is very simple to use as well.
Dependency Reports − Apache Ivy provides options to print dependencies graph in html as well as in reports format.
Non-intrusive − Apache Ivy don't impose any restrictions as to be part of distribution. Even build files are not dependent on Apache Ivy.
Highly Flexible − Apache Ivy provides lots of default configurations and can be configured as per the requirement very easily.
Extendible − Apache Ivy can be extended easily. You can define your own repository, conflict resolvers and latest strategy.
Performance − Apache Ivy is built towards performance. It keeps a cache of library already downloaded. Looks into local repositories first to resolve dependencies than look into other repositories.
Transitive Dependencies − Apache Ivy automatically manages transitive dependencies if one project or library depends upon other library which may need another library.
Maven Repository − Apache Ivy follows conventions similar to Maven repository conventions. Apache Ivy can resolve dependencies using maven global repository.
Maven 2 POMs − Apache Ivy can read Maven 2 POMs as module descriptors, can set ivy as module descriptor. Thus it makes easy to migrate existing projects to IVY managed projects.
Publishing − Apache Ivy provides supports to publish your project and simplifies the multi-project environment deployment process.
Free to Use − Apache Ivy is open source and is free to use.
Documentation − Apache Ivy has a very detailed documentation and tutorials available to learn.
Apache IVY - Environment Setup
Apache Ivy needs Java and ANT installed on your machine as the only requirement.
Apache Ant is distributed under the Apache Software License, a fully-fledged open source license certified by the open source initiative.
The latest Apache Ant version, including its full-source code, class files, and documentation can be found at http://ant.apache.org.
Installing Apache Ant
It is assumed that you have already downloaded and installed Java Development Kit (JDK) on your computer. If not, please follow the instructions here.
Ensure that the JAVA_HOME environment variable is set to the folder where your JDK is installed.
Download the binaries from https://ant.apache.org
Unzip the zip file to a convenient location c:\folder. using Winzip, winRAR, 7-zip or similar tools.
Create a new environment variable called ANT_HOME that points to the Ant installation folder, in this case c:\apache-ant-1.10.12-bin folder.
Append the path to the Apache Ant batch file to the PATH environment variable. In our case this would be the c:\apache-ant-1.10.12-bin\bin folder.
Verifying Apache Ant Installation
To verify the successful installation of Apache Ant on your computer, type ant on your command prompt.
You should see an output similar to −
C:\>ant -version
Apache Ant(TM) version 1.10.12 compiled on October 13 2021
If you do not see the above output, then please verify that you have followed the installation steps properly.
Installing Apache Ivy
Download the binaries from https://ant.apache.org/ivy
Unzip the zip file to a convenient location c:\folder. using Winzip, winRAR, 7-zip or similar tools.
Copy the ivy-2.5.0.jar to c:\apache-ant-1.10.12-bin/lib folder.
Verifying Apache Ivy Installation
To verify the successful installation of Apache Ivy on your computer, create following build file in a folder E: > ivy.
<project name="test ivy installation"
   default="test" xmlns:ivy="antlib:org.apache.ivy.ant">
   <target name="test" description="Test ivy installation">
      <ivy:settings />
   </target>
</project>
You should see an output similar to −
C:\>ant
Buildfile: E:\ivy\build.xml

test:

BUILD SUCCESSFUL
Total time: 2 seconds
Installing Eclipse
This tutorial also covers integration of Ant with Eclipse IDE. Hence, if you have not installed Eclipse already, please download and install Eclipse
To install Eclipse −
Download the latest Eclipse binaries from www.eclipse.org
Unzip the Eclipse binaries to a convenient location, say c:\folder
Run Eclipse from c:\eclipse\eclipse.exe
Apache IVY - Terminology
Consider the following example ivy.xml to understand Ivy terminology.
<?xml version="1.0" encoding="ISO-8859-1"?>
<ivy-module version="2.0"
   xmlns:xsi="http://www.w3.org/2001/XMLSchema-instance"
   xsi:noNamespaceSchemaLocation="http://ant.apache.org/ivy/schemas/ivy.xsd">
   <info organisation="com.tutorialspoint" module="ivy-test" status="integration">
   </info>
   <dependencies>
      <dependency org="commons-lang" name="commons-lang" rev="2.6" />
   </dependencies>
</ivy-module>
Ivy Terms
Following are the important terms of Ivy Eco-System.
Organisation − As name suggests, it refers to the name of the company, individual developer or team name who creates the project or library. For example, com.tutorialspoint.
Module − As name suggests, it refers to the reusable unit or module. A module generally have a version attached to it. For example commons-lang, or ivy-test etc.
Module Descriptor − Module descriptor refers to ivy.xml file which describes a module. A module descriptor contains the identifier (org, name, branch and version), artifacts published, configurations and dependencies.
Artifact − Artifact refers to a single file as deliverable. For example, a jar file. Artifact can be of type: zip, gz etc. Jar, Source Jar, Javadoc Jar are various artifacts of a module.
Type − Type identifies the artifact category like jar, war , src, doc etc.
Artifact file name extension − Artifact extension like .jar, ,zip, .gz etc.
Module Revision − A unique revision number of the module or its version number.
Status of Revision − Status of revision indicates the stability of the revision. Following are the important value of status −
integration − Represents continous development, nightly build etc.
milestone − Represents a distribution but not finalized.
release − Represents tested and completed, a major version.
Repository − Similar to Maven repositories, repository represents a distribution site where ivy can search a library, artifacts, modules etc. A repository can be public, private or shared.
Ivy Settings − Apache Ivy follows Maven principles and comes with lot of default configurations. Default settings can be overridden by defining a ivysettings.xml file.
Apache IVY - Settings File
Apache Ivy follows Maven principles and comes with lot of default configurations. Default settings can be overridden by defining a ivysettings.xml file.
<ivysettings>
   <properties file="${ivy.settings.dir}/ivysettings-file.properties" />
   <settings defaultCache="${cache.dir}" defaultResolver="ibiblio" checkUpToDate="false" />
   <resolvers>
      <ibiblio name="ibiblio" />
      <filesystem name="internal">
         <ivy pattern="${repository.dir}/[module]/ivy-[revision].xml" />
         <artifact pattern="${repository.dir}/[module]/[artifact]-[revision].[ext]" />
      </filesystem>
   </resolvers>
   <modules>
      <module organisation="tutorialspoint" name=".*" resolver="internal" />
   </modules>
</ivysettings>
Tags of Ivy Settings File
Following are the important tags of Ivy Setting file.
property − To set an ivy variable. Cardinality: 0..n
properties − To set an ivy variables using properties file. Cardinality: 0..n
settings − To configure ivy with default values. Cardinality: 0..1
include − To include another settings file. Cardinality: 0..n
classpath − To add a location in the classpath used to load plugins. Cardinality: 0..n
typedef − To define new types in ivy. Cardinality: 0..n
lock-strategies − To define lock strategies. Cardinality: 0..1
caches − To define repository cache managers. Cardinality: 0..1
latest-strategies − To define latest strategies. Cardinality: 0..1
parsers − To define module descriptor parsers. Cardinality: 0..1
version-matchers − To define new version matchers. Cardinality: 0..1
triggers − To register triggers on ivy events. Cardinality: 0..1
namespaces − To define new namespaces. Cardinality: 0..1
macrodef − To define a new macro resolver. Cardinality: 0..n
resolvers − To define dependency resolvers. Cardinality: 0..1
conflict-managers − To define conflicts managers. Cardinality: 0..1
modules − To define rules between modules and dependency resolvers. Cardinality: 0..1
outputters − To define the list of available report outputters. Cardinality: 0..1
statuses − To define the list of available statuses. Cardinality: 0..1
Apache IVY - Eclipse Ivy Plugin
IvyDE is an Eclipse plugin provided by Apache. To install IvyDE, start Eclipse and navigate to Help > Install New Software. It displays the Available Softwares window. Enter IvyDE update site http://www.apache.org/dist/ant/ivyde/updatesite/ and press enter key. It displays the following plugins.
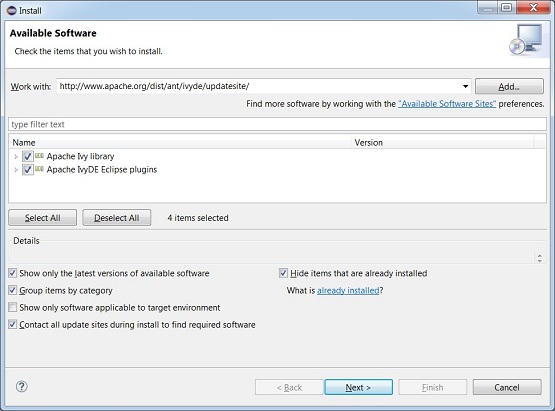
Click Next and you will see the following screen.
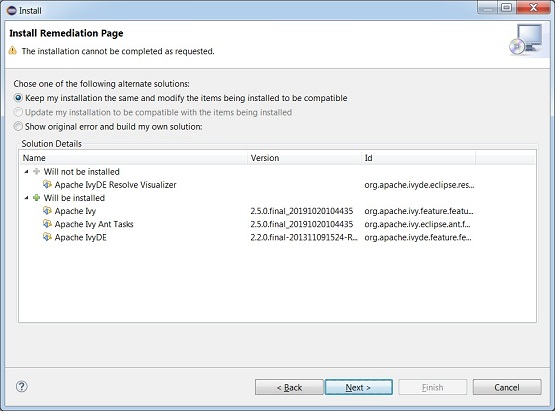
If you are facing any error while installing the plugin then just restart the process. After successful installation, you will see the plugin in eclipe.
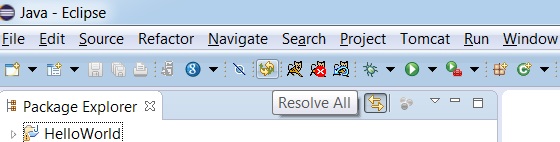
Now you can do the dependency management using Eclipse and Ivy.
Apache IVY - Resolve Task
Resolve task is used to resolve dependencies described in ivy.xml, download and put them in ivy cache.
Let's first create a java file Tester.java in E: > ivy > src > com > tutorialspoint folder which will act as source folder for ant project.
Application.java
package com.tutorialspoint;
import org.apache.commons.lang.StringUtils;
public class Application {
   public static void main(String[] args) {
      String string = StringUtils.upperCase("Ivy Beginner Guide");
      System.out.println(string);
   }
}
Above class is using apache commons lang library to use its class StringUtils. Ivy should download this library and thus it should be defined under dependencies section in ivy.xml. Following is the ivy.xml created in E: > ivy folder.
ivy.xml
<?xml version="1.0" encoding="ISO-8859-1"?>
<ivy-module version="2.0" xmlns:xsi="http://www.w3.org/2001/XMLSchema-instance"
   xsi:noNamespaceSchemaLocation="http://ant.apache.org/ivy/schemas/ivy.xsd">
   <info
      organisation="com.tutorialspoint"
      module="test"
      status="integration">
   </info>
   <dependencies>
      <dependency org="org.apache.commons" name="commons-lang3" rev="3.9"/>
   </dependencies>
</ivy-module>
Following are the important terms.
ivy-module − Root element to identify ivy version, namespace etc.
info − element to identify the project as a unique entity.
organisation − name of the organization
module − name of the module
status − status like release, integration or milestone.
dependencies − element to contain project dependencies as dependency tags which has following attributes.
org − name of the dependency's organization
name − name of the dependency.
rev − version of the dependency.
build.xml
<project name="test" default="resolve" xmlns:ivy="antlib:org.apache.ivy.ant">
   <target name="resolve" description="resolve dependencies">
      <ivy:resolve />
   </target>
</project<
Following are the important terms.
project − Root element to identify project name, default task namespace for ivy etc.
target − target element to create a new task and its description. This contains an ivy resolve task. When ant builds the project, it runs the ivy resolve task which then resolves the dependencies using ivy.
Building the project
As we've all the files ready. Just go the console. Navigate to E: > ivy folder and run the ant command.
E:\ivy > ant
Ivy will come into action, resolving the dependencies, you will see the following result.
Buildfile: E:\ivy\build.xml
resolve:
[ivy:resolve] :: Apache Ivy 2.5.0 - 20191020104435 :: https://ant.apache.org/ivy
/ ::
[ivy:resolve] :: loading settings :: url = jar:file:/E:/Apache/apache-ant-1.9.14
/lib/ivy-2.5.0.jar!/org/apache/ivy/core/settings/ivysettings.xml
[ivy:resolve] :: resolving dependencies :: com.tutorialspoint#test;working@Acer-
PC
[ivy:resolve]   confs: [default]
[ivy:resolve]   found commons-lang#commons-lang;2.6 in public
[ivy:resolve]   found junit#junit;3.8.1 in public
[ivy:resolve] :: resolution report :: resolve 375ms :: artifacts dl 79ms
      ---------------------------------------------------------------------
      |                  |            modules            ||   artifacts   |
      |       conf       | number| search|dwnlded|evicted|| number|dwnlded|
      ---------------------------------------------------------------------
      |      default     |   2   |   2   |   0   |   0   ||   4   |   0   |
      ---------------------------------------------------------------------
[ivy:retrieve] :: retrieving :: com.tutorialspoint#test [sync]
[ivy:retrieve]  confs: [default]
[ivy:retrieve]  0 artifacts copied, 2 already retrieved (0kB/101ms)
BUILD SUCCESSFUL
Total time: 1 second
E:\ivy>
Resolve Output
Following are the important terms.
conf − configuration, in our case we are using default configuration.
modules − indicates the total number of modules, downloaded modules etc.
artifacts − indicates the total number of artifacts, downloaded artifacts etc.
You can verify the downloaded files in ivy cache's default location in ${ivy.default.ivy.user.dir} > .ivy2 > cache folder. And ${ivy.default.ivy.user.dir} is by default user home: $HOME.
Apache IVY - Install Task
Install task is used to install a module and its dependencies in a resolver. It is used when a public artifact is to be downloaded and used in private repository. By default, a user local repository is his/her private repository and is present in ${ivy.default.ivy.user.dir}/local.
Let's create Tester.java, build.xml and ivy.xml as described in IVY - Resolve Task chapter.
Update the build.xml to use the ivy install task.
build.xml
<project name="test" default="resolve" xmlns:ivy="antlib:org.apache.ivy.ant">
   <target name="resolve" description="resolve dependencies">
      <ivy:resolve />
   </target>
   <target name="install" description="install dependencies">
      <ivy:install organisation="commons-lang" module="commons-lang"
         revision="2.6" transitive="true" overwrite="false"
         from="public" to="local" />
   </target>
</project>
Following are the important terms.
organisation − name of the organization.
module − module name of the project.
revision − version of the project.
from − from repository type.
to − to repository type.
Building the project
As we've all the files ready. Just go the console. Navigate to E: > ivy folder and run the ant command.
E:\ivy > ant install
Ivy will come into action, resolving the dependencies, you will see the following result.
E:\ivy > ant install
Buildfile: E:\ivy\build.xml
install:
[ivy:install] :: Apache Ivy 2.5.0 - 20191020104435 :: https://ant.apache.org/ivy
/ ::
[ivy:install] :: loading settings :: url = jar:file:/E:/Apache/apache-ant-1.9.14
/lib/ivy-2.5.0.jar!/org/apache/ivy/core/settings/ivysettings.xml
[ivy:install] :: installing commons-lang#commons-lang;2.6 ::
[ivy:install] :: resolving dependencies ::
[ivy:install]   found commons-lang#commons-lang;2.6 in public
[ivy:install]   found junit#junit;3.8.1 in public
[ivy:install] :: downloading artifacts to cache ::
[ivy:install] :: installing in local ::
[ivy:install]   published commons-lang to C:\Users\Acer\.ivy2\local\commons-lang
\commons-lang\2.6.part\sources\commons-lang.jar
[ivy:install]   published commons-lang to C:\Users\Acer\.ivy2\local\commons-lang
\commons-lang\2.6.part\jars\commons-lang.jar
[ivy:install]   published commons-lang to C:\Users\Acer\.ivy2\local\commons-lang
\commons-lang\2.6.part\javadocs\commons-lang.jar
[ivy:install]   published ivy to C:\Users\Acer\.ivy2\local\commons-lang\commons-
lang\2.6.part\ivys\ivy.xml
[ivy:install]   publish committed: moved C:\Users\Acer\.ivy2\local\commons-lang\
commons-lang\2.6.part
[ivy:install]           to C:\Users\Acer\.ivy2\local\commons-lang\commons-lang\2
.6
[ivy:install]   published junit to C:\Users\Acer\.ivy2\local\junit\junit\3.8.1.p
art\jars\junit.jar
[ivy:install]   published ivy to C:\Users\Acer\.ivy2\local\junit\junit\3.8.1.par
t\ivys\ivy.xml
[ivy:install]   publish committed: moved C:\Users\Acer\.ivy2\local\junit\junit\3
.8.1.part
[ivy:install]           to C:\Users\Acer\.ivy2\local\junit\junit\3.8.1
[ivy:install] :: install resolution report ::
[ivy:install] :: resolution report :: resolve 0ms :: artifacts dl 21ms
      ---------------------------------------------------------------------
      |                  |            modules            ||   artifacts   |
      |       conf       | number| search|dwnlded|evicted|| number|dwnlded|
      ---------------------------------------------------------------------
      |      default     |   2   |   0   |   0   |   0   ||   4   |   0   |
      ---------------------------------------------------------------------
BUILD SUCCESSFUL
Total time: 43 seconds
You can verify the downloaded files in ivy cache's default local repository location ${ivy.default.ivy.user.dir} > .ivy2 > local directory.
Apache IVY - Retrieve Task
retrieve task is used to resolve dependencies to a specified location in project workspace.
Let's create Tester.java, build.xml and ivy.xml as described in IVY - Resolve Task chapter.
Update the build.xml to use the ivy retrieve task.
build.xml
<project name="test" default="resolve" xmlns:ivy="antlib:org.apache.ivy.ant">
   <target name="resolve" description="resolve dependencies">
      <ivy:resolve />
      <ivy:retrieve sync="true" type="jar" />
   </target>
</project>
Following are the important terms.
sync − sync true ensure that lib directory is up-to-date and any extra file gets deleted.
type − type directs ivy to copy only specified type of artifacts like jar. Source jar, javadoc jar will be ignored. type for source jar is src or source and doc or bundle for javadoc jar.
retrieve tasks copies the resolved dependencies in the lib directory of the project by default and can be changed using pattern attribute.
Building the project
As we've all the files ready. Just go the console. Navigate to E: > ivy folder and run the ant command.
E:\ivy > ant
Ivy will come into action, resolving the dependencies, you will see the following result.
Buildfile: E:\ivy\build.xml
resolve:
[ivy:resolve] :: Apache Ivy 2.5.0 - 20191020104435 :: https://ant.apache.org/ivy
/ ::
[ivy:resolve] :: loading settings :: url = jar:file:/E:/Apache/apache-ant-1.9.14
/lib/ivy-2.5.0.jar!/org/apache/ivy/core/settings/ivysettings.xml
[ivy:resolve] :: resolving dependencies :: com.tutorialspoint#test;working@Acer-
PC
[ivy:resolve]   confs: [default]
[ivy:resolve]   found commons-lang#commons-lang;2.6 in public
[ivy:resolve]   found junit#junit;3.8.1 in public
[ivy:resolve] :: resolution report :: resolve 316ms :: artifacts dl 18ms
      ---------------------------------------------------------------------
      |                  |            modules            ||   artifacts   |
      |       conf       | number| search|dwnlded|evicted|| number|dwnlded|
      ---------------------------------------------------------------------
      |      default     |   2   |   2   |   0   |   0   ||   4   |   0   |
      ---------------------------------------------------------------------
[ivy:retrieve] :: retrieving :: com.tutorialspoint#test [sync]
[ivy:retrieve]  confs: [default]
[ivy:retrieve]  0 artifacts copied, 2 already retrieved (0kB/2756ms)
BUILD SUCCESSFUL
Total time: 31 seconds
You can verify the downloaded files in project lib directory.
Apache IVY - Cachepath Task
cachepath task is used to create an ANT classpath with resolved artifacts present in the cache. As ANT needs jars to be classpath to compile java files, Ivy cachepath builds the classpath.
Let's create Tester.java, build.xml and ivy.xml as described in IVY - Resolve Task chapter.
Update the build.xml to use the ivy retrieve task.
build.xml
<project name="test" default="resolve" xmlns:ivy="antlib:org.apache.ivy.ant">
   <target name="resolve" description="resolve dependencies">
      <ivy:resolve />
      <ivy:cachepath pathid="new.classpath" />
   </target>
   <target name="compile" depends="resolve" description="Compile">
      <mkdir dir="build/classes" />
      <javac srcdir="src" destdir="build/classes">
         <classpath refid="new.classpath" />
      </javac>
   </target>
</project>
Following are the important terms.
pathid − id of the classpath where cached jars are present.
retrieve tasks copies the resolved dependencies in the lib directory of the project by default and can be changed using pattern attribute.
Building the project
As we've all the files ready. Just go the console. Navigate to E: > ivy folder and run the ant command.
E:\ivy > ant compile
Ivy will come into action, resolving the dependencies, you will see the following result.
Buildfile: E:\ivy\build.xml
resolve:
[ivy:resolve] :: Apache Ivy 2.5.0 - 20191020104435 :: https://ant.apache.org/ivy
/ ::
[ivy:resolve] :: loading settings :: url = jar:file:/E:/Apache/apache-ant-1.9.14
/lib/ivy-2.5.0.jar!/org/apache/ivy/core/settings/ivysettings.xml
[ivy:resolve] :: resolving dependencies :: com.tutorialspoint#test;working@Acer-
PC
[ivy:resolve]   confs: [default]
[ivy:resolve]   found commons-lang#commons-lang;2.6 in public
[ivy:resolve]   found junit#junit;3.8.1 in public
[ivy:resolve] :: resolution report :: resolve 2314ms :: artifacts dl 15ms
      ---------------------------------------------------------------------
      |                  |            modules            ||   artifacts   |
      |       conf       | number| search|dwnlded|evicted|| number|dwnlded|
      ---------------------------------------------------------------------
      |      default     |   2   |   2   |   0   |   0   ||   4   |   0   |
      ---------------------------------------------------------------------
compile:
   [javac] E:\ivy\build.xml:13: warning: 'includeantruntime' was not set, defau
lting to build.sysclasspath=last; set to false for repeatable builds
   [javac] Compiling 1 source file to E:\ivy\build\classes
BUILD SUCCESSFUL
Total time: 3 seconds
You can verify the compiled class file in project build directory.
Apache IVY - Publish Task
publish task is used to publish current artifacts and its resolved descriptor files to mentioned repository.
Let's create Tester.java, build.xml and ivy.xml as described in IVY - Resolve Task chapter.
Update the build.xml to use the ivy publish task. First we'll create a jar file and then publish it.
build.xml
<project name="test" default="resolve" xmlns:ivy="antlib:org.apache.ivy.ant">
   <property name = "build.dir" value = "build"/>
   <target name="resolve" description="resolve dependencies">
      <ivy:resolve />
   </target>
   <target name = "jar">
      <jar destfile = "${build.dir}/lib/application.jar"
         basedir = "${build.dir}/classes">
         <manifest>
            <attribute name = "Main-Class" value = "com.tutorialspoint.Application"/>
         </manifest>
      </jar>
   </target>
   <target name="publish" depends="jar">
      <ivy:resolve />
      <ivy:publish resolver="local" pubrevision="1.0" overwrite="true">
         <artifacts pattern="${build.dir}/lib/[artifact].[ext]" />
      </ivy:publish>
   </target>
</project>
Following are the important terms.
resolver − resolver to be used for publication.
pattern − pattern to locate the artifact.
Here publish task first build the jar, then resolve the dependencies, set the information and then publish the artifact to local repository.
Building the project
As we've all the files ready. Just go the console. Navigate to E: > ivy folder and run the ant command.
E:\ivy > ant publish
Ivy will come into action, resolving the dependencies, you will see the following result.
E:\ivy > ant publish
Buildfile: E:\ivy\build.xml
jar:
publish:
[ivy:resolve] :: Apache Ivy 2.5.0 - 20191020104435 :: https://ant.apache.org/ivy
/ ::
[ivy:resolve] :: loading settings :: url = jar:file:/E:/Apache/apache-ant-1.9.14
/lib/ivy-2.5.0.jar!/org/apache/ivy/core/settings/ivysettings.xml
[ivy:resolve] :: resolving dependencies :: com.tutorialspoint#test;1.0.0
[ivy:resolve]   confs: [default]
[ivy:resolve]   found commons-lang#commons-lang;2.6 in public
[ivy:resolve]   found junit#junit;3.8.1 in public
[ivy:resolve] :: resolution report :: resolve 121ms :: artifacts dl 15ms
      ---------------------------------------------------------------------
      |                  |            modules            ||   artifacts   |
      |       conf       | number| search|dwnlded|evicted|| number|dwnlded|
      ---------------------------------------------------------------------
      |      default     |   2   |   2   |   0   |   0   ||   4   |   0   |
      ---------------------------------------------------------------------
[ivy:publish] :: publishing :: com.tutorialspoint#test
[ivy:publish]   published application to C:\Users\Acer\.ivy2\local\com.tutorials
point\test\1.0\jars\application.jar
[ivy:publish]   published ivy to C:\Users\Acer\.ivy2\local\com.tutorialspoint\te
st\1.0\ivys\ivy.xml
BUILD SUCCESSFUL
Total time: 1 second
You can verify the publish ivy artifacts in local repository.
Apache IVY - Info Task
info task is used to set ivy specific information in a file and can be used without any dependency resolution.
Let's create Tester.java, build.xml and ivy.xml as described in IVY - Resolve Task chapter.
Update the build.xml to use the ivy publish task. First we'll create a jar file and then publish it. Before publish task, we've set the required ivy information using info task.
build.xml
<project name="test" default="resolve" xmlns:ivy="antlib:org.apache.ivy.ant">
   <property name = "build.dir" value = "build"/>
   <target name="resolve" description="resolve dependencies">
      <ivy:resolve />
   </target>
   <target name = "jar">
      <jar destfile = "${build.dir}/lib/application.jar"
         basedir = "${build.dir}/classes">
         <manifest>
            <attribute name = "Main-Class" value = "com.tutorialspoint.Application"/>
         </manifest>
      </jar>
   </target>
   <target name="publish" depends="jar">
      <ivy:info file="ivy.xml" />
      <ivy:publish resolver="local" pubrevision="1.0" overwrite="true">
         <artifacts pattern="${build.dir}/lib/[artifact].[ext]" />
      </ivy:publish>
   </target>
</project>
Here publish task first build the jar, then set the information using ivy:info task and then publish the artifact to local repository.
Building the project
As we've all the files ready. Just go the console. Navigate to E: > ivy folder and run the ant command.
E:\ivy > ant publish
Ivy will come into action, resolving the dependencies, you will see the following result.
Buildfile: E:\ivy\build.xml
jar:
publish:
 [ivy:info] :: Apache Ivy 2.5.0 - 20191020104435 :: https://ant.apache.org/ivy/
::
 [ivy:info] :: loading settings :: url = jar:file:/E:/Apache/apache-ant-1.9.14/l
ib/ivy-2.5.0.jar!/org/apache/ivy/core/settings/ivysettings.xml
[ivy:publish] :: publishing :: com.tutorialspoint#test
[ivy:publish]   published application to C:\Users\Acer\.ivy2\local\com.tutorials
point\test\1.0\jars\application.jar
[ivy:publish]   published ivy to C:\Users\Acer\.ivy2\local\com.tutorialspoint\te
st\1.0\ivys\ivy.xml
BUILD SUCCESSFUL
Total time: 0 seconds
If we do not put the info task then publish task will not work. Use the below modified build.xml and see the error for missing organization attribute and so on.
build.xml
<project name="test" default="resolve" xmlns:ivy="antlib:org.apache.ivy.ant">
   <property name = "build.dir" value = "build"/>
   <target name="resolve" description="resolve dependencies">
      <ivy:resolve />
   </target>
   <target name = "jar">
      <jar destfile = "${build.dir}/lib/application.jar"
         basedir = "${build.dir}/classes">
         <manifest>
            <attribute name = "Main-Class" value = "com.tutorialspoint.Application"/>
         </manifest>
      </jar>
   </target>
   <target name="publish" depends="jar">
      <ivy:publish resolver="local" pubrevision="1.0" overwrite="true">
         <artifacts pattern="${build.dir}/lib/[artifact].[ext]" />
      </ivy:publish>
   </target>
</project>
Navigate to E: > ivy folder and run the ant command.
E:\ivy > ant publish
Ivy will come into action, resolving the dependencies, you will see the following result.
Buildfile: E:\ivy\build.xml
jar:
publish:
[ivy:publish] :: Apache Ivy 2.5.0 - 20191020104435 :: https://ant.apache.org/ivy
/ ::
[ivy:publish] :: loading settings :: url = jar:file:/E:/Apache/apache-ant-1.9.14
/lib/ivy-2.5.0.jar!/org/apache/ivy/core/settings/ivysettings.xml
BUILD FAILED
E:\ivy\build.xml:28: no organisation provided for ivy publish task: It can eithe
r be set explicitly via the attribute 'organisation' or via 'ivy.organisation' p
roperty or a prior call to <resolve/>
Total time: 3 seconds
Apache IVY - Resolvers
Resolvers are used to find locations from where a library is to be downloaded. A dependency resolver also handles common tasks. Ivy provides two types of Resolvers.
Composite − A resolver which uses other resolvers to do its tasks.
Standard − A resolver performs the required tasks.
Standard Resolvers
Following table lists down the standard resolvers and their usage.
| Sr.No. | Name (Type) & Description |
|---|---|
| 1 | IvyRep (Standard) Locates Ivy files on ivyrep and artifacts on ibiblio. |
| 2 | IBiblio (Standard) Locates artifacts on ibiblio. |
| 3 | BinTray (Standard) Locates artifacts on bintray. |
| 4 | Packager (Standard) Locates Ivy files and packaging instructions via URLs, creates artifacts using instructions. |
| 5 | FileSystem (Standard) Locates Ivy files and artifacts on local file system. |
| 6 | URL (Standard) Locates Ivy files and artifacts on repositories which can be accessed using URLs. |
| 7 | MirroredURL (Standard) Locates Ivy files and artifacts on repositories which can be accessed using URLs from a mirror list. |
| 8 | VFS (Standard) Locates Ivy files and artifacts on repositories which can be accessed using Apache Commons VFS. |
| 9 | SSH (Standard) Locates Ivy files and artifacts on repositories which can be accessed using SSH. |
| 10 | SFTP (Standard) Locates Ivy files and artifacts on repositories which can be accessed using SFTP. |
| 11 | Jar (Standard) Locates Ivy files and artifacts on repositories within a jar. |
| 12 | Chain (Composite) Delegates the search to a chain of sub resolvers. |
| 13 | Dual (Composite) Delegates the search to a one resolver and artifacts to another. |
| 14 | OBR (Standard) Resolve modules as OSGi bundles listed by an OSGi obr.xml. |
| 15 | Eclipse updatesite (Standard) Resolve modules as OSGi bundles which are hosted on an Eclipse update site. |
| 16 | OSGi-agg (Composite) Delegates the search to a chain of sub resolvers supporting OSGi bundles. |
Let's create Tester.java, build.xml and ivy.xml in a new project under E: > ivy2 folder similar to as described in IVY - Resolve Task chapter. Create a settings folder under E: > ivy2. Create the ivysettings.xml in the settings folder.
build.xml
<project name="test" default="resolve" xmlns:ivy="antlib:org.apache.ivy.ant">
   <property name = "build.dir" value = "build"/>
   <property name = "base.dir" value = ""/>
   <target name="resolve" description="resolve dependencies">
      <ivy:resolve />
   </target>
   <target name="compile" depends="resolve" description="Compile">
      <mkdir dir="build/classes" />
      <javac srcdir="src" destdir="build/classes">
         <classpath refid="new.classpath" />
      </javac>
   </target>
</project>
ivy.xml
<?xml version="1.0" encoding="ISO-8859-1"?>
<ivy-module version="2.0" xmlns:xsi="http://www.w3.org/2001/XMLSchema-instance"
   xsi:noNamespaceSchemaLocation="http://ant.apache.org/ivy/schemas/ivy.xsd">
   <info organisation="org.apache" module="chained-resolvers"/>
   <dependencies>
      <dependency org="commons-lang" name="commons-lang" rev="2.6" conf="default"/>
      <dependency org="com.tutorialspoint" name="test" rev="1.0"/>
   </dependencies>
</ivy-module>
Here we've added two dependencies,one of commons-lang library and another as test which we published in IVY - Publish Task chapter.
ivysettings.xml
<ivysettings>
   <settings defaultResolver="multiresolver"/>
   <resolvers>
      <chain name="multiresolver">
         <filesystem name="libraries">
            <artifact pattern="${ivy.settings.dir}/repository/[artifact]-[revision].[ext]"/>
         </filesystem>
         <ibiblio name="ibiblio" m2compatible="true"/>
      </chain>
   </resolvers>
</ivysettings>
Here we've added created a composite resolver using chain resolver which has two resolver, one named libraries to locate libaries on local repository and one named ibiblio on maven public repository.
Building the project
As we've all the files ready. Just go the console. Navigate to E: > ivy2 folder and run the ant command.
E:\ivy > ant
Ivy will come into action, resolving the dependencies, you will see the following result.
Buildfile: E:\ivy2\build.xml
resolve:
[ivy:resolve] :: Apache Ivy 2.5.0 - 20191020104435 :: https://ant.apache.org/ivy
/ ::
[ivy:resolve] :: loading settings :: url = jar:file:/E:/Apache/apache-ant-1.9.14
/lib/ivy-2.5.0.jar!/org/apache/ivy/core/settings/ivysettings.xml
[ivy:resolve] :: resolving dependencies :: org.apache#chained-resolvers;working@
Acer-PC
[ivy:resolve]   confs: [default]
[ivy:resolve]   found commons-lang#commons-lang;2.6 in public
[ivy:resolve]   found com.tutorialspoint#test;1.0 in local
[ivy:resolve]   found junit#junit;3.8.1 in public
[ivy:resolve] downloading C:\Users\Acer\.ivy2\local\com.tutorialspoint\test\1.0\
jars\application.jar ...
[ivy:resolve] .. (1kB)
[ivy:resolve] .. (0kB)
[ivy:resolve]   [SUCCESSFUL ] com.tutorialspoint#test;1.0!application.jar (13ms)
[ivy:resolve] :: resolution report :: resolve 1085ms :: artifacts dl 22ms
      ---------------------------------------------------------------------
      |                  |            modules            ||   artifacts   |
      |       conf       | number| search|dwnlded|evicted|| number|dwnlded|
      ---------------------------------------------------------------------
      |      default     |   3   |   3   |   1   |   0   ||   5   |   1   |
      ---------------------------------------------------------------------
BUILD SUCCESSFUL
Total time: 9 seconds
In the logs you can verify that we have used both local and public repository resolvers.
Apache IVY - Local Repository
A local repository is a private repository of a user. It is very useful in case a user is using a library whose version has been changed on other places and have breaking changes. In case of local repository, ivy will use the library present in the local if found and will not look into public or shared repositories.
Default Location
By default, local repository is present in ${ivy.default.ivy.user.dir}/local folder. If you want to change it, the use the ivy.local.default.root variable in ant file.
build.xml
<target name="resolve">
   <property name="ivy.local.default.root" value="/opt/ivy/repository/local"/>
   <ivy:resolve />
</target>
Other properties like ivy pattern and artifact pattern can also be customized as follows −
build.xml
<target name="resolve">
   <property name="ivy.local.default.root" value="/opt/ivy/repository/local"/>
   <property name="ivy.local.default.ivy.pattern" value="[module]/[revision]/ivy.xml"/>
   <property name="ivy.local.default.artifact.pattern" value="[module]/[revision]/[artifact].[ext]"/>
   <ivy:resolve />
</target>
Overriding ivysettings defaults
By default ivy has its configurations in ivysettings.xml present in ivy.jar.
ivysettings.xml
<ivysettings>
   <settings defaultResolver="default"/>
   <include url="${ivy.default.settings.dir}/ivysettings-public.xml"/>
   <include url="${ivy.default.settings.dir}/ivysettings-shared.xml"/>
   <include url="${ivy.default.settings.dir}/ivysettings-local.xml"/>
   <include url="${ivy.default.settings.dir}/ivysettings-main-chain.xml"/>
   <include url="${ivy.default.settings.dir}/ivysettings-default-chain.xml"/>
</ivysettings>
To override local repository setting, update the contents of ivysettings-local.xml.
ivysettings-local.xml
<ivysettings>
   <property name="ivy.local.default.root" value="${ivy.default.ivy.user.dir}/local" override="false"/>
   <property name="ivy.local.default.ivy.pattern" value="[organisation]/[module]/[revision]/[type]s/[artifact].[ext]" override="false"/>
   <property name="ivy.local.default.artifact.pattern" value="[organisation]/[module]/[revision]/[type]s/[artifact].[ext]" override="false"/>
   <resolvers>
      <filesystem name="local">
         <ivy pattern="${ivy.local.default.root}/${ivy.local.default.ivy.pattern}" />
         <artifact pattern="${ivy.local.default.root}/${ivy.local.default.artifact.pattern}" />
      </filesystem>
   </resolvers>
</ivysettings>
Apache IVY - Shared Repository
A shared repository is a team level shared repository of a team. It is very common to be overridden in organizations.
Default Location
By default, shared repository is present in ${ivy.default.ivy.user.dir}/shared folder. If you want to change it, the use the ivy.shared.default.root variable in ant file.
build.xml
<target name="resolve">
   <property name="ivy.shared.default.root" value="/opt/ivy/repository/shared"/>
   <ivy:resolve />
</target>
Other properties like ivy pattern and artifact pattern can also be customized as follows −
build.xml
<target name="resolve">
   <property name="ivy.shared.default.root" value="/opt/ivy/repository/shared"/>
   <property name="ivy.shared.default.ivy.pattern" value="[organisation]/[module]/[revision]/ivy.xml"/>
   <property name="ivy.shared.default.artifact.pattern" value="[organisation]/[module]/[revision]/[artifact].[ext]"/>
   <ivy:resolve />
</target>
Overriding ivysettings defaults
By default ivy has its configurations in ivysettings.xml present in ivy.jar.
ivysettings.xml
<ivysettings>
   <settings defaultResolver="default"/>
   <include url="${ivy.default.settings.dir}/ivysettings-public.xml"/>
   <include url="${ivy.default.settings.dir}/ivysettings-shared.xml"/>
   <include url="${ivy.default.settings.dir}/ivysettings-local.xml"/>
   <include url="${ivy.default.settings.dir}/ivysettings-main-chain.xml"/>
   <include url="${ivy.default.settings.dir}/ivysettings-default-chain.xml"/>
</ivysettings>
To override shared repository setting, update the contents of ivysettings-shared.xml.
ivysettings-shared.xml
<ivysettings>
   <property name="ivy.shared.default.root" value="${ivy.default.ivy.user.dir}/shared" override="false"/>
   <property name="ivy.shared.default.ivy.pattern" value="[organisation]/[module]/[revision]/[type]s/[artifact].[ext]" override="false"/>
   <property name="ivy.shared.default.artifact.pattern" value="[organisation]/[module]/[revision]/[type]s/[artifact].[ext]" override="false"/>
   <resolvers>
      <filesystem name="shared">
         <ivy pattern="${ivy.shared.default.root}/${ivy.shared.default.ivy.pattern}" />
         <artifact pattern="${ivy.shared.default.root}/${ivy.shared.default.artifact.pattern}" />
      </filesystem>
   </resolvers>
</ivysettings>
Apache IVY - Public repository
A public repository is a repository accessible using internet and have third party modules. By default ibiblio in m2 compatible mode is the public repository. It is also referred as maven 2 public repository.
Overriding ivysettings defaults
By default ivy has its configurations in ivysettings.xml present in ivy.jar.
ivysettings.xml
<ivysettings>
   <settings defaultResolver="default"/>
   <include url="${ivy.default.settings.dir}/ivysettings-public.xml"/>
   <include url="${ivy.default.settings.dir}/ivysettings-shared.xml"/>
   <include url="${ivy.default.settings.dir}/ivysettings-local.xml"/>
   <include url="${ivy.default.settings.dir}/ivysettings-main-chain.xml"/>
   <include url="${ivy.default.settings.dir}/ivysettings-default-chain.xml"/>
</ivysettings>
To override public repository setting, update the contents of ivysettings-public.xml or create the ivysettings.xml in setting folder of your project.
ivysettings.xml
<ivysettings>
   <settings defaultResolver="default"/>
   <include url="http://customserver/ivy/ivysettings-public.xml"/>
   <include url="${ivy.default.settings.dir}/ivysettings-shared.xml"/>
   <include url="${ivy.default.settings.dir}/ivysettings-local.xml"/>
   <include url="${ivy.default.settings.dir}/ivysettings-main-chain.xml"/>
   <include url="${ivy.default.settings.dir}/ivysettings-default-chain.xml"/>
</ivysettings>
Update the default ivysetting-public.xml contents.
Original - ivysetting-public.xml
<ivysettings>
   <resolvers>
      <ibiblio name="public" m2compatible="true"/>
   </resolvers>
</ivysettings>
Updated - ivysetting-public.xml
<ivysettings>
   <resolvers>
      <filesystem name="public">
         <ivy pattern="/path/to/my/public/rep/[organisation]/[module]/ivy-[revision].xml" />
         <artifact pattern="/path/to/my/public/rep/[organisation]/[module]/[artifact]-[revision].[ext]" />
      </filesystem>
   </resolvers>
</ivysettings>
