- AWS - Cloud Computing
- AWS - Basic Architecture
- AWS - Management Console
- AWS - Console Mobile App
- AWS - Account
- Amazon Computer Services
- AWS - Elastic Compute Cloud
- AWS - Auto Scaling
- AWS - WorkSpaces
- AWS - Lambda
- Amazon Network Services
- AWS - Virtual Private Cloud
- AWS - Route 53
- AWS - Direct Connect
- Amazon Storage Services
- AWS - Amazon S3
- AWS - Elastic Block Store
- AWS - Storage Gateway
- AWS - CloudFront
- Amazon Database Services
- AWS - Relational Database Service
- AWS - DynamoDB
- AWS - Redshift
- Amazon Analytics Services
- AWS - Amazon Kinesis
- AWS - Elastic MapReduce
- AWS - Data Pipeline
- AWS - Machine Learning
- Amazon Application Services
- AWS - Simple WorkFlow Service
- AWS - WorkMail
- Amazon Web Services Resources
- AWS - Quick Guide
- AWS - Useful Resources
- AWS - Discussion
Amazon Web Services - Virtual Private Cloud
Amazon Virtual Private Cloud (VPC) allows the users to use AWS resources in a virtual network. The users can customize their virtual networking environment as they like, such as selecting own IP address range, creating subnets, and configuring route tables and network gateways.
The list of AWS services that can be used with Amazon VPC are −
- Amazon EC2
- Amazon Route 53
- Amazon WorkSpaces
- Auto Scaling
- Elastic Load Balancing
- AWS Data Pipeline
- Elastic Beanstalk
- Amazon Elastic Cache
- Amazon EMR
- Amazon OpsWorks
- Amazon RDS
- Amazon Redshift
How to Use Amazon VPC?
Following are the steps to create VPC.
Create VPC
Step 1 − Open the Amazon VPC console by using the following link − https://console.aws.amazon.com/vpc/
Step 2 − Select creating the VPC option on the right side of the navigation bar. Make sure that the same region is selected as for other services.
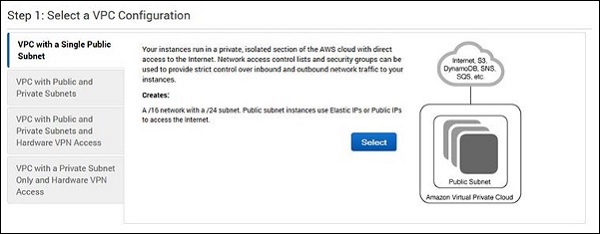
Step 3 − Click the start VPC wizard option, then click VPC with single public subnet option on the left side.
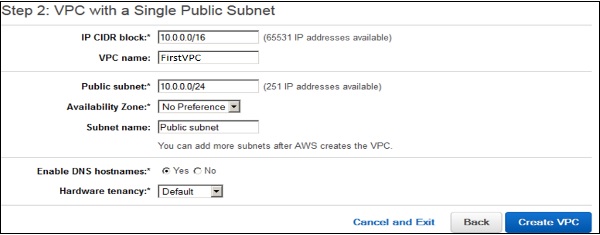
Step 4 − A configuration page will open. Fill in the details like VPC name, subnet name and leave the other fields as default. Click the Create VPC button.
Step 5 − A dialog box will open, showing the work in progress. When it is completed, select the OK button.
The Your VPCs page opens which shows a list of available VPCs. The setting of VPC can be changed here.

Select/Create VPC Group
Step 1 − Open the Amazon VPC console by using the following link − https://console.aws.amazon.com/vpc/
Step 2 − Select the security groups option in the navigation bar, then choose create security group option.
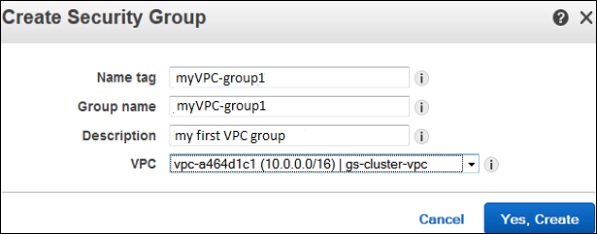
Step 3 − A form will open, enter the details like group name, name tag, etc. Select ID of your VPC from VPC menu, then select the Yes, create button.
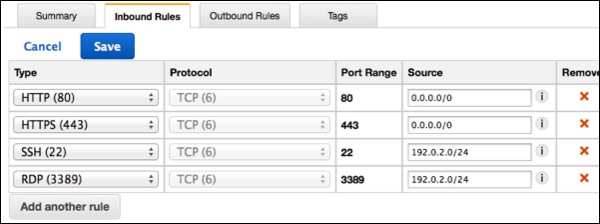
Step 4 − The list of groups opens. Select the group name from the list and set rules. Then click the Save button.
Launch Instance into VPC
Step 1 − Open the Amazon VPC console using the following link − https://console.aws.amazon.com/vpc/
Step 2 − Select the same region as while creating VPC and security group.
Step 3 − Now select the Launch Instance option in the navigation bar.
Step 4 − A page opens. Choose the AMI which is to be used.
Step 5 − A new page opens. Choose an Instance Type and select the hardware configuration. Then select Next: Configure Instance Details.
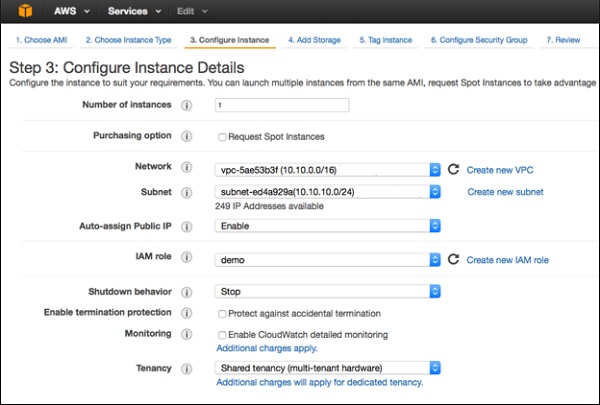
Step 6 − Select the recently created VPC from the Network list, and the subnet from the Subnet list. Leave the other settings as default and click Next till the Tag Instance page.
Step 7 − On the Tag Instance page, tag the instance with the Name tag. This helps to identify your instance from the list of multiple instances. Click Next: Configure Security Group.
Step 8 − On the Configure Security Group page, select the recently created group from the list. Then, select Review and Launch button.
Step 9 − On the Review Instance Launch page, check your instance details, then select Launch.
Step 10 − A dialog box appears. Choose the option Select an existing key pair or create a new key pair, then click the Launch Instances button.
Step 11 − The confirmation page open which shows all the details related to instances.
Assign Elastic IP Address to VPC Instances
Step 1 − Open the Amazon VPC console using the following link − https://console.aws.amazon.com/vpc/
Step 2 − Select Elastic IPs option in the navigation bar.
Step 3 − Select Allocate New Address. Then select Yes, Allocate button.
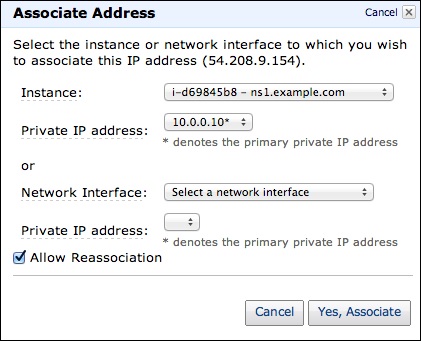
Step 4 − Select your Elastic IP address from the list, then select Actions, and then click the Associate Address button.
Step 5 − A dialog box will open. First select the Instance from the Associate with list. Then select your instance from the Instance list. Finally click the Yes, Associate button.
Delete a VPC
There are several steps to delete VPC without losing any resources associated with it. Following are the steps to delete a VPC.
Step 1 − Open the Amazon VPC console using the following link − https://console.aws.amazon.com/vpc/
Step 2 − Select Instances option in the navigation bar.
Step 3 − Select the Instance from the list, then select the Actions → Instance State → Terminate button.
Step 4 − A new dialog box opens. Expand the Release attached Elastic IPs section, and select the checkbox next to the Elastic IP address. Click the Yes, Terminate button.
Step 5 − Again open the Amazon VPC console using the following link − https://console.aws.amazon.com/vpc/
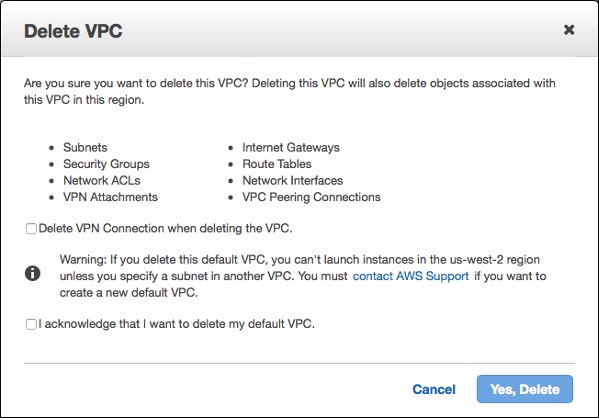
Step 6 − Select the VPC from the navigation bar. Then select Actions & finally click the Delete VPC button.
Step 7 − A confirmation message appears. Click the Yes, Delete button.
Features of VPC
Many connectivity options − There are various connectivity options that exist in Amazon VPC.
Connect VPC directly to the Internet via public subnets.
Connect to the Internet using Network Address Translation via private subnets.
Connect securely to your corporate datacenter via encrypted IPsec hardware VPN connection.
Connect privately to other VPCs in which we can share resources across multiple virtual networks through AWS account.
Connect to Amazon S3 without using an internet gateway and have good control over S3 buckets, its user requests, groups, etc.
Combine connection of VPC and datacenter is possible by configuring Amazon VPC route tables to direct all traffic to its destination.
Easy to use − Ease of creating a VPC in very simple steps by selecting network set-ups as per requirement. Click "Start VPC Wizard", then Subnets, IP ranges, route tables, and security groups will be automatically created.
Easy to backup data − Periodically backup data from the datacenter into Amazon EC2 instances by using Amazon EBS volumes.
Easy to extend network using Cloud − Move applications, launch additional web servers and increase storage capacity by connecting it to a VPC.
