- AWS - Cloud Computing
- AWS - Basic Architecture
- AWS - Management Console
- AWS - Console Mobile App
- AWS - Account
- Amazon Computer Services
- AWS - Elastic Compute Cloud
- AWS - Auto Scaling
- AWS - WorkSpaces
- AWS - Lambda
- Amazon Network Services
- AWS - Virtual Private Cloud
- AWS - Route 53
- AWS - Direct Connect
- Amazon Storage Services
- AWS - Amazon S3
- AWS - Elastic Block Store
- AWS - Storage Gateway
- AWS - CloudFront
- Amazon Database Services
- AWS - Relational Database Service
- AWS - DynamoDB
- AWS - Redshift
- Amazon Analytics Services
- AWS - Amazon Kinesis
- AWS - Elastic MapReduce
- AWS - Data Pipeline
- AWS - Machine Learning
- Amazon Application Services
- AWS - Simple WorkFlow Service
- AWS - WorkMail
- Amazon Web Services Resources
- AWS - Quick Guide
- AWS - Useful Resources
- AWS - Discussion
Amazon Web Services - Auto Scaling
As the name suggests, auto scaling allows you to scale your Amazon EC2 instances up or down automatically as per the instructions set by the user. Parameters like minimum and maximum number of instances are set by the user. Using this, the number of Amazon EC2 instances youre using increases automatically as the demand rises to maintain the performance, and decreases automatically as the demand decreases to minimize the cost.
Auto Scaling is particularly effective for those applications that fluctuate on hourly, daily, or weekly usage. Auto Scaling is enabled by Amazon CloudWatch and is available at no extra cost. AWS CloudWatch can be used to measure CPU utilization, network traffic, etc.
Elastic Load Balancing
Elastic Load Balancing (ELB) automatically distributes incoming request traffic across multiple Amazon EC2 instances and results in achieving higher fault tolerance. It detects unfit instances and automatically reroutes traffic to fit instances until the unfit instances have been restored in a round-robin manner. However, if we need more complex routing algorithms, then choose other services like Amazon Route53.
ELB consists of the following three components.
Load Balancer
This includes monitoring and handling the requests incoming through the Internet/intranet and distributes them to EC2 instances registered with it.
Control Service
This includes automatically scaling of handling capacity in response to incoming traffic by adding and removing load balancers as required. It also performs fitness check of instances.
SSL Termination
ELB provides SSL termination that saves precious CPU cycles, encoding and decoding SSL within your EC2 instances attached to the ELB. An X.509 certificate is required to be configured within the ELB. This SSL connection in the EC2 instance is optional, we can also terminate it.
Features of ELB
Following are the most prominent features of ELB −
ELS is designed to handle unlimited requests per second with gradually increasing load pattern.
We can configure EC2 instances and load balancers to accept traffic.
We can add/remove load balancers as per requirement without affecting the overall flow of information.
It is not designed to handle sudden increase in requests like online exams, online trading, etc.
Customers can enable Elastic Load Balancing within a single Availability Zone or across multiple zones for even more consistent application performance.
How to Create Load Balancers?
Step 1 − Go to Amazon EC2 console using this link − https://console.aws.amazon.com/ec2/.
Step 2 − Select your load balancer region from the region menu on the right side.
Step 3 − Select Load Balancers from the navigation pane and choose Create Load Balancer option. A pop-up window will open and we need to provide the required details.
Step 4 − In load Balancer name box: Enter name of your load balancer.
Step 5 − In create LB inside box: Select the same network which you have selected for instances.
Step 6 − Select Enable advanced VPC configuration, if selected default VPC.
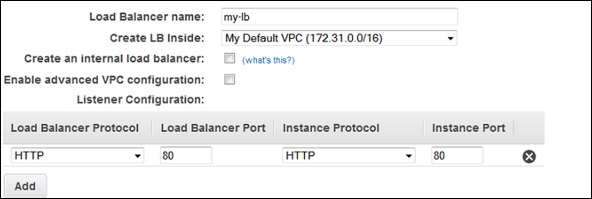
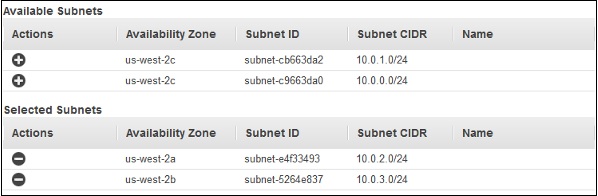
Step 7 − Click the Add button and a new pop-up will appear to select subnets from the list of available subnets as shown in the following screenshot. Select only one subnet per availability zone. This window will not appear if we do not select Enable advanced VPC configuration.
Step 8 − Choose Next; a pop-up window will open. After selecting a VPC as your network, assign security groups to Load Balancers.
Step 9 − Follow the instructions to assign security groups to load balancers and click Next.
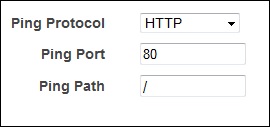
Step 10 − A new pop-up will open having health checkup configuration details with default values. Values can be set on our own, however these are optional. Click on Next: Add EC2 Instances.
Step 11 − A pop-up window will open having information about instances like registered instances, add instances to load balancers by selecting ADD EC2 Instance option and fill the information required. Click Add Tags.
Step 12 − Adding tags to your load balancer is optional. To add tags click the Add Tags Page and fill the details such as key, value to the tag. Then choose Create Tag option. Click Review and Create button.
A review page opens on which we can verify the setting. We can even change the settings by choosing the edit link.
Step 13 − Click Create to create your load balancer and then click the Close button.
How to Delete a Load Balancer?
Step 1 − Go to Amazon EC2 console using this link − https://console.aws.amazon.com/ec2/.
Step 2 − Choose Load Balancers option from the navigation pane.
Step 3 − Select Load balancer and click the Action button.
Step 4 − Click the Delete button. An alert window will appear, click the Yes, Delete button.
