 Data Structure
 Networking
 RDBMS
RDBMS Operating System
 Java
Java MS Excel
 iOS
iOS HTML
HTML CSS
CSS Android
 Python
 C Programming
 C++
C++ C#
C# MongoDB
 MySQL
MySQL Javascript
 PHP
PHP
- Selected Reading
- UPSC IAS Exams Notes
- Developer's Best Practices
- Questions and Answers
- Effective Resume Writing
- HR Interview Questions
- Computer Glossary
- Who is Who
What is a programmed I/O?
It is one of the simplest forms of I/O where the CPU has to do all the work. This technique is called programmed I/O.
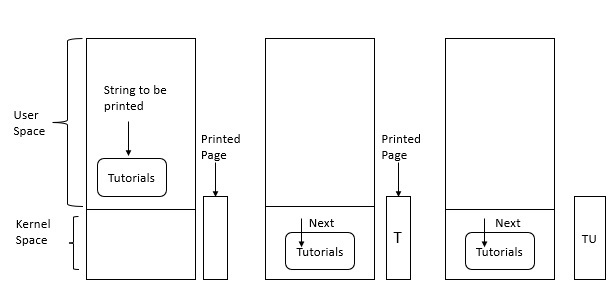
Consider a user process that wants to print the Nine-character string ‘‘TUTORIALS’’ on the printer with the help of a serial interface.
The software first assembles the string in a buffer in user space, as shown in the figure −

Explanation
Step 1 − The user process acquires the printer for writing by using a system call to open it.
Step 2 − If the printer is currently in use by another process, this system call fails and returns an error code or it blocks until the printer is available, depending on the operating system and the parameters of the call.
Step 3 − Once the printer is available, the user process makes a system call telling the operating system to print the string on the printer.
Step 4 − The operating system generally copies the buffer with the string to an array.
Step 5 − It then checks to see if the printer is currently available. If not, it waits until it is. Whenever the printer is available, the operating system copies the first character to the printer’s data register, In the above example use memory-mapped I/O. This action activates the printer. The character does not appear still, because some printers buffer a line or a page before printing anything.
Step 6 − In the next figure, we see that the first character has been printed and that the system has marked the ‘‘U’’ as the next character to be printed.
Step 7 − Whenever it has copied the first character to the printer, the operating system checks to see if the printer is ready to accept another one.
Step 8 − Generally, the printer has a second register, which gives its status. The act of writing to the data register causes the status to become not ready.
Step 9 − When the printer controller has processed the current character, it indicates its availability by setting some bit in its status register or putting some value in it.
Step 10 − At this point the operating system waits for the printer to become ready again.
Step 11 − It prints the next character, as shown in the third figure.
Step 12 − This loop continues till the entire string has been printed.
Step 13 − Then control returns to the user process.

