
Article Categories
- All Categories
-
 Data Structure
-
 Networking
-
 RDBMS
RDBMS
-
 Operating System
-
 Java
Java
-
 MS Excel
-
 iOS
iOS
-
 HTML
HTML
-
 CSS
CSS
-
 Android
-
 Python
-
 C Programming
-
 C++
C++
-
 C#
C#
-
 MongoDB
-
 MySQL
MySQL
-
 Javascript
-
 PHP
PHP
-
 Economics & Finance
Using NoSQl Database with IOT
NoSql databases are those databases that do not store the data as data is stored in relational databases. Most of the data that is used in real life is often unstructured. These NoSQL databases provide an easy way to store this unstructured data by using key-value pairs. In this article, a NoSQL database called Firebase is used with a C program that controls the IOT circuit. The article presents the writing of the values to the firebase and getting the values from the firebase in real time and using those for controlling the circuit components.
Connecting the Firebase, Wifi, C program, and the Circuit
First, the circuit is made and an LED is used. Then the led of the circuit is made HIGH and LOW and it will be controlled by a C program that is written in Arduino IDE. Then this C program is to be connected with a noSQL firebase real-time database. For this, the connection will be made using the internet and wifi. The LED_STATUS is stored in the real-time database of firebase, its value is fetched and then depending on the value that is read, LED will be turned ON or OFF by the C program. The result can be seen on the circuit, on the serial monitor, and on the firebase itself.
Task 1: Making the circuit.
The circuit is made using one led, one resistor, one microcontroller (ESP32), a breadboard, and some wires.
Circuit Design Steps:
Step 1 ? Connect the ESP32 microcontroller to the breadboard.
Step 2 ? Attach the breadboard negative rail to the ESP32?s GND.
Step 3 ? Use an LED. Connect the smaller leg of the LED to the blue rail directly and the other line to the resistor. Now connect the resistor?s pins to the ESP32 pin (D18 )
The Circuit
The circuit is made with one LED and ESP32. Yellow wire is connected to D18 pin.
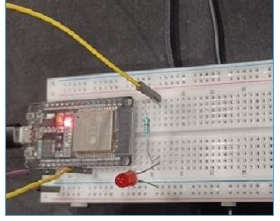
Fig 1: The circuit on the breadboard.
Task 2: Write the program in C using Arduino.
Step 1 ? Download Arduino IDE if it is not installed on the Computer and set it ups.
Step 2 ? Start Arduino IDE. Write the C program and compile it using the tick sign.
Step 3 ? Upload the program to ESP32 by pressing the right arrow near the tick sign.
The Code
//Libraries included
#include <Arduino.h>
//Library for wifi
#include <WiFi.h>
//Libraries for Firebase connectivity
#include <Firebase_ESP_Client.h>
#include <addons/TokenHelper.h>
#include <addons/RTDBHelper.h>
#define WIFI_SSID "TYPE YOUR wifi_SSID HERE"
#define WIFI_PASSWORD " TYPE YOUR wifi_PASSWORD HERE "
#define API_KEY " TYPE YOUR API_KEY HERE "
#define DATABASE_URL " TYPE YOUR DATABASE_URL HERE "
#define USER_EMAIL " TYPE YOUR authentication_EMAIL HERE "
#define USER_PASSWORD " TYPE YOUR authentication_PASSWORD HERE "
FirebaseData fdata;
FirebaseAuth auth;
FirebaseConfig config;
//The fetched led status from the Firebase real-time database
String fireStatus = "";
//led is connected to D18 pin of ESP32
int led = 18;
void setup(){
//set the baud rate
Serial.begin(115200);
//set the led pin as output
pinMode(led, OUTPUT);
// start the wifi connection
WiFi.begin(WIFI_SSID, WIFI_PASSWORD);
Serial.print("Connecting to Wi-Fi");
while (WiFi.status() != WL_CONNECTED){
Serial.print(".");
delay(300);
}
Serial.println();
Serial.print("Connected with IP: ");
//Display the localIP here
Serial.println(WiFi.localIP());
Serial.println();
Serial.printf("Firebase Client v%s<br><br>", FIREBASE_CLIENT_VERSION);
//These are required to make a connection with the real-time database
config.api_key = API_KEY;
auth.user.email = USER_EMAIL;
auth.user.password = USER_PASSWORD;
config.database_url = DATABASE_URL;
config.token_status_callback = tokenStatusCallback;
fdata.setResponseSize(2048);
Firebase.begin(&config, &auth);
Firebase.reconnectWiFi(true);
config.timeout.serverResponse = 10 * 1000;
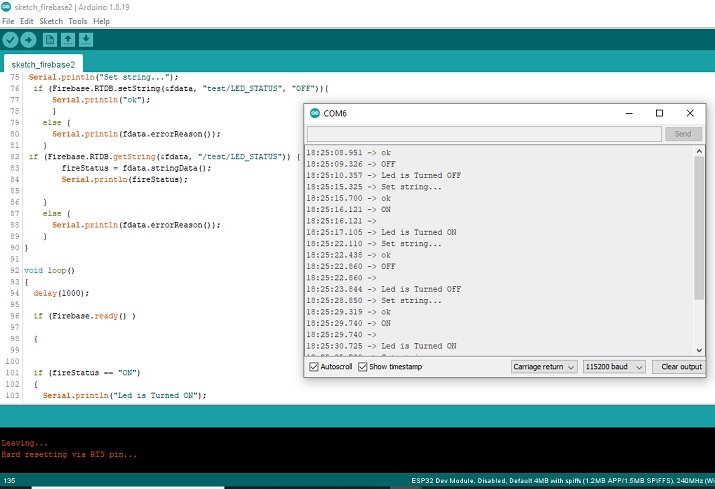
Serial.println("Set string...");
if (Firebase.RTDB.setString(&fdata, "test/LED_STATUS", "OFF")){
Serial.println("ok");
}
else {
Serial.println(fdata.errorReason());
}
if (Firebase.RTDB.getString(&fdata, "/test/LED_STATUS")) {
fireStatus = fdata.stringData();
Serial.println(fireStatus);
}
else {
Serial.println(fdata.errorReason());
}
}
void loop(){
delay(1000);
if (Firebase.ready() ){
if (fireStatus == "ON"){
Serial.println("Led is Turned ON");
digitalWrite(led, HIGH);
delay(5000);
Serial.println("Set string...");
if (Firebase.RTDB.setString(&fdata, "test/LED_STATUS", "OFF")){
Serial.println("ok");
}
else {
Serial.println(fdata.errorReason());
}
if (Firebase.RTDB.getString(&fdata, "/test/LED_STATUS")) {
fireStatus = fdata.stringData();
Serial.println(fireStatus);
}
else {
Serial.println(fdata.errorReason());
}
}
else if (fireStatus == "OFF"){
Serial.println("Led is Turned OFF");
digitalWrite(led, LOW);
delay(5000);
Serial.println("Set string...");
if (Firebase.RTDB.setString(&fdata, "test/LED_STATUS", "ON")){
Serial.println("ok");
}
else {
Serial.println(fdata.errorReason());
}
if (Firebase.RTDB.getString(&fdata, "/test/LED_STATUS")) {
fireStatus = fdata.stringData();
Serial.println(fireStatus);
}
else {
Serial.println(fdata.errorReason());
}
}
else{
Serial.println("Cmd Error! Please just send ON/OFF");
}
Serial.println();
}
}
Task 3: Set the real-time database and link it with the C program
Step 1 ? Log in to Firebase. Go to the console and start a new project. Disable Google Analytics and proceed.
Step 2 ? After the project has started, in the left side menu, go to Realtime Database. Create a real-time database and find the DATABASE_URL and write it in the C program.
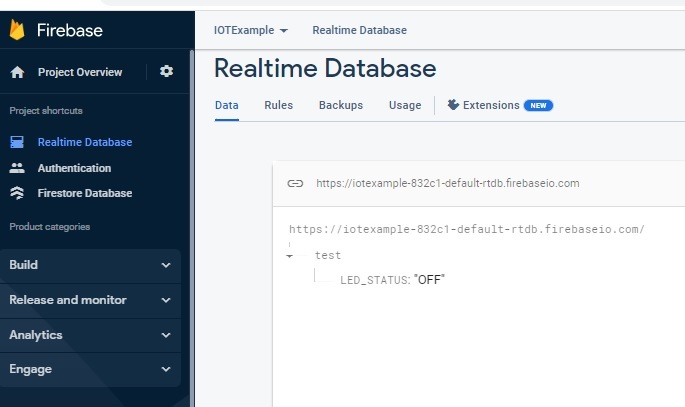
Step 3 ? Now go to the Authentication on the left menu. In the Sign-In tab enable email-password. In the Users tab, create an email and password for authentication. Write this email and password in the C program for authentication.
Step 4 ? In the left side menu, go to the real-time database and set the rules as follows:
{
   "rules": {
      ".read": "auth != null",
      ".write": "auth != null",
   }
}
Step 5 ? In the left side menu, go to project settings and then find the Web API Key. Write this API key in the C program.
Step 6 ? Compile the C program, run it, and then check the changing values in the real-time database.
Viewing The Result
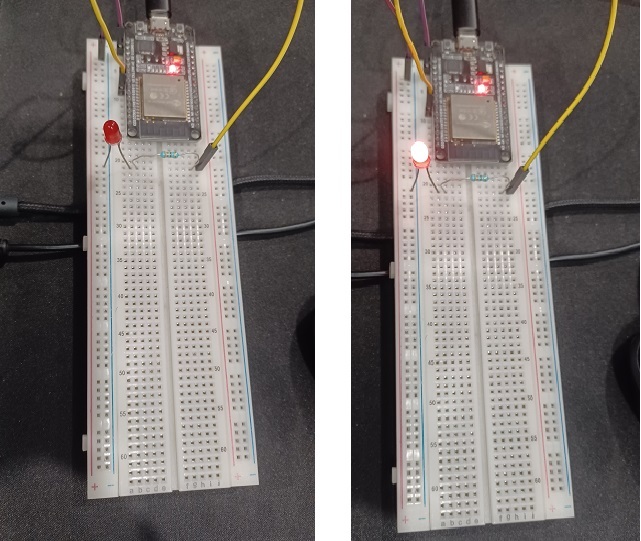
Fig 2: The program result showing on the circuit
In this article, the way to use a NoSQL database (firebase) with IOT programs is given. First, the circuit is made, then a program to handle the circuit is written in Arduino IDE using C language and then the connectivity is made with the Firebase real-time database through the internet using wifi. The use of the real-time database, authentication, and setting of the read and write rules are also given along with reading and writing of the data values of the real-time Firebase database.

2K+ Views
