
Article Categories
- All Categories
-
 Data Structure
-
 Networking
-
 RDBMS
RDBMS
-
 Operating System
-
 Java
Java
-
 MS Excel
-
 iOS
iOS
-
 HTML
HTML
-
 CSS
CSS
-
 Android
-
 Python
-
 C Programming
-
 C++
C++
-
 C#
C#
-
 MongoDB
-
 MySQL
MySQL
-
 Javascript
-
 PHP
PHP
-
 Economics & Finance
Troubleshoot the download issue from internet
Worldwide, user uses famous browsers like; Internet Explorer, Firefox, Google Chrome, Opera or other browsers on Window 7/8 Operating System to download, save and run the files. If, user is unable to download, save and run the file or while downloading (clicking on download link) nothing happens or it shows error, or at the time of saving the file “Save As” dialog box appears and then quickly disappears, automatically.
This article will help you in protecting the system from unsafe file.
Internet Explorer’s Attachment Manager protects users system while downloading unsafe attachments file and Internet downloads by recognizing the file type and the particular security settings.
Tips to download the file from Internet
These are some tips to identify, troubleshoot and resolve the problem of downloading file.
Step 1
Check that your internet connection is working properly without any automatic disconnection.
Step 2
Before doing any task, clear Internet Cache, Temporary Files, Cookies, History, etc, using system clean-up tools like; Disk Cleanup, CCleaner or the built-in browser UI and then restart the system.
Step 3
If your download path or folder is not working properly (it may be corrupted or has some other problem), change the path to download the files. Changed path might work.
Step 4
Each and every downloaded file has default file name. If you want, you can save the file with default file name after download, but if the default file name is not responding properly, then save it with different file-type and file name.
Step 5
Disable the Download Manager, it might works for you.
Step 6
If you are sure that the downloaded file is safe, then disable the Firewall, antivirus, and security software temporarily and see if the download works properly.
Step 7
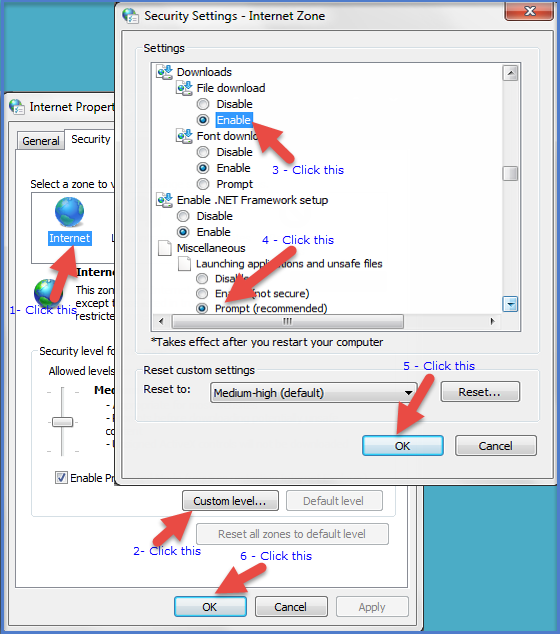
Ensure that the File downloads are enabled. To do so, go to Start menu –> “Search Programs and Files” and type “inetcpl.cpl” to open “Internet Options”. When “Internet Options” dialog box opens, go to the Security tab and select “Internet” form Select zone area and then click on the Custom level button.
Once you click the Custom level button, the Security Settings – Internet zone dialog box opens. Scroll down to the Security Settings – Internet zone dialog box and go till “Downloads” option to enable the “File download”. Again, scroll down till “Miscellaneous” option and check the Prompt (recommended) of “Launching applications and unsafe files” then click on “OK” to exit the Security Settings – Internet zone dialog box. After closing the Security Settings – Internet zone dialog box, close the Internet Properties dialog box by clicking on “OK”.
If this does not work, reset “Internet Security” settings by clicking on “Reset all zones to default level” under Security tab.
Step 8
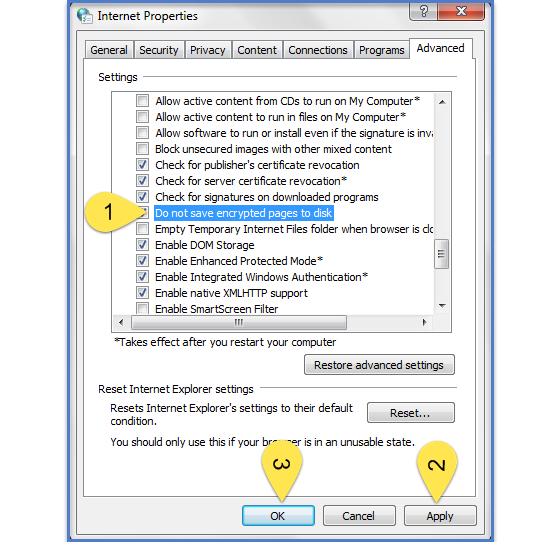
Internet Explorer creates temporary cache file while downloading. In Internet Explorer, if the file sends over HTTPS, response headers are set to stop caching, and “Do not save encrypted pages to disk” option is unchecked then the cache file would not be created. In such cases, the download may fail with message “Internet Explorer Cannot Download” or “File couldn’t be downloaded”.
Just go to the Internet Option –> Advanced tab –> Settings to uncheck the option “Do not save encrypted pages to disk” temporarily then click on “Apply” and “OK” and see if it helps.
Step 9
This is not much advisable, but you may temporarily disable the scanning feature via the browser settings, if you are sure that the file you have downloaded is safe.
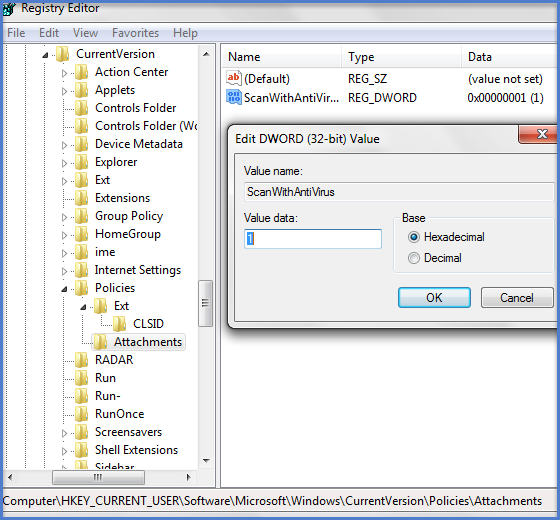
If you want, you can also disable antivirus scanning of the downloaded files through “Windows Registry”. To do this, go to the Window Start menu –> Search programs and files and type “regedit” to open the Window Registry then navigate to the following key: “HKEY_CURRENT_USER\Software\Microsoft\Windows\CurrentVersion\Policies\Attachments”
If the Attachments sub key is not visible, generate it by right-clicking the Policies –> New –> Key –> Type Attachments as the key name. Next, right click Attachments –> select New –> DWORD (32-bit) and give the New Value Name: ScanWithAntiVirus and the value 1.
If, “ScanWithAntiVirus” registry key values is 1(Can ‘Off’ or disable the scan), 2 (Optional scan) and 3 (Can enable the virus scan right after you completely open or save the program or file).
Step 10
At last, if nothing works, reset the browser settings to default. This will work with all browsers like; Google Chrome, Firefox, Opera, etc.
Conclusion
Some of the steps mentioned above might insecure your system. So, use the above steps when you are sure that the file you have downloaded is safe. Once your work gets over, change the settings back.

383 Views
