- Talend - Home
- Talend - Introduction
- Talend - System Requirements
- Talend - Installation
- Talend Open Studio
- Talend - Data Integration
- Talend - Model Basics
- Components for Data Integration
- Talend - Job Design
- Talend - Metadata
- Talend - Context Variables
- Talend - Managing Jobs
- Talend - Handling Job Execution
- Talend - Big Data
- Hadoop Distributed File System
- Talend - Map Reduce
- Talend - Working with Pig
- Talend - Hive
Talend - Hadoop Distributed File System
In this chapter, let us learn in detail about how Talend works with Hadoop distributed file system.
Settings and Pre-requisites
Before we proceed into Talend with HDFS, we should learn about settings and pre-requisites that should be met for this purpose.
Here we are running Cloudera quickstart 5.10 VM on virtual box. A Host-Only Network must be used in this VM.
Host-Only Network IP: 192.168.56.101
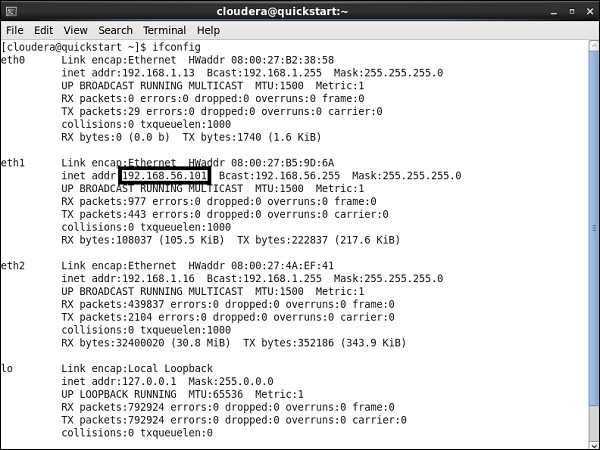
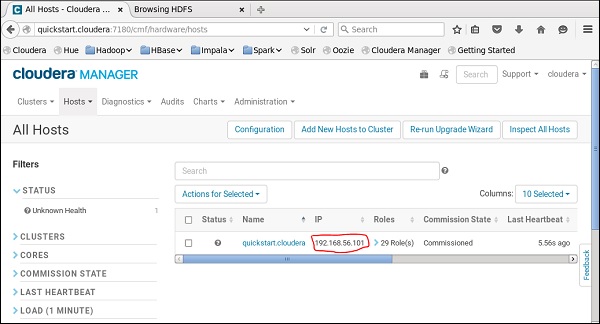
You must have the same host running on cloudera manager also.
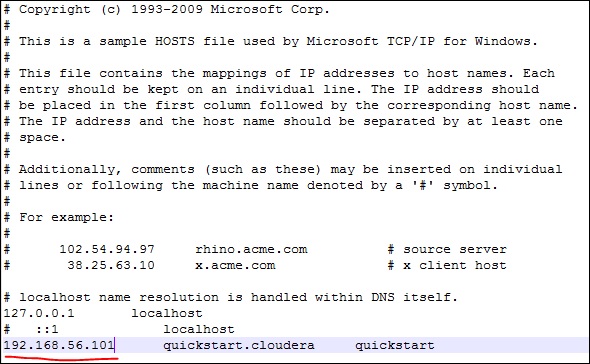
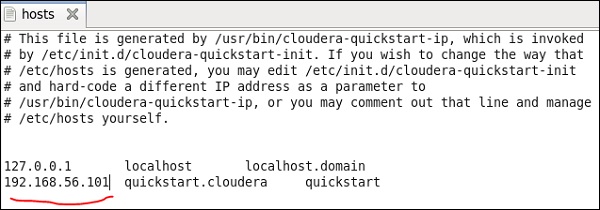
Now on your windows system, go to c:\Windows\System32\Drivers\etc\hosts and edit this file using Notepad as shown below.
Similarly, on your cloudera quickstart VM, edit your /etc/hosts file as shown below.
sudo gedit /etc/hosts
Setting Up Hadoop Connection
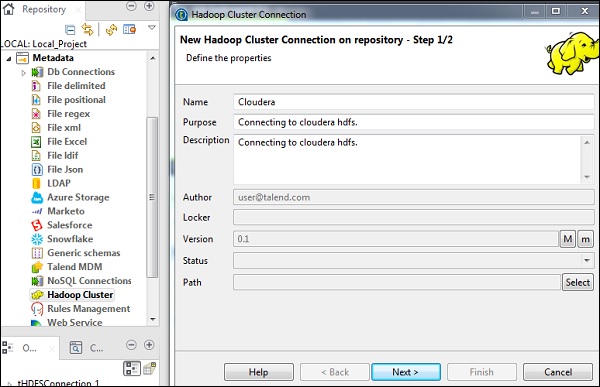
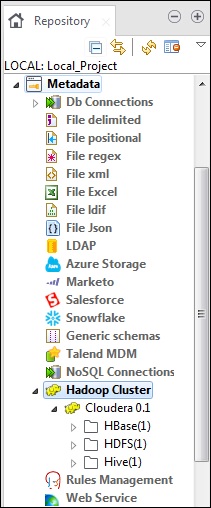
In the repository panel, go to Metadata. Right click Hadoop Cluster and create a new cluster. Give the name, purpose and description for this Hadoop cluster connection.
Click Next.
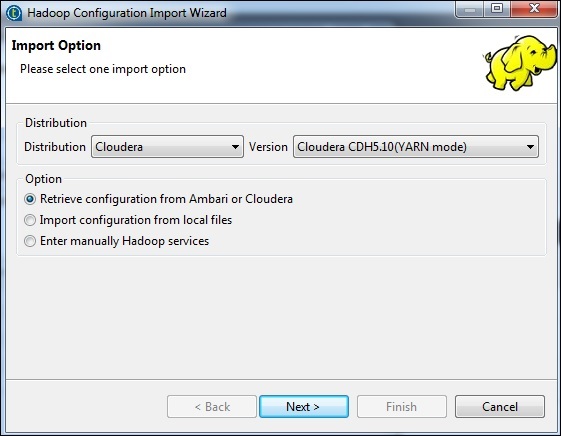
Select the distribution as cloudera and choose the version which you are using. Select the retrieve configuration option and click Next.
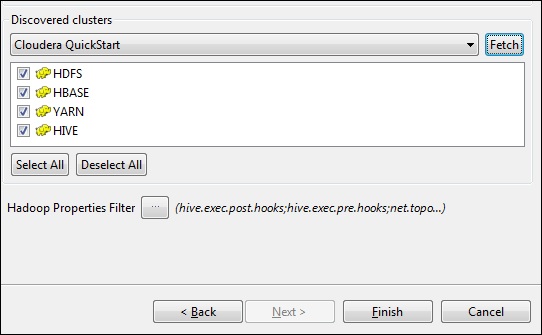
Enter the manager credentials (URI with port, username, password) as shown below and click Connect. If the details are correct, you will get Cloudera QuickStart under discovered clusters.
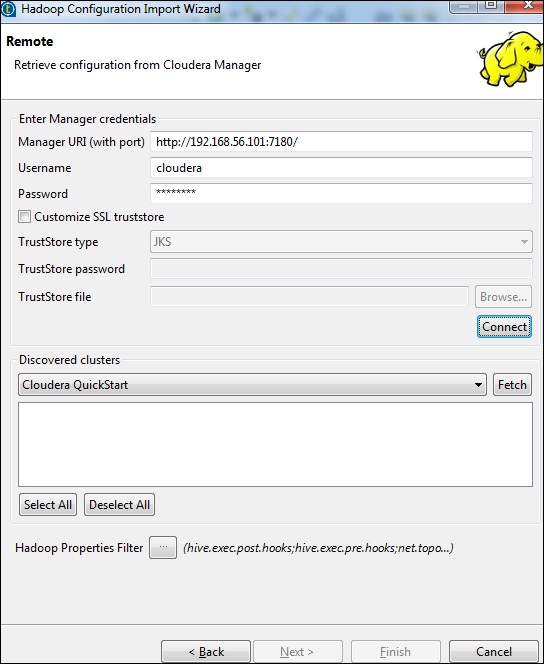
Click Fetch. This will fetch all the connections and configurations for HDFS, YARN, HBASE, HIVE.
Select All and click Finish.
Note that all the connection parameters will be auto-filled. Mention cloudera in the username and click Finish.
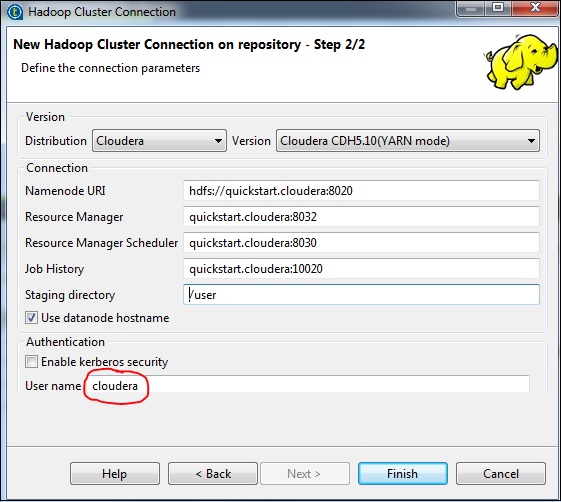
With this, you have successfully connected to a Hadoop Cluster.
Connecting to HDFS
In this job, we will list all the directories and files which are present on HDFS.
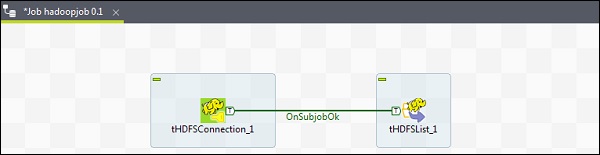
Firstly, we will create a job and then add HDFS components to it. Right click on the Job Design and create a new job hadoopjob.
Now add 2 components from the palette tHDFSConnection and tHDFSList. Right click tHDFSConnection and connect these 2 components using OnSubJobOk trigger.
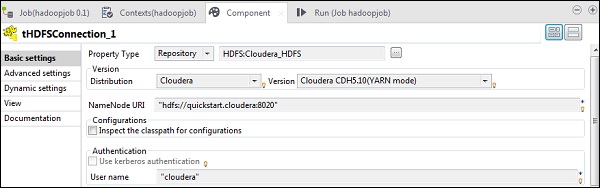
Now, configure both the talend hdfs components.
In tHDFSConnection, choose Repository as the Property Type and select the Hadoop cloudera cluster which you created earlier. It will auto-fill all the necessary details required for this component.
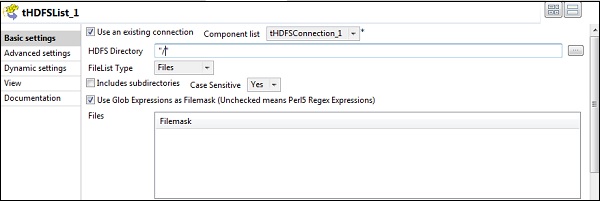
In tHDFSList, select Use an existing connection and in the component list choose the tHDFSConnection which you configured.
Give the home path of HDFS in HDFS Directory option and click the browse button on the right.
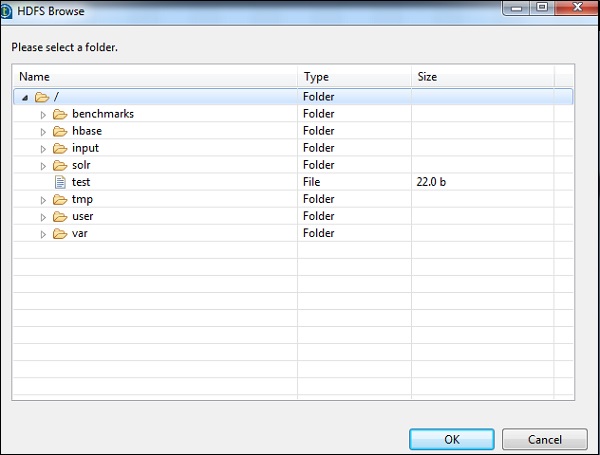
If you have established the connection properly with the above-mentioned configurations, you will see a window as shown below. It will list all the directories and files present on HDFS home.
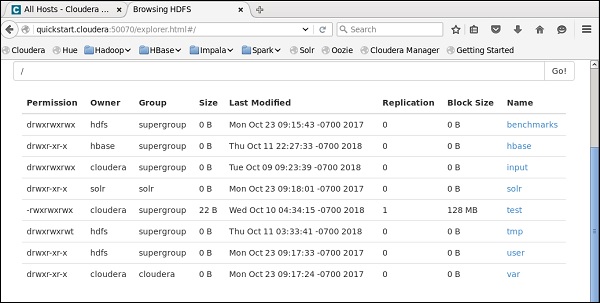
You can verify this by checking your HDFS on cloudera.
Reading file from HDFS
In this section, let us understand how to read a file from HDFS in Talend. You can create a new job for this purpose, however here we are using the existing one.
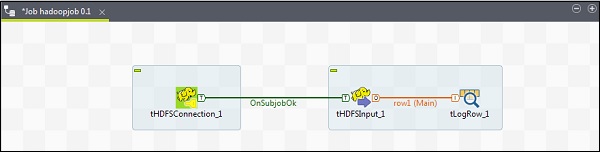
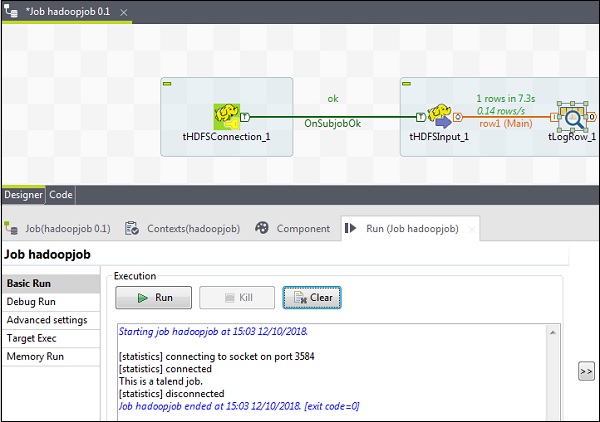
Drag and Drop 3 components tHDFSConnection, tHDFSInput and tLogRow from the palette to designer window.
Right click tHDFSConnection and connect tHDFSInput component using OnSubJobOk trigger.
Right click tHDFSInput and drag a main link to tLogRow.
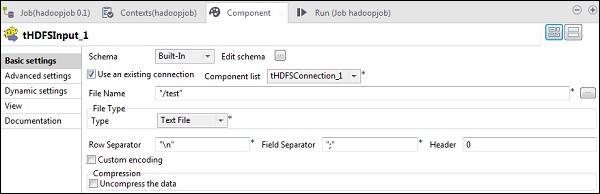
Note that tHDFSConnection will have the similar configuration as earlier. In tHDFSInput, select Use an existing connection and from the component list, choose tHDFSConnection.
In the File Name, give the HDFS path of the file you want to read. Here we are reading a simple text file, so our File Type is Text File. Similarly, depending on your input, fill the row separator, field separator and header details as mentioned below. Finally, click the Edit schema button.
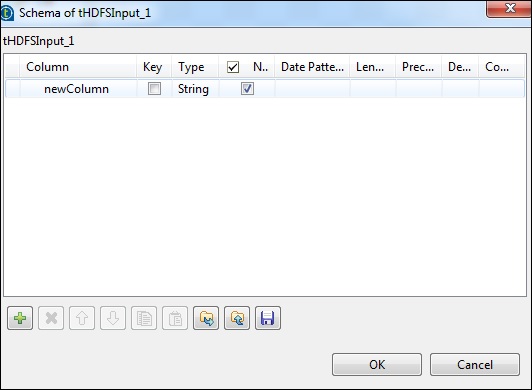
Since our file is just having plain text, we are adding just one column of type String. Now, click Ok.
Note − When your input is having multiple columns of different types, you need to mention the schema here accordingly.
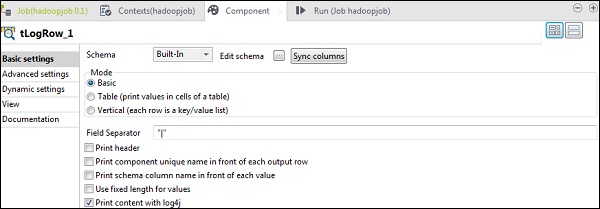
In tLogRow component, click Sync columns in edit schema.
Select the mode in which you want your output to be printed.
Finally, click Run to execute the job.
Once you were successful in reading a HDFS file, you can see the following output.
Writing File to HDFS
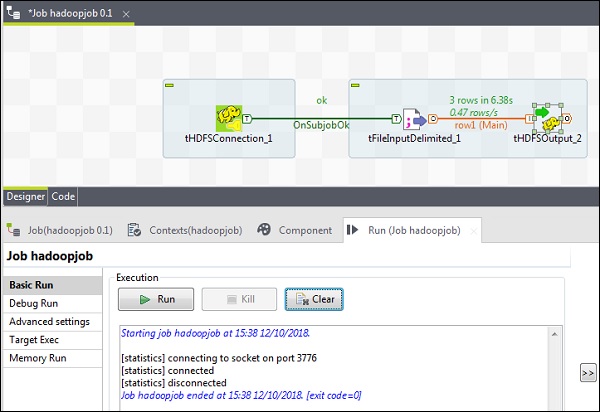
Lets see how to write a file from HDFS in Talend. Drag and Drop 3 components tHDFSConnection, tFileInputDelimited and tHDFSOutput from the palette to designer window.
Right click on tHDFSConnection and connect tFileInputDelimited component using OnSubJobOk trigger.
Right click on tFileInputDelimited and drag a main link to tHDFSOutput.
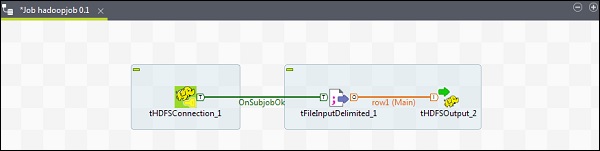
Note that tHDFSConnection will have the similar configuration as earlier.
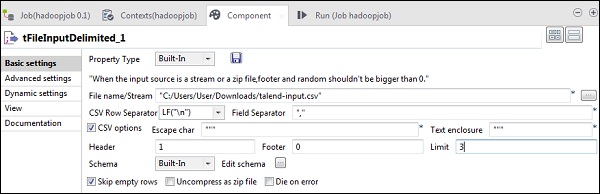
Now, in tFileInputDelimited, give the path of input file in File name/Stream option. Here we are using a csv file as an input, hence the field separator is ,.
Select the header, footer, limit according to your input file. Note that here our header is 1 because the 1 row contains the column names and limit is 3 because we are writing only first 3 rows to HDFS.
Now, click edit schema.
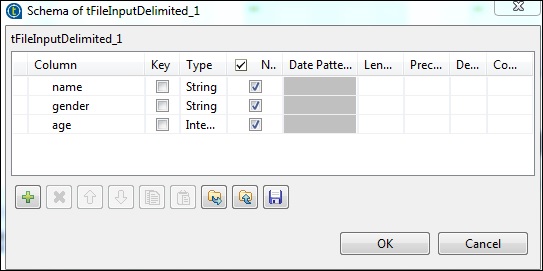
Now, as per our input file, define the schema. Our input file has 3 columns as mentioned below.
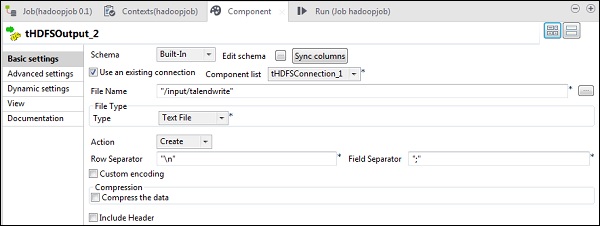
In tHDFSOutput component, click sync columns. Then, select tHDFSConnection in Use an existing connection. Also, in File name, give a HDFS path where you want to write your file.
Note that file type will be text file, Action will be create, Row separator will be \n and field separator is ;
Finally, click Run to execute your job. Once the job has executed successfully, check if your file is there on HDFS.
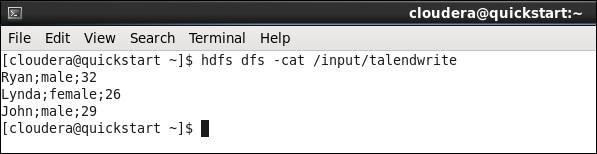
Run the following hdfs command with the output path you had mentioned in your job.
hdfs dfs -cat /input/talendwrite
You will see the following output if you are successful in writing on HDFS.