- Spring - Home
- Spring - Overview
- Spring - Architecture
- Spring - Environment Setup
- Spring - Hello World Example
- Spring - IoC Containers
- Spring - Bean Definition
- Spring - Bean Scopes
- Spring - Bean Life Cycle
- Spring - Bean Post Processors
- Spring - Bean Definition Inheritance
- Spring - Dependency Injection
- Spring - Injecting Inner Beans
- Spring - Injecting Collection
- Spring - Beans Auto-Wiring
- Annotation Based Configuration
- Spring - Java Based Configuration
- Spring - Event Handling in Spring
- Spring - Custom Events in Spring
- Spring - AOP with Spring Framework
- Spring - JDBC Framework
- Spring - Transaction Management
- Spring - Web MVC Framework
- Spring - Logging with Log4J
Spring Useful Resources
Spring - MVC Form Handling Example
The following example shows how to write a simple web-based application, which makes use of HTML forms using Spring Web MVC framework. To start with, let us have a working Eclipse IDE in place and take the following steps to develope a Dynamic Form-based Web Application using Spring Web Framework −
Example - MVC Form Handling
| Steps | Description |
|---|---|
| 1 | Create a Maven project with archetype as maven-archetype-webapp with a name web, groupid com.tutorialspoint, artifactid web and create a package com.tutorialspoint under the src folder in the created project. |
| 2 | Update the pom.xml as explained in the Spring - MVC Hello World Example chapter. |
| 3 | Create a Java class Student and StudentController under the com.tutorialspoint package. |
| 4 | Create Spring configuration files web.xml and web-servlet.xml under the WEB-INF folder as explained in the Spring - MVC Hello World Example chapter. |
| 5 | Create a sub-folder with a name jsp under the WEB-INF folder. Create a view files student.jsp and result.jsp under this sub-folder. |
| 6 | The final step is to create the content of all the source and configuration files and export the application as explained below. |
Student.java
package com.tutorialspoint;

public class Student {
   private Integer age;
   private String name;
   private Integer id;

   public void setAge(Integer age) {
      this.age = age;
   }
   public Integer getAge() {
      return age;
   }
   public void setName(String name) {
      this.name = name;
   }
   public String getName() {
      return name;
   }
   public void setId(Integer id) {
      this.id = id;
   }
   public Integer getId() {
      return id;
   }
}
StudentController.java
package com.tutorialspoint;

import org.springframework.stereotype.Controller;
import org.springframework.web.bind.annotation.ModelAttribute;
import org.springframework.web.bind.annotation.RequestMapping;
import org.springframework.web.bind.annotation.RequestMethod;
import org.springframework.web.servlet.ModelAndView;
import org.springframework.ui.ModelMap;

@Controller
public class StudentController {
   @RequestMapping(value = "/student", method = RequestMethod.GET)
   public ModelAndView student() {
      return new ModelAndView("student", "command", new Student());
   }
   @RequestMapping(value = "/addStudent", method = RequestMethod.POST)
      public String addStudent(@ModelAttribute("SpringWeb")Student student,

   ModelMap model) {
      model.addAttribute("name", student.getName());
      model.addAttribute("age", student.getAge());
      model.addAttribute("id", student.getId());

      return "result";
   }
}
Here the first service method student(), we have passed a blank Student object in the ModelAndView object with the name "command" because the Spring framework expects an object with the name "command" if you are using <form:form> tags in your JSP file. So, when student() method is called , it returns student.jsp view.
The second service method addStudent() will be called against a POST method on the HelloWeb/addStudent URL. You will prepare your model object based on the submitted information. Finally a "result" view will be returned from the service method, which will result in rendering result.jsp
student.jsp
<%@taglib uri = "http://www.springframework.org/tags/form" prefix = "form"%>
<html>
<head>
<title>Spring MVC Form Handling</title>
</head>
<body>
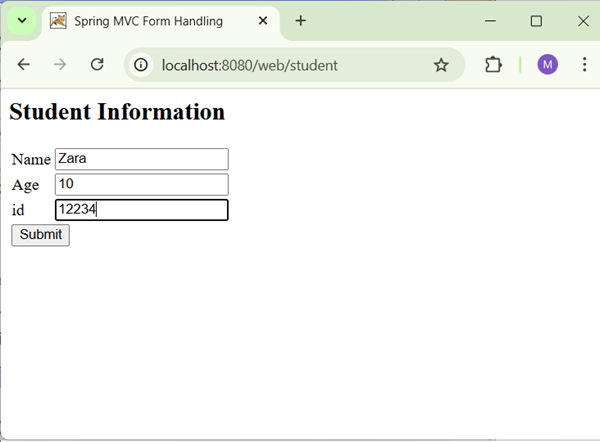
<h2>Student Information</h2>
<form:form method = "POST" action = "/web/addStudent">
<table>
<tr>
<td><form:label path = "name">Name</form:label></td>
<td><form:input path = "name" /></td>
</tr>
<tr>
<td><form:label path = "age">Age</form:label></td>
<td><form:input path = "age" /></td>
</tr>
<tr>
<td><form:label path = "id">id</form:label></td>
<td><form:input path = "id" /></td>
</tr>
<tr>
<td colspan = "2">
<input type = "submit" value = "Submit"/>
</td>
</tr>
</table>
</form:form>
</body>
</html>
result.jsp
<%@page contentType = "text/html;charset = UTF-8" language = "java" %>
<%@page isELIgnored = "false" %>
<%@taglib uri = "http://www.springframework.org/tags/form" prefix = "form"%>
<html>
<head>
<title>Spring MVC Form Handling</title>
</head>
<body>
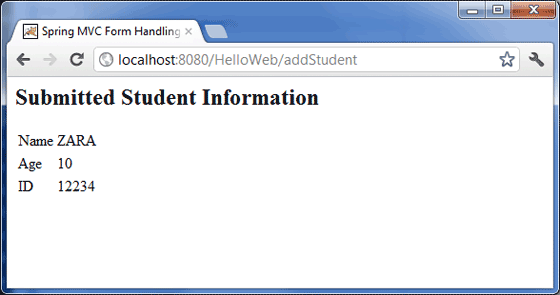
<h2>Submitted Student Information</h2>
<table>
<tr>
<td>Name</td>
<td>${name}</td>
</tr>
<tr>
<td>Age</td>
<td>${age}</td>
</tr>
<tr>
<td>ID</td>
<td>${id}</td>
</tr>
</table>
</body>
</html>
Output
Once you are done creating the source and configuration files, export your application. Right-click on your application and use run as > maven install > option and save your web.war file in Tomcat's webapps folder.
Now start your Tomcat server and make sure you are able to access other web pages from webapps folder using a standard browser. Now try a URL http://localhost:8080/web/student and you should see the following result if everything is fine with your Spring Web Application.
After submitting the required information, click the Submit button to submit the form. You should see the following result if everything is fine with your Spring Web Application.