- Spring - Home
- Spring - Overview
- Spring - Architecture
- Spring - Environment Setup
- Spring - Hello World Example
- Spring - IoC Containers
- Spring - Bean Definition
- Spring - Bean Scopes
- Spring - Bean Life Cycle
- Spring - Bean Post Processors
- Spring - Bean Definition Inheritance
- Spring - Dependency Injection
- Spring - Injecting Inner Beans
- Spring - Injecting Collection
- Spring - Beans Auto-Wiring
- Annotation Based Configuration
- Spring - Java Based Configuration
- Spring - Event Handling in Spring
- Spring - Custom Events in Spring
- Spring - AOP with Spring Framework
- Spring - JDBC Framework
- Spring - Transaction Management
- Spring - Web MVC Framework
- Spring - Logging with Log4J
Spring Useful Resources
Spring - Environment Setup
This chapter will guide you on how to prepare a development environment to start your work with Spring. It will also teach you how to set up JDK on your machine before you set up Spring −
Setup Java Development Kit (JDK)
You can download the latest version of SDK from Oracle's Java site − Java SE Downloads. You will find instructions for installing JDK in downloaded files, follow the given instructions to install and configure the setup. Finally set PATH and JAVA_HOME environment variables to refer to the directory that contains java and javac, typically java_install_dir/bin and java_install_dir respectively.
If you are running Windows and have installed the JDK in C:\jdk-24, you would have to put the following line in your C:\autoexec.bat file.
set PATH=C:\jdk-24;%PATH%
set JAVA_HOME=C:\jdk-24
Alternatively, on Windows NT/2000/XP, you will have to right-click on My Computer, select Properties → Advanced → Environment Variables. Then, you will have to update the PATH value and click the OK button.
On Unix (Solaris, Linux, etc.), if the SDK is installed in /usr/local/jdk-24 and you use the C shell, you will have to put the following into your .cshrc file.
setenv PATH /usr/local/jdk-24/bin:$PATH
setenv JAVA_HOME /usr/local/jdk-24
Alternatively, if you use an Integrated Development Environment (IDE) like Borland JBuilder, Eclipse, IntelliJ IDEA, or Sun ONE Studio, you will have to compile and run a simple program to confirm that the IDE knows where you have installed Java. Otherwise, you will have to carry out a proper setup as given in the document of the IDE.
Popular Java Editors
To write your Java programs, you need a text editor. There are many sophisticated IDEs available in the market. But for now, you can consider one of the following −
Notepad − On Windows machine, you can use any simple text editor like Notepad (Recommended for this tutorial), TextPad.
Netbeans − It is a Java IDE that is open-source and free, which can be downloaded from www.netbeans.org/index.html.
Eclipse − It is also a Java IDE developed by the eclipse open-source community and can be downloaded from www.eclipse.org.
Install Eclipse
In this chapter, we will explain how to set Spring environment in Eclipse IDE. Before proceeding with the installation, make sure that you already have Eclipse installed in your system. If not, download and install Eclipse.
For more information on Eclipse, please refer our Eclipse Tutorial
Step 2: Create a Maven project and set build path
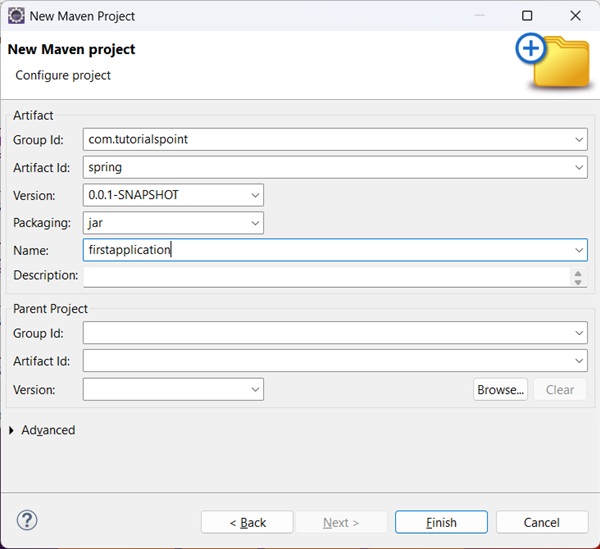
Open eclipse and create a Maven based project as shown below.
Update the pom.xml as shown below to include spring framework libraries. Rest eclipse will handle automatically.
Pom.xml for Spring
open the pom.xml and paste the following content in it and refresh the project.
<project xmlns="http://maven.apache.org/POM/4.0.0"
   xmlns:xsi="http://www.w3.org/2001/XMLSchema-instance"
   xsi:schemaLocation="http://maven.apache.org/POM/4.0.0 https://maven.apache.org/xsd/maven-4.0.0.xsd">
   <modelVersion>4.0.0</modelVersion>
   <groupId>com.tutorialspoint</groupId>
   <artifactId>spring</artifactId>
   <version>0.0.1-SNAPSHOT</version>
   <name>firstapplication</name>
   <properties>
      <java.version>24</java.version>
      <spring.version>7.0.0-M9</spring.version>
   </properties>
   <build>
      <plugins>
         <plugin>
            <artifactId>maven-compiler-plugin</artifactId>
            <version>3.7.0</version>
            <configuration>
               <source>${java.version}</source>
               <target>${java.version}</target>
            </configuration>
         </plugin>
      </plugins>
   </build>
   <dependencies>
      <dependency>
         <groupId>org.springframework</groupId>
         <artifactId>spring-core</artifactId>
         <version>${spring.version}</version>
      </dependency>
      <dependency>
         <groupId>org.springframework</groupId>
         <artifactId>spring-context</artifactId>
         <version>${spring.version}</version>
      </dependency>
      <dependency>
         <groupId>org.springframework</groupId>
         <artifactId>spring-aspects</artifactId>
         <version>${spring.version}</version>
      </dependency>
      <dependency>
         <groupId>jakarta.annotation</groupId>
         <artifactId>jakarta.annotation-api</artifactId>
         <version>2.1.1</version>
      </dependency>
   </dependencies>
</project>
