- SL4A - Home
- SL4A - Android Overview
- SL4A - Android Architecture
- SL4A - Scripting Layer for Android
- SL4A - Architecture
- SL4A - Python Library
- SL4A - Development Environment
- SL4A - Configuring Your Device
- SL4A - Navigating the Android SDK
- SL4A - Working with Eclipse
- SL4A - Exploring Android API
- SL4A - Building GUIs
- SL4A - Utilities using Python Facades
- SL4A - Background Script with Python
- SL4A - Packaging & Distributing
SL4A - Quick Guide
SL4A - Android Overview
Android is a Linux based operating system, designed primarily for portable devices like smartphones and tablet. Android is more than an operating system. It is a software stack that provides many features for users, developers and manufacturers.
| Android Version | Features |
|---|---|
| Android (Alpha) 1.0 | First version of Android |
| Android 1.5 (Cupcake) | Added auto-rotation option, copy and paste feature added in the web browser |
| Android 1.6 (Donut) | Voice search and Search box were added |
| Android 2.0/2.1 (clair) | Bluetooth 2.1 support |
| Android 2.2/2.2.3(Froyo) | Support for Adobe Flash 10.1 |
| Android 2.3/2.3.7 (Gingerbread) | Internet calling, one touch word selection and copy/paste |
| Android 3.0/3.2.6 (Honeycomb) | This version is available only for tablets.Features include support for multi-core processors, ability to encrypt all user data |
| Android 4.0/4.0.4 (Ice cream sandwich) | Virtual button in the UI, ability to shut down apps that are using data in the background |
| Android 4.1/4.3.1 (Jelly Bean) | Based on Linux Kernel 3.0.31? Smoother User Interface, Bluetooth data transfer for Android Beam |
| Android 4.4/4.4.4,4.4W/4.4W.2 (KitKat) | Integration with cloud storage, Built-In sensors, Lock Art Screen |
| Android 5.0/5.1.1 (Lollipop) | Improved RAM and Battery Management, Fixes for sudden App closure, issues with wireless connections, notifications etc. |
It is open source and business friendly. The user can choose to replace built-in applications with applications of their choice. Many versions of Android have been released since its original release.
SL4A - Android Architecture
The Android software stack comprises of different layers, each layer manifesting well-defined behavior and providing specific services to the layer above it. The following figure presents a broad architecture of Android with its primary components.
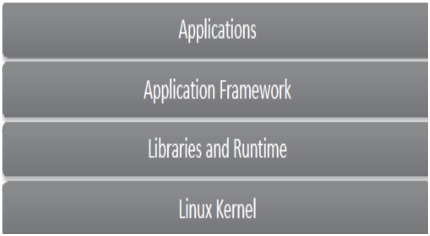
Linux Kernel
Android is built on the Linux kernel code modified to run on embedded systems as against the traditional Linux system. Hardware drivers for many common devices are built into the kernel, thereby ensuring device portability. It is based on secure user based permission model, which prevents one application from reading another applications information or from interfering with its execution (e.g. CPU, memory, devices etc.).
Group ID based access to networking and Bluetooth features, logger, alarm, power management, low memory killer, Binder IPC mechanisms are a few noted enhancements to the Kernel.
Libraries and Runtime
This forms the second layer of the architecture. It includes a set of hardware optimized C, C++ libraries, also referred to as the native layer. Examples include Media Libraries, SQLite, SSL, Bionic, WebKit etc.
The Android Runtime comprises of two different components − the Dalvik VM and Core Libraries. The Dalvik VM provides an execution environment for the applications on the Android Platform. The set of core libraries provides most of the functionality available in Java APIs.
Application Framework
This layer makes available the Libraries as services to the applications. Some most important components within this layer include Location Manager, Resource Manager, Activity Manager and Notification Manager.
Applications
By default, Android comes with a rich set of applications, including the browser, SMS program, calendar, contact manager, maps etc. Google Play provides alternatives to these applications, if the user desires so.
Building Blocks
An application can interface with the system with four function blocks. They are as follows −
Activities − Activities represent a single screen that the user sees or interacts with visually. For example, an email app might have one activity that shows a list of new emails, another activity to compose an email, and another activity for reading emails.
Services − A majority of processing is done by these services for your application. It is the logic behind the user interface. For example, a service might play music in the background while the user is in a different app, or it might fetch data over the network without blocking user interaction with an activity.
Broadcast Receivers − A component that can be registered to listen for system or application events and issue notifications about the same. An instance for broadcast originating from the system is a low battery notification while an application level broadcast could be a download successful notification.
Content Providers − A content provider manages and helps you share data between multiple applications. For e.g. a content provider may be used to share the contacts data.
These components interact with each other through messages called Intents.
SL4A - Scripting Layer for Android
Android scripting is a handy tool for simple tasks such as automation and prototyping as against using the Java programming language for the same. The Scripting Layer for Android (SL4A) provides a platform for multiple scripting solutions on the android platform.
What is SL4A?
The Scripting Layer for Android (SL4A) is a library that provides a platform to write simple scripts to automate tasks on an android device using languages other than JAVA.
SL4A, originally called Android Scripting Environment (ASE), was first announced on the Google Open Source blog in June 2009. The project saw the light of the day primarily through the efforts of Damon Kohler and it has grown through the contributions of other developers.
It supports most popular scripting languages. These include −
- Beanshell 2.0b4
- JRuby 1.4
- Lua 5.1.4
- Perl 5.10.1
- PHP 5.3.3
- Python
- Rhino 1.7R2
- Javascript
- TCL
Why SL4A Scripting Languages Vs JAVA
One of the first questions one would probably ask is, Why use SL4A instead of Java?
Firstly, not everyone is a fan of Java. Scripting languages provide an easy programming environment as compared to Java.
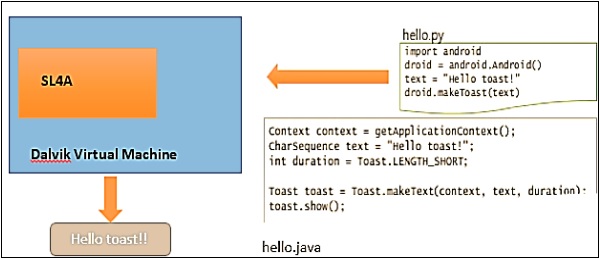
Secondly, the language requires the use of an edit/compile/run design loop. This means that you edit, re-compile and then run the application each time you desire some modification. On the contrary, scripts are interpreted and executed on the fly. Moreover, SL4A even makes it possible, in many cases, to reuse code written for a desktop environment.
The following figure illustrates scripts written in Python targeting SL4A and in Java respectively.
SL4A - Architecture
SL4A has three main components. They are as follows −
- Script Interpreters
- Android RPC Client
- Facades
In this chapter, we will discuss more about these three components.
Script Interpreters
SL4A acts a scripting host. It supports many scripting languages such as Python, Ruby, Lua, BeanShell, JavaScript and TCL . SL4A can be extended by incorporating new scripting languages dynamically by developing a new SL4A interpreter for that scripting language.
Each script runs in its own interpreter instance. Hence, multiple scripts can run simultaneously without affecting each other.
Android RPC Client
Scripts running within the interpreter instance communicates with the SL4A application through the Android Proxy RPC Client. The client establishes a Remote Procedure Call (RPC) connection to SL4A, and allows scripts to interact with the Android Framework. The SL4A facades facilitate this communication. Data is sent as JSON payloads.
Android RPC clients are provided for every supported scripting language. The client modules can be obtained from the SL4A website at https://code.google.com.
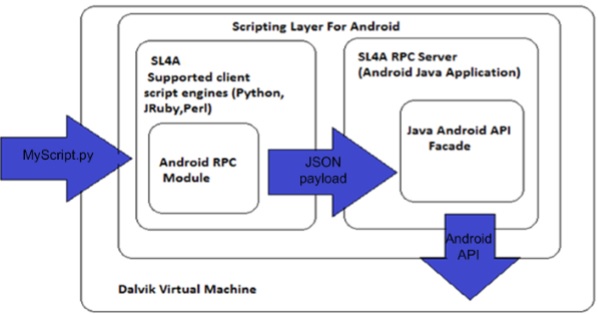
Facades
The faade simplifies the scripts access to the underlying Android API. SL4A exposes the Android Framework API to scripts through an extensive set of facades like AndroidFacade, BluetoothFacade, ActivityManagerFacade, CommonIntentsFacade, etc.
SL4A functionality offers a basket of rich functionalities like Camera, Location, Battery Manager, Media Player, Media Recorder and many more.
Using SL4A
The SL4A system is suited for the following kinds of tasks −
RAD programming − With SL4A, it is possible to use Rapid Application Development (RAD) approach to create a prototype application quickly. You can create a full-blown Android application if the feasibility of the idea is confirmed.
Test scripts − It can be used to write test scripts.
Building Utilities − Utility scripts or tools that perform small tasks or automate certain aspects of repetitive tasks can be built using SL4A.
SL4A - Python Library
Python has a standard library, which includes a wide variety of routines that help you code and reuse these codes easily. A Module is a Python file that has definitions of variables and a set of related routines or functions.
Some of the core Modules provided by the Python library are as follows −
Built-in Functions and Exceptions − Python imports both these modules when it starts up and makes their content available for all programs. The built-in module defines built-in functions like len, int, range, while the exceptions module defines all built-in exceptions.
Operating System Interface Modules − The OS module makes available, the functions that enables performing OS level operations through scripts.
Type Support Modules − Type support modules include string module-to implement, commonly used string operations; math module provides mathematical operations etc.
Regular Expressions − Regular Expressions are string patterns written in a specific syntax, which can be used to match or extract strings or substrings. The re module provides Regex support for Python.
Language Support Modules − The sys module gives you access to various interpreter variables, such as the module search path, and the interpreter version. The operator module provides functional equivalents to many built-in operators. The copy module allows you to copy objects. Finally, the gc module gives you more control over the garbage collector facilities in python 2.0.
About JSON
The JavaScript Object Notation (JSON) is a data-interchange format. Though many programming languages support JSON, it is especially useful for JavaScript-based apps, including websites and browser extensions. JSON can represent numbers, Booleans, strings, null, arrays (ordered sequences of values), and objects (string-value mappings) made up of these values (or of other arrays and objects).
SL4A - Development Environment
This chapter details the procedure to set up your development environment. It also discusses how to configure your device to use SL4A.
Development Environment
You must download and install several pre-requisites before you can start developing with SL4A.
Java Development Kit (JDK)
To begin with, you should have a recent version of JDK (JDK 5 or upwards) installed on your system.
To confirm that a compatible version of the JDK installed available to the environment, execute the following on the command line or console terminal, as follows −
$javac version
$java version
Note − Set the PATH environment variable to jdk/bin folder
Python
It is likely that Python is installed on Mac OS X and Linux, by default. Windows OS, by default, does not have Python installed. Python can be downloaded from http://python.org.
Once installed, modify your Windows path to add the Python directory.
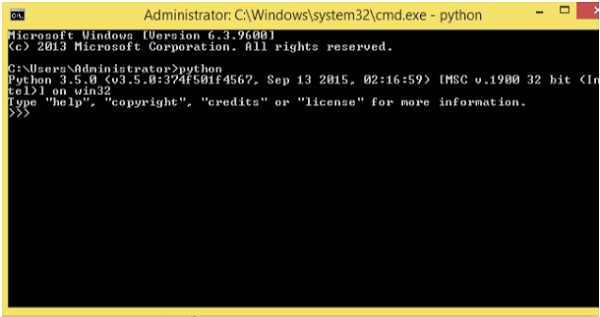
To verify if Python is installed on your system, open the terminal window and enter Python.
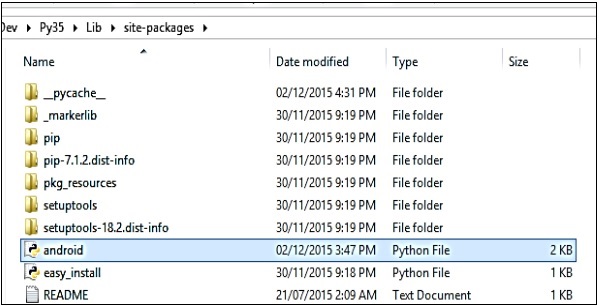
Android.py file
The only additional file that one needs to download is the android.py file. Include a copy of this file under /Lib/site-packages in the Python installation directory. This file includes python modules for Android development.
Android SDK
A number of tools are provided with the Android SDK. The first step is to download the appropriate install file for your operating system. Installers for Mac OS X, Linux and Windows are available. The SDK installer can be found at https://developer.android.com/sdk.
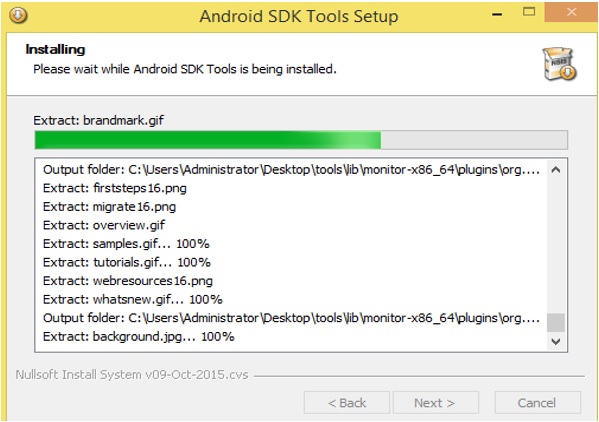
The development environment discussed here is Windows. Google provides a zip file and an executable to install SDK on Windows.
Installing Eclipse on a Development Machine
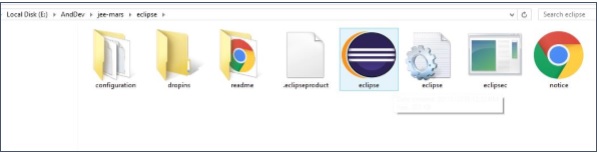
Eclipse was developed as an extensible, Integrated Development Environment (IDE) written in Java language. It requires an installation of Java to work. Eclipse comes in many flavors − Classic, Galelio, Luno, Mars, Neon, etc.
It is distributed in a single .zip file. All you have to do is unpack the program contents. The extracted folder has an Eclipse.exe file. Double click the file to start the program.
SL4A - Configuring Your Device
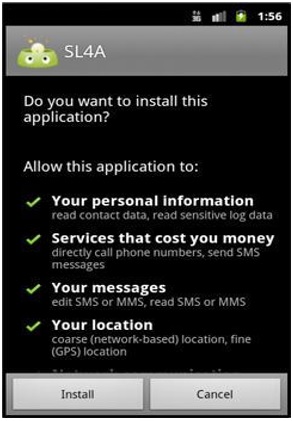
Installing SL4A
At times, you may want to write scripts on the device and execute them. The Scripting Layer for Android helps achieve the same. To install SL4A on your device, follow the steps given below −
Download the SL4A.apk file on your device.
Launch the .apk file from the notifications screen.
Select Install on the next screen to actually install SL4A.
Alternatively, if you choose to use an emulator as against an android device, install SL4A using the browser inside the emulator. The SL4A installation initial screen on a device is shown below.
Adding the Python Interpreter
To install the python interpreter on a device, follow the steps given below −
Step 1 − Start the SL4A application.
Step 2 − Click the Menu button.
Step 3 − A list of options will be displayed. Select View.
Step 4 − Select the Interpreter option from the dialog box. Click Add.
Step 5 − A list of interpreters available for download is displayed. Select Python 2.62 (or greater).
To install python interpreter on an emulator, follow the steps given below −
Step 1 − Ensure that the emulator is running in the background.
Step 2 − Download python_for_android_rx.apk.
Step 3 − In the terminal command-line shell, navigate to the location where the apk file is stored and type the following on the command line −
adb install python_for_android_rx.apk
SL4A supports scripting engine for multiple languages. A list of some language specific apk files are mentioned below −
- beanshell_for_android_rx.apk
- jruby_for_android_rx.apk
- lua_for_android_rx.apk
- perl_for_android_rx.apk
- python_for_android_rx.apk
- rhino_for_android_rx.apk
Connecting to Windows OS
Step 1 − Download and Install the USB Driver for Windows.
Step 2 − Setup your device −
Start SL4A from All apps screen on the device.
Tap the Menu button → View.
Choose the interpreters from the list.
Tap the Menu button → Start Server.
Select Public (to connect over Wi-Fi) or Private(to connect over USB).
Step 3 − Add an environment variable (User variable) AP_PORT and value 9999.
Android SDK and Eclipse have been discussed in the subsequent chapters.
SL4A - Navigating the Android SDK
A software development kit that enables developers to create applications for the Android platform. The Android SDK includes sample projects with source code, development tools, an emulator, and required libraries to build Android applications. This chapter discusses the Android SDK and ways to use it for developing the code targeted at SL4A.
SDK Components
The directory tree where you installed the Android SDK, contains a list of folders containing documentation, sample code and a number of tools. Navigating to the tools subdirectory reveals a number of executable files.
Discussed below are some important components within the Android SDK.
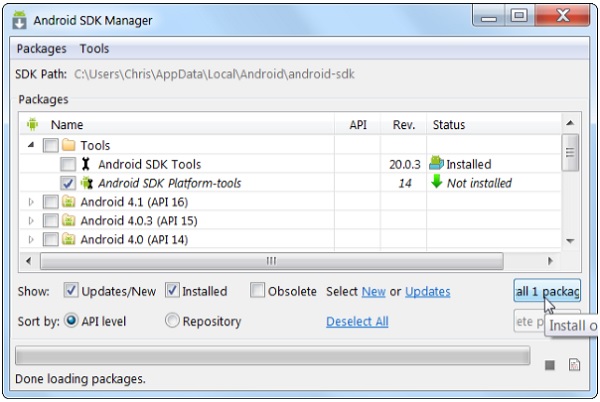
SDK Manager
The Android SDK Manager separates the SDK tools, platforms, and other components into packages for easy access and management. The SDK can be configured to check for new or updated SDK packages and add-on tools.
By default, Android Studio does not check for Android SDK updates. To enable automatic Android SDK checking −
Step 1 − Choose File → Settings → Appearance & Behavior → System Settings → Updates.
Step 2 − Check the Automatically check updates for Android SDK checkbox and select an update channel.
Step 3 − Click OK or Apply to enable the update checking.
The SDK Update Sites tab displays the sites that Android Studio checks for Android SDK and third-party updates. You can add other sites that host their own Android SDK addons, then download the SDK add-ons from those sites.
Android Emulator
The AVD Manager provides a graphical user interface in which you can create and manage Android Virtual Devices (AVDs), which are required by the Android Emulator. An Android Virtual Device (AVD) consists of a number of files including configuration and virtual storage required by the emulator. You can create as many AVDs as you want for simulating different devices.
The following steps can be used to create an AVD in Eclipse −
Step 1 − Select Window → AVD Manager.
Step 2 − Click New.
Step 3 − Type the name of the AVD, choose the target and specify values for the other features.
Step 4 − Click Create AVD.
For devices with keyboard, there is a standard set of mappings from the host keyboard to actions on the device. The default Emulator key mappings are −
| Emulator Key | Mapping on Host Device |
|---|---|
| BUTTON_CALL | F3 |
| BUTTON_HANGUP | F4 |
| BUTTON_HOME | Home |
| BUTTON_BACK | Escape |
| BUTTON_MENU | F2, PageUp |
| BUTTON_STAR | Shift+F2, PageDown |
| BUTTON_POWER | F7 |
| BUTTON_SEARCH | F5 |
| BUTTON_CAMERA | Ctrl+Keypad_5, Ctrl+F3 |
| BUTTON_VOLUME_UP | Keypad_Plus, Ctrl+F5 |
| BUTTON_VOLUME_DOWN | Keypad_Minus, Ctrl+F6 |
| TOGGLE_NETWORK | F8 |
| TOGGLE_TRACING | F9 |
| TOGGLE_FULLSCREEN | Alt-Enter |
| BUTTON_DPAD_CENTER | Keypad_5 |
| BUTTON_DPAD_UP | Keypad_8 |
| BUTTON_DPAD_LEFT | Keypad_4 |
| BUTTON_DPAD_RIGHT | Keypad_6 |
| BUTTON_DPAD_DOWN | Keypad_2 |
| TOGGLE_TRACKBALL | F6 |
| SHOW_TRACKBALL | Delete |
| CHANGE_LAYOUT_PREV | Keypad_7, Ctrl+F11 |
| CHANGE_LAYOUT_NEXT | Keypad_9, Ctrl+ F12 |
| ONION_ALPHA_UP | Keypad_Multiply |
| ONION_ALPHA_DOWN | Keypad_Divide |
You can change these settings by editing the default.keyset file in the .android subdirectory.
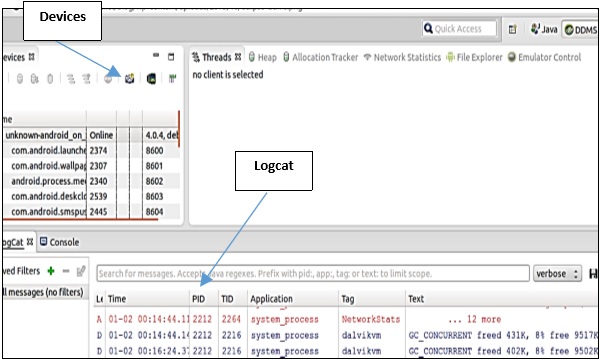
Android Debug Bridge
ADB, Android Debug Bridge, is a command-line utility included with Googles Android SDK. ADB can control your device over USB from a computer, copy files back and forth, install and uninstall apps, run shell commands, and more.
If you have an emulator running and a real device connected, you must specify where you want the ADB commands to a real device, use the option − d and for the emulator, use e. Following is the list of flags and commands for ADB.
| S.No. | ADB flags & Description |
|---|---|
| 1 | -d Directs device to the only connected USB device; returns an error if more than one USB device is connected. |
| 2 | -e Directs command to the only running emulator; returns an error if more than one emulator is running. |
| 3 | -s <serial_number> Directs command the USB device or emulator with the given serial number. |
| 4 | devices List all connected devices |
| 5 | connect <host>:<port> Connect to a device via TCP/IP |
| 6 | disconnect <host>:<port> Disconnect from a TCP/IP device |
| S.No. | ADB commands & Description |
|---|---|
| 1 | adb push <local> <remote> Copy file/dir to device |
| 2 | adb pull <remote> [<local>] Copy file/dir from device |
| 3 | adb sync [<directory>] If <directory>is not specified, both /system and /data partitions will be updated. If it is system or data, only the corresponding partition is updated. |
| 4 | adb shell Run remote shell interactively |
| 5 | adb emu <command> Run emulator console command |
| 6 | adb logcat View device log |
| 7 | adb forward <local> <remote> Forward socket connections |
| 8 | adb install [-l] [-r] [-s] <file> Push this package file to device and install it. (-l forward lock the app) (-r reinstall the app, keeping its data) (-s install on SD card instead of internal storage) |
| 9 | adb uninstall [-k] <package> Remove this app package from the device. -k means keep the data and cache directories |
| 10 | adb bugreport Return all information from the device that should be included in the bug report. |
| 11 | adb help Show this help message |
| 12 | adb version Show version number |
The Shell
A shell is a program that listens to keyboard input from the user and performs actions as directed by the user. The adb shell command provides Unix to send shell commands to an emulator or a connected device and display the results. It can also be used to launch an interactive shell locally.
To issue a single command without entering a remote shell, use the shell command like this −
adb [-d|-e|-s <serialNumber>] shell <shell_command>
Or to enter a remote shell on an emulator/device −
adb [-d|-e|-s <serialNumber>] shell
When you are ready to exit the remote shell, press CTRL+D or type EXIT.
Dalvik Debug Monitor Service
Android ships a debugging tool, Dalvik Debug Monitor Service (DDMS). This tool provides additional services such as port-forwarding services, screen capture on device, incoming call and SMS spoofing etc.
When DDMS starts, it connects to adb. A VM monitoring service is created between adb and DDMS, when a device is connected. This service notifies DDMS when a VM on the device is started or terminated.
Once the VM starts running, its process id is sent to the DDMS via adb and the adb daemon opens a connection to the VMs debugger. DDMS can now talk to the VM using a custom wire protocol.
SL4A - Working with Eclipse
This chapter will walk you through the basics of Eclipse IDE and configuring it to develop Python scripts for Android.
Basics of Eclipse
Eclipse is an application with many capabilities and options. A welcome screen will greet you, the first time you launch the program. Eclipse uses a number of basic concepts and terminology to address different functions and operations of the program.
Some of these terminologies are explained here −
Workbench − It identifies the overall window of the Eclipse application. It contains multiple child windows, each window containing multiple tabs.
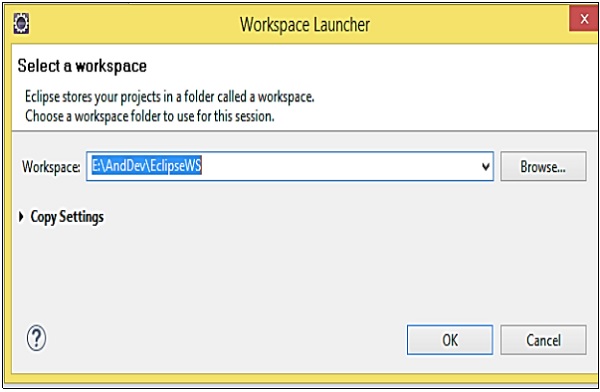
Workspace − It refers to the location on your systems file system where projects created using Eclipse will be saved.
Perspective − It is a personal preference for which menus and windows are open at any one time. Eclipse has a number of perspectives configured for typical usage, such as writing code, debugging etc. You can also switch to a different perspective when your activity changes. Perspectives are also customizable.
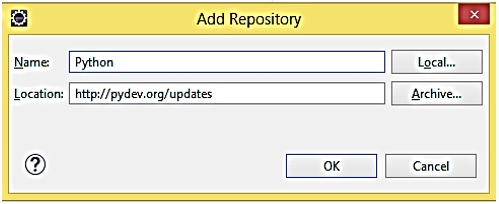
Installing Plugins for Eclipse
One needs to configure Eclipse to be able to develop SL4A applications. Once the prerequisites are installed successfully on the host, the following plugins for Eclipse must be added −
ADT plugin for Eclipse (available at http://dl-ssl.google.com/android/eclipse/ )
Python Plugin for Eclipse (available at http://pydev.org/updates )
The following steps can be used to install plugins on Eclipse −
Step 1 − Click Help.
Step 2 − Select Install New Software.
Step 3 − Click Add.
Step 4 − Specify the name and the URL to access the plugin. Click OK.
Step 5 − Select all the tools and click Next. The plugin installation starts
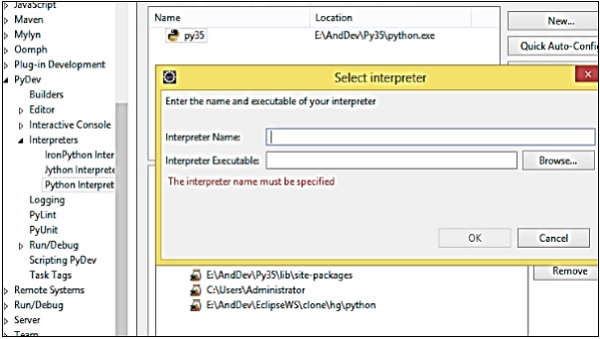
Python Interpreter in Eclipse
Follow the given steps to configure Python Interpreter in Eclipse.
Step 1 − Select Windows → Preferences.
Step 2 − Go to PyDev → Interpreter → Python.
Step 3 − Click the New button.
Step 4 − Specify a name for the interpreter. In the Location field, enter the path to python.exe. For example, C:\Python26\python.exe
Step 5 − Click OK.
SL4A - Exploring Android API
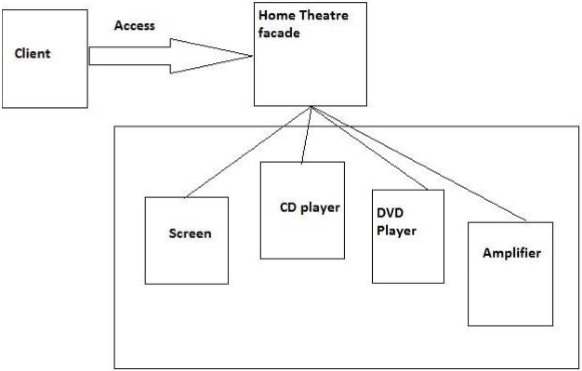
SL4A is based on the Facade Design Pattern to communicate with the underlying Android API. This chapter explains the working of Faade Design Pattern and the different SL4A API facades.
What is a Facade Design Pattern?
A facade is an object that provides an interface that simplifies the access to the related interfaces in the application. In other words, a faade insulates the working of the libraries from the client and acts as an entry point to each subsystem level. Thus, the clients communicate only through their facades. The following illustration explains the same.
SL4A and Android API Facades
SL4A hosts interpreters for each language it supports. The interpreters access the underlying Android APIs through an interface called a faade.
The following table lists the top-level facades and the functionality they provide −
| S.No. | Android API Facade & Description |
|---|---|
| 1 | ActivityResultFacade It sets how your script will return information as an activity. This method implies that your script will return a result of some kind. The result type can be set to either RESULT_CANCELED(0) or RESULT_OK(-1) |
| 2 | AndroidFacade It provides access to common Android functions like reading input, notifications, launching application components etc. |
| 3 | ApplicationManagerFacade List all available and running packages, launch an activity, create your task manager or terminate a specific set of packages. |
| 4 | BatteryManagerFacade Exposes the battery manager and allows tracking battery status, health, type level, voltage etc. |
| 5 | BluetoothFacade Provides access to Bluetooth capabilities from basic connection features to sending and receiving both ASCII and binary data. This faade requires at least API level 5. |
| 6 | CameraFacade This method provides access to all camera-related functions. Allows taking a picture using the devices camera and saving it to a specified path. It provides two functions namely cameraCapturePicture and cameraInteractiveCapturePicture. These functions are strictly for using the lens on the rear of the device. |
| 7 | CommonIntentsFacade Provides access to common Android Intents like opening a list of contacts, making a map search, starting an activity by action etc. |
| 8 | ContactsFacade Allows access to contacts such as providing the contact list for picking a contact, querying the contact list by attributes and getting a list of all contacts with their IDs and attributes. Some methods provided by the faade include contactsGet, pickContact, contactsGetById etc. |
| 9 | EventFacade The Android OS maintains an event queue for passing information between applications asynchronously. This faade provides functions to manage the event queue such as clearing the existing events, posting new events, listing, registering and unregistering broadcast signals etc. Examples of methods include eventPost, eventClearBuffer, etc. |
| 10 | EyesFreeFacade Available on devices below API level 4. It allows scripts to speak using text-to-speech technology. This faade is now replaced by TextToSpeechFacade. The only available function is ttsSpeak. |
| 11 | LocationFacade Provides functions that enables tracking the current location either by GPS or by using information about the cell tower youre currently using. This feature requires an active internet connection to do the actual lookup. The faade provides methods like getLastKnownLocation, startLocating, stopLocating, readLocation etc. |
| 12 | MediaPlayerFacade Allows playing media files, controlling the media player, querying the current status of the media player and getting information about the media files. mediaIsPlaying, mediaPlayInfo and mediaPlayList returns the current state of the media player. A call to the startActivity function launches the media player. Functions like mediaPlay, mediaPlayPause, mediaPlayClose, mediaPlaySeek,mediaPlayStart and mediaPlaySetLooping are used to control the media player. |
| 13 | MediaRecorderFacade This faade provides audio and video recording capability. startInteractiveVideoRecording, recorderStartMicrophone, recorderCaptureVideo functions are used to launch and start audio/video recording respectively. To end a previously started recording call the recorderStop function. |
| 14 | PhoneFacade Makes available basic phone operations like tracking phone state, roaming status, initiating calls, SIM information etc. programmatically. Examples of methods include phoneCallNumber, phoneDialNumber, getCellLocation etc. |
| 15 | PreferencesFacade Allows access to shared preferences like getting the list of existing preferences and reading, modifying and adding new preferences. There are three functions supported by SL4A r4 release: prefGetAll, prefGetValue and prefPutValue. |
| 16 | SensorManagerFacade Allows tracking sensor data such as light,acceleration, magnetic field and orientation. To start/ stop sensing use the startSensing (deprecated and replaced with startSensingThreshold and startSensingTimed by SL4r4) and stopSensing function calls. readSensors, sensorsGetLight, sensorsReadAccelerometer, sensorsReadMagnetometer and sensorsReadOrientation are the functions provided by this faade. |
| 17 | SettingsFacade Provides access to different phone settings like ringer volume, screen brightness, airplane mode, vibration, media volume etc. Functions provided by this faade are checkAirplaneMode, checkRingersilentMode and checkScreenOn(atleast API level 7), getVibrateMode, setScreenTimeout, toggleVibrateMode setRingerVolume etc. |
| 18 | SignalStrengthFacade Allows monitoring phone signal strength. Call the startTrackingSignalStrengths function to start gathering data. Call the readSignalStrengths function to start gathering data. To shut down the process call the stoptrackingSignalStrengths function. It requires at least API level 7. |
| 19 | SmsFacade It has functions for deleting, reading, marking and sending SMS messages. Examples of functions provided by this faade include smsMarkMessageRead, smsDeleteMessage, smsSend etc. |
| 20 | SpeechRecognitionFacade Enables adding speech recognition functionality to the script. It has only one function named recognizeSpeech. |
| 21 | TextToSpeechFacade Provides TTS services for API4 and later. To have a device speak use the ttsSpeak function. To determine if the speak function has completed use the ttsIsSpeaking function. |
| 22 | ToneGeneratorFacade Generates DTMF tones for given digits. To use it you must call the generateDtmfTones function. |
| 23 | UiFacade Provides functions for creating user interface elements like textboxes, checkboxes, datepickers etc. It also allows interactive use of HTML pages. |
| 24 | WakeLockFacade Provides functions to create a wake lock include wakeLockAcquireBright, wakeLockAcquireDim, wakeLockAcquireFull and wakelockAcquirePartial. |
| 25 | WebCamFacade This faade requires at least API level 8. It allows streaming MJPEG streams from the front-facing device camera to the network. To start/stop the webcam use the webcamStart and the webcamStop functions respectively. To adjust the quality of the video while streaming use the webcamAdjustQuality function. |
| 26 | WifiFacade Helps you to control the Wi-Fi radio on your device. It allows scripts to query the status of Wi-Fi connectivity, search for access points, connect to and disconnect WiFi networks and hold a Wi-Fi lock during script execution. |
Refer https://code.google.com for a full list of methods provided by these facades. The subsequent chapters illustrate how to create utilities using Android Faade API functions.
SL4A - Building GUIs
A Graphical User Interface (GUI) represents a set of graphical components that enables the user to browse, access and interact with the application functionalities.
There are two basic approaches to user interaction with SL4A namely −
Dialog boxes such as Alerts.
Using HTML and JavaScript to build the UI and then Python behind the scenes to handle any additional processing.
This chapter explains both the approaches.
Python Dialog Box Based GUIs
SL4A includes a UI faade to access the basic UI elements provided by the android API. These functions return a result object as a named tuple when called. Each result is assigned a unique id for tracking purpose. The second element is the result. It represents the users input. The tuple also includes the third element error to provide feedback to the caller about any error condition that might have been encountered. If no errors were encountered this element is set to None.
| S.No. | UiFacade Function & Description |
|---|---|
| 1 | dialogGetInput Queries the user for a text input. title (String) title of the input box (default = Value) message (String) message to display above the input box (default = Please enter value:) defaultText (String) text to insert into the input box (optional) The result is the user's input, or None (null) if cancel was hit. |
| 2 | dialogShow Show dialog |
| 3 | dialogCreateAlert Create alert dialog. title (String)(optional) message (String) (optional) |
| 4 | dialogDismiss Dismiss dialog. |
| 5 | dialogCreateDatePicker Create date picker dialog. year (Integer) (default = 1970) month (Integer) (default = 1) day (Integer) (default = 1) |
| 6 | dialogCreateTimePicker Create time picker dialog. hour (Integer) (default = 0) minute (Integer) (default = 0) is24hour (Boolean) Use 24 hour clock (default = false) |
| 7 | dialogGetPassword Queries the user for a password. title (String) title of the password box (default = Password) message (String) message to display above the input box (default = Please enter password:) |
| 8 | dialogGetResponse Returns dialog response. |
| 9 | dialogSetPositiveButtonText Set alert dialog positive button text. text (String) |
| 10 | dialogSetNegativeButtonText Set alert dialog button text. text (String) |
| 11 | dialogSetNeutralButtonText Set alert dialog button text. text (String) |
| 12 | dialogSetSingleChoiceItems This creates a list of radio buttons. |
| 13 | dialogSetMultiChoiceItems This creates a checkbox |
| 14 | dialogCreateHorizontalProgress Create a horizontal progress dialog. title (String) (optional) message (String) (optional) maximum progress (Integer) (default = 100) |
| 15 | dialogCreateSpinnerProgress Create a spinner progress dialog. title (String) (optional) message (String) (optional) maximum progress (Integer) (default = 100) |
| 16 | addContexMenuItem Adds a new item to context menu. label (String) label for this menu item event (String) event that will be generated on menu item click eventData (Object) (optional) |
| 17 | addOptionsMenuItem Adds a new item to options menu. label (String) label for this menu item event (String) event that will be generated on menu item click eventData (Object) (optional) iconName (String) |
| 18 | webViewShow Display a WebView with the given URL. url (String) wait (Boolean) block until the user exits the WebView (optional) |
| 19 | clearContextMenu Removes all items previously added to context menu. |
| 20 | clearOptionsMenu Removes all items previously added to options menu |
| 21 | makeToast Create a notification |
Examples
A simple Toast Example
import android
droid = android.Android()
uname = droid.getInput("Enter your name")
print uname
droid.makeToast("Hello %s" %uname.result)
A Horizontal Progress Bar
import android
   droid = android.Android()
   title = "Progress"
   str = "Loading..."
   droid.dialogCreateHorizontalProgress(title,str,100)
   droid.showDialog()

   for x in range(0,99)
      time.sleep(0.1)
      droid.dialogSetCurrentProgress(x)

   droid.dialogDismiss()
Modal Vs Non-Modal Dialog Boxes
A modal dialog box or window is a child to another process or window. With a modal dialog box, processing will wait or block until the user interacts with the new dialog box.
A typical example of this case is an alert dialog box. The alert will not close until the user performs an action.
The following image is an example of a modal dialog box.
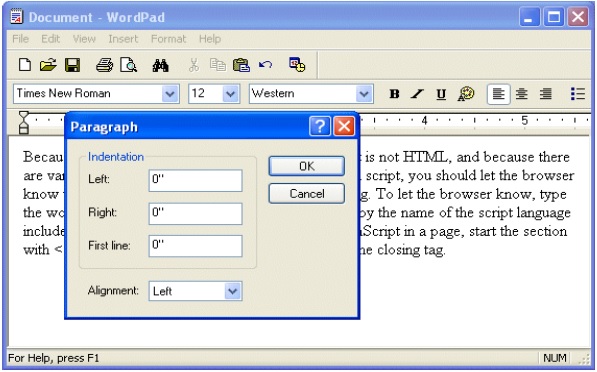
To sum up, use a modal dialog box when you need input from the user before you continue execution.
Python GUIs with HTML
SL4A enables building Graphical User Interfaces (GUIs) based on CSS, HTML, JavaScript and Python. The approach uses HTML and JavaScript to build the UI, CSS to enhance the appearance and consistency of HTML elements and fonts and Python to handle any additional processing.
The following example illustrates a basic HTML GUI example −
1. Speech.html
<html>
   <head>
      <title>Text To Speech</title>

      <script>
         var droid = new Android();
         var speak = function(){
            droid.postEvent("say",document.getElementById("say").value);
         }
      </script>

   </head>

   <body>
      <form onsubmit = "speak()";return false;>
         <label for = "say">What is your message?</label>
         <input type = "text" id = "say"/>
         <input type = "submit" value = "Speak"/>
      </form>
   </body>

</html>
2. txtToSpeech.py
import android
droid = android.Android()
droid.webViewShow(file:///sdcard/sl4a/scripts/Speech.html)

while True:
   result = droid.waitForEvent(say).result
   droid.ttsSpeak(result[data])
Both the files − Speech.html and txtToSpeech.py, must reside in the /sdcard/sl4a/scripts directory on the device. Run the python script to launch the HTML file.
This file is launched by the webViewShow API call. The event is generated when the Speak button is clicked.
SL4A - Utilities using Python Facades
Email-based Applications
Email based applications are one of the most common utilities available in a mobile device. One can use the sendEmail API call available through the SL4A Android facade.
This function takes three parameters −
to_address − a comma-separated list of recipients.
title − represents the title of the email message.
message − represents the message to be sent.
import android,datetime,smtplib
from email.mime.multipart import MIMEMultipart
from email.mime.text import MIMEText

droid = android.Android()
serv = smtp.gmail.com
port = 587
mailto = chris
mailfrom = charley
pass = pass@123

msg = MIMEMultipart()
msg[Subject] = Tes Mail
msg[To] = mailto
msg[From] = mailfrom

body = This is a test mail!!
msg.attach(MIMEText(body,plain))

smtpCon = smtplib.SMTP(serv,port)
smtpCon.starttls()
smtpCon.login(mailfrom,pass)
smtpSendmail(mailfrom,mailto,msg.as_string())
smtpCon.close()
The python library that have used to build the email program is smtplib. In addition, we have used the email library. This library contains a number of helper functions allowing us to construct our message in the correct form. The mimetypes library helps with the encoding of our message.
Wifi Scanner
The following code lists all available Wi-Fi access spots −
import android, time

def main():
   global droid
   droid = android.Android()

while not droid.wifiStartScan().result:
   time.sleep(0.25)

networks = {}

while not networks:
   for ap in in droid.wifiGetScanResults().result:
      networks[ap[bssid]] = ap.copy()

   droid.dialogCreateAlert(Access Points)
   droid.dialogSetItems([%(ssid)s,%(level)s,%(capabilities)s %
      ap for ap in networks.values() ])

droid.dialogSetPositiveButtonText(OK)
dorid.dialogShow()

if __name__=__main__:
   main()
Call Logs
The code for call logs is given below.
import android
droid = android.Android()
mylog = droid.getConstants("android.provider.Calllog$Calls").result
calls = droid.queryContent(mylog["CONTENT_URI"],["name","number","duration"]).result

for c in calls:
   print c
SL4A - Background Scripting with Python
A service is a component, which runs in the background, without direct interaction with the user. It does not have any UI (user interface). The service runs in the background indefinitely even if application is destroyed.
This chapter describes the writing scripts that perform specific tasks in the background.
Background Tasks
SL4A enables a script to run in a terminal or in the background. To launch a script in the background choose the icon that looks like a cog wheel. The script runs in the background infinitely. However, one may choose to explicitly shut down such services.
Launch on Boot Scripts
These scripts are launched whenever the device boots. The Launch on Boot preferences screen is an application that lets you specify the devices boot preferences. The utility supports execution of multiple scripts via a Master script. The Master script launches the other scripts.
Triggers
A trigger defines a set of actions that must be performed in response to an action/event. Triggers may be added as well as deleted. The /sdcard/sl4a/scripts directory allows you to choose a script to run when an event is triggered. The list of options that may trigger you script includes battery, location, phone, sensors and signal strength.
Orientation-based Actions
SL4A lets us run scripts depending on the orientation and movement of the device. The startSensingTimedAPI is used to determine the orientation and movement of the device.
The following snippet uses TTS function to notify the user when the phone has been placed face down −
import android,time
droid = android.Android()
droid.startSensing()

while True:
   res = droid.sensorsGetLight().result

   if res is not None and res <=10:
      droid.ttsSpeak("Device faced down!!")
   time.sleep(5)
Location-based Actions
Library, church are the locations that you may frequently visit and you definitely want to silence your phone when you are there. SL4A allows you to build scripts that will track your location and take specific actions.
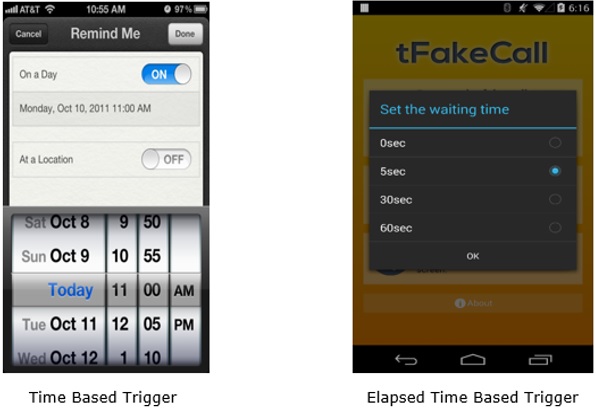
Time-based / Elapsed-Time-based Triggers
These triggers are used to perform actions at a specific time of day. The 24-hour time format should be used to specify the time. Examples include a script to set alarm, reminders etc. As against a time-based trigger, an elapsed time-based trigger executes the script after an elapsed number of time. The snooze option on an alarm application is based on this concept.
SL4A - Packaging & Distributing
This chapter explains the ways to package and distribute scripts using Eclipse and QR codes.
Quick Response (QR) Codes
Most Android devices include a native barcode scanner. SL4A supports importing QR codes directly into the editor. A QR code can only encode 4,296 characters of content. Hence, this method of distribution is suitable for short scripts.
There are several websites where you can paste text and create a QR code. However, we shall reference http://zxing.appspot.com/generator to generate the QR code in our illustration.
The steps are explained below −
Step 1 − Open the Contents drop-down and choose Text.
Step 2 − On the first line of the Text Content, enter the name of the script (e.g., greet.py).
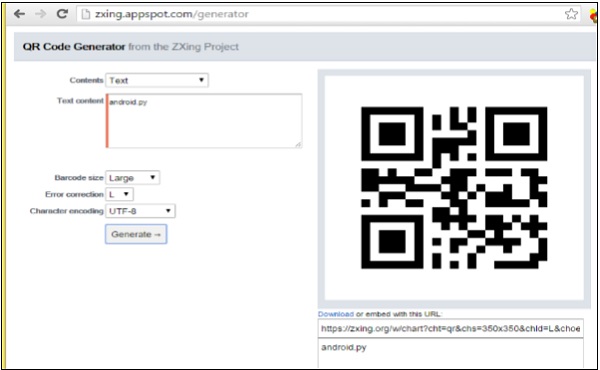
Step 3 − Paste the script content below that.
Step 4 − Choose the barcode size from the Size drop-down.
Step 5 − Click Generate.
Step 6 − Embed the resulting barcode image or share it.
Thus, QR code is an effective way to share short scripts through a blog or a website.
Build Application Packages Eclipse
Android applications are distributed in a single file/package with an .apk extension. The Android Package (.apk) is similar to a .jar or .zip file. Each .apk contains a number of mandatory files that must be present. The most important file is the AndroidManifest.xml.
The manifest file does a number of things −
Declares application components.
Identify user permissions the application requires.
Declares hardware and software features used or required by the application, such as camera, Bluetooth services etc.
Specifies API libraries the application needs to be linked against, such as the Google Maps Library.
The steps to build a distributable project i.e. .apk in eclipse are illustrated below −
Download and install Hg from mercurial − http://mercurial.selenic.com/wiki/Download. Set the PATH variable to the installation folder.
Create a clone of the latest SL4A repository: Open the terminal and navigate to the directory where the clone must be created. Enter the following Hg clone: https://android-scripting.googlecode.com/hg/android-scripting.
Open Eclipse and click on File/Import/General/Existing Projects into Workspace/Next and Browse to the cloned directory. Click on Android/OK then select all and click Finish.
Include ANDROID_SDK in the Classpath Variable list by clicking Windows/Preferences/Java/BuildPathVariables/New. Put ANDROID_SDK for the name and your SDK directory for the folder (probably c:\ProgramFiles\Android\android-sdk-windows).
Click Project/Build Automatically, then Project/Clean/Clean all Projects/OK.
To turn your script into an APK, make a copy of ScriptForAndroidTemplate (right click/copy then right click/paste into the same area). A new project will appear with the name Copy of ScriptForAndroidTemplate.
To connect this project to your clone of SL4A, double click on it, right click on build.xml /Run As /Ant Build. Rename the project using Refactor/Rename to whatever name you choose for your project and Refresh/Clean/Build the project.
Next, double-click on raw and Refactor/Rename to change the name script.py to your_script_name.py and then double-click src/com.dummy.fooforandroid/Script.java and change R.raw.script to R.raw.your_script_name and save.
Double-click on src and Refactor/Rename to change the package name com.dummy.fooforandroid to your.package.name. Do the same for gen.
Now highlight your project then click on Project/Properties/Android. Select your android target and click OK.
Towards the bottom of your project list, double click on AndroidManifest.xml. Change the package name in the manifest from com.dummy.fooforandroid to your.package.name. Change your minSdkVersion from "4" to suit your android target (this is the API level for your android target shown in Project/Preferences/Android). Uncomment the permissions you require your application to have (take off <!-- at the start and --> at the end). Set Debug to False.
Right click on your_script_name and open with text editor. Delete the default script, replace it with your own and save. Then Clean/Build/Refresh your project and run it. If all goes well click on File/Export to export your application as an apk.
Click Next.
Every Android Application must be digitally signed before it can be installed. Select Create new Keystore, if this is the first time you have been through this process.
Select a file to hold your keystore and it must be password protected.
Click Next. Notice the validity field. You may create a key valid for any number of years, from 1 to 99.
The final dialog box allows you to specify where you want the .apk file to reside. Click Finish.
One may use Eclipse or the ADB tool to test/install the .apk file. To install using ADB, open a terminal window, navigate to the .apk destination directory and type the following −
adb install distributable_file.apk
