
 Data Structure
 Networking
 RDBMS
RDBMS Operating System
 Java
Java MS Excel
 iOS
iOS HTML
HTML CSS
CSS Android
 Python
 C Programming
 C++
C++ C#
C# MongoDB
 MySQL
MySQL Javascript
 PHP
PHP
- Selected Reading
- UPSC IAS Exams Notes
- Developer's Best Practices
- Questions and Answers
- Effective Resume Writing
- HR Interview Questions
- Computer Glossary
- Who is Who
Simple Android grid example using RecyclerView with GridLayoutManager
Before getting into grid Layout manager for recycler view example, we should know what is Recycler view in android. Recycler view is more advanced version of list view and it works based on View holder design pattern. Using recycler view we can show grids and list of items.
This example demonstrate about how to integrate Recycler View with Grid layout manager by creating a beautiful student records app that displays student name with age.
Step 1 − Create a new project in Android Studio, go to File ⇒ New Project and fill all required details to create a new project.
Step 2 − Open build.gradle and add Recycler view library dependency.
apply plugin: 'com.android.application'
android {
   compileSdkVersion 28
   defaultConfig {
      applicationId "com.example.andy.tutorialspoint"
      minSdkVersion 19
      targetSdkVersion 28
      versionCode 1
      versionName "1.0"
      testInstrumentationRunner "android.support.test.runner.AndroidJUnitRunner"
   }
   buildTypes {
      release {
         minifyEnabled false
         proguardFiles getDefaultProguardFile('proguard-android.txt'), 'proguard-rules.pro'
      }
   }
}
dependencies {
   implementation fileTree(dir: 'libs', include: ['*.jar'])
   implementation 'com.android.support:appcompat-v7:28.0.0'
   implementation 'com.android.support:design:28.0.0'
   implementation 'com.android.support.constraint:constraint-layout:1.1.3'
   implementation 'com.android.support:recyclerview-v7:28.0.0'
   testImplementation 'junit:junit:4.12'
   androidTestImplementation 'com.android.support.test:runner:1.0.2'
   androidTestImplementation 'com.android.support.test.espresso:espresso-core:3.0.2'
}
Step 3 − Add the following code to res/layout/activity_main.xml.
<?xml version = "1.0" encoding = "utf-8"?>
<RelativeLayout
   xmlns:android = "http://schemas.android.com/apk/res/android"
   xmlns:tools = "http://schemas.android.com/tools"
   xmlns:app = "http://schemas.android.com/apk/res-auto"
   android:layout_width = "match_parent"
   android:layout_height = "match_parent"
   app:layout_behavior = "@string/appbar_scrolling_view_behavior"
   tools:showIn = "@layout/activity_main"
   tools:context = ".MainActivity">
   <android.support.v7.widget.RecyclerView
      android:id = "@+id/recycler_view"
      android:layout_width = "match_parent"
      android:layout_height = "wrap_content"
      android:scrollbars = "vertical" />
</RelativeLayout>
In the above code we have added recycler view to window manager as relative parent layout.
Step 4 − Add the following code to src/MainActivity.java
package com.example.andy.tutorialspoint;

import android.annotation.TargetApi;
import android.os.Build;
import android.os.Bundle;
import android.support.annotation.RequiresApi;
import android.support.v7.app.AppCompatActivity;
import android.support.v7.widget.DividerItemDecoration;
import android.support.v7.widget.GridLayoutManager;
import android.support.v7.widget.LinearLayoutManager;
import android.support.v7.widget.RecyclerView;

import java.util.ArrayList;
import java.util.Collections;
import java.util.Comparator;
import java.util.List;


public class MainActivity extends AppCompatActivity {
   private RecyclerView recyclerView;
   private StudentAdapter studentAdapter;
   private List studentDataList = new ArrayList<>();
   @TargetApi(Build.VERSION_CODES.O)
   @Override
   protected void onCreate(Bundle savedInstanceState) {
      super.onCreate(savedInstanceState);
      setContentView(R.layout.activity_main);
      recyclerView = findViewById(R.id.recycler_view);
      studentAdapter = new StudentAdapter(studentDataList);
      RecyclerView.LayoutManager manager = new GridLayoutManager(this, 2);
      recyclerView.setLayoutManager(manager);
      recyclerView.addItemDecoration(new DividerItemDecoration(this, LinearLayoutManager.VERTICAL));
      recyclerView.setAdapter(studentAdapter);
      StudentDataPrepare();
   }
   @RequiresApi(api = Build.VERSION_CODES.N)
   private void StudentDataPrepare() {
      studentData data = new studentData("sai", 25);
      studentDataList.add(data);
      data = new studentData("sai", 25);
      studentDataList.add(data);
      data = new studentData("raghu", 20);
      studentDataList.add(data);
      data = new studentData("raj", 28);
      studentDataList.add(data);
      data = new studentData("amar", 15);
      studentDataList.add(data);
      data = new studentData("bapu", 19);
      studentDataList.add(data);
      data = new studentData("chandra", 52);
      studentDataList.add(data);
      data = new studentData("deraj", 30);
      studentDataList.add(data);
      data = new studentData("eshanth", 28);
      studentDataList.add(data);
      Collections.sort(studentDataList, new Comparator() {
         @Override
         public int compare(studentData o1, studentData o2) {
            return o1.name.compareTo(o2.name);
         }
      });
   }
}
In the above code we have added recycler view and studentAdapter. In that student adapter we have passed studentDatalist as arraylist. In Student data list contains name of the student and age.
To get the grids, we have to use grid layout manager as shown below -
RecyclerView.LayoutManager manager = new GridLayoutManager(this, 2);
In the above code we have used layout manager as GridlayoutManger and added cells as 2.So It will show the result with two grids in each row.
To compare recycler view items we have used collections framework and sort method as shown below -
Collections.sort(studentDataList, new Comparator() {
   @Override
   public int compare(studentData o1, studentData o2) {
      return o1.name.compareTo(o2.name);
   }
});
In the above code we are comparing elements by using name.
Step 5 − Following is the content of the modified file src/ StudentAdapter.java.
package com.example.andy.tutorialspoint;

import android.graphics.Color;
import android.support.annotation.NonNull;
import android.support.v7.widget.RecyclerView;
import android.view.LayoutInflater;
import android.view.View;
import android.view.ViewGroup;
import android.widget.LinearLayout;
import android.widget.TextView;

import java.util.List;
import java.util.Random;

class StudentAdapter extends RecyclerView.Adapter<StudentAdapter.MyViewHolder> {
   List<studentData> studentDataList;
   public StudentAdapter(List<studentData> studentDataList) {
      this.studentDataList = studentDataList;
   }
   @NonNull
   @Override
   public MyViewHolder onCreateViewHolder(@NonNull ViewGroup viewGroup, int i) {
      View itemView = LayoutInflater.from(viewGroup.getContext())
      .inflate(R.layout.student_list_row, viewGroup, false);
      return new MyViewHolder(itemView);
   }
   @Override
   public void onBindViewHolder(MyViewHolder viewHolder, int i) {
      studentData data=studentDataList.get(i);
      Random rnd = new Random();
      int currentColor = Color.argb(255, rnd.nextInt(256), rnd.nextInt(256), rnd.nextInt(256));
      viewHolder.parent.setBackgroundColor(currentColor);
      viewHolder.name.setText(data.name);
      viewHolder.age.setText(String.valueOf(data.age));
   }
   @Override
   public int getItemCount() {
      return studentDataList.size();
   }
   class MyViewHolder extends RecyclerView.ViewHolder {
      TextView name,age;
      LinearLayout parent;
      public MyViewHolder(View itemView) {
         super(itemView);
         parent = itemView.findViewById(R.id.parent);
         name = itemView.findViewById(R.id.name);
         age = itemView.findViewById(R.id.age);
      }
   }
}
In the adapter class we have four methods as shown below -
onCreateViewHolder() :- It is used to create a view holder and it returns a view.
onBindViewHolder() - it going to bind with created view holder.
getItemCount() - it contains size of list.
MyViewHolder class- it is view holder inner class which is extended by RecyclerView.ViewHolder
To set random background for recycler view items, we have generated random colors using random class(which is predefined class in Android) and added color to parent of view item as shown below -
Random rnd = new Random();
int currentColor = Color.argb(255, rnd.nextInt(256), rnd.nextInt(256), rnd.nextInt(256));
viewHolder.parent.setBackgroundColor(currentColor);
Step 6 − Following is the modified content of the xml res/layout/student_list_row.xml.
<?xml version = "1.0" encoding = "utf-8"?>
<LinearLayout xmlns:android = "http://schemas.android.com/apk/res/android"
   android:orientation = "horizontal" android:layout_width="match_parent"
   android:weightSum =" 1"
   android:layout_height="wrap_content">
   <TextView
      android:id = "@+id/name"
      android:layout_width = "0dp"
      android:layout_weight = "0.5"
      android:gravity = "center"
      android:textSize = "15sp"
      android:layout_height = "100dp" />
      <TextView
      android:id = "@+id/age"
      android:layout_width = "0dp"
      android:layout_weight = "0.5"
      android:gravity = "center"
      android:textSize = "15sp"
      android:layout_height = "100dp" />
</LinearLayout>
In the above list view we have created two text views for name and age.
Step 7 − Following is the content of the modified file src/ studentData.java.
package com.example.andy.tutorialspoint;

class studentData {
   String name;
   int age;
   public studentData(String name, int age) {
      this.name = name;
      this.age = age;
   }
}
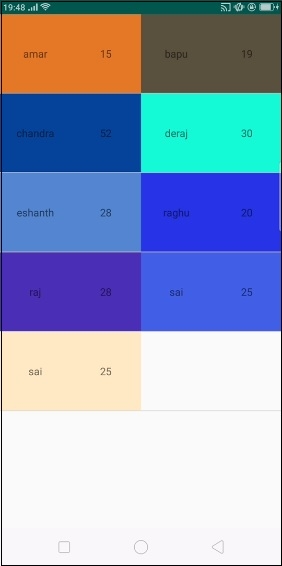
In the above informs about student data object. Let's try to run your application. I assume you have connected your actual Android Mobile device with your computer. To run the app from android studio, open one of your project's activity files and click Run ![]() icon from the toolbar. Select your mobile device as an option and then check your mobile device which will display your default screen −
icon from the toolbar. Select your mobile device as an option and then check your mobile device which will display your default screen −
Click here to download the project code

1K+ Views
