- ServiceNow - Home
- ServiceNow - Introduction
- ServiceNow - Fundamentals
- ServiceNow - ITIL
- ServiceNow - Cloud Services
- ServiceNow - Administration
- ServiceNow - Development
- Mastering and Certification
- ServiceNow Useful Resources
- ServiceNow - Quick Guide
- ServiceNow - Useful Resources
- ServiceNow - Discussion
ServiceNow - Quick Guide
ServiceNow - Introduction
ServiceNow is a cloud based platform, which was mainly developed for workflow and process automation as per the ITIL principles. However, it is highly customisable and also can be used for other purposes. ServiceNow is an American based company and was founded in 2004 by Fred Luddy. It has a unique way for naming its versions. They name the versions based on the major cities of the world. The latest version of ServiceNow is Orlando.
ServiceNow offers many ready to use solutions, workflows and products for an organisation. The organisation can develop the customised applications and modules as per the business requirement using the ServiceNow scripting and existing tools.
Services of ServiceNow
Some of the important offerings and most widely used services of ServiceNow are explained below −
IT Service management
ServiceNow is mainly used as a ticketing tool to manage incidents, problems and changes. It has many advanced features, analytics and insights that impacts the speed and delivery of IT.
HR management
ServiceNow can be used for almost all HR delivery services like leave management, timesheet management, employee document management, new onboarding management, performance management, etc.
IT Asset management
With ServiceNow, we can manage our hardware and software assets to optimise cost and increase efficiency. ServiceNow has features such as licence management, warranty management, CI management, advanced reporting and insights, etc.
Finance operation management
ServiceNow manages all the activities related to finance close and automates the financial processes.
Apart from offerings mentioned above, ServiceNow also offers services for IT business management, security operations, virtual chatbots, etc.
ServiceNow is built using Java and Tomcat web server running on Linux. Although to develop new modules and applications in ServiceNow the JavaScript knowledge is sufficient.
ServiceNow Instance
A ServiceNow instance is a set of databases, applications, virtual machines, libraries grouped together to provide the required services to a specific customer. ServiceNow customer instance is built on multi-instance architecture.
The figure given below shows multi-instance architecture −
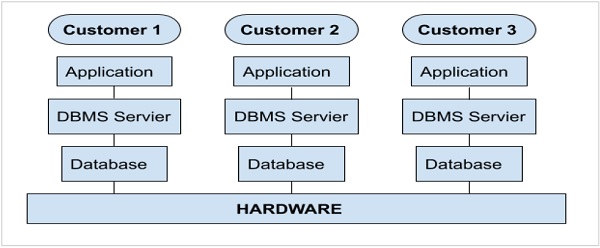
The important point to note here is that, each customer has a separate customised application(s) along with separate database(s) running on shared hardware resources. The customer data is encrypted and therefore, is completely secure. The deployment of ServiceNow is very flexible and it can also be implemented in a private cloud.
ServiceNow also offers developer instance, which is a community edition free of cost. ServiceNow developer instance was launched, to promote the use of ServiceNow and to provide the resources, so that the developers/administrators can learn, build, enhance and customise the applications in ServiceNow.
Generating Developer Instance
In this tutorial, we will use the ServiceNow developer instance and we also recommend you to generate a developer instance using the steps below −
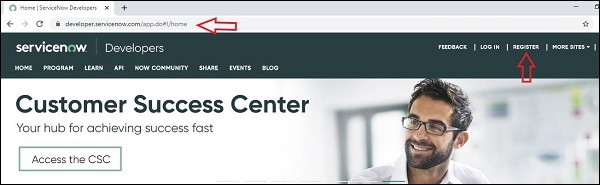
Step 1
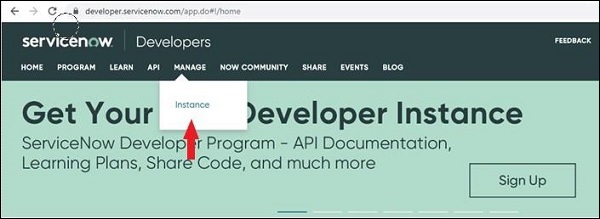
Go to the URL https://developer.servicenow.com/ and click on register. You will see a screen like the one shown below.
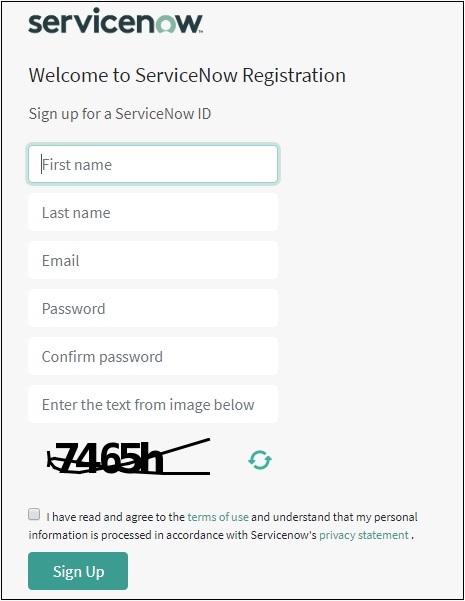
Step 2
ServiceNow registration form will open. Give your details and click submit, as given below.
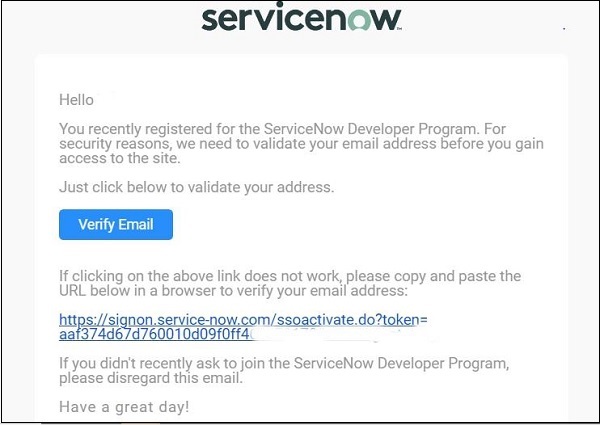
Step 3
ServiceNow will send the confirmation email. Click on the link in email to confirm the registration. Kindly refer the screen given below.
Step 4
Now, login to your ServiceNow account. You will see the dashboard below. Go to Manage → Instance.
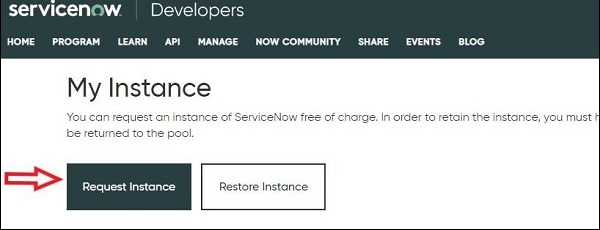
Step 5
Now, click on request instance.
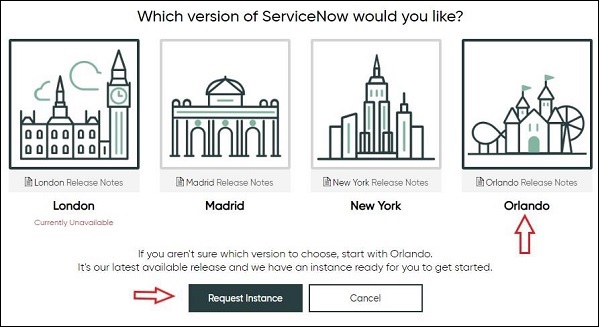
Step 6
Click on the latest release of ServiceNow and click on Request Instance. At the time of writing this tutorial, the latest version is Orlando.
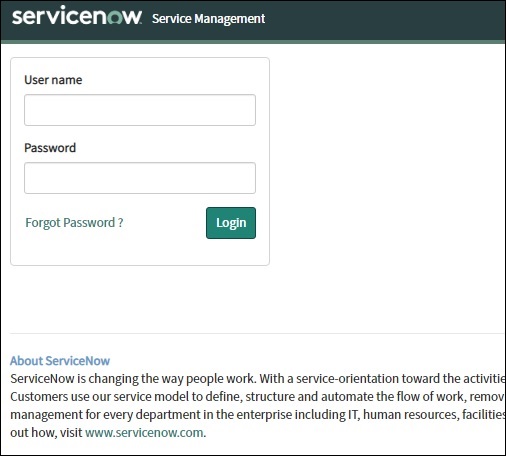
It will take around 20 minutes and your instance will get ready. On the following page, you will get the link for your instance, the admin username and password. Click on the instance link and give your username and password. After Login, you will be required to change the default password given by ServiceNow.
Please keep in mind that, if you do not use your developer instance for 10 consecutive days then, it will become inactive and you have to reclaim that instance back. After logging into your instance, you will get the first look of the ServiceNow portal.
Now that, you have your ServiceNow instance, you can explore various applications and features along with this tutorial.
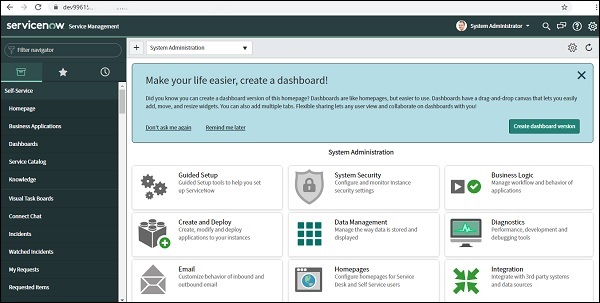
ServiceNow User Interface (UI)
ServiceNow user interface (UI) is made up of default elements. The interface is highly flexible and can be customised as per the business requirements. An overview of ServiceNow UI is mentioned below −
All the components in the UI are explained below.
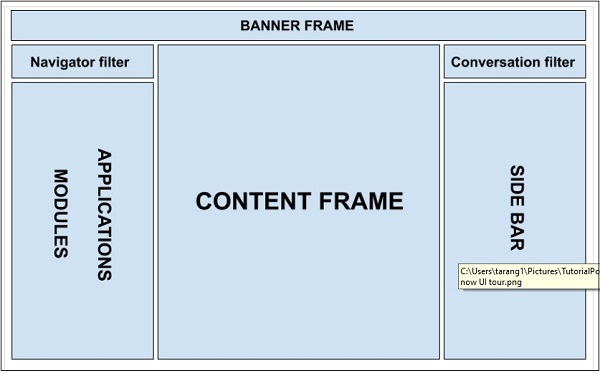
Banner frame
The banner frame has a logo, setting options, user profile, global search bar, and option to toggle between conversation and help in the right side bar.
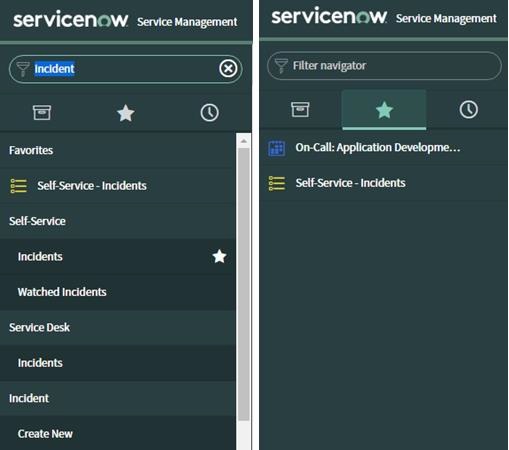
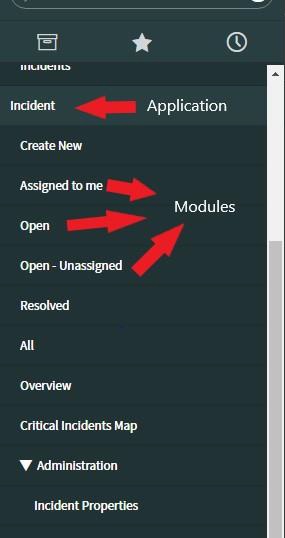
Application navigator
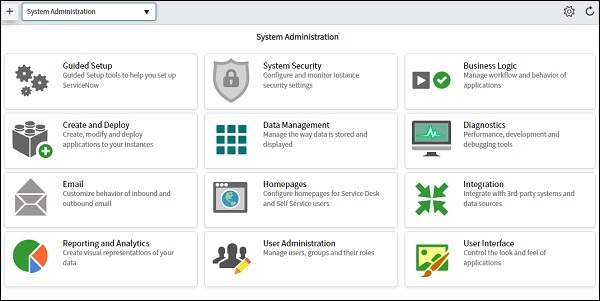
The Application navigator allows us to browse through all the applications and modules under the applications. We can give the name of application or module in the navigation filter and ServiceNow will automatically show us all the matching applications and modules.
For example, Incident is an application in service now and Create new is a module under it, using which, we can create a new incident. Similarly, Open is another module inside incident application, which will list all the open incidents.
ServiceNow provides an option to add applications or modules as favourite by clicking in the star at the side. This is very helpful in navigating our favourite applications or modules easily.
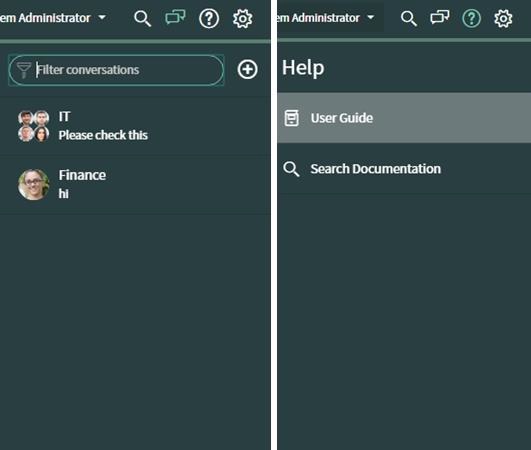
Sidebar
The sidebar is not provided by default. The user has to activate it from the banner frame. The sidebar can either display the conversations or the help options. Using the conversation feature, we can chat with fellow colleagues and browse through chat history. The Help option allows us, to refer to the support articles which are added by administrators.
Content frame
The content frame is the centre part of ServiceNow portal, which lists the entire content of applications and modules. This also contains the centralised menu of the applications, which are important from the administration point of view. Below, are the samples of content frame displaying centralised menu and displaying content of the open module in incident application.
ServiceNow - Fundamentals
Lets move a step ahead and learn some basics of ServiceNow. In this chapter, we will go through users/groups/roles, lists, forms, applications, modules and a few more concepts.
The ServiceNow developer instance has ample of dummy data like users, incidents, groups etc., which we can refer to gain good understanding about the concept. Throughout the remaining chapter, we will take our old example of BookWorm ltd. and try to understand where, ServiceNow fits in the internal functioning of the organisation.
Applications and Modules
ServiceNow defines Application as, a collection of files and data that deliver a service and manage business processes and Modules are, children of application linking to other pages or records in the platform.
For example, we have an Incident application, which has modules like Create new to create a new incident for any department in BookWorm ltd. Open module lists all the open incidents within BookWorm ltd. (This module may only be visible to system administrators).
Similarly, there are other important applications like Problem, Change, Workflows, etc. and its respective modules like Create New, Open, WorkFlow editor, etc.
Lists and Forms
Here, you will understand what are the lists and forms in ServiceNow.
Lists
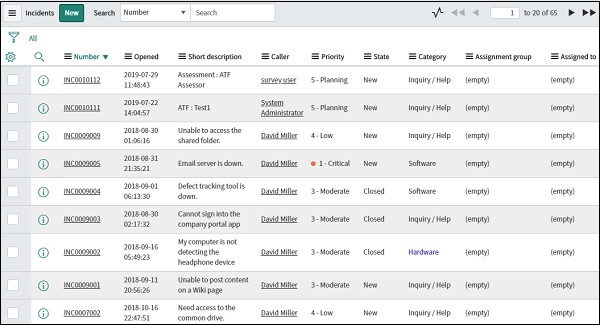
It displays the set of records (based on certain conditions) from the data table. It could be a list of incidents assigned to a certain group, from the incident table or list of problems not assigned to any group from problem table, etc.
Below is an example, of the Incident list having incidents, which are resolved from the incident table.
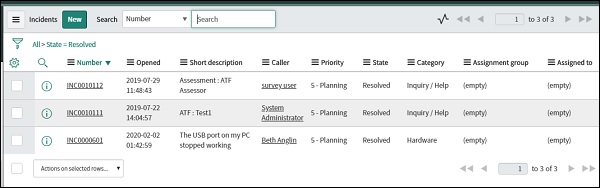
This List is generated via the Resolved module of Incident application. This is a default module provided with ServiceNow. To open this module and explore this list, search Incident in application navigator and inside the Incident application find Resolved module.
Forms
It displays one record from the data table or it can be used to enter/update a record in a data table. For example, an incident form will display details related to a single selected incident or it can also be used to enter details of a new incident in an incident table.
The form which have details of existing incident record and form to enter the details of the new incident record are given below respectively.
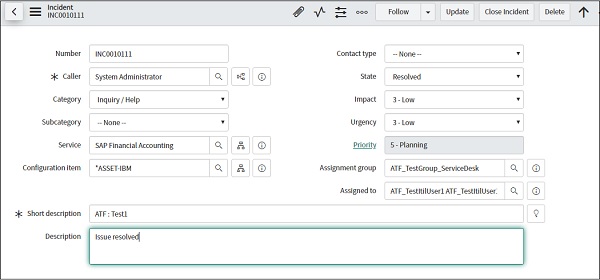

To access the first form in the above example, go to Resolved module inside Incident application. A list of resolved incidents will appear. Click on any incident number, to open the form. The second screen in the above example, having a form to enter new incident details, can be accessed via Create New module of Incident application.
Users, Roles and Groups
The users, roles and groups in ServiceNow are explained below in detail.
Users
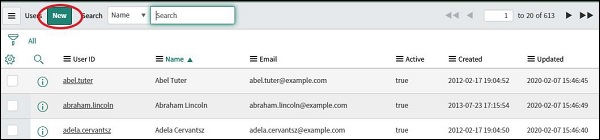
are the individuals who use the ServiceNow within an organisation. The system administrator has the authority to create a new user, browse through the list of existing users, delete a user and impersonate a user.
To open the list of existing user, go to Users module inside User administration application.
(Search user in application navigator and click on Users under User Administration)
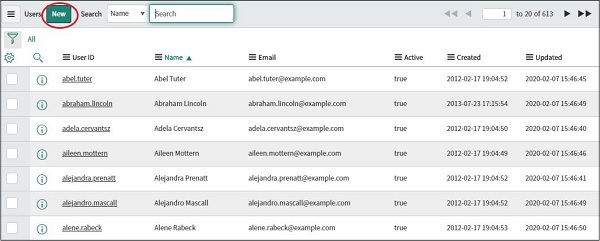
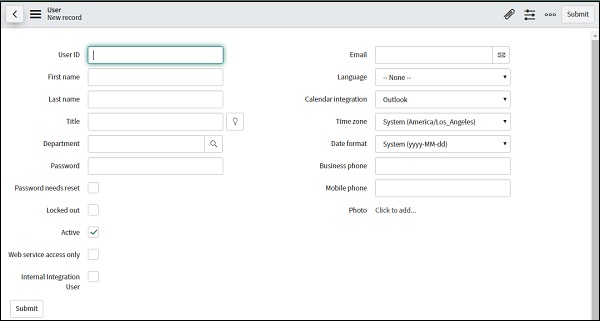
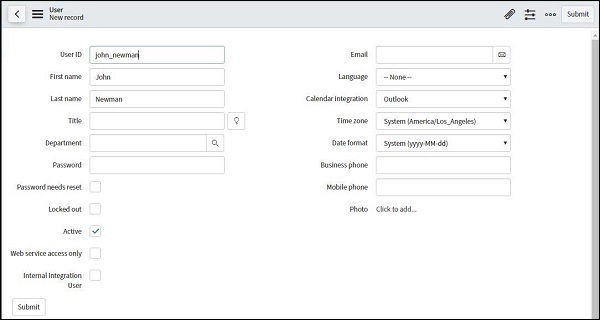
To create a new user, click on the New button in top left of the content frame. Following form will open to enter a new data record for the user table.
A system administrator can also impersonate a user, which means that system administrator can login to ServiceNow as another user. There is an option in the banner frame, to impersonate as any other user.

Roles
are associated with the task that a user performs within an organisation. The role is assigned based on the work profile. For example, there can be an incident manager role, application developer role, incident analyst role, etc.
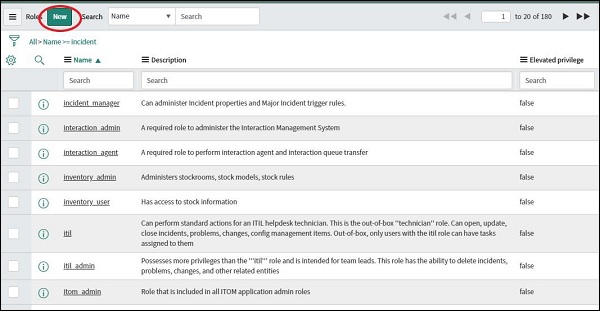
The roles control the access to the features and capabilities in applications and modules. So, a system administrator role may have access to a few applications which incident manager role may not have. The list of roles and form to add a new role can be found in System security application under Users and Groups.
Groups
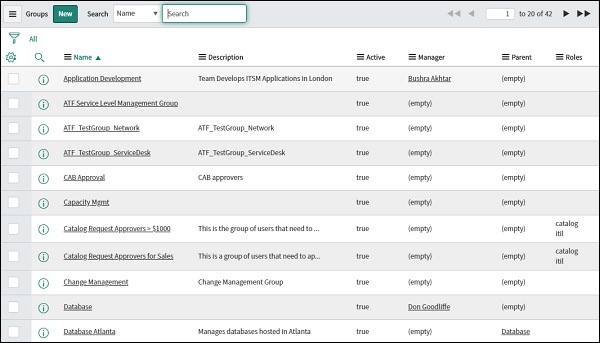
Groups are the collection of users, which perform a similar task. For example, there can be a group of change managers, who can approve the changes in production, or there can be a procurement group, who have the access to raise the purchase order, etc. The group can be accessed via System security → Users and groups → Groups.
It is always best practise to assign users to groups or vice versa, and further assign roles to groups. Generally, it is not recommended to assign users directly to the roles. The reason is explained using the below example −
Suppose among many groups in BookWorm ltd. (in ServiceNow), there is one group for the IT team and under the IT team there is a child group for Full stack engineers. In addition to this, there are a couple of roles i.e., Backend IT services and Frontend IT services. The Full stack engineers need to be assigned to both the roles so that they have accesses and licence privileges meant for both, Frontend and Backend IT services.
A full stack engineer joined BookWorm ltd. who is expert in both backend technologies and frontend technologies. Therefore, instead of assigning this user to two roles (Backend IT services and Frontend IT services) separately, it would be a good idea to create a group of full stack engineer and assign this group to two roles, i.e., Backend IT services and Frontend IT services.
Now, for all the full stack engineers joining the BookWorm ltd., the administrator only has to assign that full stack engineer user to the full stack engineer group, which is a child group of the IT team.
Lets implement the example mentioned above practically in ServiceNow, to understand this concept better.
Practical
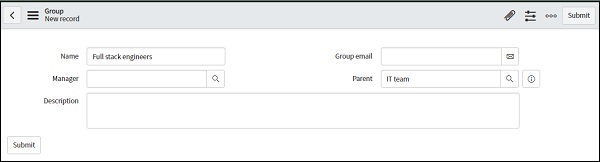
First, we will create a group, i.e. IT team and its child group Full stack engineers. In the navigation filter, search User administration and select Group modules under user administration. The following screen will open in the content frame.

Click on the New button and give the details. Only Name is sufficient to identify the Group. You can also give Group email and select the manager from the list of users. The parent tag is used to create a hierarchical structure in the group, so for the IT team group, we can leave it blank and for Full stack engineers group, we can give IT team group as the parent.
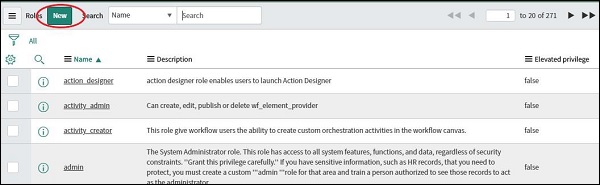
Now that we have created the groups, let's move ahead and create two roles - Backend IT services and Frontend IT services, which will be assigned to the group Full stack engineers. Inside User administration, go to Roles module.
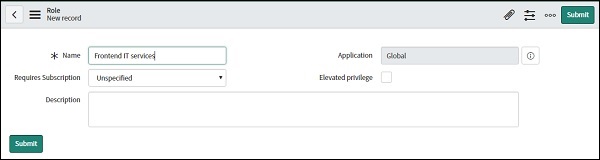
Click on the New button and give the name of the role. Keep the application as Global to allow this role to be implemented for every application in your ServiceNow. Granting elevated privilege means that, the user assigned to this role, will be given accesses/privileges more than a standard user. They may require administering certain functionality.
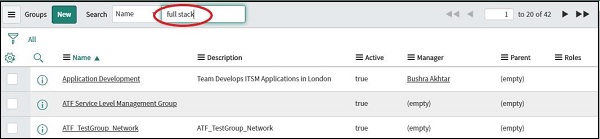
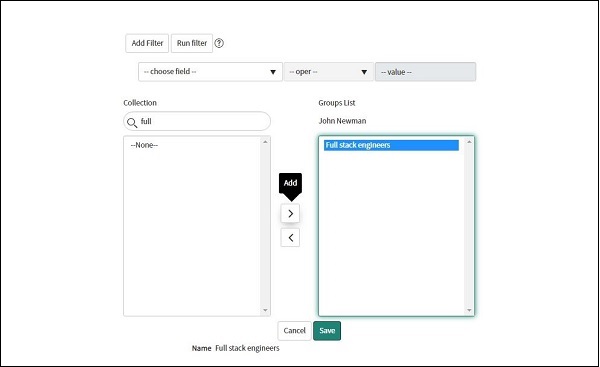
Now, we have to assign these roles to our group. Go to Groups module again and search our group Full stack engineers at the top of content frame beside New button.
Open group Full stack engineers and now you will see, a new section to add roles or Group members. In the roles tab, click edit button and below screen will appear.
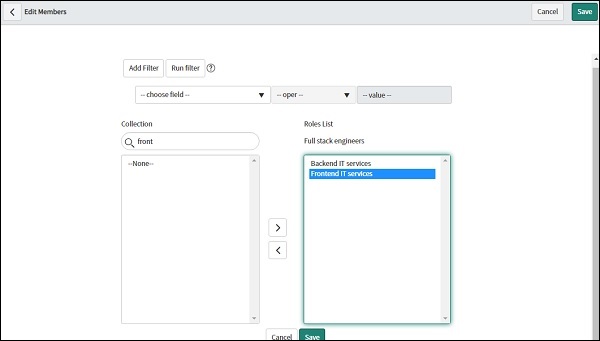
Search the role, we have just created Frontend IT services in the collection box. Select the role and click on the arrow button to add the role in this group. Finally, press the Save button. You will be taken back to the main screen of the Group module. Update the record, using the update button in the top right corner. Similarly, repeat the process for Backend IT team services.
Lets move ahead and add some users in ServiceNow. Navigate to users module in user administration application and click on New button.
Enter the details of the new user and press submit button. Similarly, you can add a few more users. We have added two new users here, John Newman and Cindy Davis.
To assign the group full stack engineer to these users, open the newly created users again and scroll at the bottom of the user. You will see a new section to add roles or groups to this user.
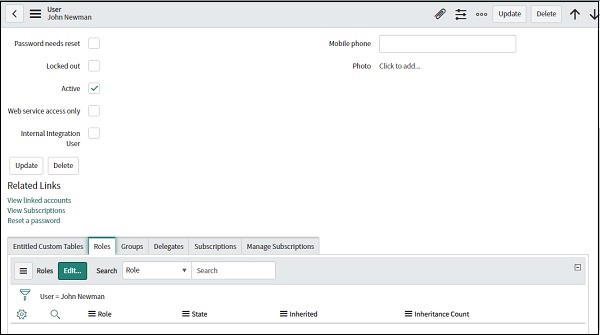
Go to Groups tab and click on edit button. Following screen will appear −
Search the group full stack engineers in the collection box, select the group and click on the arrow button to add this group to the user John Newman. Repeat the similar process for Cindy Davis. So, finally we have created users, groups and roles. We have then added the roles to the group and group to the user.
Tables, Columns and Fields
Let us learn, what are tables, columns and fields in ServiceNow. We will begin by understanding about the tables.
Tables
Tables are the collection of data in ServiceNow. The applications and modules use tables to store, display and process the data. For example, the Incident application has an incident table. Similarly, there is a user table, change request table, etc.
To check the structure or update the structure of any table make use of the Tables module of System Definition application.
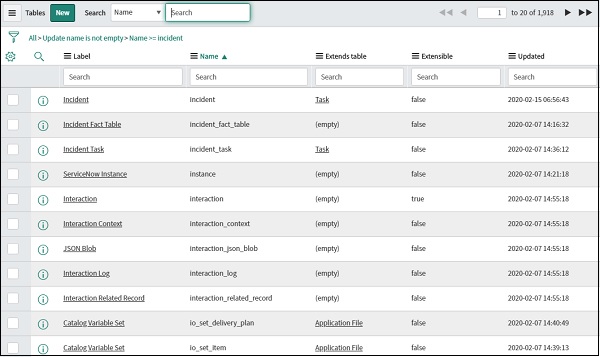
The table name can be searched in the top section of the content screen.
Lets explore the incident table. Once, we click the desired table, we can find all the columns in the table, column type (integer, string, etc.), maximum length, etc. The new column can be added to the table, using the New button.
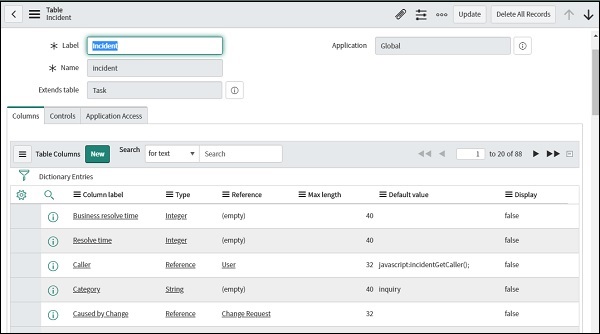
The important point to note here is that, every row in the table points to the unique record. So, for example, if an incident IN3325643 is raised in BookWorm ltd., for the full stack engineers group reporting the database connectivity issue. There will be a new row added in the incident table, which is specific for the incident record IN3325643.
To browse the data, in the table search <tablename>.list in the navigation bar (incident.list in this case).

If we focus on this incident record, every column in this record represents the field having a specific value. For example, this incident record IN3325643 is having column Caller as Abel Tuter, this is one of the fields of this record. To open any record, click on the incident number from the list.
Similarly, you can explore other tables like users, problem, change, etc. We can even create a new table, for our custom applications as per the business requirements. The new table can be created from the Table module → New button in the top section of the content frame.
ServiceNow - ITIL
ITIL stands for Information Technology Infrastructure Library. It was introduced by the UK governments Central Computer and Telecommunications Agency (CCTA) during the 1980s.
ITIL is a collection of books having processes and best practises laid down in order to achieve efficient IT (Information Technology) Service Management (ITSM) and elaborating all the activities required for delivering end to end IT services in any organisation.
ITIL defines service as means of delivering value to customers by facilitating outcomes customers want to achieve, but without the ownership of specific costs and risks. ITSM states the systematic approach to design, deliver and manage IT services within the organization.
Stages of ITIL
ITIL is divided into five main stages. Every stage has a specific role to play in a service life cycle and form the skeleton of ITIL. Let's look into each stage briefly.
Service Strategy
It is the first stage of ITIL, which lays down the blueprint of a new service (or changes in an existing service). The proper plan and roadmap of the service is prepared in this stage. All the aspects of services like value creation, resources, capabilities, investment, portfolio, etc. are discussed in this phase.
Service Design
This is the next phase of ITIL, wherein, architecture of the new or changed service takes place, as per the service strategy. It also lays down the processes, policies and solutions as per the business requirements.
Service Transition
This is the third stage of ITIL and the main objective of this stage is plan, manage, build and deploy the new or changed IT service in the production (real world). This stage also drafts the risk management and back out plans. Change management is one of the important processes which comes under service transition, which is explained later.
Service Operation
This stage of ITIL focuses on the day to day IT services, which are delivered to the customers. It makes sure that; every IT service is delivered efficiently without any (or at minimum possible) disruption. This stage introduces various processes, which need to be carried out in case of service disruption, incident management and problem management being important among them.
Continual Service Improvement (CSI)
This stage highlights the steps that could be taken, to increase the overall efficiency and performance of the service. The CSI works closely with all the other stages and identifies improvement opportunities with metrics driven approach.
Processes in ITIL
Now let's look into the three main processes in ITIL. The Change Management comes under Service Transition and Incident Management and Problem Management comes under Service operation.
Change Management
It is an approach which guides on how to prepare, manage and support transition in the service. It deals with any kind of change within the organisation. May it be technological change, process change, organisational restructuring, physical datacenter related changes, software related changes, server related changes, etc.
specific change request is raised in any ITIL tools like ServiceNow, Remedy, etc. to track the change. The change request undergoes several stages like review, approval, budgeting, documentations, etc. which may vary as per the organisations policies.
Incident Management
It is an approach to identify, analyse, manage and restore any disruption caused in the service. Incident management ensures that the performance of the service is up to the mark and any interruption in the quality of the service is restored as soon as possible.
A specific incident record with unique ticket number is raised in ITIL tool, by support/service desk executive for each and every disruption reported. The corresponding team further analyses and restore the service and updates the Incident ticket accordingly in ITIL tool.
Problem Management
The purpose of problem management is to find a permanent root cause for the recurring incidents. Problem management mitigates the impact of the recurring incidents in the services. As per the ITIL practice, a problem record is raised for recurring types of incidents.
The corresponding team finds the exact root cause and proposes change or fix in the service for the permanent resolution of the incident. A change request is raised for the proposed fix/change and it is implemented in production through change management process.
Example of entire ITIL process
Let us take an example of a startup BookWorm ltd., which sells books online through their website. The company is planning to launch a book rental service in selected cities. This service provides facility for doorstep delivery and return of the rented books. The company has adopted an ITIL framework, since its establishment and since, this is a new service, it should undergo various stages of ITIL.
Service strategy
The service proposal is first presented to the stakeholders. The discussions on customer base, return on investment (ROI), prices, market research, competitors and business model takes place in this phase.
Service design
The blueprint of the service is prepared by the experts in the respective fields. The technology that will be used to deliver the service to the customer, subscription plans, payment method, online portal design, delivery and return model and charges are finalised in this stage.
Service transition
At this point of time, scope and design of the service is already defined. In service transition, the preparation to implement the service starts. The change request is raised for the new service and activities like software development, budgeting, approval, acquisitions, inventory management is undertaken by the respective teams. The roadmap for the service is finalised and milestone dates are set for the service to go live.
Service operation
The service is now in production and each and every issue (whether one time or recurring) reported during the service delivery by the customers, users or internal team is tracked and managed by the Service operation.
Continual Service Improvement
In this continuous process, the opportunities are identified to make service better, for example, internal IT team suggests a new CMS (content management system) tool for their website, which provides improved metrics, easy access and enhanced features.
Change, Incident and Problem Management
An example of BookWorm Ltd. with respect to change management, incident management and problem management is discussed below −
The BookWorm ltd. has taken forward the idea to implement the new CMS as a part of continual service improvement. The service improvement plan undergoes various stages of ITIL - Service strategy, Service design, Service transition and finally the new CMS is implemented in production and is being monitored as part of Service operation. The new CMS is performing as expected and is providing enhanced features.
One fine day a customer using book rental service calls up the customer care and reports that, he had opted for the monthly subscription of their basic plan, but he was billed as per the premium plan. The customer care executive creates an Incident ticket for the issue in ITIL tool and forwards it to the respective team. This is the Incident management phase. The IT team checks the issue and corrects the bill amount and plan from the backend (database) directly and marks the incident as resolved.
With time, several similar incidents got reported by multiple customers. After resolving the issue by manual adjustment from the backend, the IT team decides to find a permanent root cause and fix this issue. They open a problem record for this recurring incident in an ITIL tool and start the investigation. This is a problem management phase. After an investigation, the team spots a bug in their script and identifies the changes required in the script as a part of fix.
The IT team now raises a change request in ITIL tool to fix the script of the new CMS and starts working in the code changes. This is the change management phase. The change request goes through various approval, prioritisation and budgeting phase and finally, gets implemented in production as per the agreed date.
ServiceNow - Cloud Services
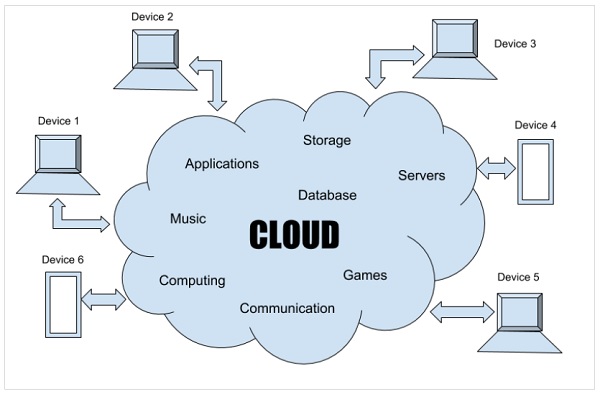
The vendors providing Cloud computing are called Cloud services. The cloud in cloud computing refers to the internet. Therefore, cloud computing refers to providing computing services like storage, CPU, networking, RAM, servers, etc. over the Internet. However, cloud computing has evolved over the years and thereby, providing a range of services like software development platforms, tools, enhanced infrastructure management, etc.
The major cloud service providers in the market include Google, Amazon, IBM, Oracle, SAP, etc. A perfect example of cloud computing is Google docs. All your documents are stored in Google cloud and you can access your documents from anywhere, anytime and from any device without having any specific software (Document viewer/editor) installed in your system. Your documents and application through which you can access your documents, both are available in the cloud.
The below figure gives an overall view of cloud computing.
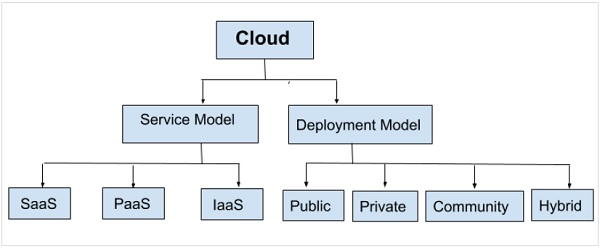
Cloud computing can be implemented in a number of ways based on the organisations or individuals requirement and business needs. Cloud infrastructure can be setup in a number of ways, which are referred to as cloud deployment models.
Types of deployment models
The types of deployment models are as follows −
Public cloud
This type of cloud is freely available for public use. It can be owned by big companies or government organisations providing free of cost services. For Example - Gmail, Dropbox, Microsoft Azure, etc.
Private cloud
Private cloud is used exclusively by a single organisation for their internal purposes. They are generally, accompanied by firewalls restricting the general public from using the cloud. For example, a big MNC operating private cloud for its multiple subsidiaries or business unit for their internal computing/sharing resources.
Community cloud
It is a model between public and private cloud. Only selected organisations or communities of users having the same line of business or same agenda have access to this type of cloud. For example, all the banks maintaining a common cloud having the database of loan defaulters, which is shared among the banks to refer while issuing a fresh loan.
Hybrid cloud
This type of cloud infrastructure is a mixture of any of the deployment models discussed above (Public, Private and Community). For example, a large company maintaining a hybrid cloud of public and private. All the sensitive information of the companies like future strategies, internal policies, etc. are stored and processed in private cloud while public information such as product details, prices, orders are processed and stored in a public cloud.
Cloud Service Models
There are also cloud service models, which are categorised based on the services offered by the cloud service providers. We have discussed the three service models of cloud below −
Infrastructure as a service (IaaS)
This is the most fundamental level of cloud service, where in customer only takes computing resources or virtual hardware like storage, CPU, RAM, etc. from the cloud service providers. The customer takes complete ownership of managing applications, operating systems, software, databases, etc. in the cloud. For example − Rackspace, Digital ocean, etc.
Platform as a service (PaaS)
This is one level further to IaaS. Here, along with the computing resources/virtual hardware, operating system, some software service and tools are also provided by the cloud service providers. The customer takes ownership of developing application using those software services/tools and maintaining it. For example − Google App Engine, Apache Stratos, ServiceNow, etc.
Software as a service (SaaS)
This service model offers fully functional, ready to use software over the internet. The service provider takes the complete ownership of managing the software, servers, database, infrastructure, etc. The SaaS services can be free or available at monthly/yearly prices. For example: Salesforce, Google Apps, ServiceNow, etc.
We can summarise the deployment model and service model of the cloud based on the below figure.
ServiceNow is a highly flexible application which provides the option of PaaS as well as SaaS. Its SaaS offering provides fully functional workflow automation and ITSM tools, while its PaaS offering, allows the user to develop a custom application on the top of existing suite, as per the business requirement. We will study more about this in later sections.
ServiceNow - Administration
ServiceNow administration deals with general support, administration and maintenance of the ServiceNow platform for the organisation.
It also includes customising user interface, keeping versions up to date, configuration of applications and modules, managing security and user access, monitoring the system performance and doing regular health checks, managing workflows, UI policies, UI actions, etc.
ServiceNow administrators are also responsible for setting up the ServiceNow, loading ServiceNow with the initial data, setting up groups, roles, users, SLAs, etc.
ServiceNow Configuration
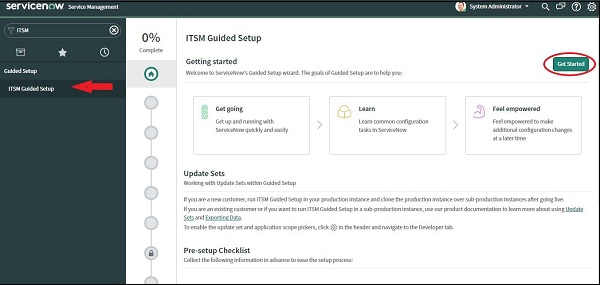
The best way for the initial configuration of the ServiceNow is to use the ITSM guided setup application. Generally, only system administrators have access to ITSM guided setup application.
ITSM guided setup provides a sequence of tasks that help you configure IT Service Management (ITSM) applications on your ServiceNow instance from scratch including company name, logo, colour combinations, fonts, banner, form layout, fields to be displayed in forms, lists, etc.
Moreover, the ITSM guided setup also assists in configuring the major applications like Incident, Change, Problem, etc. To open ITSM guided setup, search ITSM in the navigation bar and open the first search result ITSM guided setup and click on the Get started button, as shown below.
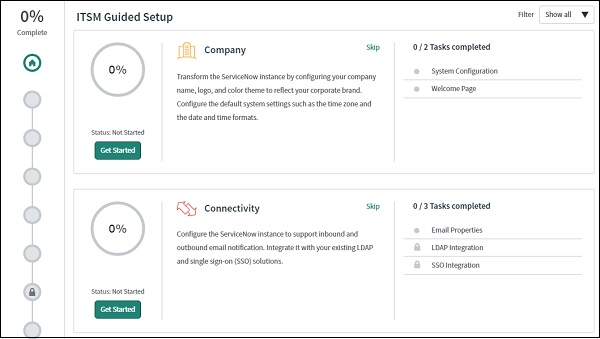
The entire setup is organised into categories like Company, Connectivity, Foundational data, CMDB, etc. We have to configure each category one by one using an interactive and guided menu. The completion progress for each category is displayed, beside the content frame and also, the overall completion status is displayed at the top of content frame.
We can configure the category in any order and we can skip the configuration of any specific category as well. The task for the configuration of the ServiceNow from scratch is very big and, therefore, we can assign the task to configure each category to the individual admin user.
The steps in guided setup are very detailed and self-explanatory. You can play around with the guided setup and try to configure the various categories. There are instructions and help available in every category for the reference.
Import sets
The import sets are used to import the data in ServiceNow from external sources like excel, JDBC, etc. The data is imported in the ServiceNow and then, mapped in the relevant ServiceNow tables. The data can be imported manually one time, or we can schedule the periodic import to happen automatically. Lets discuss, both the imports one by one with the help of an example.
Manual Import
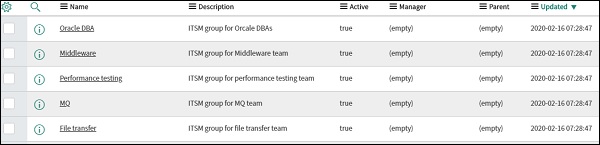
The data can be imported manually using the Load data module of System import set application. Lets take an example, we have to import 5 groups in ServiceNow. The table, which stores the group in the ServiceNow is sys_user_group. To browse the data in this table, simply type sys_user_group.list in the navigation bar.
Suppose, we have data of five groups in the excel, which we want to upload in the ServiceNow.
| A | B | C | |
|---|---|---|---|
| 1 | Name | Description | Active |
| 2 | Oracle DBA | ITSM group for Oracle DBAs | True |
| 3 | Middleware | ITSM group for Middleware Team | True |
| 4 | File Transfer | ITSM group for File Transfer Team | True |
| 5 | MQ | ITSM group for MQ Team | True |
| 6 | Performance testing | ITSM group for performance testing team | True |
Open the Load data module for System import set application. In the import set table, click on the Create table, as we do not have any existing import table for importing user groups. The import tables are basically the intermediate tables or the staging table.
As we import the file, the data is first loaded in this table and then, we can load the data from this import table to the actual target table in the ServiceNow (sys_user_group in this case).
Then, give the name of the new table in the Label field. The important point to note here, is all the tables, which are created by the user, have the prefix of u_ in the name and all the system tables of ServiceNow have prefix sys_ in the name.
Select the file from the explorer. Additionally, you can give the sheet number, which corresponds to the tab in the excel and header row (column name) in the excel. Both of them are 1 in our case. Finally, click on submit.

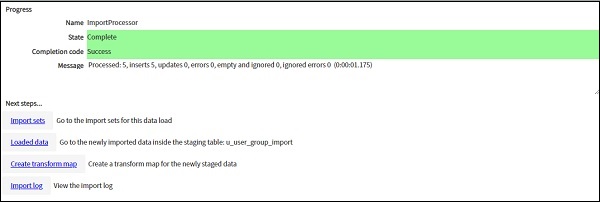
Once the process is complete, you will see the above screen with state as complete and the next steps which have to be followed. First, let us go to the Import Sets under Next steps.
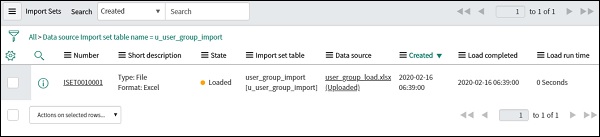
You can see that the import set has been created with the state as Loaded, which means that the data in our excel file, has been loaded in our intermediate table u_user_group_import. You can check the data in this intermediate table, by searching u_user_group_import.list in the navigation bar.
Now let's move ahead and create a transform map for this imported data. In the transform map, basically, we create the mapping between intermediate table and target table (sys_user_group system table), that means which column of intermediate table corresponds to which column of target table, so that data can be loaded in target table accordingly.
Go to the Create transform map module under the System import set application and give any name for the transform map. Select the source table, which is u_user_group_import in our case and the target table, which is sys_user_goup. Since, we have to keep this transform map active, check the active box and check Run business rule as well. The business rules are a set of rules, which runs when any insert or update is made on the table.
For example, if a user does not enter any data in a field, the default values are set automatically. You can even give your own script, if you want to process the data before inserting it to target table, for this check the Run script box.

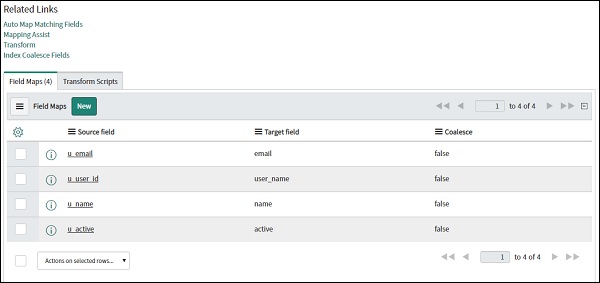
Now, that we have created a transform map, either we can map the column of source table to target table, or allow ServiceNow to do the auto mapping for us. Go to Transform maps module under System import sets → Administrations → Transform maps.
Select the transform map, which we have just created and check for the section Related links. There are two options, auto mapping and mapping assist. Click on Auto map matching fields and you will find all the mapping done automatically in the Field map tab.
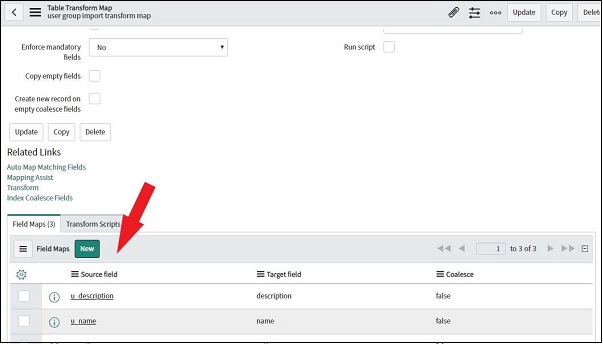
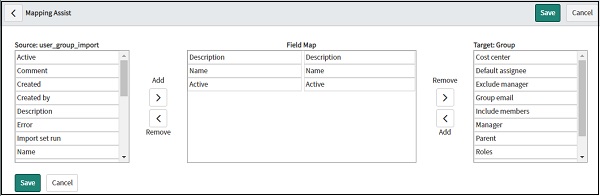
You can also try to do the mapping manually, by clicking on Mapping assist.
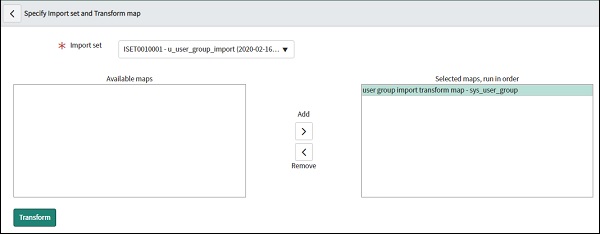
Let us run this transform map to load the data in our target table. This is our final step. Go to Run transform module inside System import set. Select the transform map, we have just created and click Transform.
We will get the below screen showing the .
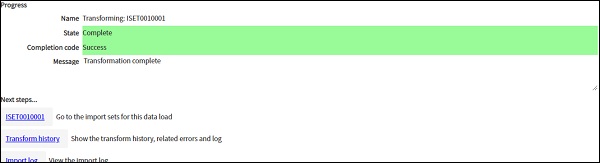
Now, we will go to sys_user_group table and check that our groups are imported successfully.
Since, we were importing the user groups for the first time, we were required to create an import table, transform map, etc. These efforts will be reduced in all the subsequent imports of the user groups, as we already have an import table and transform map.
Scheduled Data Import
Scheduled data import is very useful if, our ServiceNow is receiving data from some external system. ServiceNow can be connected to other systems via FTP, HTTP, SCP, etc. We can also upload the file periodically in ServiceNow, so that, it can be picked up by the scheduled import process.
Let us take an example, wherein, we have some external system based on UNIX, which will daily generate a file (in the fixed path), having details of the new employee joining the BookWorm ltd.
The ServiceNow is supposed to pull this file from the external system, process this file and finally, import the data in the sys_user table. Lets implement this step by step. First of all, we have to create a data source, navigate to the Data source module under System import set application.
Give the name of data source, import set table (new table will be created), format of the file which ServiceNow will pull (CSV, XML, Excel, Jason, Etc). Here, we are taking the example of csv, so we have to give csv delimiter as well, which would be , (comma) in our case. Now select the file retrieval method, here we are using FTP and we have to give the server, pathname where, file will be available for pull, FTP username and password.
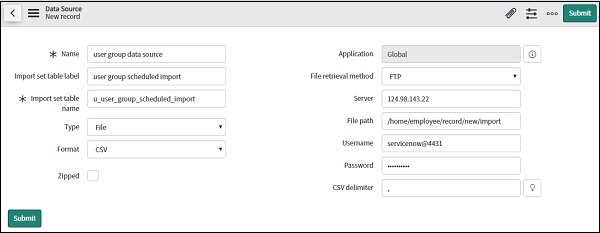
After clicking the submit button, open the Data source again and click on Test load 20 records in the Related link section. ServiceNow will now try to test load the records via FTP, so make sure that, the file is present in the mentioned location.
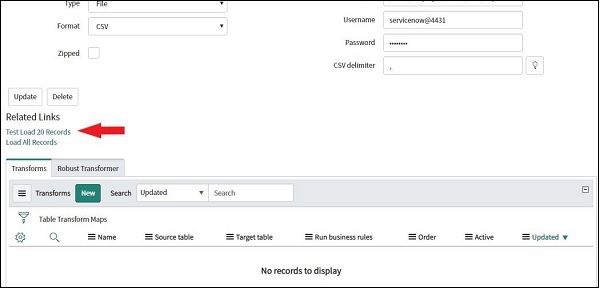
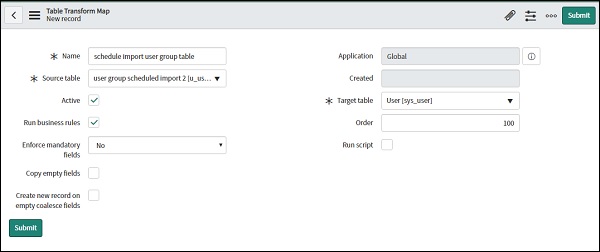
Now, after the test load, we have to create the transform map. Navigate to Transform map and click on new, to create a new transform map. Give the name of the source table, which we created during data source definition and target table as sys_user.
After submitting, open the newly created transformed map and go to Related links sections. Here, you can use auto mapping or use mapping assist (for manual mapping), if auto mapping is unable to detect the fields properly.
Click on the update to confirm the mapping.
Now, it's time to create the scheduled import. Navigate to Scheduled import module inside System import set application and click on new to create a new scheduled import. Select the data source, which we have created and select the frequency of running this scheduled import. It can be daily, weekly, monthly or periodically. Let us make it run daily at 08:00 hrs.
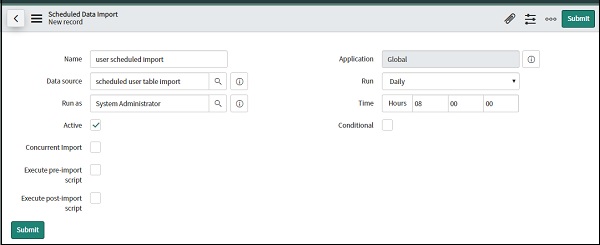
Click on submit and check the user table after the scheduled import run. The data should be imported into the sys_user table.

SLAs Configuration
SLA stands for Service Level Agreement, which is a commitment or contract between the service provider and the service consumer (customer), or it can also be commitment between various departments within an organisation. This contract clearly states the level of service that, the provider should give, the response time, the resolution time of incidents, penalties (if any), uptime, system performance, etc.
For example − BookWorm ltd. has implemented ITIL within its organisation, in such a way that, each incident reported within an organisation should be recorded in ServiceNow and categorised in any of the following four categories - Critical, High, Medium and Low.
A SLA is signed between the IT and business of BookWorm ltd., which clearly defines the time limit to resolve incidents in each category −
Critical - 6 hrs, High - 24 hrs, Medium - 48 hrs and Low - 72 hrs
This is called as resolution time. In a similar manner, there is a response time SLA, which defines time limit to acknowledge the incident (or assign the incident to respective group) in ServiceNow system.
Critical - 30 mins, High - 60 mins, Medium - 5 hrs and Low - 8 hrs.
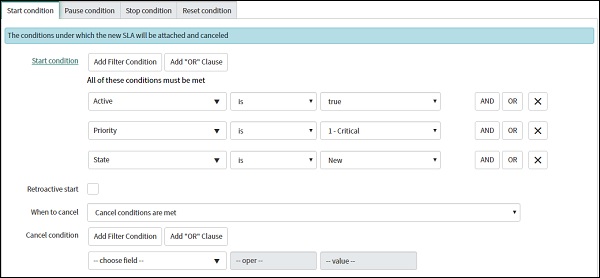
For defining the SLA, we have a module called SLA definition inside SLA application. To define a new SLA, open SLA definition module and click on New button.
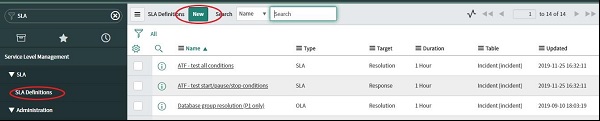
Lets create a SLA in the incident table. We can also choose to create SLA in any other table like change, problem, etc. First, start with Response time for critical incidents. Give the name of SLA, select type as SLA, select Target as Response and Table as Incident. Workflow is used for escalation purposes.
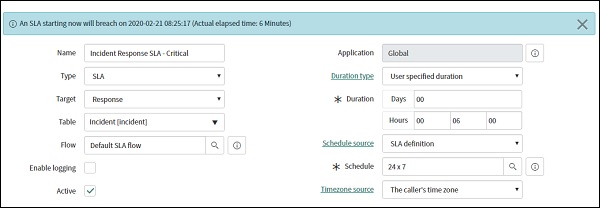
For example, if 50% of SLA time is over and the incident is not resolved/acknowledged, we can choose to send an alert email to the leader of that team. Then, if 75% of SLA time is over, we can choose to send email to manager of that team and so on. We will take a look at workflow in more detail in the next section.
Now, select duration as User defined and give duration as 30 minutes, as it is for Critical incident. Then select the schedule, which means, if we want to calculate the SLA time 24 X 7, exclude weekends, exclude only Sundays, etc.
Now let's put the conditions, so that this SLA gets attached to every new critical incident. Scroll down to the next section and there, you can give the Start conditions, as given herewith,
Incident is active.
Incident is new.
Priority of incident is critical.
Further, for the Stop condition we choose to stop the SLA, once the incident is assigned and moved to in progress status.

Finally, click submit. Now, we will create one new critical incident and check if, this SLA gets attached to the incident.
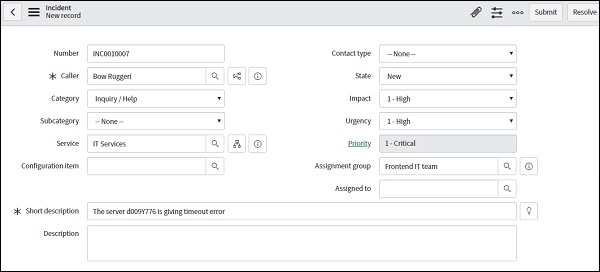
Open the incident again from the incident list and scroll down to the Tasks SLA section. You can see that, our new SLA is attached and showing the time left to breach the response SLA.

Similarly, Resolution SLA can also be created, post which, you can see two separate SLAs namely Response and Resolution, attached to the incidents in Task SLA section.
Workflows
The ServiceNow defines workflow as sequence of activities to automate processes in applications. It is basically a flowchart, which records all the activities to be triggered step by step, once the desired event has occurred. Let us try to understand this, with an example of BookWorm ltd.
We have to add a new workflow to every change request, that is assigned to the Frontend IT team, the workflow includes two activities −
If the Assignment group is selected as Frontend IT team in the change request, then, the value in the Service field should be automatically set to IT Services.
Each change request for the Frontend IT team required approval from its Manager Cristina Sharper.
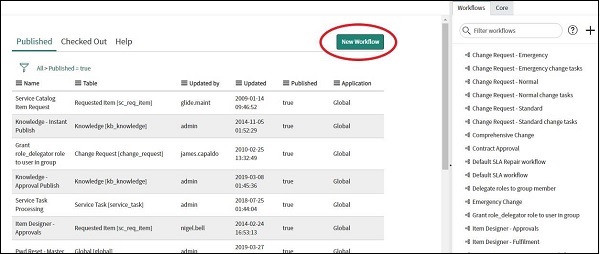
For Workflows we have a module called Workflow editor. Search in the navigation bar and click on the Workflow editor. Click on new to create a new Workflow. In this screen, we can also see the existing workflows and we can edit them as well. You can see the screen below −
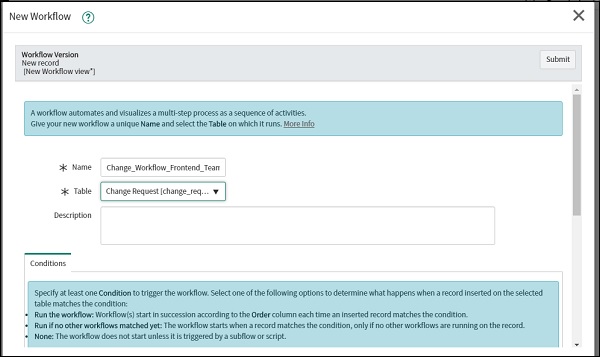
Give the name of the Workflow and table for which, we have to create the workflow. We can also give, the conditions for workflow at this point of time, but we can also give the conditions later.
Now that, the workflow is created, let us add conditions and activities in this workflow. Click on the top left menu bar and go to properties.
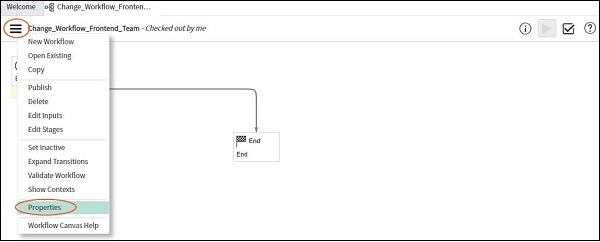
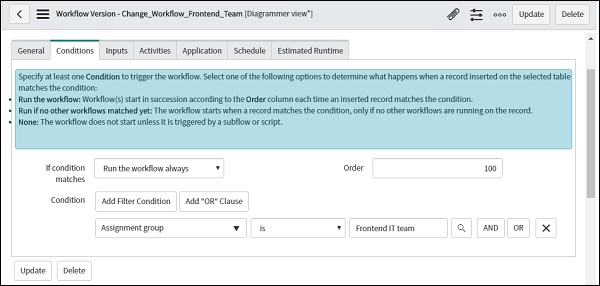
From the properties, go to Conditions tab to give the condition for the workflow to be triggered. Here, we will select If assignment group is Frontend IT team. We can add multiple conditions combined with AND/OR. Then, click on Update.
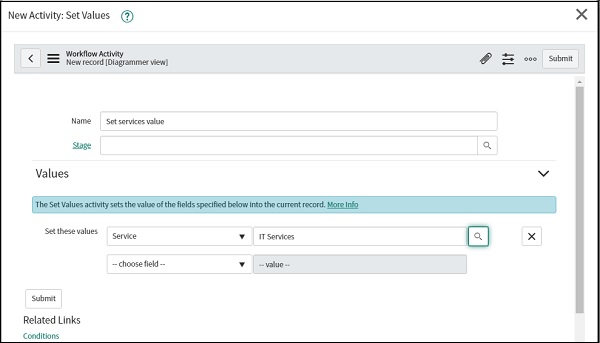
In the right frame, go to Core tab. Here, you will see a list of activities, which we can add in our workflow, like approval, conditions, tasks, etc. You can go ahead and try them. For this example, we will use Approval user under Approval main activity and Set values under Utilities main activity.

First, let's drag Set values in our workflow. Once you drag the Set values activity, a popup will open and we have to mention, the fields for which we need to set the value. We will select the Services field and set value as IT services.
Now, you will see our activity in the workflow but, it is not connected as of now by any arrow. So first, we have to delete the existing arrow between Begin and End activity and insert our Set values activity between Begin and End.
Select the existing arrow between Begin and End and click delete button from the keyboard. Then drag an arrow, from the yellow dot of Begin activity to the Set value activity. A new arrow will be generated.
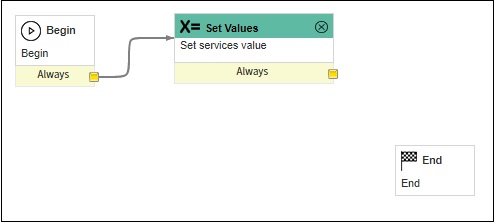
Now, we have to add another activity for the approval-user. Drag the approval-user activity and perform the same as above.
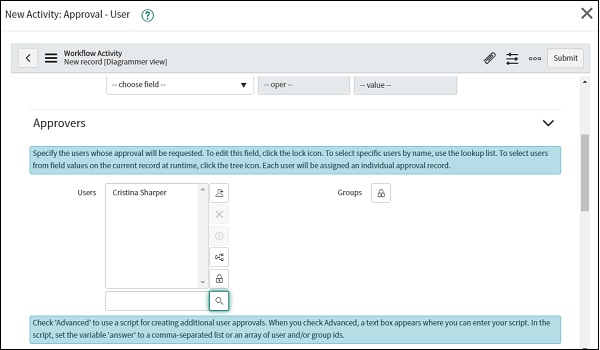
This is how our final workflow looks like −

Now, click on the top left menu bar and click on Publish to make our workflow live.
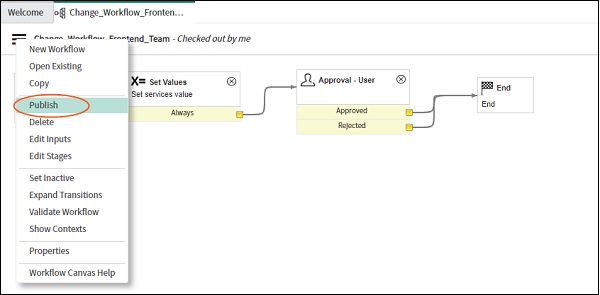
After publishing, our workflow will become active and when any change request will be assigned to the Frontend IT team, our new workflow will get triggered.
Notifications
Notifications are used to notify or send an alert to the user on the occurrence of certain events, like change in the priority of incident, change in the state of incident, etc. Notifications are generally sent via emails.
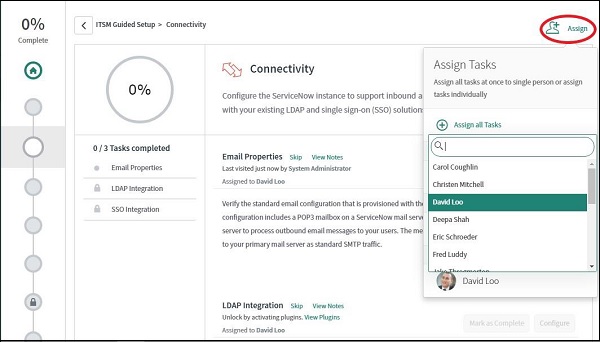
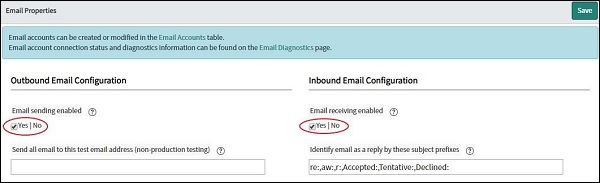
First of all, to start setting up the notification, check whether the email settings are configured in the ServiceNow. Go to Email properties module of System mailboxes and check on Email sending enabled box and Email receiving enabled box. Click Save.
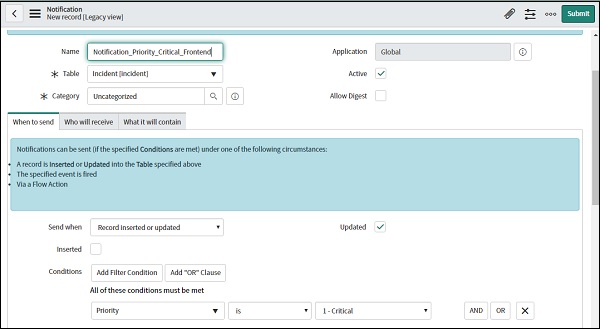
Now, lets create a notification that whenever, any Critical incident is assigned to the Frontend IT team group, an email will be sent to the manager of the team Cristina Sharper. Go to Notification module under System notification application.
Now, give the name of the notification, followed by the table for which this notification is created and then under the When to send tab set the conditions.
Now, go to Who will receive tab and set the users who will receive the email.

Finally, in the What it will contain tab, we can give the body/text of the email.
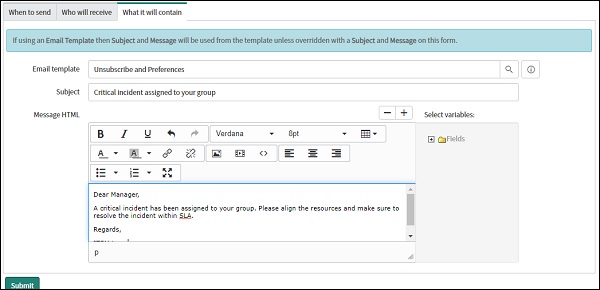
Now, once any critical incident is assigned to the Frontend IT team, its manager will receive an email notification regarding the same.
Reporting and Scheduled Jobs
Reporting is used to create a report based on the data available in the ServiceNow. The report can give information related to incident, user, change, problem, etc. We can generate the report in bar chart, pie chart, graphical format or as per the business requirement. The reports can also be generated automatically by the scheduled jobs based on the defined frequency.
Let us create a report for BookWorm ltd. wherein, the manager of the Frontend IT team will receive the weekly report (via scheduled job) having a number of Critical, High, Medium and Low priority incidents open and assigned to the Frontend IT team.
Let's start by creating the report. Navigate to Create new module under Report application. Give the report name. In the Source type, select table, as we have to extract data from the incident table. Finally, click Run. You will see entire data from the table.
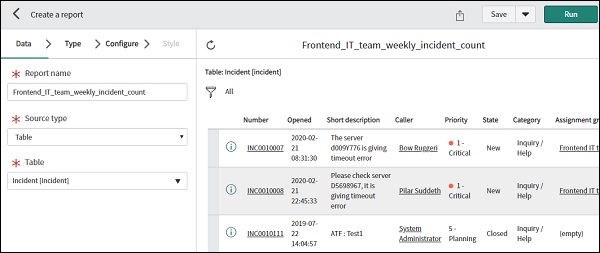
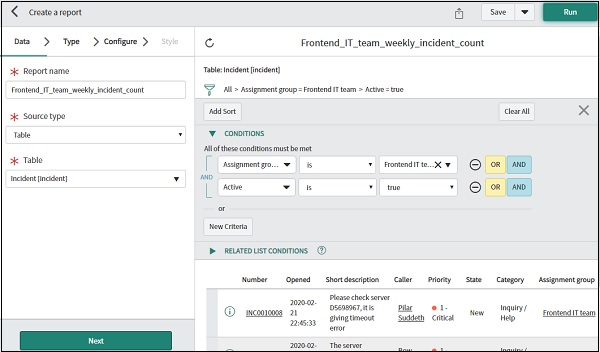
Now, we can add the filters to add the conditions so that only specific data, based on our requirements should be extracted.
Click next and select the type of report you need, like - bars, pie chart, time series, etc. We will use bars here. Select bar and click Next.
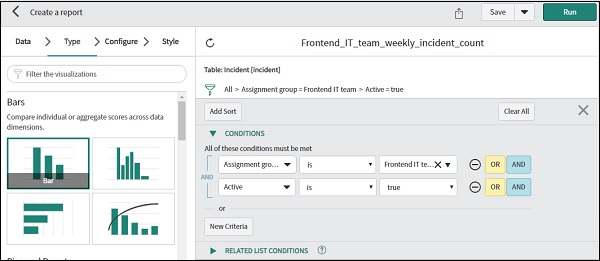
Click on next, you will now be able to configure the report. In the group by option, we will select priority and in the aggregation by, we will select count.
Click next and you will be asked to customise the style for your report. You can change the colour of bars, fonts of heading, location on heading, etc.
Finally, click on Save to save this report. You can Run your report by using, the button at the top right to see the result.
Next, we have to schedule this report weekly using the scheduled jobs. Go to scheduled jobs module under System definition application and click on New.
On the next screen, select Automate the generation and distribution of a report. Then give the name of the scheduled job, select the report which, we have just created and add the user receiving the report. Change the Run field to make it run weekly. We can also give the introductory message about the report. Finally, click on submit.
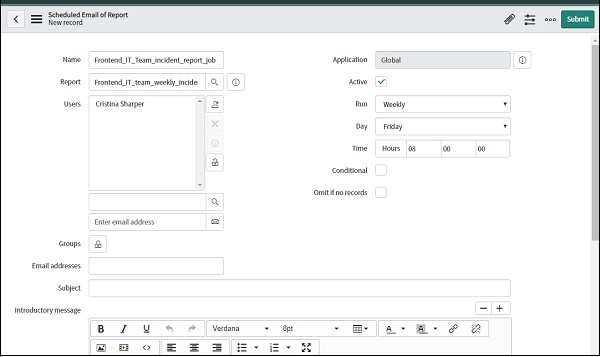
You can find this new report in the list of reports inside the scheduled jobs module.
Service Catalogs
Service catalogs provide self-service opportunities to the users. The users can select the desired services from the list (catalog) and submit the request. It has look and feel like online shopping, wherein, users can add the services (hardware, software or any other listed services) in the cart and finally order them.
We can also bundle the items under the package and order the package directly. For example, in BookWorm ltd., if a new member joins the Frontend IT team, he/she can simply order a package Frontend IT kit, which has software used within the team like Rational developer, Notepad ++, Winscp and Sql developer.
So, the user will be raising one request, which has four items in it (Rational developer, Notepad ++, Winscp and Sql developer). For each item, there may be different tasks like, there can be task for procurement team to get the new license of the software, then a task for the IT team to install the software in the machine or a task for additional approval for some software, etc.
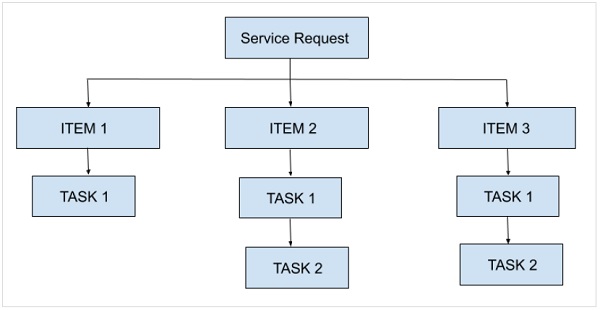
Accordingly, there are three tables in ServiceNow service catalog for this −
The Requests table
The Items table
The tasks table
All these tables are co-related and you can find these tables in the Service catalog application → Open records module.
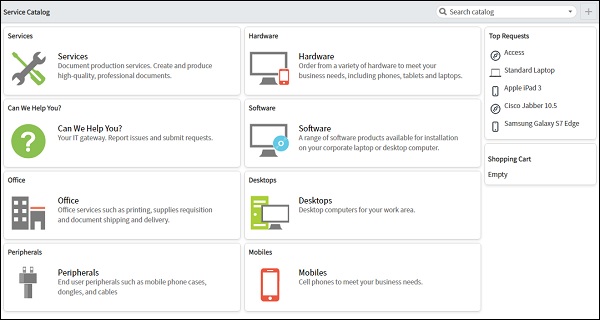
ServiceNow has provided some default categories and items. Go to Service catalog module of Self-service application. You can find the homepage of service catalog in content frame.
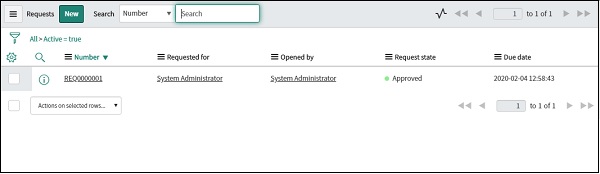
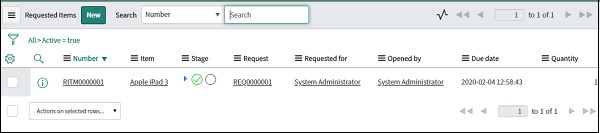
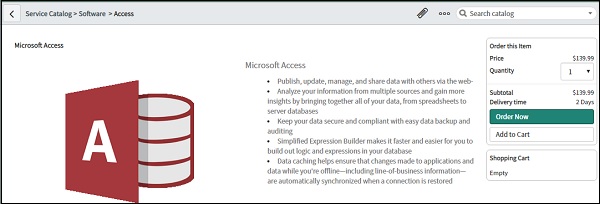
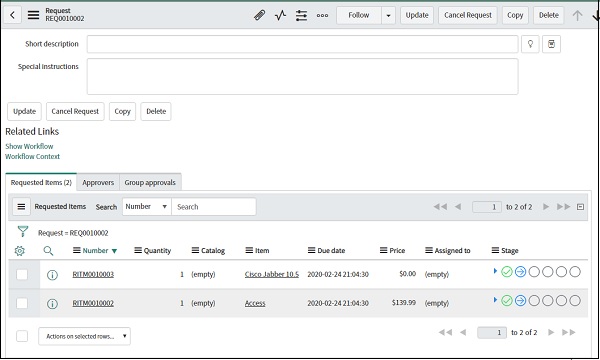
Let's place a sample request for Microsoft access and Cisco jabber. Go to Software and click on Microsoft access. You can add to the cart or directly order the item.
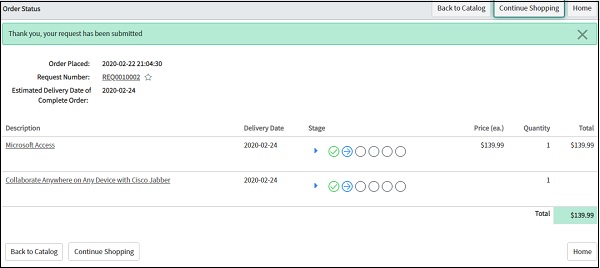
Here, we have to add Cisco jabber as well, so we will choose Add to cart and continue shopping. Follow similar steps to add Cisco jabber and finally, click on Proceed to check out. After submitting a request, you will see the following page and entries in the three tables.
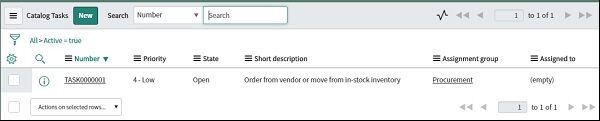
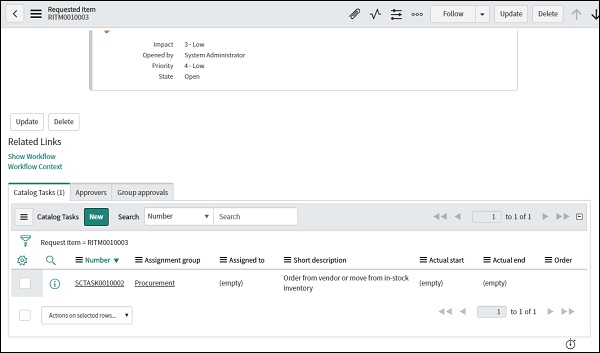
Open the request table and select your request. You will see the items attached to this request. Click on the items and you will see the tasks associated with the item.
You can also create your own service catalog and items in ServiceNow using Catalog definition application inside My catalogs, My categories and My items modules.
Diagnostics and Troubleshooting
The responsibility of system administrator is not limited to the setup and configuration of applications and modules. The system administrator is also responsible for the performance and response time of the system by referring to the logs, stats, memory utilization, CPU consumption, etc.
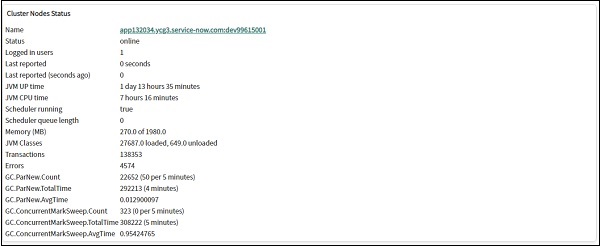
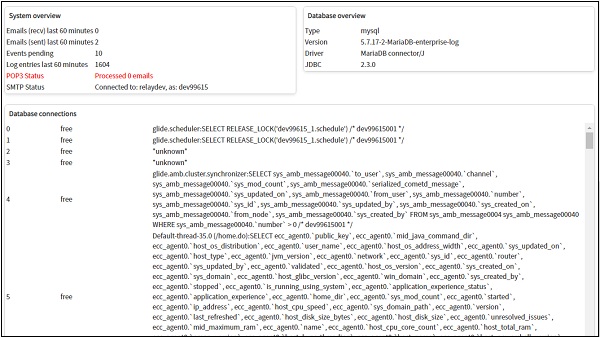
ServiceNow has provided an application called System diagnostics which is a collection of many useful modules for the system administrators. A module called Diagnostics page lists the entire configuration of server, database, stats, etc. The diagnostics page is divided in four main parts −
Cluster node status
System overview
Database overview
Database connections
The cluster is a collection of nodes and node is a single system, which is responsible to store and process the data. In the cluster node status section, you will find the details of memory utilisation, number of transactions hit, logged in users, JVM uptime, etc. The system overview section lists the details related to events, POP3, SMTP, etc.
The database overview section gives the details related to the database version, driver, type, etc. and finally, the database connections give the logs of the queries executed in ServiceNow, connection details, etc.
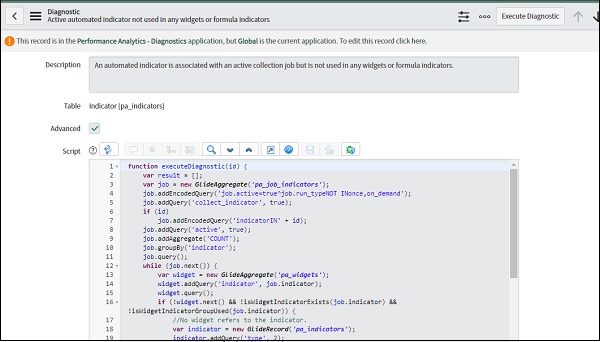
Another important application is Performance analytics. Its Diagnostics module under the troubleshooting lists down each and every error and exception received in ServiceNow.

Click on any error to find the underlying script which caused the error.
ServiceNow - Development
ServiceNow provides a lot of inbuilt features and applications, which we can easily use to implement ITSM in any organisation. At the same time, there are business requirements to set up different processes and features. ServiceNow is highly customisable and developers can easily create applications and modules based on customers requirements using principles of Javascript.
Javascript is mandatory for ServiceNow scripting. In this section, we will give you an overview of ServiceNow development.
Application Creation Overview
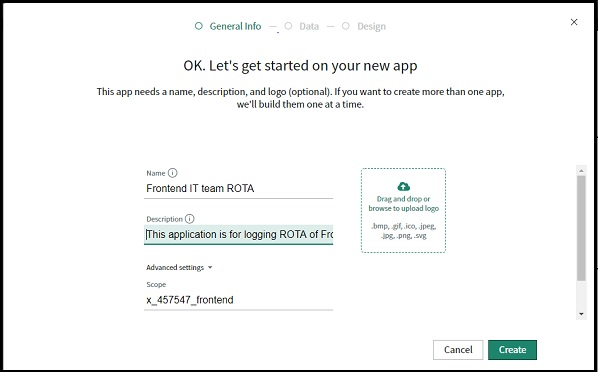
ServiceNow provides an application called Studio, where you can create your new applications, give the source codes, create new tables for your applications, etc. The Studio provides guided and easy to use interface for creating new applications. Lets create a new application for the following case of BookWorm ltd.
The Frontend IT team needs an application in ServiceNow wherein the Manager can publish the shift ROTA (shift rotation). There would be a 6 hrs shift for each employee and the team has to support 24 X 7.
From the navigator goto Studio, a new window will open. Click on Create application. You will be prompted to enter the application name and description. Finally, click Create.
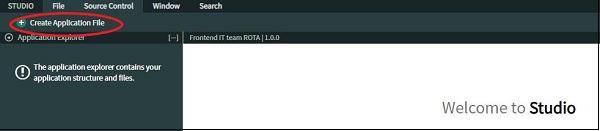
You will find the application page below. Now, it is time to create a table for our application. Go to Create application file.
Click on Table under Data model and click create. You will be prompted to enter the details for the new table. Give the name of the table and keep remaining details as default.
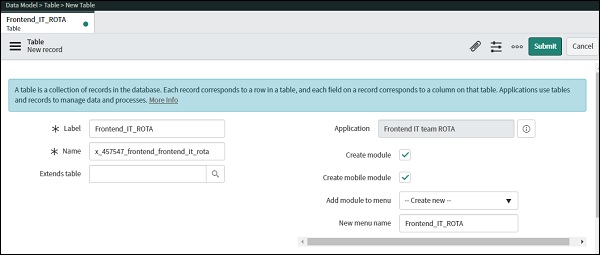
Now scroll down and start defining the columns for these tables. We have below column definition, the important point to note here is that, we have selected reference of sys_user in Member column.

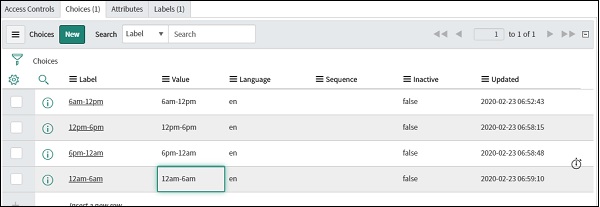
Now, click on the Shift column and select Create choice list as here, we will create choices of shift like 6am-12pm, 12pm-6pm, 6pm-12am and 12am-6am.
So, now that we have created the table our application in the studio looks like this.
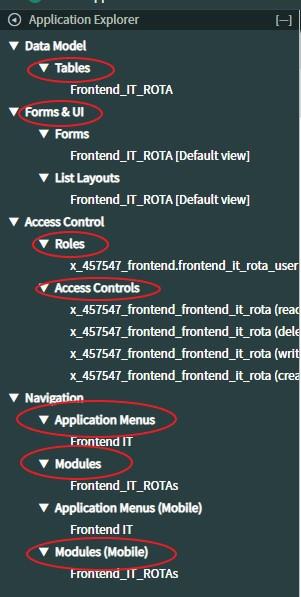
The studio has automatically created Form, list, module, application menu for us. We can create additional modules, tables, UI etc. from the create application file option, as we did for creating the ROTA table.
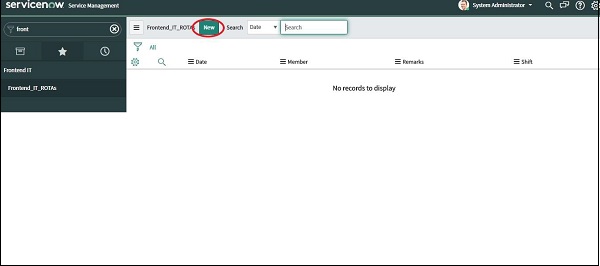
Now lets see how our application looks in service now. Search Frontend_IT_ROTA in the navigation bar and go to our new module.
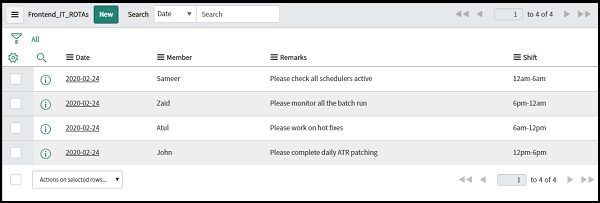
Lets go ahead and add some new ROTA records in our application. Click on the New button.

UI Policy and Actions
ServiceNow defines UI policies as a tool through which, we can dynamically change the behaviour of information on a form and control custom process flows for tasks. UI action on the other hand is used to make the UI more interactive, customised, and specific to user activities. Lets understand this with the help of an example.
Suppose, we have to configure the Incident form in such a way that, if any incident is assigned to the Frontend IT team assignment group then, the Services field should become invisible and Configuration items should get disabled. The UI policy here is, if assignment group is selected as frontend IT team and UI actions here, is Services field should become invisible and Configuration item field should get disabled.
The UI action can be implemented through, an easy way to use interface and also through the client script. Writing client script will help us, to do advanced operations in the fields. We will also demonstrate the client scripting later in this section.
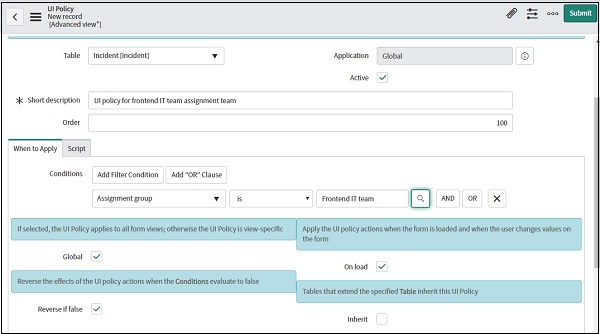
The important point to note over here is that, UI actions are faster and executed first, followed by client scripts. Let's create an UI policy and action for our use case. From the navigation bar, open UI policy module under System UI application and click on New button.

Give the name of the table, it is Incident in our case. Keep application as Global. If you can't find the option of global, navigate to the cog wheel in the top right corner and from developer tab select application as global.
Now, start giving the conditions in the next section. It would be Assignment group is Frontend IT team in our case. Next, there are some checkboxes, which are as follows −
Global − tick if you want, your UI policies to be implemented globally.
On load − tick if you want, to run your UI policy every time the page is refreshed.
Reverse if false − tick if you want, to reverse all the actions which we created if the conditions are changed.
Inherit − tick if you want, the table (in which UI policy is created) that extend the specified table inherit this UI Policy.
Fill all the required details and press submit.
Now, open the UI policy again and you will find the option to enter the UI actions. Lets give the UI actions as per our use case. Click on the New button in the UI action section.

We will select the following actions for Services and Configuration items fields.
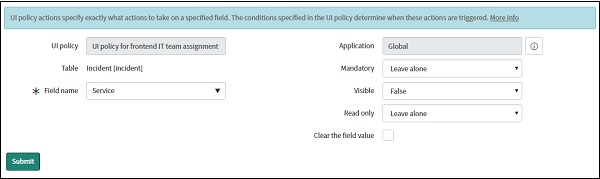
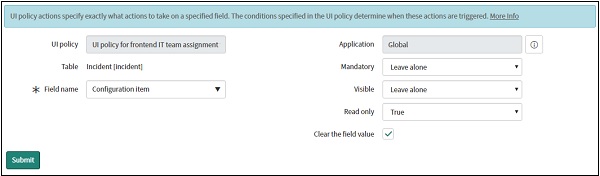
Click submit to confirm your UI actions and finally, click Update to save the changes in UI policy. You can now go, to incident forms and verify your UI policy and actions.
ServiceNow Scripting
There are two types of scripting in ServiceNow, which are Client side and Server side. The server side scripting means that, processing takes place at the web server, while client scripting means, processing takes place at the user's machine. There are specific tasks, which could be accomplished by each type of script. Let's discuss, examples of both the scripts −
Client side scripting
The client side scripting can be used in various scenarios like populating some default values in the field of form, displaying some alert message, setting value in one field based on the response by the user in another field in a form, altering the choice list, etc. There are three main types of client scripts.
Onload() - This gets executed, when the form is loaded.
Onchange() - This gets executed, when particular field in the form is changed.
Onsubmit() - This gets executed, when form is submitted.
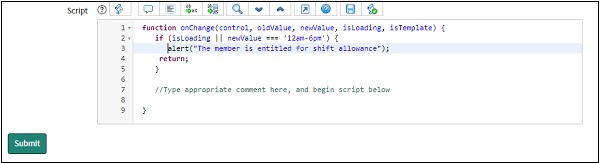
Lets create a client script for two use cases. In our new application, Frontend IT team ROTA, we will implement an alert Please use this application once a week, to set shift rotation, once the application is loaded. Then, we will display an alert The Member is entitled for shift allowance, if the shift timing is selected as 12am-6am.
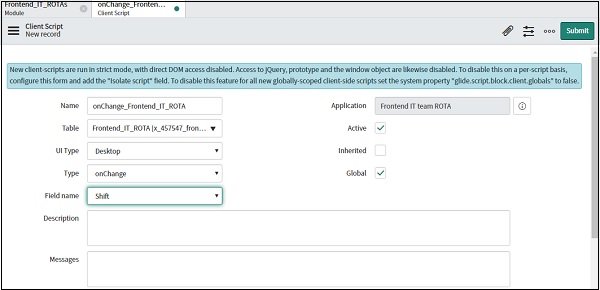
Navigate to Studio module, open the application and click Create application file. Then, select client script under client development option and give the required details as below −
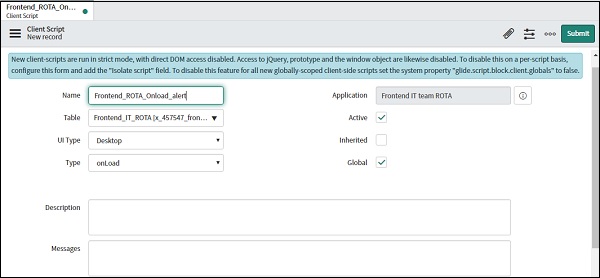
Scroll down and give the script. We will give an alert as below.
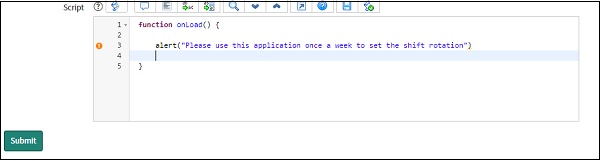
Function onLoad() {
alert (Please use this application once a week to set the shift rotation);
}
Click submit and load your new application to see the result.
Now, let us implement the next use case. Here, we will use onChange. The onChange Function is automatically passed with 5 arguments by ServiceNow.
Control − It is the field for which the Client Script is configured
OldValue − It is the value of the field, when the form is loaded (prior to the change).
newValue − It is the value of the field after the change.
isLoading − It is the boolean value indicating whether, the change is occurring as part of a form load. Value is true if, change is due to a form load. When form loads, all the field values on the form changes.
isTemplate − It is the boolean value indicating whether, the change that occurred, is due to the population of the field by a template. Value is true if, change is due to population by a template.
function onChange(control, oldValue, newValue, isLoading, isTemplate) {
   if (isLoading || newValue === '12am-6pm') {
      alert("The member is entitled for shift allowance");
      return;
   }
}
Glideform (g_form) class
The glideform is the class which is used to control the forms and the fields of the forms. We can perform tasks such as Hide a value of field, set the value of field based on the response on the other fields, add fields to choice list, etc.
The glide form class comes with many methods. A few important methods are addOption(), clearOptions(), showFieldMsg(), clearMessages(), clearValue(), setValue(), etc.
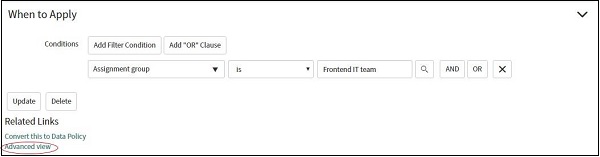
Lets create a client script in incident form to populate some message in the description field, if the assignment group is selected as the Frontend IT team. Go to UI policies and create a new policy. Give the condition in the Where to apply section as Assignment group is Frontend IT team.
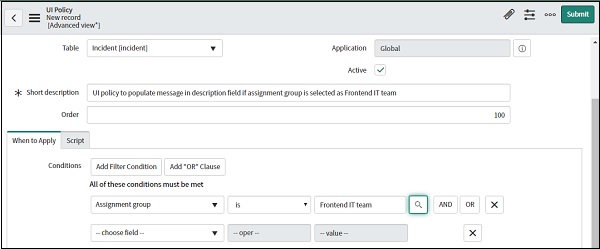
Submit the UI policy, open it again and then, click on the advanced view. Later, you will find the option to give the script.
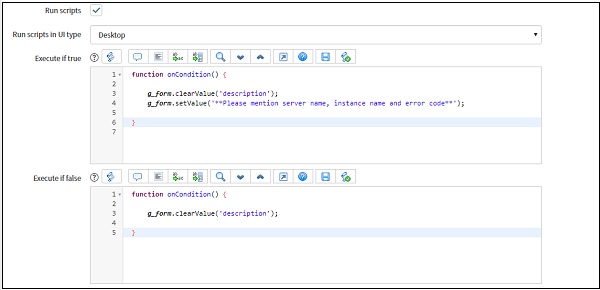
The script is automatically populated with function onCondition(). The onCondition function will be executed automatically once, the condition we have given in UI policy is met. Another point to note is that there are two scripts, Execute if true and Execute if false.
The execute if true script will execute once the condition is matched and if, we change the values in the fields such that, condition we have mentioned is no longer met, then the script in execute if false will execute.
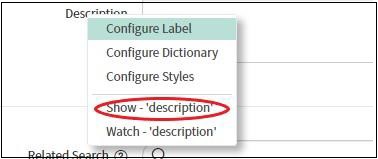
Let's write a script for both. Here, we will use setValue and clearValue methods. To get the field name, which needs to be mentioned in the script, open the incident form and right click on the desired field, you can find the field name in format Show - <fieldname>
On true script
function onCondition() {
   g_form.clearValue('description');
   g_form.setValue(description,'**Please mention server name, instance name and error code**');
}
On false script
function onCondition() {
   g_form.clearValue('description');
}
Now, open the incident form and check the result.

Server Side Scripting
Server-side scripts execute on the ServiceNow server or database. Server side scripting has two categories −
Business rules
Script include
Let us take a look into each category one by one.
Business rules
The business rules module can be found in System definition application. To create a business rule, click on new. We can create a simple business rule using business rule actions, which have a simple dropdown interface.
You can use business rule action to set the values of the field or to add a message in the form. We can choose, when to run the business rule as below −
Before − The logic in business rule executes before the database operation
After − The logic in the business rule executes after the database operation
Async − Async Business Rules executes their logic after a database operation occurs but the scheduler queues the task to be run as soon as possible but not necessarily immediately after the database operation.
Display − Display Business Rules executes their logic, when a form loads and a record is loaded from the database.
We can also choose the database operation, at which the business rule should execute. Let us create a business rule action, in the Frontend IT team ROTA application, we created in the last section.
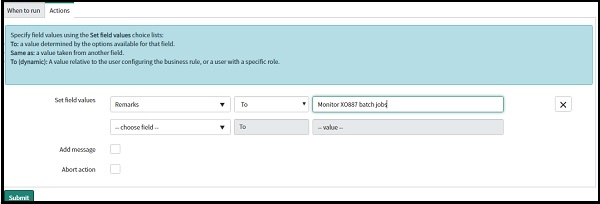
We have to set the value in the Remark field as Monitor XO887 batch jobs if the shift timing is 12am to 6am. Give the name and table frontend_it_rota. Inside, when to run tab give the condition, as shift is 12am to 6am and check insert and update box.
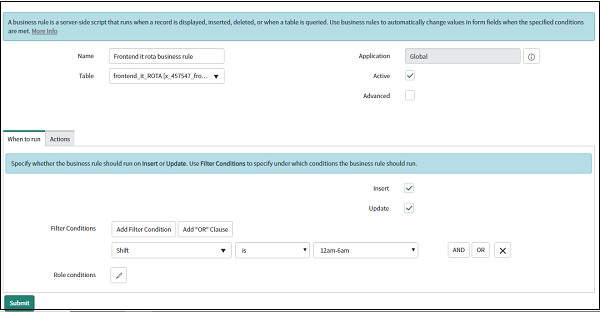
Inside Action tab give your condition for the remark field.
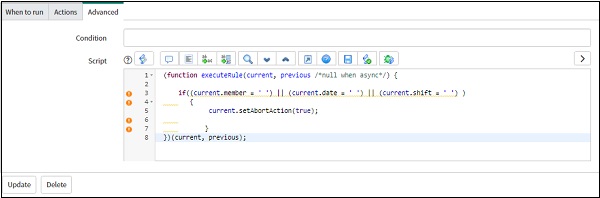
We can also give our custom script in this business rule. To start writing the custom script, check the Advanced checkbox and you will see, the new Advanced tab to write the script.
Let us write a script, to abort the insert transaction when the member, time or date field is not given. We will use current and previous objects for this purpose.
(function executeRule(current, previous /*null when async*/)) {
   if((current.member = ' ') || (current.date = ' ') || (current.shift = ' '){
      current.setAbortAction(true);
   }
}
Script Include
Using script includes, we can write custom functions or classes and then, use them in other scripts as many times we need. They are sort of reusable scripts; we can use in other client-side or server side scripts. However, they get executed only, when called by the other scripts explicitly. To create a new script include, we have a module Script include under the System definition application. Click on new to create a new script include.
In the script include form, give the name of the script include. The API name field is the internal name of the script include and it is used, when this script include is called from other applications. Check the client callable checkbox, if you want to use this script include in client-side scripts. In the application, give the application for which this script is used. In the accessible from field, give the application scope.
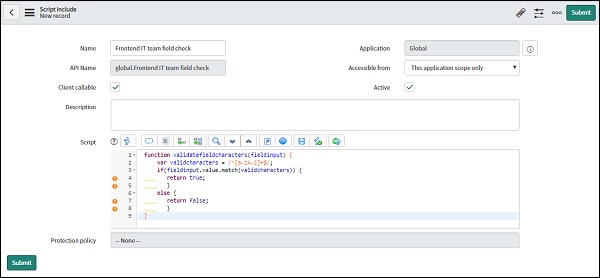
Let us write a script for the following case in Frontend IT team ROTA application. First, we will write a script include, which will check an invalid character in any field. We will define a function, which will take the argument as a string and return true or false, based on the characters in the string.
We will use this function in our business rule scripting to validate, if the value given in the Member (Name) field (in frontend IT team ROTA app), does not have any invalid character while submitting the form.
Open the script include module, below is the script which we will use.
function validatefieldcharacters(fieldinput) {
   var validcharacters = /^[a-zA-Z]+$/;
   if(fieldinput.value.match(validcharacters)) {
      return true;
   } else {
      return false;
   }
}
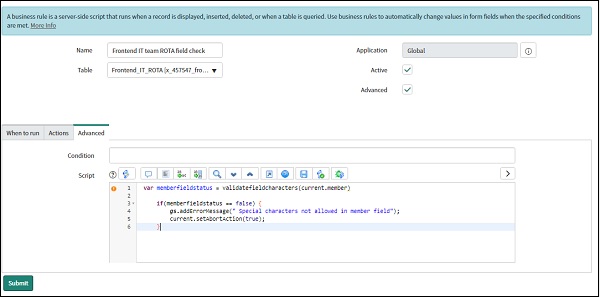
Now, let us write down the Business rule script to validate the Member field. Open business rule module and create a new business rule for our application Frontend IT team ROTA.
var memberfieldstatus = validatefieldcharacters(current.member)
   if(memberfieldstatus == false) {
   gs.addErrorMessage(" Special characters not allowed in member field");
   current.setAbortAction(true);
}
Debugging
We can use various debugging techniques, if our script is not performing as per the expectations, or if we are getting some error. Lets discuss various ways in which, we can debug client side and server side script.
Debugging client scripts
The best way to debug the client script is referring to logs. The Javascript provides jslog() method to write messages in Javascript logs. The jslog() method accepts messages, which we want in the logs in the argument. Below is an example on, how we can implement the jslog(). You can use the below script in the business rule script.
function onLoad(){
   jslog("This log is displayed from jslog().");
   jslog("The value of Member field is = " + g_form.getValue('Member'));
}
This will give the value given in the member field in the logs. In this case, we have used the getvalue method, to retrieve the value of the member field. Now, the next step is to turn the logs on. Go to setting option on the top right corner and click on developer tab. Turn on the Javascript log and Field watcher option.
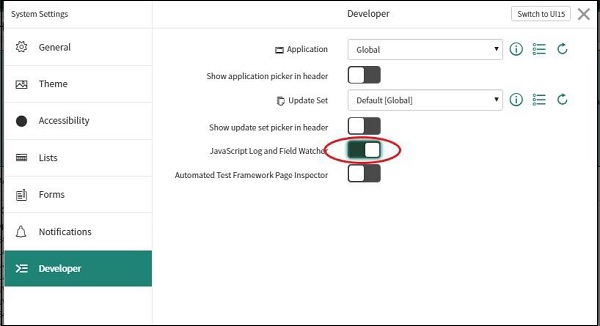
The JavaScript Logs will open in a new section at the bottom of the main ServiceNow browser window.

Apart from jslog() we can also use try/catch statements which we generally use in Javascript to debug the scripts.
Debugging server side script
The most common way of debugging server side script is using Script debugger module. The script debugger can be used to place breakpoints, traverse the code step by step, view value of variables, etc. To access script debugger, find script debugger in the navigation bar. It is present inside System Diagnostics application.
Apart from this, we can also refer to Application logs module, which is present inside System log application.
ServiceNow - Mastering and Certification
ServiceNow is an enterprise cloud ecosystem, which has revolutionised the way ITSM is implemented within the organisation. Due to its flexibility, better quality, improved productivity and easy integration, it is in very much demand.
Our ServiceNow tutorial, should have given you a strong base and sufficient knowledge to start your journey as a ServiceNow professional. You can start creating new applications in your developer instances, for hypothetical use cases, because hands on is very necessary, to grasp each and every topic and to build good understanding on each topic.
You have two career options in the field of ServiceNow, which are as follows −
ServiceNow developer
ServiceNow administrators
Although having a specialisation in administration or development is very beneficial. Many organisations prefer to hire resources having knowledge of both fields. We have tried to cover the important concepts of both administration and development in this tutorial.
However, you can gain more proficiency by going through ServiceNow documentations. ServiceNow has organised the documentation of their products very systematically and you can refer to it, using this link https://www.servicenow.com/docs/ .
Next thing, we want to highlight is that, you can showcase your ServiceNow skills through ServiceNow certification. To earn a ServiceNow certification, it is mandatory to complete the ServiceNow paid training first and post which, you will receive a free certification voucher.
ServiceNow have divided the certifications in four main categories, which are as follows −
Certified implementation specialist (CIS)
Certified application developer (CAD)
Certified application specialist (CAS)
You can find more details on ServiceNow certifications and ServiceNow authorised training partners on this URL, www.servicenow.com
