- SaltStack - Home
- SaltStack - Overview
- SaltStack - Architecture
- SaltStack - Competitors
- SaltStack - Installation
- Creating a Simple Environment
- SaltStack - Access Control System
- SaltStack - Job Management
- SaltStack - Salt File Server
- SaltStack - Git as a File Server
- Using MinionFS as the File Server
- SaltStack - Using Cron with Salt
- SaltStack - Remote Execution
- Configuration Management
- SaltStack - Logging
- SaltStack - Salt through SSH
- Salt for Cloud Infrastructure
- SaltStack - Salt Proxy Minions
- SaltStack - Event system
- SaltStack - Orchestration
- SaltStack - Salt Package Manager
- SaltStack - Python API
- SaltStack - Working Example
SaltStack - Quick Guide
SaltStack - Overview
In this chapter, we will learn the basics of SaltStack. SaltStacks remote execution capabilities allow administrators to run commands on various machines in parallel with a flexible targeting system. Salt configuration management establishes a master-minion model to quickly, very easily, flexibly and securely bringing infrastructure components in line with a given policy.
What is SaltStack?
Salt is a very powerful automation framework. Salt architecture is based on the idea of executing commands remotely. All networking is designed around some aspect of remote execution. This could be as simple as asking a Remote Web Server to display a static Web page, or as complex as using a shell session to interactively issue commands against a remote server. Salt is an example of one of the more complex types of remote execution.
Salt is designed to allow users to explicitly target and issue commands to multiple machines directly. Salt is based around the idea of a Master, which controls one or more Minions. Commands are normally issued from the Master to a target group of Minions, which then execute the tasks specified in the commands and then return the resulting data back to the Master. Communications between a master and minions occur over the ZeroMQ message bus.
SaltStack modules communicate with the supported minion operating systems. The Salt Master runs on Linux by default, but any operating system can be a minion, and currently Windows, VMware vSphere and BSD Unix variants are well supported. The Salt Master and the minions use keys to communicate. When a minion connects to a master for the first time, it automatically stores keys on the master. SaltStack also offers Salt SSH, which provides an agent less systems management.
Need for SaltStack
SaltStack is built for speed and scale. This is why it is used to manage large infrastructures with tens of thousands of servers at LinkedIn, WikiMedia and Google.
Imagine that you have multiple servers and want to do things to those servers. You would need to login to each one and do those things one at a time on each one and then you might want to do complicated things like installing software and then configuring that software based on some specific criteria.
Let us assume you have ten or maybe even 100 servers. Imagine logging in one at a time to each server individually, issuing the same commands on those 100 machines and then editing the configuration files on all 100 machines becomes very tedious task. To overcome those issues, you would love to update all your servers at once, just by typing one single command. SaltStack provides you exactly the solution for all such problems.
Features of SaltStack
SaltStack is an open-source configuration management software and remote execution engine. Salt is a command-line tool. While written in Python, SaltStack configuration management is language agnostic and simple. Salt platform uses the push model for executing commands via the SSH protocol. The default configuration system is YAML and Jinja templates. Salt is primarily competing with Puppet, Chef and Ansible.
Salt provides many features when compared to other competing tools. Some of these important features are listed below.
Fault tolerance − Salt minions can connect to multiple masters at one time by configuring the master configuration parameter as a YAML list of all the available masters. Any master can direct commands to the Salt infrastructure.
Flexible − The entire management approach of Salt is very flexible. It can be implemented to follow the most popular systems management models such as Agent and Server, Agent-only, Server-only or all of the above in the same environment.
Scalable Configuration Management − SaltStack is designed to handle ten thousand minions per master.
Parallel Execution model − Salt can enable commands to execute remote systems in a parallel manner.
Python API − Salt provides a simple programming interface and it was designed to be modular and easily extensible, to make it easy to mold to diverse applications.
Easy to Setup − Salt is easy to setup and provides a single remote execution architecture that can manage the diverse requirements of any number of servers.
Language Agnostic − Salt state configuration files, templating engine or file type supports any type of language.
Benefits of SaltStack
Being simple as well as a feature-rich system, Salt provides many benefits and they can be summarized as below −
Robust − Salt is powerful and robust configuration management framework and works around tens of thousands of systems.
Authentication − Salt manages simple SSH key pairs for authentication.
Secure − Salt manages secure data using an encrypted protocol.
Fast − Salt is very fast, lightweight communication bus to provide the foundation for a remote execution engine.
Virtual Machine Automation − The Salt Virt Cloud Controller capability is used for automation.
Infrastructure as data, not code − Salt provides a simple deployment, model driven configuration management and command execution framework.
Introduction to ZeroMQ
Salt is based on the ZeroMQ library and it is an embeddable networking library. It is lightweight and a fast messaging library. The basic implementation is in C/C++ and native implementations for several languages including Java and .Net is available.
ZeroMQ is a broker-less peer-peer message processing. ZeroMQ allows you to design a complex communication system easily.
ZeroMQ comes with the following five basic patterns −
Synchronous Request/Response − Used for sending a request and receiving subsequent replies for each one sent.
Asynchronous Request/Response − Requestor initiates the conversation by sending a Request message and waits for a Response message. Provider waits for the incoming Request messages and replies with the Response messages.
Publish/Subscribe − Used for distributing data from a single process (e.g. publisher) to multiple recipients (e.g. subscribers).
Push/Pull − Used for distributing data to connected nodes.
Exclusive Pair − Used for connecting two peers together, forming a pair.
ZeroMQ is a highly flexible networking tool for exchanging messages among clusters, cloud and other multi system environments. ZeroMQ is the default transport library presented in SaltStack.
SaltStack - Architecture
The architecture of SaltStack is designed to work with any number of servers, from local network systems to other deployments across different data centers. Architecture is a simple server/client model with the needed functionality built into a single set of daemons.
Take a look at the following illustration. It shows the different components of SaltStack architecture.
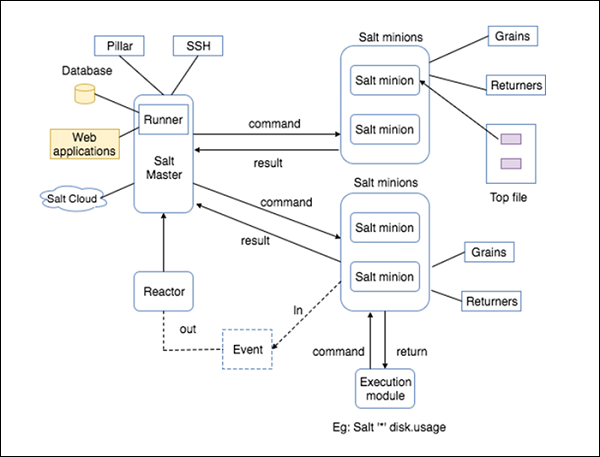
SaltMaster − SaltMaster is the master daemon. A SaltMaster is used to send commands and configurations to the Salt slaves. A single master can manage multiple masters.
SaltMinions − SaltMinion is the slave daemon. A Salt minion receives commands and configuration from the SaltMaster.
Execution − Modules and Adhoc commands executed from the command line against one or more minions. It performs Real-time Monitoring.
Formulas − Formulas are pre-written Salt States. They are as open-ended as Salt States themselves and can be used for tasks such as installing a package, configuring and starting a service, setting up users or permissions and many other common tasks.
Grains − Grains is an interface that provides information specific to a minion. The information available through the grains interface is static. Grains get loaded when the Salt minion starts. This means that the information in grains is unchanging. Therefore, grains information could be about the running kernel or the operating system. It is case insensitive.
Pillar − A pillar is an interface that generates and stores highly sensitive data specific to a particular minion, such as cryptographic keys and passwords. It stores data in a key/value pair and the data is managed in a similar way as the Salt State Tree.
Top File − Matches Salt states and pillar data to Salt minions.
Runners − It is a module located inside the SaltMaster and performs tasks such as job status, connection status, read data from external APIs, query connected salt minions and more.
Returners − Returns data from Salt minions to another system.
Reactor − It is responsible for triggering reactions when events occur in your SaltStack environment.
SaltCloud − Salt Cloud provides a powerful interface to interact with cloud hosts.
SaltSSH − Run Salt commands over SSH on systems without using Salt minion.
In the next chapter, we will learn in detail about the various competitors of SaltStack and their features.
SaltStack - Competitors
Salt, Puppet, Chef, and Ansible are the leading configuration management and orchestration tools, each of which takes a different path to server automation. They were built to make it easier to configure and maintain dozens, hundreds or even thousands of servers.
Let us understand how SaltStack competes primarily with Puppet, Chef, and Ansible.
Platforms and Support
Following is a list of all the platforms that support SaltStack and its competitors.
SaltStack − SaltStack software runs on and manages many versions of Linux, Windows, Mac OS X and UNIX.
Puppet − Red Hat Enterprise Linux, CentOS, Oracle Linux, Scientific Linux, SUSE Linux Enterprise Server and Ubuntu.
Chef − Chef is supported on multiple platforms such as AIX, RHEL/CentOS, FreeBSD, OS X, Solaris, Microsoft Windows and Ubuntu.
Ansible − Fedora distribution of Linux, CentOS, and Scientific Linux via Extra Packages for Enterprise Linux (EPEL) as well as for other operating systems.
Origin Language
SaltStack − Python
Puppet − Ruby
Chef − Ruby and its CLI uses ruby-based DSL
Ansible − Python
Supported Language
SaltStack − Any language
Puppet − Ruby
Chef − Ruby and its CLI uses ruby-based DSL
Ansible − Any language
Web UI
SaltStack − Web UI offers views of running jobs, minion status and event logs.
Puppet − Web UI handles reporting, inventorying and real-time node management.
Chef − Web UI lets you search and inventory nodes, view node activity and assign Cookbooks, roles and nodes.
Ansible − Web UI lets you configure users, teams and inventories and apply Playbooks to inventories.
Management Tools
SaltStack − SaltStack Enterprise is positioned as the main tool for managing the orchestration of cloud and IT operations, as well as DevOps.
Puppet − Puppet comes in two flavors, Puppet Enterprise and Open Source Puppet. In addition to providing functionalities of the Open Source Puppet, Puppet Enterprise also provides GUI, API and command line tools for node management.
Chef − CFEngine is the configuration management tool.
Ansible − Ansible 1.3 is the main tool for management.
Performance
SaltStack − Salt is designed for high-performance and scalability. Salts communication system establishes a persistent data pipe between the Salt master and minions using ZeroMQ.
Puppet − Secure as well as high-performance and no agents required.
Chef − The most apparent struggle for Chef Server is search; Search is slow and is not requested concurrently from clients.
Ansible − Secure, high-performance and no agents required.
Price and Value
SaltStack − Free open source version. SaltStack Enterprise costs $150 per machine per year.
Puppet − Free open source version. Puppet Enterprise costs $100 per machine per year.
Chef − Free open source version; Enterprise Chef free for 5 machines, $120 per month for 20 machines, $300 per month for 50 machines.
Ansible − Free open source version; Ansible free for 10 machines, then $100 or $250 per machine per year depending on the support you needed.
Usage
SaltStack − SaltStack is used by Cisco and Rackspace. It can integrate with any cloud-based platform.
Puppet − Puppet is used by Zynga, Twitter, the New York Stock Exchange, PayPal, Disney, Google and so on.
Chef − Chef can integrate with cloud-based platforms such as Internap, Amazon EC2, Google Cloud Platform, OpenStack, Microsoft Azure and Rackspace.
Ansible − Ansible can deploy to virtualization environments, cloud environments including Amazon Web Services, Cloud Stack, DigitalOcean, and Google Cloud Platform and so on.
SaltStack - Installation
Before moving to installation, you need to have the following requirements −
A Linux server (latest Ubuntu server).
sudo or root access to this server.
Install all the updates using the following command −
sudo apt-get update
Install SaltMaster
Install the SaltMaster from the repository with the following apt-get command.
sudo apt-get install salt-master
Install Salt Minion
Install the Salt minion from the repository with the following apt-get command.
sudo apt-get install salt-minion
Install Salt syndic
Install the Salt syndic from the repository with the following apt-get command.
sudo apt-get install salt-syndic
Master Configuration
Salt configuration is very simple. The default configuration for the master will work for most installations. The configuration files are installed in the /etc/salt directory and are named after their respective components, such as − /etc/salt/master and /etc/salt/minion.
#interface: 0.0.0.0
interface: <local ip address>
After updating the configuration file, restart the Salt master using the following command.
sudo service salt-master restart
Minion Configuration
Configuring a Salt Minion is very simple. By default a Salt Minion will try to connect to the DNS name salt; if the Minion is able to resolve that name correctly, no configuration is required. Redefine the master directive in the minion configuration file, which is typically /etc/salt/minion, as shown in the code below −
#master: salt
master: <local ip address>
After updating the configuration file, restart the Salt minion using the command below.
sudo service salt-minion restart
Key Management
Salt uses AES Encryption for all the communication between the Master and the Minion. The communication between Master and Minion is authenticated through trusted, accepted keys.
salt-key -L
It will produce the following output −
Accepted Keys:
Denied Keys:
Unaccepted Keys:
<local system name>
Rejected Keys:
Accept all keys by issuing the command below.
sudo salt-key -A
It will produce the following output −
The following keys are going to be accepted:
Unaccepted Keys:
<local system name>
Proceed? [n/Y] y
Key for minion bala-Inspiron-N4010 accepted.
Now again issue the salt key listing command,
salt-key -L
It will produce the following output −
Accepted Keys:
<local system name>
Denied Keys:
Unaccepted Keys:
Rejected Keys:
Sending Commands
The communication between the Master and a Minion must be verified by running the test.ping command.
sudo salt '*' test.ping
It will produce the following output −
<local system name>
   True
Here, * refers to all the minions. Since, we only have one minion test.ping, it executes the ping command and returns whether the ping is successful or not.
SaltStack - Creating a Simple Environment
In this chapter, we will create a simple SaltStack environment, one salt master and two salt minions. This environment will help us to learn the salt concept in the upcoming chapters.
Let us adhere to the following steps to create the SaltStack environment.
Install the VirtualBox Environment
VirtualBox is a cross-platform virtualization application. VirtualBox allows you to run more than one operating system at a time. VirtualBox runs on Windows, Linux, Macintosh and Solaris. It hosts and supports a large number of Guest Operating Systems.
You can download and install VirtualBox by visiting the following link − https://www.virtualbox.org/wiki/Downloads
We will create three virtual machines and run it using the VirtualBox.
Install Vagrant
Vagrant provides easy to configure, reproducible and portable work environments.
You can download and install the Vagrant by visiting the following link − https://www.vagrantup.com
After the successful installation of Vagrant, you need to configure it. Create a single file named as Vagrantfile in a folder and describe the type of machine and its properties.
Run Vagrant − To run the Vagrant, issue the following command −
vagrant up
After you run vagrant up, Vagrant creates and starts those machines, which are defined in the Vagrantfile using the VirtualBox in the background. These machines will be running until you close them.
Stop Vagrant − To stop all the running machines in the VirtualBox, type the following command −
vagrant halt
Download the Demo Environment
SaltStack provides a simple demo environment as Vagrant setup and it is hosted in the github. Let us download the setup using the following command −
cd /cd/to/path

git clone https://github.com/UtahDave/salt-vagrant-demo
Start Environment
Now, start the demo environment using the following command −
cd /cd/to/path/salt-vagrant-demo
vagrant up
After this command, you will see the following response −
result
Now, three servers are running, one with the salt master configured and two with the salt minion configured.
Run Salt master
Login to the Salt master using the following command −
vagrant ssh master
Now, move to the root user using the command below −
sudo su
Now we have successfully connected to the Salt master.
Let us now go through some of the basic commands in SaltStack.
List out all the Keys
The following command is to verify the Salt minion connections and view whether the connection is accepted, rejected or pending.
salt-key list-all
It will produce the following output −
Accepted Keys:
minion1
minion2
Denied Keys:

Unaccepted Keys:
Rejected Keys:
Verify Salt Minions
Now, we have accepted all the keys, you can send a command from Salt master to check whether Salt minions are listening or not,
salt '*' test.ping
It will produce the following output −
minion1:
   True
minion2:
   True
From the above result, list out minion 1 and minion 2, which means minions are listening properly, otherwise minions might now respond properly.
SaltStack - Access Control System
An Access Control System provides options for a user for a group to execute a task with permissions. A Salt access control system is used to configure access to non-administrative control interfaces. You can apply this process to all the systems. This control helps the non-administrative users to execute the Salt commands.
Salt interfaces are of the following three types −
- Publisher ACL system
- External Auth system
- Peer system
Let us understand go through each of these interfaces in detail.
Publisher ACL System
A Publisher ACL system allows access to the users other than root to execute Salt commands on minions from the master. The publisher ACL system is configured in the master configuration file via the publisher_acl configuration option. It is defined as follows −
publisher_acl:
   user1:
      - .*

   user2:
      - web*:
         - test.*
         - pkg.*
Here,
user1 is allowed to execute anything.
user2 is allowed to use test and pkg, but only on web* minions.
External Auth System
The external auth system is used to provide access to execute salt commands on specific minions through external authorization system like PAM, LDAP, etc. This configuration file is defined in the master file as described below.
external_auth:
   pam:
      user1:
         - 'web*':
            - test.*
            - network.*
      user2:
         - .*
Here,
user1 is allowed to execute functions in the test and network modules on the minions that match the web* target.
user2 is allowed to execute all the functions.
Enable the External Auth System in Command
Salt server provides an option a to enable external authentication.
salt -a pam web\* test.ping
Here, the -a pam option is used to enable PAM external authentication. Salt Server will ask for authentication details whenever we execute the command. To restrict Salt Server from asking the authentication details for the first time only, we can use the T option. This -T option caches the authentication details for the next 12 hours (default setting) and use it to authenticate the users.
salt -T -a pam web\* test.ping
Peer System
Salt minions can pass commands using the peer interface. The peer interface is configured through the master configuration file either to allow minions to send commands from the master using the peer configuration section or to allow minions to execute runners from the master using the peer_run configuration.
Let us understand both these configurations in detail.
Peer configuration
The simple configuration to be defined in master file is as below −
peer:
   .*:
      - .*
Here, It enables communication for all minions, but it is only recommended for very secure environments.
To assign minions to specific IDs, the configuration needs to be defined as shown below: peer −
.*domain.com:
   - test.*
peer_run Configuration
This configuration is to allow minions to execute runners from the master using the peer_run option on the master file. The following example is to allow access to all minions and to all the runners.
peer_run:
   .*:
      - .*
To assign minions to a specific ID, the configuration needs to be defined as given below −
peer_run:
   .*domain.com:
      - test.*
How to Execute Commands
To execute test.ping on all the minions, use the salt-call command along with the publish.publish module.
salt-call publish.publish \* test.ping
To execute runner, use the salt-call command along with the publish.runner module.
salt-call publish.runner manage.up
SaltStack - Job Management
Salt has the capability of high-speed communication with a large number of systems. This approach helps Salt to make a powerful multitasking system. Salt can run jobs on more than one systems, so Salt uses job management technique to manage each job running on all the systems. This chapter explains about job management in detail.
What is a Job ID?
Salt has cache directory, cachedir. Inside this, a directory that minions maintain is called as the proc directory. It is located in the following directory /var/cache/salt/proc.
The proc directory is used to maintain all the files. When these files are executed, they assign with a unique job ID. This job id helps to identify the current running jobs on the minion and allow the jobs to be looked up.
SALTUTIL Module
Salt introduces a new module that is called as the Saltutil job management process. This module contains different functions to manage jobs. These functions are used to manage jobs at the minion level. The functions are described in brief as follows −
running − Returns all the running jobs data that are found in the proc directory.
find_job − Returns specific data about a certain job based on the job id.
signal_job − Allows a given job id(jid) to be sent a signal.
term_job − Sends a termination signal for the specified job.
kill_job − Sends a kill signal for the specified job.
Jobs Runner
The jobs runner contains functions to make viewing data easier and cleaner. It has different functions. Let us discuss each of these functions in detail.
ACTIVE Function
The Active function is used to identify which jobs are still running and check what systems have completed a job and what systems are still being waited on. It is executed using the following command,
salt-run jobs.active
LOOKUP_JID Function
The lookup_jid runner will display the data for the current looking job. These jobs are configured via the keep_jobs option in the master configuration. It is executed using the following command.
salt-run jobs.lookup_jid <job id number>
LIST_JOBS Function
The List_jobs function is used to list out the job data for jobs. It is expressed by the following command −
salt-run jobs.list_jobs
Job Scheduling
The schedule system exposes the execution of any execution function on minions or any runner on the master.
It is performed by the following methods −
Schedule − The schedule option in either the master or the minion config files.
Minion pillar data − It refreshes the minion pillar data using the saltutil.refresh_pillar command.
The schedule state or schedule module.
Salt states are executed on the minion. You can pass the positional arguments and provide a YAML dict of the named arguments in the config file as shown below.
schedule:
   job1:
      function: saltstate.sls
      seconds: 3600
      args:
         - httpd
      kwargs:
         test: True
Here, job1 will execute the function saltstate.sls with the specified arguments, httpd for every hour. The test: True is the additional argument for the httpd command that is defined in saltstate.sls.
SaltStack - Salt File Server
The Salt file server is a stateless ZeroMQ server. It is built into the Salt master. A Salt file server is used for distributing files from master to minions. It contains different modules. Let us understand the salt file server, its configuration, modules related to the salt file server, how to access the salt file server in python, etc., in this chapter.
File Server Backend
The file server backend allows the Salt file server to act as a transparent interface to other file server like a local file system, Git version control system, etc.
A Git file server backend can be enabled by using the following configuration in the master file.
fileserver_backend:
   - git
To enable multiple backend file system, we can use the following configuration.
fileserver_backend:
   - roots
   - git
We can also specify the additional option for a different backend server using the specific section of the corresponding backend server.
Local File System
For using this system, we have to use the following code.
file_roots:
   base:
      - /srv/salt/prod
Git File System
For using this system, we have to use the following code.
gitfs_remotes:
   - https://github.com/sample/sample1.git
Requesting Files
Salt has the option to request files for specific environments.
salt://path/to/file?saltenv = base
Here, the environment is defined using the roots option.
File Server Configuration
Salt files can be allocated within many root directories and accessed by specifying both the file path and the environment to search. The individual environments can span across multiple directory roots.
Environment
The default environment is base. This environment is defined and is used to download files when no other environment is specified.
file_roots:
   base:
      - /srv/salt/base
You can also use multiple environments as shown in the code below.
file_roots:
   base:
      - /srv/salt/base
   dev:
      - /srv/salt/dev
      - /srv/salt/base
CP Module
The CP module is the main module to manipulate the Salt file server. The salt-cp command can also be used to distribute files presented by the Salt file server.
GET_FILE
The cp.get_file function can be used on the minion to download a file from the master. It is defined as shown in the following code block.
salt '*' cp.get_file salt://vimrc /etc/vimrc
The above command instructs all Salt minions to download the vimrc file and copy it to /etc/vimrc.
Enable Template
You can enable template option in get_file as follows −
salt '*' cp.get_file "salt://vimrc" /etc/vimrc template = jinja
Apply Compression
To use compression, use the gzip named argument. The valid values are integers from 1 to 9, where 1 is the minimum compression and 9 is maximum value.
The command is defined as follows −
salt '*' cp.get_file salt://vimrc /etc/vimrc gzip = 5
GET_DIR
The cp.get_dir function can be used on the minion to download an entire directory from the master. It is defined in the following code block.
salt '*' cp.get_dir salt://etc/mysql /etc
The cp.get_dir supports template rendering and gzip compression arguments. If you want, you can assign as well.
FILECLIENT Module
Salt provides a python module that helps to access the salt file server. The salt/fileclient.py module is used to set up the communication from the minion to the master.
The sample code to get files is as follows −
import salt.minion
import salt.fileclient

def get_file(path, dest, saltenv = base'):
   client = salt.fileclient.get_file_client(__opts__)
   return client.get_file(path, dest, true, saltenv)
Here,
opts is available when the module is run in the salt environment. Otherwise, we should provide the configuration path /etc/salt/minion.
path refers to the path of the source file in salt file server.
dest refers the destination path of the file.
saltenv refers to the environment
In the next chapter, we will understand how to use Git as the file server.
SaltStack - Git as a File Server
Git is an open-source distributed version control system. It can be used to keep a track of changes in any files. Salt sends files from Git repositories using the Git file server. You can configure Git to the fileserver_backend list option and if you need to configure one or more repositories, you can do so by using the gitfs_remotes option.
This chapter explains about how to install and configure the Git file server. Before moving towards the installation, you must have the following prerequisites.
Salt Server Prerequisites for Using Git
The minimal requirement for the salt server to use Git as the file server is as follows −
- pygit2
- Dulwich
Pygit2 and Dulwich are configured using the gitfs_provider parameter in the master config file. If gitfs_provider is not configured in the master file then Salt will prefer pygit2, if the suitable version is available, followed by GitPython and Dulwich.
Install pygit2
The following commands are used to install pygit2 in the Fedora and Ubuntu based systems −
Fedora-based system
yum install python-pygit2
Ubuntu-based system
apt-get install python-pygit2
Here, the minimum supported version of pygit2 is 0.20.3.
Install GitPYTHON
GitPython can be easily installed on the master using the yum / apt command as shown below.
Fedora-based system
yum install GitPython
Ubuntu-based system
apt-get install python-git
Install DULWICH
Dulwich can be easily installed on the master using the yum command.
Fedora-based system
yum install python-dulwich
Ubuntu-based system
apt-get install python-dulwich
Now, we have installed all the dependencies for the Git file server. Let us now configure this Git file server using the fileserver_backend section in the master config file.
Backend Configuration
In order to use the Git file server, you need to add Git in the fileserver_backend list in the master config file. It is described as follows −
fileserver_backend:
   - git
Let us further understand how to configure the Git file server in a remote configuration.
gitfs_remotes Configuration
You can specify any one or all of the URLs such as git://, https://, file://, or ssh:// for the gitfs_remotes configuration in the master file. This is used to search for the requested files.
The simple https URL specification is defined below.
gitfs_remotes:
   - https://github.com
The ssh configuration can be done as shown below.
gitfs_remotes:
   - git@github.com:user1/sample.git
   - ssh://user@domain.tld/path/to/sample.git
Now, we have configured the Git file server using the two options fileserver_backend and gitfs_remotes.
Restart Master
After making all the changes in the master file, now restart the master to load all the configurations in the Git file server.
Multiple Remotes Configuration
The following command is used for multiple configuration in gitfs_remotes in the master file.
gitfs_remotes:
   - git://github.com/sample/sample1.git
   - https://github.com/sample/sample2.git
   - file:///root/user/sample
Here, the repositories sample1.git, sample2.git, and sample.doc may have the following files.
sample1.git:
   top.sls

sample2.git
   edit/vimrc

sample.doc
   edit/vimrc
SaltStack - Using MinionFS as the File Server
The MinionFS is a special file server provided by Salt for the minions to exchange the files between them. The files served by the MinionFS are the files intentionally shared by minions. To share the files, a Minion has to follow steps given below.
Source minion has to push the file to the salt master using the cp.push function.
Once the files are pushed by the source minion, the deployed files can be accessed by any other minion using the MinionFS file server.
Enable Pushing
By default, pushing the files by minions to a master is disabled. To accept the files from minions, the master needs to have the file_recv option in the config file and its value must be set to True. By default, the value if file_recv is false.
file_recv: True
Once the option is enabled, restart the master service.
Pushing Files
Minions can push the files to the master. It is performed by the cp.push function. This cp.push function provides an easy mechanism to push the files by minion using the minion id.
salt 'minion-id' cp.push /path/to/the/file
Here, the minion-id is used to identify which minion is pushing the file. This command will store the file in a subdirectory named minions under the master's cachedir. Usually, the path is /var/cache/salt/master/minions.
For minion, m1 and the file /var/log/mylog.txt, the file will be stored in the /var/cache/salt/master/minions/m1/var/log/mylog.txt.
Enable MinionFS
To enable the MinionFS, simply add minion in the fileserver backend setting as shown in the following code block.
fileserver_backend:
   - roots
   - minion
Once MinionFS is enabled, the minion pushed files are available as −
salt://<minion-id>/path/to/pushed/file
For minion, m1 and the pushed file /var/log/mylog.txt, the pushed file will be served from salt://m1/var/log/mylog.txt.
This minionFS can be mounted in a special directory using the following configuration. It will separate the minionFS files from other files and will help in organizing the minion files.
minionfs_mountpoint: salt://minionfs
For the above configuration, the file will available under the minionfs directory as salt://minionfs/m1/var/log/mylog.txt
MinionFS Advanced Options
The MinionFS also provides an option to enable / disable the availability of pushed files from a certain minion. The options are minionfs_whitelist, to enable minions and minionfs_blacklist, to disable the minions.
minionfs_whitelist:
   - webserver
   - develop*
   - mail\d+.mysite.com'

minionfs_blacklist:
   - testing
In the above configuration, all minions except testing are allowed to share the file using minionFS.
Webserver1
Minions whose ids matches the regular expression develop *
Minions whose ids matches the regular expression mail\d+.mysite.com.
Testing
In the next chapter, we will learn how to use Cron with Salt.
SaltStack - Using Cron with Salt
Salt can be used along with the Cron application. Using both applications together provides a great opportunity to automate Salt. While Salt provides an option to execute commands remotely, Cron enables it to run in a pre-scheduled or automated manner. Let us learn how to use Cron and Salt together in this chapter.
What is Cron?
Cron is very useful application in the Linux Environment. It enables to preset a command or script to run in a specific date and time. It also enables to run an application in a regular interval, say daily, weekly or every first day of the month.
Cron starts when the system starts and check the /etc/crontab file for configuration details. The /etc/crontab has every application and its schedule in a separate line as shown below.
15 * * * * root echo "This command runs at 15 minutes past every hour"
15 10 * * * root echo "This command is run daily at 10:15 am"
Every line has the following seven entry points, which are separated by space and they are as follows −
minute − minute of the hour and is between 0 and 59.
hour − hour and is specified in the 24-hour clock.
day_of_month − Day of the Month and is between 1 and 31. For example, the 10th of each month is 10.
month − A month specified and is specified numerically (0-12), or as the name of the month (e.g. May).
day_of_week − Day of the week is specified numerically (0-7) or as the name of the day (e.g. Sun).
user − User account under which the command runs.
cmd − The actual command and its arguments.
Here, * replaces, if nothing is assigned.
Salt Caller (salt-call)
Salt provides a CLI (Command Line Interface), salt-call to run the modules in the local minion system itself instead of from the master server using the salt command. The salt call CLI supports all the options supported by salt command, but run locally.
Salt Caller was initially designed to support debugging, but now, it can be used as a standalone application.
salt-call test.ping
Using salt-call in cron
The salt-call CLI is useful to schedule salt operation using Cron. For example, to check the state of the minion every day at midnight, we can use salt-call along with the option state.apply as shown below.
/etc/crontab
PATH = /bin:/sbin:/usr/bin:/usr/sbin:/usr/local/bin:/usr/local/sbin:/opt/bin
0 0 * * * salt-call state.apply
Here,
The state.apply function will check the salt configuration file for the minion and check whether all action defined for the minion is properly configured.
Setting the path is a good practice because sometimes the salt command may not be available in the system path.
In the next chapter, we will learn Remote Execution, which is a core concept of Salt.
SaltStack - Remote Execution
One of the core concepts of Salt is remote execution. Salt can execute commands across thousands of systems in a matter of seconds. Salt uses its own command to do this functionality. Let us now understand the different Salt commands for remote execution in the chapter.
Salt Command
Salt command enables the Salt master to communicate with one or more Salt minions. The basic syntax is as follows,
salt '<target>' <module.function> [arguments]
The above command syntax consists of the following three main components.
target − It determines which systems is applied by the command.
module.function − It is a command. Commands consists of a module and function.
arguments − Additional data needed for calling the function.
Let us understand each of the components in detail.
What is the Target Component?
Target is a component, which allows you to filter minions (managed system) to run the function. A simple command using the target component is defined below.
salt '*' test.ping
It will produce the following output −
minion2:
   True
minion1:
   True
Here, the target * represents all the managed systems. The test here is a module and ping is a function. This is used to test the ping service in the remote system. We will learn about the different modules and its functions in subsequent chapters.
Targets using ID (minion)
You can send a command to a specific minion using its id in the target. Instead of using '*', you can replace it using minion id. It is defined below.
salt 'minion1 test.ping
It will produce the following output −
minion1:
   True
Targets using Regular Expression
Targets can be filtered by specific regular expression. It is defined below.
salt -E 'minion[0-9]' test.ping
It will produce the following output −
minion2:
   True
minion1:
   True
Targets using List
Targets can be explicitly specified in a list. It is defined in the following code block.
salt -L 'minion1,minion2' test.ping
It will produce the following output −
minion2:
   True
minion1:
   True
Targets by Condition
Targets can be combined in one command as shown in the code block below.
salt -C 'G@os:Ubuntu and minion* or S@192.168.50.*' test.ping
It will produce the following output −
minion1:
   True
minion2:
   True
Module and Functions (module.function)
Salt can execute shell commands; update packages and distribute files, etc., in all of its managed systems simultaneously. Salt does these operations using modules. Salt has special modules for all the available functionalities. Let us understand the different Salt modules using some simple example in this chapter.
Shell Command
Salt executes shell commands remotely across multiple systems using the cmd.run command. The cmd is the main module and run is one of the function available in the cmd module. The run function enables any shell command to be executed in the remote system as shown in the code block below.
salt '*' cmd.run 'ls -l /etc'
It will produce the following output −
minion2:
   total 868
   drwxr-xr-x 7 root root    4096 Jan 26 22:10 X11
   drwxr-xr-x 3 root root    4096 Jan 26 21:02 acpi
   -rw-r--r-- 1 root root    2981 Jan 26 20:48 adduser.conf
   -rw-r--r-- 1 root root      10 Jan 26 21:04 adjtime
   drwxr-xr-x 2 root root    4096 Jan 26 22:10 alternatives
   drwxr-xr-x 3 root root    4096 Jan 26 20:53 apm
   drwxr-xr-x 3 root root    4096 Jan 26 21:02 apparmor
   drwxr-xr-x 9 root root    4096 Jan 26 21:02 apparmor.d
   drwxr-xr-x 3 root root    4096 Jan 26 21:02 apport
   drwxr-xr-x 6 root root    4096 Jan 29 07:14 apt
   drwxr-xr-x 2 root root    4096 Jan 26 22:10 at-spi2


minion1:
   total 868
   drwxr-xr-x 7 root root    4096 Jan 26 22:10 X11
   drwxr-xr-x 3 root root    4096 Jan 26 21:02 acpi
   -rw-r--r-- 1 root root    2981 Jan 26 20:48 adduser.conf
   -rw-r--r-- 1 root root      10 Jan 26 21:04 adjtime
   drwxr-xr-x 2 root root    4096 Jan 26 22:10 alternatives
   drwxr-xr-x 3 root root    4096 Jan 26 20:53 apm

   drwxr-xr-x 3 root root    4096 Jan 26 21:02 apparmor
   drwxr-xr-x 9 root root    4096 Jan 26 21:02 apparmor.d
   drwxr-xr-x 3 root root    4096 Jan 26 21:02 apport
   drwxr-xr-x 6 root root    4096 Jan 29 07:09 apt
   drwxr-xr-x 2 root root    4096 Jan 26 22:10 at-spi2
   -rw-r----- 1 root daemon   144 Oct 21  2013 at.deny
   -rw-r--r-- 1 root root    2177 Apr  9  2014 bash.bashrc
   -rw-r--r-- 1 root root      45 Mar 22  2014 bash_completion
Show Disk Usage
Salt provides a special module, disk to get the complete disk details of the managed system. The diskmodule has a usage function to query the details.
salt '*' disk.usage
It will produce the following output −
minion1:
   ----------
   /:
      ----------
      1K-blocks:
         41251136
      available:
         37852804
      capacity:
         5%
      filesystem:
         /dev/sda1
      used:
         1662420
   /dev:
      ----------
      1K-blocks:
         503908
      available:
         503896
      capacity:
         1%
      filesystem:
         udev
      used:
         12
   /run:
      ----------
      1K-blocks:
         101780
      available:
         101412
      capacity:
         1%
      filesystem:
         tmpfs
      used:
         368
   /run/lock:
      ----------
      1K-blocks:
         5120
      available:
         5120
      capacity:
         0%
      filesystem:
         none
      used:
         0
   /run/shm:
      ----------
      1K-blocks:
         508884
      available:
         508872
      capacity:
         1%
      filesystem:
         none
      used:
         12
   /run/user:
      ----------
      1K-blocks:
         102400
      available:
         102400
      capacity:
         0%
      filesystem:
         none
      used:
         0
   /sys/fs/cgroup:
      ----------
      1K-blocks:
         4
      available:
         4
      capacity:
         0%
      filesystem:
         none
      used:
         0
   /vagrant:
      ----------
      1K-blocks:
         303114632
      available:
         252331440
      capacity:
         17%
      filesystem:
         none
      used:
         50783192
minion2:
   ----------
   /:
      ----------
      1K-blocks:
         41251136
      available:
         37852804
      capacity:
         5%
      filesystem:
         /dev/sda1
      used:
         1662420
   /dev:
      ----------
      1K-blocks:
         503908
      available:
         503896
      capacity:
         1%
      filesystem:
         udev
      used:
         12
   /run:
      ----------
      1K-blocks:
         101780
      available:
         101412
      capacity:
         1%
      filesystem:
         tmpfs
      used:
         368
   /run/lock:
      ----------
      1K-blocks:
         5120
      available:
         5120
      capacity:
         0%
      filesystem:
         none
      used:
         0
   /run/shm:
      ----------
      1K-blocks:
         508884
      available:
         508872
      capacity:
         1%
      filesystem:
         none
      used:
         12
   /run/user:
      ----------
      1K-blocks:
         102400
      available:
         102400
      capacity:
         0%
      filesystem:
         none
      used:
            0
   /sys/fs/cgroup:
      ----------
      1K-blocks:
         4
      available:
         4
      capacity:
         0%
      filesystem:
         none
      used:
         0
   /vagrant:
      ----------
      1K-blocks:
         303114632
      available:
         252331440
      capacity:
         17%
      filesystem:
         none
      used:
         50783192
Network Interfaces
Salt provides a separate module, network and function, interfaces inside the module to query the network interface information about the managed systems.
salt '*' network.interfaces
It will produce the following output −
minion1:
   ----------
   eth0:
      ----------
      hwaddr:
         08:00:27:04:3e:28
      inet:
         |_
            ----------
            address:
               10.0.2.15
            broadcast:
               10.0.2.255
            label:
               eth0
            netmask:
               255.255.255.0
      inet6:
         |_
            ----------
            address:
               fe80::a00:27ff:fe04:3e28
            prefixlen:
               64
            scope:
               link
      up:
         True
   eth1:
      ----------
      hwaddr:
         08:00:27:34:10:52
      inet:
         |_
            ----------
            address:
               192.168.50.11
            broadcast:
               192.168.50.255
            label:
               eth1
            netmask:
               255.255.255.0
      inet6:
         |_
            ----------
            address:
               fe80::a00:27ff:fe34:1052
            prefixlen:
               64
            scope:
               link
      up:
         True
   lo:
      ----------
      hwaddr:
         00:00:00:00:00:00
      inet:
         |_
            ----------
            address:
               127.0.0.1
            broadcast:
               None
            label:
               lo
            netmask:
               255.0.0.0
      inet6:
         |_
            ----------
            address:
               ::1
            prefixlen:
               128
            scope:
               host
      up:
         True
minion2:
   ----------
   eth0:
      ----------
      hwaddr:
         08:00:27:04:3e:28
      inet:
         |_
            ----------
            address:
               10.0.2.15
            broadcast:
               10.0.2.255
            label:
               eth0
            netmask:
               255.255.255.0
      inet6:
         |_
            ----------
            address:
               fe80::a00:27ff:fe04:3e28
            prefixlen:
               64
            scope:
               link
      up:
         True
   eth1:
      ----------
      hwaddr:
         08:00:27:a7:31:8e
      inet:
         |_
            ----------
            address:
               192.168.50.12
            broadcast:
               192.168.50.255
            label:
               eth1
            netmask:
               255.255.255.0
      inet6:
         |_
            ----------
            address:
               fe80::a00:27ff:fea7:318e
            prefixlen:
               64
            scope:
               link
      up:
         True
   lo:
      ----------
      hwaddr:
         00:00:00:00:00:00
      inet:
         |_
            ----------
            address:
               127.0.0.1
            broadcast:
               None
            label:
               lo
            netmask:
               255.0.0.0
      inet6:
         |_
            ----------
            address:
               ::1
            prefixlen:
               128
            scope:
               host
      up:
         True
sys.doc Execution Module
Salt functions can be sent to the sys.doc execution module. This is used to get the details on any module directly from the command line. The Salt functions are self-documenting. All the function documentation can be retrieved from the minions via the sys.doc() function, which is defined below.
salt '*' sys.doc
Arguments for a Function Call
Arguments are used to provide additional data for the function call. A simple argument example is given below.
salt '*' sys.doc pkg.install
Here, the argument pkg.install is a module to install specific packages.
Python Function
Arguments are space-delimited parameters to the function. It allows the python code to be passed as arguments as given below.
salt '*' cmd.exec_code python 'import sys;print sys.version'
It will produce the following output −
minion2:
   2.7.6 (default, Oct 26 2016, 20:30:19)
   [GCC 4.8.4]
minion1:
   2.7.6 (default, Oct 26 2016, 20:30:19)
   [GCC 4.8.4]
Similarly, you can use optional keywords and the YAML format as well.
SaltStack - Configuration Management
Configuration management is one of the most significant concept in SaltStack. It is used to create a reusable configuration template, called a state. The state describes everything required to put a system component or an application into a known configuration.
Salt State
Salt state is a reusable configuration for a specific part of a system. States are easier to understand and described using a simple YAML.
Create a Salt State
Salt states are easy to create. Let us create a simple state in this chapter. Move to the directory salt-vagrant-demo/saltstack/salt/ and create a file named samples.sls and add the following lines in it.
samples.sls
install_network_packages:
   pkg.installed:
      - pkgs:
         - rsync
         - lftp
         - curl
Now, save the file and run the following command in the Salt master.
root@saltmaster:/home/vagrant# salt 'minion1 state.apply samples
Here, we installed rsync, lftp and curl through the pkg.installed module using the Salt state in a salt minion, minion1. If it works properly, you could see the response as shown below.
It will produce the following output −
minion1:
----------
   ID: install_network_packages
   Function: pkg.installed
   Result: True
   Comment: All specified packages are already installed
   Started: 08:08:48.612336
   Duration: 545.385 ms
   Changes:

Summary for minion1
------------
Succeeded: 1
Failed:    0
------------
Total states run:     1
Total run time: 545.385 ms
Apply Salt State
Now that we have created a state using the .sls file and applied it by specifically calling it. Salt has a default state file called as the top.sls file. The top file is used to apply multiple state files to Salt minions. The top file describes where states should be applied. Well, States and the Top file work together to create the core of SaltStacks configuration management capability.
Let us now create a simple top.sls file in the directory saltstack/salt and add the following.
top.sls
base:
  '*':
      - common
   'minion1':
      - samples
Here, the state, commonly applies to all system state, samples applies to minion1.
Next, run the Salt master and apply the state as shown below.
root@saltmaster:/home/vagrant# salt '*' state.apply
It will produce the following output −
minion1:
----------
   ID: common_packages
   Function: pkg.installed
   Result: True
   Comment: All specified packages are already installed
   Started: 09:33:35.642355
   Duration: 588.21 ms
   Changes:

Summary for minion1
------------
Succeeded: 1
Failed:    0
------------
Total states run:     1
Total run time: 588.210 ms
minion2:
----------
   ID: common_packages
   Function: pkg.installed
   Result: True
   Comment: All specified packages are already installed
   Started: 09:33:35.890331
   Duration: 602.79 ms
   Changes:

Summary for minion2
------------
Succeeded: 1
Failed:    0
------------
Total states run:     1
Total run time: 602.790 ms
Apply Batch Size
If you have a large number of connected minions, then you can limit how many systems are updated at once. It is performed by using the batch-size option, which is defined below.
root@saltmaster:/home/vagrant# salt --batch-size 5 '*' state.apply
It will produce the following output −
Executing run on ['minion2', 'minion1']
jid:
   20170314094638482664
minion1:
----------
   ID: common_packages
   Function: pkg.installed
   Result: True
   Comment: All specified packages are already installed
   Started: 09:46:41.228519
   Duration: 582.24 ms
   Changes:

Summary for minion1
------------
Succeeded: 1
Failed:    0
------------
Total states run:     1
Total run time: 582.240 ms
retcode:
   0
jid:
   20170314094638482664
minion2:
----------
   ID: common_packages
   Function: pkg.installed
   Result: True
   Comment: All specified packages are already installed
   Started: 09:46:41.153609
   Duration: 605.235 ms
   Changes:

Summary for minion2
------------
Succeeded: 1
Failed:    0
------------
Total states run:     1
Total run time: 605.235 ms
retcode:
   0
Salt State Functions
Salt state functions are used to install and configure applications on your remote system. Let us install a Vim package using the Salt state function.
Create and Apply State Function
Create a file named sample.sls under the directory salt-vagrant-demo/saltstack/salt/sample.sls and add the following −
sample.sls
install vim:
   pkg.installed:
      - name: vim
Once, Vagrant environment is up, run the salt master and apply the sample.sls by running the following command.
root@saltmaster:/home/vagrant# sudo salt 'minion2 state.apply sample
It will produce the following output −
minion2:
----------
   ID: install vim
   Function: pkg.installed
   Name: vim
   Result: True
   Comment: Package vim is installed
   Started: 15:07:45.752764
   Duration: 553.506 ms
   Changes:

Summary for minion2
------------
Succeeded: 1
Failed:    0
------------
Total states run:     1
Total run time: 553.506 ms
Now, we have added a package Vim. Let us now test the package using the Salt testing method.
Salt State Testing
The test run is mandated by adding the test = True option to the states. The return information will show states that will be applied in yellow and the result is reported as None.
The following command is used to test the state −
root@saltmaster:/home/vagrant# sudo salt 'minion2 state.apply sample test = True
It will produce the following output −
minion2:
----------
   ID: install vim
   Function: pkg.installed
   Name: vim
   Result: True
   Comment: Package vim is already installed
   Started: 15:07:45.752764
   Duration: 553.506 ms
   Changes:

Summary for minion2
------------
Succeeded: 1
Failed:    0
------------
Total states run:     1
Total run time: 553.506 ms
SaltStack Pillar Component
Pillar is an essential component to make Salt states reusable. It is used to define secure data for minions assigned using targets. Salt pillar data stores values such as ports, file paths, configuration parameters and passwords.
Pillar config File
The configuration for the pillar_roots in the master config file is shown below −
pillar_roots:
   base:
      - /srv/pillar
Here, the file is in the /srv/pillar directory.
Consider, the top file located in /srv/pillar/top.sls has the following structure −
base:
   '*':
      - default
Now, move to the default.sls file located in /srv/pillar/default.sls and add the following code.
# Default pillar values
apache
git
After saving the file, refresh the pillar to update all the changes.
Refreshing the Pillar
You can refresh the pillar using the following command.
root@saltmaster:/home/vagrant# salt '*' saltutil.refresh_pillar
The above command is used to refresh the Salt pillar data on all the minions.
List Pillar Data
To list out the pillar data, you can use the command given below.
root@saltmaster:/home/vagrant# salt '*' pillar.ls
It will produce the following output −
minion2:
   - apache
   - git
minion1:
   - apache
   - git
Pillar Items
Once the pillar is setup, the data can be viewed on the minion via the pillar module. It can be accessed through the function pillar.items, which is defined below.
root@saltmaster:/home/vagrant# salt '*' pillar.items
It will produce the following output −
minion2:
   ----------
   apache:
      httpd
   git:
      git
minion1:
   ----------
   apache:
      httpd
   git:
      git
SaltStack Include Component
The Include component is used to define the same configuration task in multiple places. It is easy to perform. At the top of your state file, add an include using the following format −
include:
   - state file 1
   - state file 2
Here, state file 1 and state file 2 are the names of the SLS files that you want to include. No need to include the .sls extension. The Included Salt states are inserted at the top of the current file.
State File in the Subdirectory
You can include subdirectory state file using a dot (.). It acts as a directory separator.
include:
   - dir.sls1
Grains Interface
Grains is an interface used to derive the information about the underlying system. Grains are collected for the operating system, domain name, IP address, kernel, OS type, memory and many other system properties.
Grains Targeting
Grain data can be used when targeting minions, which is defined in the following code block.
root@saltmaster:/home/vagrant# salt -G 'os:Ubuntu' test.ping
It will produce the following output −
minion1:
   True
minion2:
   True
Listing Grains
Grains can be listed by using the grains.ls module, which is defined below.
root@saltmaster:/home/vagrant# salt '*' grains.ls
List Items
Like Pillar, Grains data can also be listed by using the 'grains.items.
root@saltmaster:/home/vagrant# salt '*' grains.items
SaltStack - Logging
Logging is used to track the running software events. An event is described by a descriptive message, which can optionally contain variable data. Salt logging approach is used to get any issues, you may face. You can check out with specific log levels.
Configuration Settings
Let us understand the different configuration settings for logging, in detail.
LOG_FILE
Salt log records are passed through the file, which contains the local path name or the network location for identification. This file is considered as the log file.
log_file: /var/log/salt/master
Here, the file dependent of the binary being executed in master. Similarly, you can execute in the minion as well, which is shown below.
log_file: /var/log/salt/minion
You can also use remote address. The syntax for using the remote address is − <file|udp|tcp>://<host|socketpath>:<port-if-required>/<log-facility>.
log_file: udp://loghost:port
Here, the Log-facility defaults to LOG_USER.
LOG_LEVEL
The log levels are ordered in a numerically assigned value. Python library has defined most of the logging levels by default. In addition to that, Salt uses some more levels. Some of the levels are explained below.
log_level: error; level value is 40 − It indicates log statement record at error.
log_level: quiet; level value is 1000 − It indicates that nothing should be logged at this level.
log_level: info; level value is 20 − It indicates the normal log information.
log_level: warn; level value is 30 − It indicates log statement record at warning.
log_level: debug; level value is 10 − Information useful for debugging both salt implementations and salt code.
log_level: trace; level value is 5 − More detailed code-debugging information.
LOG_LEVEL_LOGFILE
It defines the level of messages to send to the log file.
log_level_logfile: info
LOG_DATEFMT
It defines the log date format. By default, it is represented as %Y-%m-%d %H:%M:%S.
log_datefmt_logfile: '%Y-%m-%d %H:%M:%S'
LOG_FMT_CONSOLE
It defines the format of the console logging the messages. Salt uses a custom LogRecord attributes to colorize the console log output. It follows the following syntax −
'%(colorlevel)s'       # log level name colorized by level
'%(colorname)s'        # colorized module name
'%(colorprocess)s'     # colorized process number
'%(colormsg)s'         # colorized messages name
LOG_FMT_LOGFILE
It defines the format of the log file logging the messages. The basic syntax is as follows −
%(asctime)s,%(msecs)03d [%(name)-17s][%(levelname)-8s] %(message)s
LOG_GRANULAR_LEVELS
This level is used to control logging levels more specifically.
log_granular_levels:
   'salt': 'info'
   'salt.modules': trace'
Here, the Main salt library at the info level sets the salt.modules to log at the trace level.
External Logging Handler
Salt uses LogStash and Sentry external log handler for logging. Let us understand about it in detail in this chapter.
LOGSTASH Handler
LogStash is an open source; server-side secure data processing pipeline. Let us consider a simple UDP logging handler in Salt that uses LogStash.
Specify the following changes in the Salt master file −
logstash_udp_handler:
   host: 127.0.0.1
   port: 9999
   version: 1
   msg_type: logstash
Then add the changes in the Logstash configuration file −
input {
   udp {
      port ⇒ 9999
      codec ⇒ json
   }
}
Here, UDP is the input that needs to have a format as json_event, which is what we send over the wire.
SENTRY Logging Handler
Sentry is real-time error tracking in production deployments and information to reproduce and fix crashes. The default configuration in the master file is defined below.
sentry_handler:
   dsn: https://pub-key:secret-key@app.getsentry.com/app-id
   log_level: debug
Here, the default logging level for the sentry handler is ERROR, but we defined the debug log_level under the sentry_handler configuration key.
SaltStack - Salt through SSH
Salt executes commands in a remote system by using salt-minion. This is the normal behavior. In some scenarios, the remote system can be accessed only by the SSH protocol. For these scenarios, Salt provides an option to connect the remote system using the SSH protocol only and execute the command through the SSH layer.
Salt SSH is very easy to configure. The only needed configuration is to specify the remote system details in a special file called as the Roster file. This roster file is normally located in /etc/salt/roster. The roster file will have all the information regarding the remote system and how can we connect to it. Once the roster files are configured, all the Salt commands are executed using the salt-ssh instead of the salt command.
Roster File
The Roster System is designed specifically for Salt SSH. This is designed as a pluggable system. The sole purpose of the roster system is to gather information about the remote system. The roster file is a YAML based configuration file containing remote system information as targets. These targets are a special data structure with a predefined set of attributes. A roster file contains one or more targets and each target is identified by a Salt ID.
The basic structure of the roster file is as follows −
<Salt ID>:
   host: <host name>
   user: <user name>
   passwd: <password of the user>
All the other attributes supported by the roster file is optional. They are as follows −
port − SSH port number.
sudo − whether to run the command via sudo.
sudo_user − sudo user name.
tty − true if sudo is enabled.
priv − private key.
timeout − timeout for an SSH connection.
minion_opts − dictionary of minion opts.
thin_dir − target system's storage directory for salt components.
cmd_umask − umask to force for the salt-call command.
The sample roster file is as follows −
web:
   host: 192.168.2.1
   user: webuser
   passwd: secret
   sudo: True
db:
   host: 192.168.2.2
Deploy SSH Keys
Salt SSH will generate a default public/private key pairs for SSH logins. The default path will be /etc/salt/pki/master/ssh/salt-ssh.rsa. This key can be deployed to the remote system using the ssh-copy-id command as shown below.
ssh-copy-id -i /etc/salt/pki/master/ssh/salt-ssh.rsa.pub user@web.company.com
Execute Command
Executing a salt command is as simple as changing the salt cli command into salt-ssh as shown below.
salt-ssh '*' test.ping
Raw Shell Command
Salt SSH provides an option (-r) to execute a raw command in the remote system bypassing the salt module and functions.
salt-ssh '*' -r 'ls'
Targeting with Salt SSH
Targeting the remote system in Salt SSH supports only glob and regex targets. Since Salt SSH is a separate module, it provides only limited options as of now and will provide more features in the near future.
SaltStack - Salt for Cloud Infrastructure
Salt provides a separate module, Salt Cloud to provide virtual machines of various cloud providers like Amazon AWS, Google Compute, etc. Salt Cloud is a generic interface to configure and manage VMs of various cloud providers.
Cloud Config − The main configuration file for Salt Cloud is /etc/salt/cloud and it applies to all the VMs. The main configuration file is called Cloud Config.
Cloud Providers − To target specific cloud providers, we can use specific configuration file and they are located in /etc/salt/cloud.providers.d/*.conf, these are called as Cloud Providers.
Cloud Profiles − To target a specific VM, we can also use a special configuration file, which applies to that particular VM only and they are located at /etc/salt/cloud.profiles.d/*.conf, these are called as Cloud Profiles.
For a virtual machine, settings in the Cloud Config is applied first and then in the Cloud Providers and finally override is done by the Cloud Profiles.
Installation of Salt Cloud
By default, Salt Cloud is built into the Salt and is readily available. If it is not available, we can install it by using the command below.
pip install salt-cloud
Since Salt Cloud is a separate module and runs in its own process, it can be installed in the Salt Minion system as well instead of the Salt Master.
Provisioning a Virtual Machine
To provision a virtual machine, we need to define a cloud provider and a cloud profile. Once both are created, we can provision a new virtual machine for using it.
Cloud Provider
Cloud host information are configured in the Cloud provider configuration file. Normally, the basic information, which needs to be configured are cloud driver, username, password, private key, etc. Let us create a new cloud provider named as my-amazon-cloud.
Create a file, my-amazon-cloud.conf under /etc/salt/cloud.providers.d/
Add a new provider using the ec2 driver.
my-amazon-cloud:
   driver: ec2
   id: '<AWS_ID>'
   key: '<AWS_KEY>'
   private_key: /path/to/privatekey.pem
   keyname: <name of the key>
   securitygroup: default

   minion:
      master: <master server>
Salt provides drivers for various cloud host out of the box, such as GoGrid, HP Cloud, Google Compute Engine (GCE), Amazon AWS, Joyent, Linode, OpenNebula, ProfitBricks, Proxmox, Saltify, VexxHost, VMWare, etc.
Once the cloud providers are configured, we can query the available location of the provider, available machine images, and its various sizes.
salt-cloud --list-location my-amazon-cloud
salt-cloud --list-images my-amazon-cloud
salt-cloud --list-sizes my-amazon-cloud
Cloud Profile
A Cloud profile specifies the virtual machine image and size. It can be configured under /etc/salt/cloud.profiles.d/. Let us create a simple profile, simple.conf.
aws_micro:
   provider: my-amazon-cloud
   image: <image_id>
   size: <machine_id e.g. t1.micro>
Virtual Machine
Once the provider and profiles are configured, we can easily provide a virtual machine using the salt-cloud as shown below.
salt-cloud -p aws_micro master minion1 minion2
Where, p Profile name master, minion1 and minion2 are the new virtual machines.
The details of the newly created virtual machine can be obtained by using the following command.
salt-cloud --query
The virtual machines can be destroyed using the following command −
slat-cloud -d master minion1
Cloud Map
A Cloud Map is a special format to create multiple virtual machines at once. The format of the map file is to specify the profile and then add a list of the virtual machines under it.
A sample map file is as follows −
micro:
   - web1
   - web2
large:
   - db1
   - db2
The map file can be passed as an argument to the salt-cloud command to create the virtual machine as follows −
salt-cloud -m /path/to/mapfile
SaltStack - Salt Proxy Minions
There are lot of devices like router, network gear, etc., having custom OS, limited memory and high security considerations. In those devices, we were not able to install the standard salt-minion and subsequently were unable to manage those systems. However, Salt provides an innovative technology to overcome this constrain.
Salt has a separate module, salt proxy minion that controls the remote system using the REST service running in the remote system. This REST service is a HTTP based web service written using the Representational State Transfer (REST) concept and they are both easy to implement and easy to consume.
Every device will have its own SDK and development environment to write complex applications. Salt expects a REST service to be developed in the device as per the Salt interface specification. Salt also provides a python module to write the REST web service. If the device supports python, then it will be easy to develop the REST web service.
Once the REST web service is developed and deployed in the remote system, Salt can be configured to control the remote device using the REST web service instead of the salt minion.
Working Example
Let us learn the concept of salt proxy minion using a live working environment. For the live environment, we chose a Linux system for both the master and the proxy minion. We are going to control the system using REST web service instead of salt-minion.
Install and Configure REST Web Service
Salt provides a sample of the REST web service implementation, which is named as proxyminion_rest_example in its contrib module. Let us install the sample web service.
Install bottle using the pip. The bottle command is a python web framework to develop web application.
pip install bottle = 0.12.8
Download the saltstack/salt-contrib project from github. Otherwise, clone the project using the following command.
git clone https://github.com/saltstack/salt-contrib
Open a terminal and go to the salt-contrib directory.
This salt-contrib directory will have a folder, proxyminion_rest_example. This folder contains sample implementation for the REST web service. Go to the proxyminion_rest_example folder.
Run the following command to start the REST web service.
python rest.py --address <your ip address> --port 8000
Open a browser and load http://your ip address:8000. This will show the default page with services and packages as shown in the screenshot below.
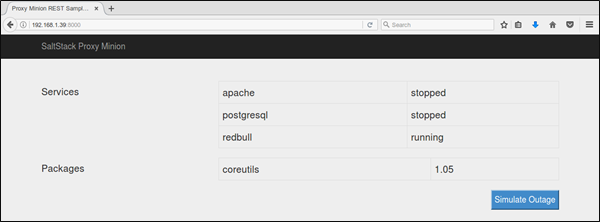
Now, we have configured the REST web service and it will check how to configure salt proxy to query the REST web service and control the system.
Configure Salt-Proxy
To configure the Salt-Proxy, we have to follow the steps given below.
We have to specify the master node for the salt-proxy. Edit the proxy-configuration file location, which is in/etc/salt /proxy, and enter the following code.
master: <your ip address>
Modify / create base pillar file in /srv/pillar/top.sls as shown in the following code block.
base:
  'p8000':
      - p8000
Add a new pillar file, p8000.sls in the /srv/pillar as shown in the code block below.
proxy:
   proxytype: rest_sample
   url: http://<your ip address>:8000
Start salt-proxy in the debug mode using the following command.
salt-proxy --proxyid = p8000 -l debug
Similar to the salt-minion, accept the salt-proxy key as shown below.
salt-key -y -a p8000

The following keys are going to be accepted:
Unaccepted Keys:
p8000
Key for minion p8000 accepted.
Running the Salt
Now, run the salt command and call the ping.test function as shown below.
salt p8000 test.ping
We can run any function supported by the REST web service by using salt, which is similar to salt-minion.
For example, the grain information can be obtained by using the following command.
salt p8000 grains.items
SaltStack - Event system
The event system in Salt is a local ZeroMQ PUB interface, which fires salt events. It is performed by the following components.
Event Sockets − It is used to publish events.
Event library − It is used to listen to events and send the events into the salt system.
Salt Master Event
A Salt master provides different types of events, which are explained in detail below −
- Authentication events
- Start events
- Key events
- Job events
- Runner Events
- Presence Events
- Cloud Events
Let us go through each of the event types in detail.
Authentication Events
These authentication events fire when a minion performs an authentication check with the master. It is represented by salt/auth.
Start Events
The start events fire whenever a minion connects to the Salt master and it is represented by salt/minion//start.
Key Events
The Key events are fired when the salt master is accepting and rejecting keys on the Salt minion. You can access this event using the salt-key command.
Job Events
A Job event is fired whenever a new job is going to start. It is represented by salt/job//new. Here, JID - Job id new - new job
Runner Events
When a runner begins execution, a runner event is fired. It is represented by salt/run//new.
Presence Events
When minions are connected or newly connected or disconnected, this event is fired on a regular interval. It is represented by salt/presence/present and salt/presence/change. Here,
Present − means the Salt master is currently connected to the minions list.
Change − used to detect a new minion connected or disconnected.
Cloud Events
The salt-cloud events are fired on a virtual machine. Unless other events, it is not performed on the minion. You can access it using salt/cloud//creating. It is fired when a Salt cloud starts the virtual machine execution process.
Event Tools
Now, let us go through the event tools and scripts. You can access the event bus using CLI. It is accessed by the following command.
salt-run state.event pretty = True
Here, the runner is designed to interact with the event bus from external tools and shell scripts. Salts event bus can be accessed remotely via the REST API. It is represented by (sample URL).
curl -SsNk https://salt-api.example.com:8000/events?token = 05A3.
Similarly, you can access events from the Python scripts as well.
SaltStack - Orchestration
In general, orchestration is an automated coordination and arrangement of systems. Orchestrate runner is used to perform the orchestration in SaltStack.
Orchestrate Runner
he Orchestrate Runner offers all the functionality of the OverState (previous system). It is originally called as the state.sls runner. This orchestrate runner is used to generalize the Salt state system to a Salt master context.
The state.sls and the state.highstate functions are executed on each Salt minion, but the state.orchestrate runner is executed on the master. The state.orchestrate runner allows you to manage your entire infrastructure as state fully. Let us understand how to go through a simple execution process.
Simple Execution
The Orchestrate Runner command is same as the state.sls function, but you can execute it with the salt-run instead of salt.
Assume that you have a sample.sls file located at /srv/salt/orch/samples.sls. Add the following code in that file.
sample.sls
install_nginx:
   salt.state:
      - tgt: 'web*'
      - sls:
         - nginx
The following command is used to run on the master and it will apply the states defined in that file.
salt-run state.orchestrate orch.sample
It will produce the following output −
saltmaster.local_master:
----------
   ID: install_nginx
   Function: salt.state
   Result: True
   Comment: States ran successfully.
   Started: 11:54:56.308078
   Duration: 63.401 ms
   Changes:

Summary for saltmaster.local_master
------------
Succeeded: 1
Failed:    0
------------
Total states run:     1
Total run time:  63.401 ms
root@saltmaster:/home/vagrant#
Here, according to the Current Version, the runner function was renamed to state.orchestrate. This will be helpful to avoid confusion with the state.sls execution function, but the previous versions of state.sls must be used.
Execute Function
To execute a function, you should use the salt.function. Consider a file data.sls located at /srv/salt/orch/data.sls. Now, add the following changes in that file.
data.sls
cmd.run:
   salt.function:
      - tgt: '*'
      - arg:
         - rm -rf /tmp/data
The following command is used to execute the Salt function.
root@saltmaster:/home/vagrant# salt-run state.orchestrate orch.data
It will produce the following output −
saltmaster.local_master:
----------
   ID: cmd.run
   Function: salt.function
   Result: True
   Comment: Function ran successfully. Function cmd.run ran on minion1, minion2.
   Started: 12:14:54.791635
   Duration: 234.615 ms
   Changes:
      minion1:

      minion2:
Summary for saltmaster.local_master
------------
Succeeded: 1 (changed = 1)
Failed:    0
------------
Total states run:     1
Total run time: 234.615 ms
SaltStack - Salt Package Manager
Salt formulas are packaged and distributed to Salt masters using the package manager. This concept was influenced from RPM, Yum and Pacman packaging systems. Salt state, pillar, file templates and other files are used by the formula and then packaged into a single file.
After a formula package is created, it is copied to the Repository System to make it to use for Salt masters. Before moving to the package manager, let us have a look at how to install an nginx package using the Salt basic command.
The following syntax is used to install a nginx package.
root@saltmaster:/home/vagrant# salt '*' pkg.install nginx
Here, the pkg.install nginx command is used to install a package. After execution, you will see the following response.
It will produce the following output −
minion2:
   ----------
   httpd:
      ----------
      new:
         1
      old:
   httpd-cgi:
      ----------
      new:
         1
      old:
   libxslt1.1:
      ----------
      new:
         1.1.28-2build1
      old:
   nginx:
      ----------
      new:
         1.4.6-1ubuntu3.7
      old:
   nginx-common:
      ----------
      new:
         1.4.6-1ubuntu3.7
      old:
   nginx-core:
      ----------
      new:
         1.4.6-1ubuntu3.7
      old:
minion1:
   ----------
   httpd:
      ----------
      new:
         1
      old:
   httpd-cgi:
      ----------
      new:
         1
      old:
   libxslt1.1:
      ----------
      new:
         1.1.28-2build1
      old:
   nginx:
      ----------
      new:
         1.4.6-1ubuntu3.7
      old:
   nginx-common:
      ----------
      new:
         1.4.6-1ubuntu3.7
      old:
   nginx-core:
      ----------
      new:
         1.4.6-1ubuntu3.7
      old:
Now, you have installed a package. To start the services for that package, use the command given below.
root@saltmaster:/home/vagrant# salt '*' service.start nginx
After running this command, the result looks as shown in the code block below.
minion1:
   True
minion2:
   True
Therefore, we have installed and started the services for the nginx package using the basic command. Let us now discuss how to build and install packages in the Salt package manager.
Building Packages
Packages can be built on any system where you can install Salt. There are three type of packages and they are follows.
- Formula
- Reactor
- Conf
Let us now understand how to build packages using the Fomula File.
Formula File
Most files from the package are located at the /srv/spm/salt/ directory by default, but the pillar file can be placed in the /srv/spm/pillar/ directory. The Formula file describes the package.
Example
name: apache
os: RedHat
os_family: RedHat
version: 201607
release: 2
summary: Formula for installing Apache
description: Formula for installing Apache
Here,
Name − The name of the package. Here, the package name is apache.
os − It is used to know which operating systems can support this package.
os_family − It is used to know which operating system families can support this package.
Version − The version of the package. It is specified in an YYYYMM format.
Release − This field refers primarily to a release of a version.
Summary − Short lines description of the package.
Description − A more detailed description of the package.
REACTOR
The reactor files resides in the /srv/spm/reactor/ directory.
CONF
The files in this type of a package are configuration files for Salt, which normally live in the /etc/salt/ directory. Configuration files for packages other than Salt can and should be handled with a Salt State (using a formula type of package).
Let us continue with the following steps to build a package.
Create a FORMULA file and place it in the root of the package folder.
Assemble the formula files in a folder on the build system.
Run spm build. The package is built and placed in the /srv/spm_build folder. The following command is used to build a package.
spm build /path/to/salt-packages-source/formula
Now, copy the .spm file to a folder on the repository system.
You can share the srv/spm_build folder on the network, or copy the files to your FTP or the Webserver.
Generate repo metadata using the following command.
spm create_repo /srv/spm_build
Installing Packages
This section explains about installing Salt package manager packages.
Configure Remote Repositories
To configure remote repositories, the Salt Master needs to know where the repository is through a configuration process.
Files are in the /etc/salt/spm.repos.d/spm.repo directory.
Example
file_repository:
   url: https://spm.example.com/
Here, the file contains the name of the repository and the link to the repository. You can also use http, https, ftp, or the file path. To use file path, you can access it using the URL: file:///srv/spm_build.
Update Metadata
After the repository is configured on the Salt master, repository metadata is downloaded using the command below.
spm update_repo
Update File Roots
The SPM packages are located in the srv/spm/salt directory. Add the following path to the file roots on the Salt master,
file_roots:
   base:
      1. /srv/salt
      2. /srv/spm/salt
Now, restart the salt master.
Install Apache Package
To install the package apache, use the following command.
spm install apache
You can also install directly from the SPM file using the command below.
spm local install /srv/spm/apache-201607-1.spm
Removing a Package
To remove a package, for example apache, use the following command,
spm remove apache
Note that, if any files have been modified, they will not be removed.
SaltStack - Python API
Salt provides programmatic access to all of its commands. Salt provides different modules for every section of the Salt system. Let us learn the basics of the python API and about how to run the basic salt commands in this chapter.
Configuration
The salt.config module is used to access Salt configuration details.
import salt.config
opts = salt.config.client_config('/etc/salt/master')
Here, the client_config reads the salt configuration file and returns the configuration details as dictionary.
Loader
The salt.loader module is used to load each modules in Salt such as grains, minions, etc.
import salt.loader
opts = salt.config.minion_config('/etc/salt/minion')
grains = salt.loader.grains(opts)
Here, grains reads the details of the grains in the Salt system and returns it.
Client Module
The salt.client module is used to execute salt, salt-call and the salt-SSH commands programmatically.
The most important python classes are as follows −
- salt.client.LocalClient
- salt.client.Caller
- salt.client.ssh.client.SSHClient
The main function provided by most of the client module is cmd. This function wraps the CLI options and executes it, which is similar to the command line and returns the results as python data structures.
LocalClient
The LocalClient is used to send commands from the master to the salt minions and return the results to the master.
import salt.client

local = salt.client.LocalClient()
local.cmd('*', 'test.ping')
It will produce the following output −
{'minion1': True, 'minion2': True }
Caller
The Caller is used to run salt-call programmatically and return the results.
import salt.client
caller = salt.client.Caller()
caller.cmd('test.ping')
It will produce the following output −
True
SSHClient
The SSHCient is used to run the salt-ssh programmatically and return the results.
import salt.client.ssh.client
ssh = salt.client.ssh.client.SSHClient()
ssh.cmd('*', 'test.ping')
It will produce the following output −
{'minion1': True, 'minion2': True }
CloudClient
The salt.cloud module is used to execute the salt-cloud commands programmatically.
client = salt.cloud.CloudClient(path = '/etc/salt/cloud')
Cloud module provides functions to create VMs (create), to destroy VMs (destroy), list images provided by a cloud provider (list_images), list locations of a cloud provider (list_locations), list machine sizes of a cloud provider (list_sizes), etc.
SaltStack - Working Example
In this working example, we will create a Salt formula that will configure the apache web server along with the PHP software. Salt is a great way to execute ad-hoc commands, but you would not really want to continually configure your infrastructure this way. By creating a set of Salt formulas, you can reliably reproduce any configuration over.
Salt Formulas are simple YAML text files and by default reside on your Salt Master in /srv/salt/*. Let us start by creating a Salt Formula to install the Apache web server and PHP at the same time.
Create a file named websetup.sls under /srv/salt/ directory and add the following code.
websetup.sls
websetup:
   pkg:
      - installed
      - pkgs:
         - apache2
         - php5
         - php5-mysql
In this example, notice the - pkgs: argument. Each item in the list below - pkgs: will be passed together to OS's package manager to be installed together. Whenever you have a large list of packages to install this is the most efficient way to install them.
Apply this Formula to Salt master using the following command.
root@saltmaster:/home/vagrant# salt 'minion2' state.sls websetup
Now, you will see the following output −
minion2:
----------
   ID: websetup
   Function: pkg.installed
   Result: True
   Comment: 3 targeted packages were installed/updated.
   Started: 01:50:53.978396
   Duration: 86738.132 ms
   Changes:
      ----------
         apache2:
            ----------
            new:
               2.4.7-1ubuntu4.13
            old:
         apache2-api-20120211:
            ----------
            new:
               1
            old:
         apache2-bin:
            ----------
            new:
               2.4.7-1ubuntu4.13
            old:
         apache2-data:
            ----------
            new:
               2.4.7-1ubuntu4.13
            old:
         libapache2-mod-php5:
            ----------
            new:
               5.5.9+dfsg-1ubuntu4.21
            old:
         libapr1:
            ----------
            new:
               1.5.0-1
            old:
         libaprutil1:
            ----------
            new:
               1.5.3-1
            old:
         libaprutil1-dbd-sqlite3:
            ----------
            new:
               1.5.3-1
            old:
         libaprutil1-ldap:
            ----------
            new:
               1.5.3-1
            old:
         php5:
            ----------
            new:
               5.5.9+dfsg-1ubuntu4.21
            old:
         php5-cli:
            ----------
            new:
               5.5.9+dfsg-1ubuntu4.21
            old:
         php5-common:
            ----------
            new:
               5.5.9+dfsg-1ubuntu4.21
            old:
         php5-json:
            ----------
            new:
               1.3.2-2build1
            old:
         php5-mhash:
            ----------
            new:
               1
            old:
         php5-mysql:
            ----------
            new:
               5.5.9+dfsg-1ubuntu4.21
            old:
         php5-readline:
            ----------
            new:
               5.5.9+dfsg-1ubuntu4.21
            old:
         phpapi-20121212:
            ----------
            new:
               1
            old:
         ssl-cert:
            ----------
            new:
               1.0.33
            old:
Summary for minion2
------------
Succeeded: 1 (changed = 1)
Failed:    0
------------
Total states run:     1
Total run time:  86.738 s
Now, you have installed the packages in minion2.
Highstate
A highstate is a way for Salt to determine which of the Salt Formulas should be applied to a certain minion. Execute a highstate using the following command.
root@saltmaster:/home/vagrant# salt <targets> state.highstate
top.sls
When the minion request to execute a highstate, as mentioned before, the minion requests the top.sls from the Salt master and searches for formulas that it matches. By default, this file is located at /srv/salt/top.sls. Let us add our formula to the top.sls file and set minion2 as target.
base:
   '*':
      - common
   'minion2:
      - websetup
Now, execute the highstate targeting minion2 as shown below.
root@saltmaster:/home/vagrant# salt 'minion2' state.highstate
After applying this, you could see the following output −
minion2:
----------
   ID: common_packages
   Function: pkg.installed
   Result: True
   Comment: All specified packages are already installed
   Started: 01:55:17.998824
   Duration: 461.615 ms
   Changes:

Summary for minion2
------------
Succeeded: 1
Failed:    0
------------
Total states run:     1
Total run time: 461.615 ms
Now, Apache web server and PHP is installed in the minion2. In this way, we have to target minions using both top.sls and highstate and install the required software with minimal work and maximum flexibility.
