- RESTful - Home
- RESTful - Introduction
- RESTful - Environment Setup
- RESTful - First Application
- RESTful - Resources
- RESTful - Messages
- RESTful - Addressing
- RESTful - Methods
- RESTful - Statelessness
- RESTful - Caching
- RESTful - Security
- RESTful - Java (JAX-RS)
- RESTful Useful Resources
- RESTful - Questions and Answers
- RESTful - Quick Guide
- RESTful - Useful Resources
- RESTful - Discussion
RESTful Web Services - Quick Guide
RESTful Web Services - Introduction
What is REST architecture?
REST stands for REpresentational State Transfer. REST is web standards based architecture and uses HTTP Protocol. It revolves around resource where every component is a resource and a resource is accessed by a common interface using HTTP standard methods. REST was first introduced by Roy Fielding in 2000.
In REST architecture, a REST Server simply provides access to resources and REST client accesses and modifies the resources. Here each resource is identified by URIs/ global IDs. REST uses various representation to represent a resource like text, JSON, XML. JSON is the most popular one.
HTTP methods
Following four HTTP methods are commonly used in REST based architecture.
GET − Provides a read only access to a resource.
POST − Used to create a new resource.
DELETE − Used to remove a resource.
PUT − Used to update a existing resource or create a new resource.
Introduction to RESTFul web services
A web service is a collection of open protocols and standards used for exchanging data between applications or systems. Software applications written in various programming languages and running on various platforms can use web services to exchange data over computer networks like the Internet in a manner similar to inter-process communication on a single computer. This interoperability (e.g., between Java and Python, or Windows and Linux applications) is due to the use of open standards.
Web services based on REST Architecture are known as RESTful web services. These webservices uses HTTP methods to implement the concept of REST architecture. A RESTful web service usually defines a URI, Uniform Resource Identifier a service, provides resource representation such as JSON and set of HTTP Methods.
Creating RESTFul Webservice
In next chapters, we'll create a webservice say user management with following functionalities −
| Sr.No. | URI | HTTP Method | POST body | Result |
|---|---|---|---|---|
| 1 | /UserService/users | GET | empty | Show list of all the users. |
| 2 | /UserService/addUser | POST | JSON String | Add details of new user. |
| 3 | /UserService/getUser/:id | GET | empty | Show details of a user. |
RESTful Web Services - Environment Setup
This tutorial will guide you on how to prepare a development environment to start your work with Jersey Framework to create RESTful Web Services. Jersey framework implements JAX-RS 2.0 API, which is a standard specification to create RESTful Web Services. This tutorial will also teach you how to setup JDK, Tomcat and Eclipse on your machine before you the Jersey Framework is setup.
Setup Java Development Kit (JDK)
You can download the latest version of SDK from Oracle's Java site − Java SE Downloads. You will find the instructions for installing JDK in the downloaded files. Follow the given instructions to install and configure the setup. Finally set the PATH and JAVA_HOME environment variables to refer to the directory that contains Java and Javac, typically java_install_dir/bin and java_install_dir respectively.
If you are running Windows and installed the JDK in C:\jdk1.7.0_75, you would have to put the following line in your C:\autoexec.bat file.
set PATH = C:\jdk1.7.0_75\bin;%PATH%
set JAVA_HOME = C:\jdk1.7.0_75
Alternatively, on Windows NT/2000/XP, you could also right-click on My Computer → select Properties → then Advanced → then Environment Variables. Then, you would update the PATH value and press the OK button.
On Unix (Solaris, Linux, etc.), if the SDK is installed in /usr/local/jdk1.7.0_75 and you use the C Shell, you would put the following into your .cshrc file.
setenv PATH /usr/local/jdk1.7.0_75/bin:$PATH
setenv JAVA_HOME /usr/local/jdk1.7.0_75
Alternatively, if you use an Integrated Development Environment (IDE) like Borland JBuilder, Eclipse, IntelliJ IDEA, or Sun ONE Studio, compile and run a simple program to confirm that the IDE knows where you installed Java, otherwise do proper setup as given document of the IDE.
Setup Eclipse IDE
All the examples in this tutorial have been written using the Eclipse IDE. So, I would suggest you should have the latest version of Eclipse installed on your machine.
To install Eclipse IDE, download the latest Eclipse binaries from https://www.eclipse.org/downloads/. Once you downloaded the installation, unpack the binary distribution to a convenient location. For example, in C:\eclipse on windows, or /usr/local/eclipse on Linux/Unix and finally set the PATH variable appropriately.
Eclipse can be started by executing the following commands on a windows machine, or you can simply double click on eclipse.exe.
%C:\eclipse\eclipse.exe
Eclipse can be started by executing the following commands on Unix (Solaris, Linux, etc.) machine −
$/usr/local/eclipse/eclipse
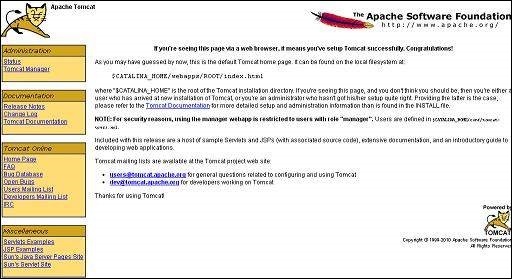
After a successful startup, if everything is fine, then your screen should display the following result −

Setup Jersey Framework Libraries
Now, if everything is fine, then you can proceed to setup the Jersey framework. Following are a few simple steps to download and install the framework on your machine.
Make a choice whether you want to install Jersey on Windows, or Unix and then proceed to the next step to download the .zip file for windows and then the .tz file for Unix.
Download the latest version of Jersey framework binaries from the following link https://eclipse-ee4j.github.io/jersey/.
At the time of writing this tutorial, I downloaded jaxrs-ri-2.17.zip on my Windows machine and when you unzip the downloaded file it will give you the directory structure inside E:\jaxrs-ri-2.17\jaxrs-ri as shown in the following screenshot.
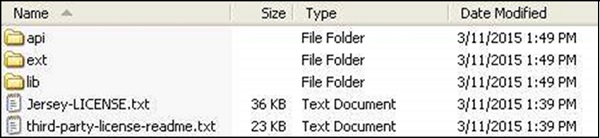
You will find all the Jersey libraries in the directories C:\jaxrs-ri-2.17\jaxrs-ri\lib and dependencies in C:\jaxrs-ri-2.17\jaxrs-ri\ext. Make sure you set your CLASSPATH variable on this directory properly otherwise you will face problem while running your application. If you are using Eclipse, then it is not required to set the CLASSPATH because all the settings will be done through Eclipse.
Setup Apache Tomcat
You can download the latest version of Tomcat from https://tomcat.apache.org/. Once you downloaded the installation, unpack the binary distribution into a convenient location. For example in C:\apache-tomcat-7.0.59 on windows, or /usr/local/apache-tomcat-7.0.59 on Linux/Unix and set CATALINA_HOME environment variable pointing to the installation locations.
Tomcat can be started by executing the following commands on a windows machine, or you can simply double click on startup.bat.
%CATALINA_HOME%\bin\startup.bat
or
C:\apache-tomcat-7.0.59\bin\startup.bat
Tomcat can be started by executing the following commands on a Unix (Solaris, Linux, etc.) machine −
$CATALINA_HOME/bin/startup.sh
or
/usr/local/apache-tomcat-7.0.59/bin/startup.sh
After a successful startup, the default web applications included with Tomcat will be available by visiting http://localhost:8080/. If everything is fine then it should display the following result −
Further information about configuring and running Tomcat can be found in the documentation included on this page. This information can also be found on the Tomcat website − https://tomcat.apache.org.
Tomcat can be stopped by executing the following commands on a windows machine −
%CATALINA_HOME%\bin\shutdown
or
C:\apache-tomcat-7.0.59\bin\shutdown
Tomcat can be stopped by executing the following commands on Unix (Solaris, Linux, etc.) machine −
$CATALINA_HOME/bin/shutdown.sh
or
/usr/local/apache-tomcat-7.0.59/bin/shutdown.sh
Once you are done with this last step, you are ready to proceed for your first Jersey example which you will see in the next chapter.
RESTful Web Services - First Application
Let us start writing the actual RESTful web services with Jersey Framework. Before you start writing your first example using the Jersey Framework, you have to make sure that you have setup your Jersey environment properly as explained in the RESTful Web Services - Environment Setup chapter. Here, I am also assuming that you have a little working knowledge of Eclipse IDE.
So, let us proceed to write a simple Jersey Application which will expose a web service method to display the list of users.
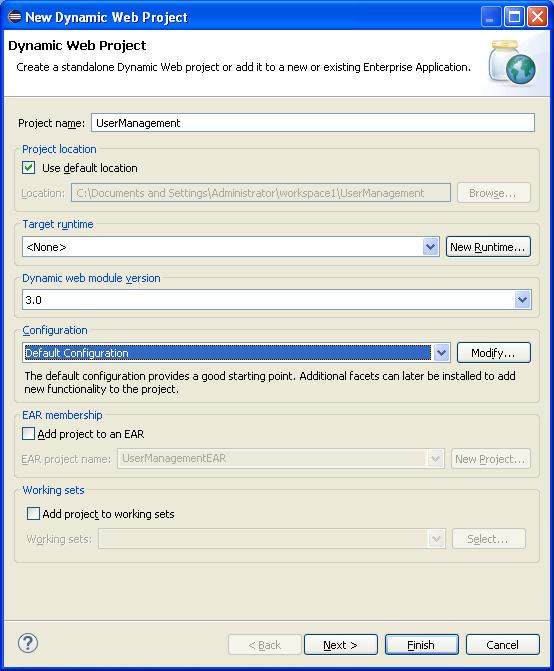
Creating a Java Project
The first step is to create a Dynamic Web Project using Eclipse IDE. Follow the option File → New → Project and finally select the Dynamic Web Project wizard from the wizard list. Now name your project as UserManagement using the wizard window as shown in the following screenshot −
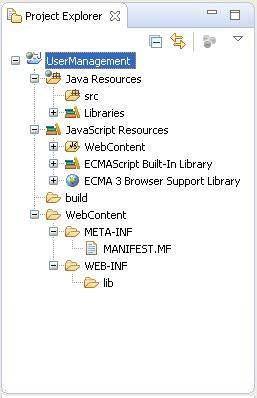
Once your project is created successfully, you will have the following content in your Project Explorer −
Adding the Required Libraries
As a second step let us add Jersey Framework and its dependencies (libraries) in our project. Copy all jars from following directories of download jersey zip folder in WEB-INF/lib directory of the project.
- \jaxrs-ri-2.17\jaxrs-ri\api
- \jaxrs-ri-2.17\jaxrs-ri\ext
- \jaxrs-ri-2.17\jaxrs-ri\lib
Now, right click on your project name UserManagement and then follow the option available in context menu − Build Path → Configure Build Path to display the Java Build Path window.
Now use Add JARs button available under Libraries tab to add the JARs present in WEBINF/lib directory.
Creating the Source Files
Now let us create the actual source files under the UserManagement project. First we need to create a package called com.tutorialspoint. To do this, right click on src in package explorer section and follow the option − New → Package.
Next we will create UserService.java, User.java,UserDao.java files under the com.tutorialspoint package.
User.java
package com.tutorialspoint;

import java.io.Serializable;
import javax.xml.bind.annotation.XmlElement;
import javax.xml.bind.annotation.XmlRootElement;
@XmlRootElement(name = "user")

public class User implements Serializable {
   private static final long serialVersionUID = 1L;
   private int id;
   private String name;
   private String profession;
   public User(){}

   public User(int id, String name, String profession){
      this.id = id;
      this.name = name;
      this.profession = profession;
   }
   public int getId() {
      return id;
   }
   @XmlElement
   public void setId(int id) {
      this.id = id;
   }
   public String getName() {
      return name;
   }
   @XmlElement
   public void setName(String name) {
      this.name = name;
   }
   public String getProfession() {
      return profession;
   }
   @XmlElement
   public void setProfession(String profession) {
      this.profession = profession;
   }
}
UserDao.java
package com.tutorialspoint;

import java.io.File;
import java.io.FileInputStream;
import java.io.FileNotFoundException;
import java.io.FileOutputStream;
import java.io.IOException;
import java.io.ObjectInputStream;
import java.io.ObjectOutputStream;
import java.util.ArrayList;
import java.util.List;

public class UserDao {
   public List<User> getAllUsers(){

      List<User> userList = null;
      try {
         File file = new File("Users.dat");
         if (!file.exists()) {
            User user = new User(1, "Mahesh", "Teacher");
            userList = new ArrayList<User>();
            userList.add(user);
            saveUserList(userList);
         }
         else{
            FileInputStream fis = new FileInputStream(file);
            ObjectInputStream ois = new ObjectInputStream(fis);
            userList = (List<User>) ois.readObject();
            ois.close();
         }
      } catch (IOException e) {
         e.printStackTrace();
      } catch (ClassNotFoundException e) {
         e.printStackTrace();
      }
      return userList;
   }
   private void saveUserList(List<User> userList){
      try {
         File file = new File("Users.dat");
         FileOutputStream fos;
         fos = new FileOutputStream(file);
         ObjectOutputStream oos = new ObjectOutputStream(fos);
         oos.writeObject(userList);
         oos.close();
      } catch (FileNotFoundException e) {
         e.printStackTrace();
      } catch (IOException e) {
         e.printStackTrace();
      }
   }
}
UserService.java
package com.tutorialspoint;

import java.util.List;
import javax.ws.rs.GET;
import javax.ws.rs.Path;
import javax.ws.rs.Produces;
import javax.ws.rs.core.MediaType;
@Path("/UserService")

public class UserService {
   UserDao userDao = new UserDao();
   @GET
   @Path("/users")
   @Produces(MediaType.APPLICATION_XML)
   public List<User> getUsers(){
      return userDao.getAllUsers();
   }
}
There are two important points to be noted about the main program,
UserService.java
The first step is to specify a path for the web service using @Path annotation to the UserService.
The second step is to specify a path for the particular web service method using @Path annotation to method of UserService.
Creating the Web.xml configuration File
You need to create a Web xml Configuration file which is an XML file and is used to specify Jersey framework servlet for our application.
web.xml
<?xml version = "1.0" encoding = "UTF-8"?>
<web-app xmlns:xsi = "http://www.w3.org/2001/XMLSchema-instance"
   xmlns = "http://java.sun.com/xml/ns/javaee"
   xsi:schemaLocation="http://java.sun.com/xml/ns/javaee
   http://java.sun.com/xml/ns/javaee/web-app_3_0.xsd"
   id = "WebApp_ID" version = "3.0">
   <display-name>User Management</display-name>
   <servlet>
      <servlet-name>Jersey RESTful Application</servlet-name>
      <servlet-class>org.glassfish.jersey.servlet.ServletContainer</servlet-class>
      <init-param>
         <param-name>jersey.config.server.provider.packages</param-name>
         <param-value>com.tutorialspoint</param-value>
      </init-param>
   </servlet>
   <servlet-mapping>
      <servlet-name>Jersey RESTful Application</servlet-name>
      <url-pattern>/rest/*</url-pattern>
   </servlet-mapping>
</web-app>
Deploying the Program
Once you are done with creating source and web configuration files, you are ready for this step which is compiling and running your program. To do this, using Eclipse, export your application as a war file and deploy the same in tomcat.
To create a WAR file using eclipse, follow the option File → export → Web → War File and finally select project UserManagement and destination folder. To deploy a war file in Tomcat, place the UserManagement.war in the Tomcat Installation Directory → webapps directory and start the Tomcat.
Running the Program
We are using Postman, a Chrome extension, to test our webservices.
Make a request to UserManagement to get list of all the users. Put http://localhost:8080/UserManagement/rest/UserService/users in POSTMAN with GET request and see the following result.
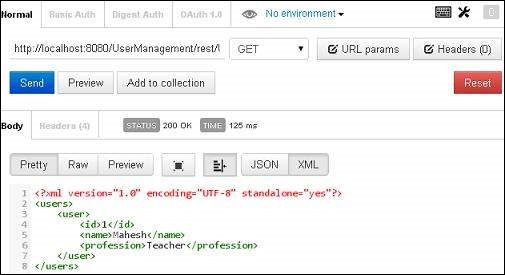
Congratulations, you have created your first RESTful Application successfully.
RESTful Web Services - Resources
What is a Resource?
REST architecture treats every content as a resource. These resources can be Text Files, Html Pages, Images, Videos or Dynamic Business Data. REST Server simply provides access to resources and REST client accesses and modifies the resources. Here each resource is identified by URIs/ Global IDs. REST uses various representations to represent a resource where Text, JSON, XML. The most popular representations of resources are XML and JSON.
Representation of Resources
A resource in REST is a similar Object in Object Oriented Programming or is like an Entity in a Database. Once a resource is identified then its representation is to be decided using a standard format so that the server can send the resource in the above said format and client can understand the same format.
For example, in RESTful Web Services - First Application chapter, a user is a resource which is represented using the following XML format −
<user>
   <id>1</id>
   <name>Mahesh</name>
   <profession>Teacher</profession>
</user>
The same resource can be represented in JSON format as follows −
{
   "id":1,
   "name":"Mahesh",
   "profession":"Teacher"
}
Good Resources Representation
REST does not impose any restriction on the format of a resource representation. A client can ask for JSON representation whereas another client may ask for XML representation of the same resource to the server and so on. It is the responsibility of the REST server to pass the client the resource in the format that the client understands.
Following are some important points to be considered while designing a representation format of a resource in RESTful Web Services.
Understandability − Both the Server and the Client should be able to understand and utilize the representation format of the resource.
Completeness − Format should be able to represent a resource completely. For example, a resource can contain another resource. Format should be able to represent simple as well as complex structures of resources.
Linkablity − A resource can have a linkage to another resource, a format should be able to handle such situations.
However, at present most of the web services are representing resources using either XML or JSON format. There are plenty of libraries and tools available to understand, parse, and modify XML and JSON data.
RESTful Web Services - Messages
RESTful Web Services make use of HTTP protocols as a medium of communication between client and server. A client sends a message in form of a HTTP Request and the server responds in the form of an HTTP Response. This technique is termed as Messaging. These messages contain message data and metadata i.e. information about message itself. Let us have a look on the HTTP Request and HTTP Response messages for HTTP 1.1.
HTTP Request
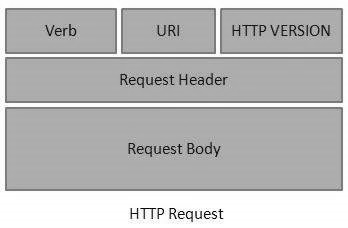
An HTTP Request has five major parts −
Verb − Indicates the HTTP methods such as GET, POST, DELETE, PUT, etc.
URI − Uniform Resource Identifier (URI) to identify the resource on the server.
HTTP Version − Indicates the HTTP version. For example, HTTP v1.1.
Request Header − Contains metadata for the HTTP Request message as key-value pairs. For example, client (or browser) type, format supported by the client, format of the message body, cache settings, etc.
Request Body − Message content or Resource representation.
HTTP Response
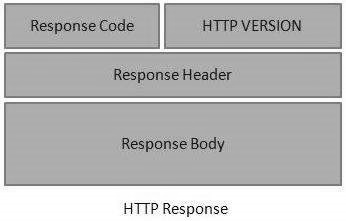
An HTTP Response has four major parts −
Status/Response Code − Indicates the Server status for the requested resource. For example, 404 means resource not found and 200 means response is ok.
HTTP Version − Indicates the HTTP version. For example HTTP v1.1.
Response Header − Contains metadata for the HTTP Response message as keyvalue pairs. For example, content length, content type, response date, server type, etc.
Response Body − Response message content or Resource representation.
Example
As we have explained in the RESTful Web Services - First Application chapter, let us put http://localhost:8080/UserManagement/rest/UserService/users in the POSTMAN with a GET request. If you click on the Preview button which is near the send button of Postman and then click on the Send button, you may see the following output.
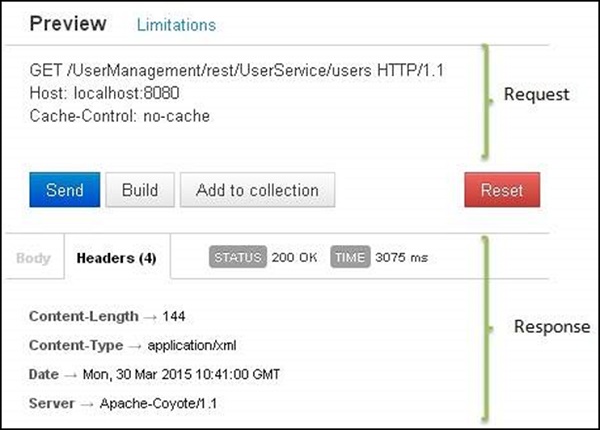
Here you can see, the browser sent a GET request and received a response body as XML.
RESTful Web Services - Addressing
Addressing refers to locating a resource or multiple resources lying on the server. It is analogous to locate a postal address of a person.
Each resource in REST architecture is identified by its URI (Uniform Resource Identifier). A URI is of the following format −
<protocol>://<service-name>/<ResourceType>/<ResourceID>
Purpose of an URI is to locate a resource(s) on the server hosting the web service. Another important attribute of a request is VERB which identifies the operation to be performed on the resource. For example, in RESTful Web Services - First Application chapter, the URI is http://localhost:8080/UserManagement/rest/UserService/users and the VERB is GET.
Constructing a Standard URI
The following are important points to be considered while designing a URI −
Use Plural Noun − Use plural noun to define resources. For example, we've used users to identify users as a resource.
Avoid using spaces − Use underscore (_) or hyphen (-) when using a long resource name. For example, use authorized_users instead of authorized%20users.
Use lowercase letters − Although URI is case-insensitive, it is a good practice to keep the url in lower case letters only.
Maintain Backward Compatibility − As Web Service is a public service, a URI once made public should always be available. In case, URI gets updated, redirect the older URI to a new URI using the HTTP Status code, 300.
Use HTTP Verb − Always use HTTP Verb like GET, PUT and DELETE to do the operations on the resource. It is not good to use operations name in the URI.
Example
Following is an example of a poor URI to fetch a user.
http://localhost:8080/UserManagement/rest/UserService/getUser/1
Following is an example of a good URI to fetch a user.
http://localhost:8080/UserManagement/rest/UserService/users/1
RESTful Web Services - Methods
As we have discussed in the earlier chapters that RESTful Web Service uses a lot of HTTP verbs to determine the operation to be carried out on the specified resource(s). The following table states the examples of the most commonly used HTTP Verbs.
| Sr.No. | HTTP Method, URI and Operation |
|---|---|
| 1 | GET http://localhost:8080/UserManagement/rest/UserService/users Gets the list of users. (Read Only) |
2 |
GET http://localhost:8080/UserManagement/rest/UserService/users/1 Gets the User of Id 1 (Read Only) |
3 |
PUT http://localhost:8080/UserManagement/rest/UserService/users/2 Inserts User with Id 2 (Idempotent) |
4 |
POST http://localhost:8080/UserManagement/rest/UserService/users/2 Updates the User with Id 2 (N/A) |
5 |
DELETE http://localhost:8080/UserManagement/rest/UserService/users/1 Deletes the User with Id 1 (Idempotent) |
6 |
OPTIONS http://localhost:8080/UserManagement/rest/UserService/users Lists out the supported operations in a web service. (Read Only) |
7 |
HEAD http://localhost:8080/UserManagement/rest/UserService/users Returns the HTTP Header only, no Body. (Read Only) |
The following points are to be considered.
GET operations are read only and are safe.
PUT and DELETE operations are idempotent, which means their result will always be the same, no matter how many times these operations are invoked.
PUT and POST operation are nearly the same with the difference lying only in the result where the PUT operation is idempotent and POST operation can cause a different result.
Example
Let us update an Example created in the RESTful Web Services - First Application chapter to create a Web service which can perform CRUD (Create, Read, Update, Delete) operations. For simplicity, we have used a file I/O to replace Database operations.
Let us update the User.java, UserDao.java and UserService.java files under the com.tutorialspoint package.
User.java
package com.tutorialspoint;

import java.io.Serializable;
import javax.xml.bind.annotation.XmlElement;
import javax.xml.bind.annotation.XmlRootElement;
@XmlRootElement(name = "user")

public class User implements Serializable {
   private static final long serialVersionUID = 1L;
   private int id;
   private String name;
   private String profession;
   public User(){}

   public User(int id, String name, String profession){
      this.id = id;
      this.name = name;
      this.profession = profession;
   }

   public int getId() {
      return id;
   }
   @XmlElement
   public void setId(int id) {
      this.id = id;
   }
   public String getName() {
      return name;
   }
   @XmlElement
      public void setName(String name) {
      this.name = name;
   }
   public String getProfession() {
      return profession;
   }
   @XmlElement
   public void setProfession(String profession) {
      this.profession = profession;
   }
   @Override
   public boolean equals(Object object){
      if(object == null){
         return false;
      }else if(!(object instanceof User)){
         return false;
      }else {
         User user = (User)object;
         if(id == user.getId()
            && name.equals(user.getName())
            && profession.equals(user.getProfession())){
               return true;
         }
      }
      return false;
   }
}
UserDao.java
package com.tutorialspoint;

import java.io.File;
import java.io.FileInputStream;
import java.io.FileNotFoundException;
import java.io.FileOutputStream;
import java.io.IOException;
import java.io.ObjectInputStream;
import java.io.ObjectOutputStream;
import java.util.ArrayList;
import java.util.List;

public class UserDao {
   public List<User> getAllUsers(){
      List<User> userList = null;
      try {
         File file = new File("Users.dat");
         if (!file.exists()) {
            User user = new User(1, "Mahesh", "Teacher");
            userList = new ArrayList<User>();
            userList.add(user);
            saveUserList(userList);
         }
         else{
            FileInputStream fis = new FileInputStream(file);
            ObjectInputStream ois = new ObjectInputStream(fis);
            userList = (List<User>) ois.readObject();
            ois.close();
         }
      } catch (IOException e) {
         e.printStackTrace();
      } catch (ClassNotFoundException e) {
         e.printStackTrace();
      }
      return userList;
   }
   public User getUser(int id){
      List<User> users = getAllUsers();
      for(User user: users){
         if(user.getId() == id){
            return user;
         }
      }
      return null;
   }
   public int addUser(User pUser){
      List<User> userList = getAllUsers();
      boolean userExists = false;
      for(User user: userList){
         if(user.getId() == pUser.getId()){
            userExists = true;
            break;
         }
      }
      if(!userExists){
         userList.add(pUser);
         saveUserList(userList);
         return 1;
      }
      return 0;
   }
   public int updateUser(User pUser){
      List<User> userList = getAllUsers();
      for(User user: userList){
         if(user.getId() == pUser.getId()){
            int index = userList.indexOf(user);
            userList.set(index, pUser);
            saveUserList(userList);
            return 1;
         }
      }
      return 0;
   }
   public int deleteUser(int id){
      List<User> userList = getAllUsers();
      for(User user: userList){
         if(user.getId() == id){
            int index = userList.indexOf(user);
            userList.remove(index);
            saveUserList(userList);
            return 1;
         }
      }
      return 0;
   }
   private void saveUserList(List<User> userList){
      try {
         File file = new File("Users.dat");
         FileOutputStream fos;
         fos = new FileOutputStream(file);
         ObjectOutputStream oos = new ObjectOutputStream(fos);
         oos.writeObject(userList);
         oos.close();
      } catch (FileNotFoundException e) {
         e.printStackTrace();
      } catch (IOException e) {
         e.printStackTrace();
      }
   }
}
UserService.java
package com.tutorialspoint;

import java.io.IOException;
import java.util.List;
import javax.servlet.http.HttpServletResponse;
import javax.ws.rs.Consumes;
import javax.ws.rs.DELETE;
import javax.ws.rs.FormParam;
import javax.ws.rs.GET;
import javax.ws.rs.OPTIONS;
import javax.ws.rs.POST;
import javax.ws.rs.PUT;
import javax.ws.rs.Path;
import javax.ws.rs.PathParam;
import javax.ws.rs.Produces;
import javax.ws.rs.core.Context;
import javax.ws.rs.core.MediaType;
@Path("/UserService")

public class UserService {

   UserDao userDao = new UserDao();
   private static final String SUCCESS_RESULT = "<result>success</result>";
   private static final String FAILURE_RESULT = "<result>failure</result>";
   @GET
   @Path("/users")
   @Produces(MediaType.APPLICATION_XML)
   public List<User> getUsers(){
      return userDao.getAllUsers();
   }
   @GET
   @Path("/users/{userid}")
   @Produces(MediaType.APPLICATION_XML)
   public User getUser(@PathParam("userid") int userid){
      return userDao.getUser(userid);
   }
   @PUT
   @Path("/users")
   @Produces(MediaType.APPLICATION_XML)
   @Consumes(MediaType.APPLICATION_FORM_URLENCODED)
   public String createUser(@FormParam("id") int id,
      @FormParam("name") String name,
      @FormParam("profession") String profession,
      @Context HttpServletResponse servletResponse) throws IOException{
      User user = new User(id, name, profession);
      int result = userDao.addUser(user);
      if(result == 1){
         return SUCCESS_RESULT;
      }
      return FAILURE_RESULT;
   }
   @POST
   @Path("/users")
   @Produces(MediaType.APPLICATION_XML)
   @Consumes(MediaType.APPLICATION_FORM_URLENCODED)
   public String updateUser(@FormParam("id") int id,
      @FormParam("name") String name,
      @FormParam("profession") String profession,
      @Context HttpServletResponse servletResponse) throws IOException{
      User user = new User(id, name, profession);
      int result = userDao.updateUser(user);
      if(result == 1){
         return SUCCESS_RESULT;
      }
      return FAILURE_RESULT;
   }
   @DELETE
   @Path("/users/{userid}")
   @Produces(MediaType.APPLICATION_XML)
   public String deleteUser(@PathParam("userid") int userid){
      int result = userDao.deleteUser(userid);
      if(result == 1){
         return SUCCESS_RESULT;
      }
      return FAILURE_RESULT;
   }
   @OPTIONS
   @Path("/users")
   @Produces(MediaType.APPLICATION_XML)
   public String getSupportedOperations(){
      return "<operations>GET, PUT, POST, DELETE</operations>";
   }
}
Now using Eclipse, export your application as a WAR File and deploy the same in Tomcat. To create a WAR file using eclipse, follow this path File → export → Web → War File and finally select project UserManagement and the destination folder. To deploy a WAR file in Tomcat, place the UserManagement.war in the Tomcat Installation Directory → webapps directory and the start Tomcat.
Testing the Web Service
Jersey provides APIs to create a Web Service Client to test web services. We have created a sample test class WebServiceTester.java under the com.tutorialspoint package in the same project.
WebServiceTester.java
package com.tutorialspoint;

import java.util.List;
import javax.ws.rs.client.Client;
import javax.ws.rs.client.ClientBuilder;
import javax.ws.rs.client.Entity;
import javax.ws.rs.core.Form;
import javax.ws.rs.core.GenericType;
import javax.ws.rs.core.MediaType;

public class WebServiceTester  {
   private Client client;
   private String REST_SERVICE_URL = "
   http://localhost:8080/UserManagement/rest/UserService/users";
   private static final String SUCCESS_RESULT = "<result>success</result>";
   private static final String PASS = "pass";
   private static final String FAIL = "fail";
   private void init(){
      this.client = ClientBuilder.newClient();
   }
   public static void main(String[] args){
      WebServiceTester tester = new WebServiceTester();
      //initialize the tester
      tester.init();
      //test get all users Web Service Method
      tester.testGetAllUsers();
      //test get user Web Service Method
      tester.testGetUser();
      //test update user Web Service Method
      tester.testUpdateUser();
      //test add user Web Service Method
      tester.testAddUser();
      //test delete user Web Service Method
      tester.testDeleteUser();
   }
   //Test: Get list of all users
   //Test: Check if list is not empty
   private void testGetAllUsers(){
      GenericType<List<User>> list = new GenericType<List<User>>() {};
      List<User> users = client
         .target(REST_SERVICE_URL)
         .request(MediaType.APPLICATION_XML)
         .get(list);
      String result = PASS;
      if(users.isEmpty()){
         result = FAIL;
      }
      System.out.println("Test case name: testGetAllUsers, Result: " + result );
   }
   //Test: Get User of id 1
   //Test: Check if user is same as sample user
   private void testGetUser(){
      User sampleUser = new User();
      sampleUser.setId(1);
      User user = client
         .target(REST_SERVICE_URL)
         .path("/{userid}")
         .resolveTemplate("userid", 1)
         .request(MediaType.APPLICATION_XML)
         .get(User.class);
      String result = FAIL;
      if(sampleUser != null && sampleUser.getId() == user.getId()){
         result = PASS;
      }
      System.out.println("Test case name: testGetUser, Result: " + result );
   }
   //Test: Update User of id 1
   //Test: Check if result is success XML.
   private void testUpdateUser(){
      Form form = new Form();
      form.param("id", "1");
      form.param("name", "suresh");
      form.param("profession", "clerk");
      String callResult = client
         .target(REST_SERVICE_URL)
         .request(MediaType.APPLICATION_XML)
         .post(Entity.entity(form,
         MediaType.APPLICATION_FORM_URLENCODED_TYPE),
         String.class);
      String result = PASS;
      if(!SUCCESS_RESULT.equals(callResult)){
         result = FAIL;
      }
      System.out.println("Test case name: testUpdateUser, Result: " + result);
   }
   //Test: Add User of id 2
   //Test: Check if result is success XML.
   private void testAddUser(){
      Form form = new Form();
      form.param("id", "2");
      form.param("name", "naresh");
      form.param("profession", "clerk");
      String callResult = client
         .target(REST_SERVICE_URL)
         .request(MediaType.APPLICATION_XML)
         .put(Entity.entity(form,
         MediaType.APPLICATION_FORM_URLENCODED_TYPE),
         String.class);

      String result = PASS;
      if(!SUCCESS_RESULT.equals(callResult)){
         result = FAIL;
      }
      System.out.println("Test case name: testAddUser, Result: " + result );
   }
   //Test: Delete User of id 2
   //Test: Check if result is success XML.
   private void testDeleteUser(){
      String callResult = client
         .target(REST_SERVICE_URL)
         .path("/{userid}")
         .resolveTemplate("userid", 2)
         .request(MediaType.APPLICATION_XML)
         .delete(String.class);
      String result = PASS;
      if(!SUCCESS_RESULT.equals(callResult)){
         result = FAIL;
      }
      System.out.println("Test case name: testDeleteUser, Result: " + result);
   }
}
Now run the tester using Eclipse. Right click on the file and follow the option Run as → Java Application. You will see the following result in the Eclipse console −
Test case name: testGetAllUsers, Result: pass
Test case name: testGetUser, Result: pass
Test case name: testUpdateUser, Result: pass
Test case name: testAddUser, Result: pass
Test case name: testDeleteUser, Result: pass
RESTful Web Services - Statelessness
As per the REST architecture, a RESTful Web Service should not keep a client state on the server. This restriction is called Statelessness. It is the responsibility of the client to pass its context to the server and then the server can store this context to process the client's further request. For example, session maintained by server is identified by session identifier passed by the client.
RESTful Web Services should adhere to this restriction. We have seen this in the RESTful Web Services - Methods chapter, that the web service methods are not storing any information from the client they are invoked from.
Consider the following URL −
https://localhost:8080/UserManagement/rest/UserService/users/1
If you hit the above url using your browser or using a java based client or using Postman, result will always be the User XML whose Id is 1 because the server does not store any information about the client.
<user>
   <id>1</id>
   <name>mahesh</name>
   <profession>1</profession>
</user>
Advantages of Statelessness
Following are the benefits of statelessness in RESTful Web Services −
Web services can treat each method request independently.
Web services need not maintain the client's previous interactions. It simplifies the application design.
As HTTP is itself a statelessness protocol, RESTful Web Services work seamlessly with the HTTP protocols.
Disadvantages of Statelessness
Following are the disadvantages of statelessness in RESTful Web Services −
Web services need to get extra information in each request and then interpret to get the client's state in case the client interactions are to be taken care of.
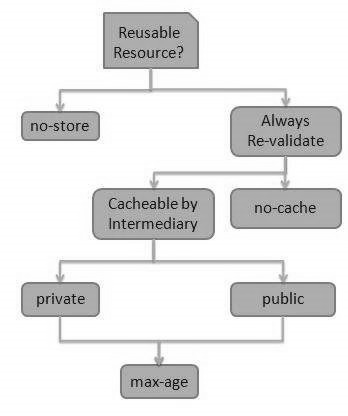
RESTful Web Services - Caching
Caching refers to storing the server response in the client itself, so that a client need not make a server request for the same resource again and again. A server response should have information about how caching is to be done, so that a client caches the response for a time-period or never caches the server response.
Following are the headers which a server response can have in order to configure a client's caching −
| Sr.No. | Header & Description |
|---|---|
1 |
Date Date and Time of the resource when it was created. |
2 |
Last Modified Date and Time of the resource when it was last modified. |
3 |
Cache-Control Primary header to control caching. |
4 |
Expires Expiration date and time of caching. |
5 |
Age Duration in seconds from when resource was fetched from the server. |
Cache-Control Header
Following are the details of a Cache-Control header −
| Sr.No. | Directive & Description |
|---|---|
1 |
Public Indicates that resource is cacheable by any component. |
2 |
Private Indicates that resource is cacheable only by the client and the server, no intermediary can cache the resource. |
3 |
no-cache/no-store Indicates that a resource is not cacheable. |
4 |
max-age Indicates the caching is valid up to max-age in seconds. After this, client has to make another request. |
5 |
must-revalidate Indication to server to revalidate resource if max-age has passed. |
Best Practices
Always keep static contents like images, CSS, JavaScript cacheable, with expiration date of 2 to 3 days.
Never keep expiry date too high.
Dynamic content should be cached for a few hours only.
RESTful Web Services - Security
As RESTful Web Services work with HTTP URL Paths, it is very important to safeguard a RESTful Web Service in the same manner as a website is secured.
Following are the best practices to be adhered to while designing a RESTful Web Service −
Validation − Validate all inputs on the server. Protect your server against SQL or NoSQL injection attacks.
Session Based Authentication − Use session based authentication to authenticate a user whenever a request is made to a Web Service method.
No Sensitive Data in the URL − Never use username, password or session token in a URL, these values should be passed to Web Service via the POST method.
Restriction on Method Execution − Allow restricted use of methods like GET, POST and DELETE methods. The GET method should not be able to delete data.
Validate Malformed XML/JSON − Check for well-formed input passed to a web service method.
Throw generic Error Messages − A web service method should use HTTP error messages like 403 to show access forbidden, etc.
HTTP Code
| Sr.No. | HTTP Code & Description |
|---|---|
1 |
200 OK − shows success. |
2 |
201 CREATED − when a resource is successfully created using POST or PUT request. Returns link to the newly created resource using the location header. |
3 |
204 NO CONTENT − when response body is empty. For example, a DELETE request. |
4 |
304 NOT MODIFIED − used to reduce network bandwidth usage in case of conditional GET requests. Response body should be empty. Headers should have date, location, etc. |
5 |
400 BAD REQUEST − states that an invalid input is provided. For example, validation error, missing data. |
6 |
401 UNAUTHORIZED − states that user is using invalid or wrong authentication token. |
7 |
403 FORBIDDEN − states that the user is not having access to the method being used. For example, Delete access without admin rights. |
8 |
404 NOT FOUND − states that the method is not available. |
9 |
409 CONFLICT − states conflict situation while executing the method. For example, adding duplicate entry. |
10 |
500 INTERNAL SERVER ERROR − states that the server has thrown some exception while executing the method. |
RESTful Web Services - Java (JAX-RS)
JAX-RS stands for JAVA API for RESTful Web Services. JAX-RS is a JAVA based programming language API and specification to provide support for created RESTful Web Services. Its 2.0 version was released on the 24th May 2013. JAX-RS uses annotations available from Java SE 5 to simplify the development of JAVA based web services creation and deployment. It also provides supports for creating clients for RESTful Web Services.
Specifications
Following are the most commonly used annotations to map a resource as a web service resource.
| Sr.No. | Annotation & Description |
|---|---|
1 |
@Path Relative path of the resource class/method. |
2 |
@GET HTTP Get request, used to fetch resource. |
3 |
@PUT HTTP PUT request, used to update resource. |
4 |
@POST HTTP POST request, used to create a new resource. |
5 |
@DELETE HTTP DELETE request, used to delete resource. |
6 |
@HEAD HTTP HEAD request, used to get status of method availability. |
7 |
@Produces States the HTTP Response generated by web service. For example, APPLICATION/XML, TEXT/HTML, APPLICATION/JSON etc. |
8 |
@Consumes States the HTTP Request type. For example, application/x-www-formurlencoded to accept form data in HTTP body during POST request. |
9 |
@PathParam Binds the parameter passed to the method to a value in path. |
10 |
@QueryParam Binds the parameter passed to method to a query parameter in the path. |
11 |
@MatrixParam Binds the parameter passed to the method to a HTTP matrix parameter in path. |
12 |
@HeaderParam Binds the parameter passed to the method to a HTTP header. |
13 |
@CookieParam Binds the parameter passed to the method to a Cookie. |
14 |
@FormParam Binds the parameter passed to the method to a form value. |
15 |
@DefaultValue Assigns a default value to a parameter passed to the method. |
16 |
@Context Context of the resource. For example, HTTPRequest as a context. |
Note − We have used Jersey, a reference implementation of JAX-RS 2.0 by Oracle, in the RESTful Web Services - First Application and RESTful Web Services - Methods chapters.
