- Raspberry Pi - Home
- Raspberry Pi - Introduction
- Raspberry Pi - Getting Started
- Raspberry Pi - Operating System
- Connecting Raspberry Pi
- Raspberry Pi - Configuration
- Raspberry Pi - Working with Linux
- PIXEL Desktop Environment
- Raspberry Pi - Linux Shell
- Raspberry Pi - Managing Software
- Raspberry Pi - GPIO Connector
- Raspberry Pi - Add-on Boards
- Third-party Software Package
- Raspberry Pi Useful Resources
- Raspberry Pi - Quick Guide
- Raspberry Pi - Useful Resources
- Raspberry Pi - Discussion
Raspberry Pi - Operating System
Before you get started with your Raspberry Pi board, you need to provide with an OS (operating system). Linux is the most frequently used OS on the Raspberry Pi.
For using an OS, we need to create a Secure Digital (SD) or MicroSD card with an OS on it. The prerequisite for setting up the SD or MicroSD is a computer having an internet connection and the ability to write to SD or MicroSD cards.
NOOBS Software
NOOBS means new-out-of-box software and it is the easiest way to get started with the Raspberry Pi. It is easy to copy NOOBS to your SD or MicroSD card. Once copied, it provides us with a simple menu for installing various operating systems.
There is an option to buy a card with NOOBS already installed on it, but it is always useful to know how to create your own NOOBS cards.
Download NOOBS
Follow the below given steps to download NOOBS −
Step 1 − Go to the website www.raspberrypi.org/downloads/noobs
Step 2 − Select from the two versions of NOOBS available. Version 1 is the main version and includes Raspbian. This is the officially supported OS, which you can use even without any network connection.
Another option is to choose the OS from the menu. You can download and install the OS from the menu, if you have a network connection. It is always recommended to download NOOBS for your first OS.
MicroSD card Formatting
Before downloading and installing OS, we first need to format our SD or MicroSD card. We can use an application program, called SD card Formatter, from SD Association. The latest version is SD Memory Card Formatter 5.0.1.
For Windows and Mac, it can be downloaded from the link https://www.sdcard.org/downloads/formatter/.
Let us see how we can format the SD card by using windows, Mac OS, and Linux.
Using Windows
Step 1 − Download and install the SD formatter application. It will be as follows −
Step 2 − Next, we need to select the drive in which we have our SD High Capacity SDHC/SDXC card. Once selected, click on the format button to format it.
The following screen will appear −
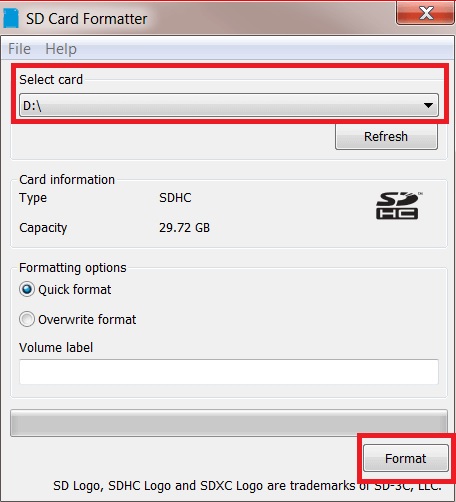
Step 3 − The program will ask for the confirmation. You need to click yes to confirm the format process.
Step 4 − Once the format process is completed, your SD card will be formatted completely.
Using Mac OS
The process of formatting is similar as we did in windows. You just need to download and install the Mac version of SD card formatter.
Using Linux
We will be using the GPartedapplication program, which is an open source partition manager for Linux.
Use the steps given below to format a SD card in Ubuntu software −
Step 1 − Download and install the GParted application by using the terminal as follows −
sudo apt-get install gparted
Step 2 − Once installation is completed, you need to insert the SD card. Next, by using Unity dash, launch the GParted application.
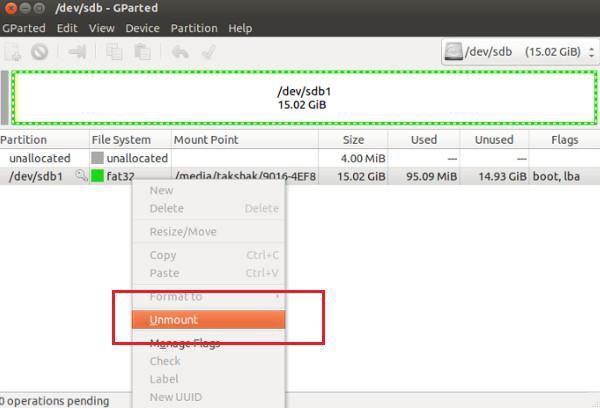
Step 3 − You will get the screen as below, which shows the partitions of the removable disk. But before starting the formatting, we need to unmount the disk by right-clicking on the partition as shown below −
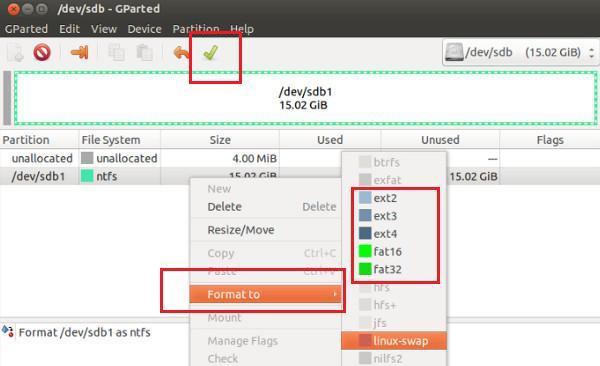
Step 4 − After unmounting, we need to right click on it, which will show us the Format to option. Now from the list, you can choose whatever type of file system you want on the disk.
After selecting the drive to format, you need to click on the Tick sign as shown below −
Step 5 − It will show you a couple of warnings and the format procedure will be started.
Install NOOBS to Memory card
Now, you have a formatted card and the .zip file that was downloaded from the Raspberry website. Hence, you can install NOOBS on your card.
On windows PC, you can simply double click the .zip file. It will open the file. Once opened, you can select all the files and copy them to your formatted card.
Similarly, on a Mac OS, you can see the folder that contains all the files by double clicking on the NOOBS .zip file. Now, click on the Edit menu and select all. Drag all the files onto your SD card.
In the same way, on Linux we can use the desktop environment to copy the NOOBS .zip files to our SD card.
Flashing a MicroSD card
Some operating systems (OS) may not be available through NOOBS. One of them is the Reduced Instruction Set Computer (RISC) OS.
For creating a card for such an OS, we need to first download the OS as an image file. Once an image file is downloaded, we need to use the process called flashing your card. Later on, the single file can be converted into all the files which we need on our card (SD or MicroSD).
To download the OS images, we can find the links at the website https://www.raspberrypi.org/software/.
Now to flash the card or you can say burning an image to the card, we can use an OS image flasher Etcher. It is available for windows, Mac OS and Linux at https://www.balena.io/etcher/.
