- Raspberry Pi - Home
- Raspberry Pi - Introduction
- Raspberry Pi - Getting Started
- Raspberry Pi - Operating System
- Connecting Raspberry Pi
- Raspberry Pi - Configuration
- Raspberry Pi - Working with Linux
- PIXEL Desktop Environment
- Raspberry Pi - Linux Shell
- Raspberry Pi - Managing Software
- Raspberry Pi - GPIO Connector
- Raspberry Pi - Add-on Boards
- Third-party Software Package
- Raspberry Pi Useful Resources
- Raspberry Pi - Quick Guide
- Raspberry Pi - Useful Resources
- Raspberry Pi - Discussion
Connecting Raspberry Pi
It is quite easy to connect Raspberry Pi. Let us understand about the same in detail in this chapter.
Ports and Sockets
You should make sure that you have to face your Raspberry Pi in the right way. Most components and sockets, with the help of which you connect it, are sticking out at the top side whereas the back side is relatively flat. The spiky GPIO (general-purpose input output) pins should be at the top left.
Let us have a look at the diagrams below representing the location of connectors and main integrated circuits (ICs) on the Raspberry Pi boards.
The source of the diagrams is https://core-electronics.com.au
Diagram 1
Following is the diagram for Raspberry Pi Model B −
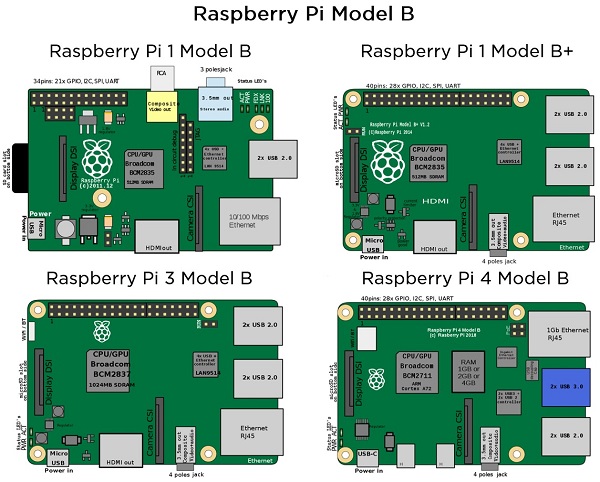
Diagram 2
Following is the diagram for Raspberry Pi Model A −
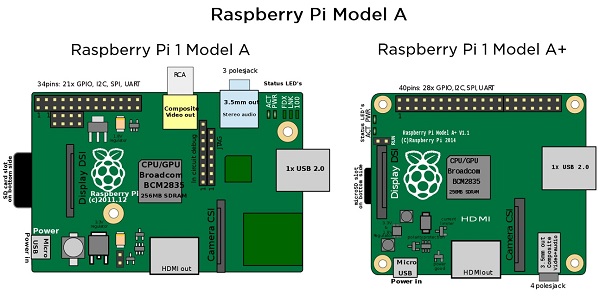
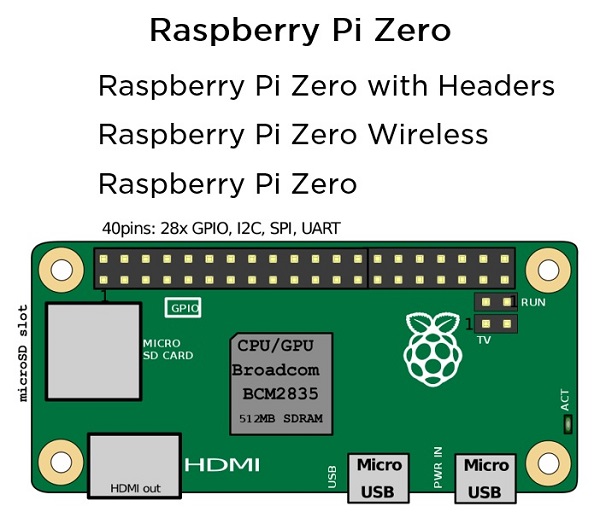
Diagram 3
Following is the diagram for Raspberry Pi Zero −
Insert SD or MicroSD card
As we have discussed, you need an SD or MicroSD card with OS to get started with Raspberry Pi. We have also discussed how you can create one, in the previous chapter. Now, it is time to insert that card and get started.
If you are using model 2, 3, A+, or B+ then, you need to turn your Raspberry Pi circuit board, so that the underside is at your side and you can see that.
You can see, there would be a metal MicroSD card slot on the left side of the board. Slide your card into this slot.
On the other hand, if you are using Model A or Model B, you need an SD card and you need to flip your Raspberry Pi over. Now, slide the SD card while facing the label side above. After that you need to gently press the card home.
And we know that the models Pi Zero and Zero W have the MicroSD card slot mounted on the top surface of the board. To insert the card, you need to put the label side facing you.
Camera Module
Camera module, an official module from the Raspberry Pi board, is a small circuit board with a strip of ribbon cable. It plugs directly into the board.
You can see the diagram below −
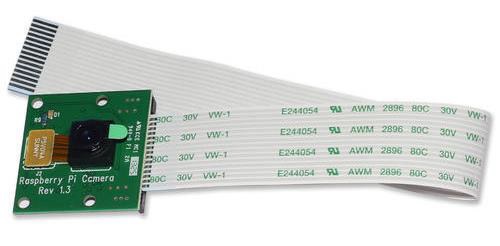
From the above diagram, you can see that for protection, the lens has a plastic film over it. You need to pull the green plastic tab to remove the film.
On Raspberry Pi Zero
The Raspberry Pi model camera socket uses a different width of cable and you can buy that cable separately. You can also get that cable with the official Raspberry Pi Zero case. You can check the board and the camera have similar sockets for the cable.
To open the connector, you just need to gently press the connector between your finger and thumb. The camera connector is on the right of the Raspberry Pi board.
To connect the cable with the camera, insert the cable with the shiny contacts facing the camera front. And on the Pi Zero board, insert the cable with the shiny contacts facing the flat side of the board i.e., the bottom side.
On other Raspberry Pi Models
To connect the camera on other boards, you need to hold the ends in between your finger and thumb. Then, gently lift the board and it will move apart to make a gap. This is the place, where you will insert the cable of the camera.
At the end of the cameras cable, you can see there are silver connectors on one side. Now hold the cable in such a way that this side faces to the left.
Once done, insert the cable into the connector on your Raspberry Pi board. Press it gently and then press the socket back together again and your board is ready with the camera.
Connect Raspberry Pi to Devices
The respective processes to connect your Raspberry Pi board to different devices is explained below in detail. Let us begin by understanding how to connect a display device to your Pi board.
Display device
Depending on the screen type, you have two ways to connect the display device to your Pi board. In these two ways, we are assuming that you are going to use either monitor or television. Apart from these two ways, there is an official Pi touchscreen that connects using the display socket. Let us check how we can connect an HDMI display and television, as explained below.
HDMI or DVI display
The HDMI connector is on the top surface of your Raspberry Pi board. But for the Raspberry Pi Zero model, you need to use an adapter that converts Mini HDMI to an HDMI socket. For connecting, insert one end of the HDMI cable in the board or Pi ZERO connector and the other end into your monitor.
On the other hand, if you are using a DVI display, an adapter should be used.
Television
If the TV you are using is having a HDMI socket, you can use that for optimal results. But if in case, your TV does not have an HDMI socket, you need to use the composite video socket.
On the Raspberry Pi Model-A and Model-B, the composite video socket is placed on the top edge of the board. It is a round, yellow-and-silver sockets.
On other models, Raspberry Pi 3, Pi 2, and Model B+, the same socket as the audio output can be used as a composite video socket. It is placed on the bottom of the board.
One thing you should note is that you will need to use a special RCA cable for this socket. Connect one end of the RCA cable to the audio output socket and the other end to Video in socket of the TV.
If you are using Pi Zero or Zero W boards then, you need to solder your own connector to the board, where it is labelled TV. This should be done because, both these boards do not have composite video socket.
Keyboard and Mouse
On Raspberry Pi Model B+, Model Pi 2, and Model Pi 3 the keyboard and mouse can be directly connected. They should work fine. But for earlier models of Raspberry Pi, you should use an external USB hub to connect keyboard and mouse.
Because with this, the devices will not draw too much power from the Pi board, and we can reduce the risk of heat and other problems caused by devices.
On the other hand, for Raspberry Pi Zero, Model A, and Model A+, we must use a USB hub, since these boards have only one USB socket.
Audio devices
Raspberry Pis audio socket is a small black or blue box. On Model A and Model B, it is stuck along the top edge of the board. Whereas, on Model B+, Pi 2 and Pi 3, it is stuck along the bottom edge of the board.
If you have connected an HDMI TV, then you do not need to connect a separate audio cable, as the sound is routed through your HDMI cable.
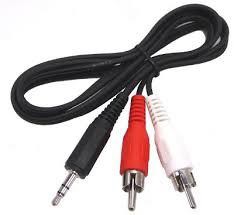
On the other hand, if you have earphones or headphones with a 3.5mm jack, you can directly plug them into the audio socket.
Alternatively, it is recommended to use a suitable cable, as shown in the below figure. The cable has Pis 3.5mm jack on the left and stereo input/output plugs that feed into many stereos shown on the right.
Internet router
All the Raspberry Pi models other than Model A, A+, and Zero have an Ethernet socket. You can find the socket on the right edge of the Raspberry board. To connect to the internet, you can use a standard Ethernet cable in this socket.
In case if you are using a router with DHCP (Dynamic Host Configuration Protocol) support, your Raspberry Pi will automatically connect to the internet.
On the other hand, if you have a Wi-Fi adapter then, you can plug into a USB socket of Raspberry Pi and it will be ready to use whenever you turn on your board.
Power
Once you are done with connecting all the necessary and required devices, it is time to connect your Raspberry Pi to power and turn it on. For this, you need to use the Micro USB power socket.
To safeguard your board from damage, you need to provide a steady 5v of power. Keep in mind that Raspberry Pi board has no on/off switch. It means, whenever you connect it with power, it will start working.
If you want to turn it off, you just need to disconnect it. So, if you want to save your data, you should proceed with caution and should shut down the Raspberry Pi first.
Turn on Raspberry Pi
Connect with the power and turn on your Raspberry Pi board. There will be a rainbow of colors on screen. Afterwards, it will start to run the NOOBS software on the Memory card. You will get a choice of OS to install.
Below are the OS choices in NOOBS −
Raspbian
Raspbian, a version of a Linux distribution called Debian, is the distribution that is recommended by the Raspberry Pi foundation. It has been optimized for the Raspberry Pi board.
Most of the Raspberry Pi users start with Raspbian and it includes −
- Graphical Desktop software.
- Web browser.
- Development and programming tools like Scratch, Python etc.
It has two versions, one with the PIXEL desktop and other is termed as Raspbian Lite, with a more minimal installation.
LibreELEC and OSMC
Both are the versions of Kodi media center. They are mainly used for playing music and video.
RISC OS
It is an alternative to Linux OS, which most of the people use on the Raspberry Pi. It has a GUI (Graphical User Interface). In 1987, it was created by Acorn Computers and now-a-days, it is maintained and managed by RISC OS open Limited.
Data Partition
If you use the Data Partition option, it will give you an option to sort the data. The sorted data can be accessed by various Linux distributions.
Lakka
It is a retro gaming system that includes emulators for a range of vintage home computers such as Commodore 64 and Amiga, Amstrad CPC, ZX Spectrum and various Atari machines.
It also includes emulators for a range of game consoles such as Nintendo machines and Sony PlayStation. Although the Bomberman clones and 2048 games are included but, if you want to use Lakka, you need to get the games separately.
Plug your USB with games files and you will be ready to get games into Lakka.
Recalbox
It is another game system. It also includes emulators for Super Nintendo Entertainment System (SNES), Nintendo Entertainment System (NES), Game Boy Advance, PC Engine, and Sega Master System. The shareware version of a famous game called Doom is also included in the Recalbox game system.
Screenly OSE
As the name implies, it is a digital signage system. It enables the users to use a Raspberry Pi with a connected HD screen as a digital sign. Here, OSE refers to Open Source Edition.
It enables the following to be displayed on the screen −
- Videos
- Images
- Web pages
Screenly OSE is also suitable for displaying the advertisements and information in public areas like shops, schools, offices, shopping malls, railway stations, etc.
Windows 10 IoT Core
As the name implies, it is the version of Windows which is designed to support the IoT (Internet of things) devices. It is actually different from the windows desktop experience we are familiar with.
Once installed, it will give us the following two versions −
RTM version − It is the release to manufacturing (RTM) version. It is recommended to use because it is a stable version as compared to the Pre-release version.
Pre-release version − Another is pre-release version, which is less stable as compared to RTM version.
TLXOS
This is ThinLinXs thin client software. It is a trial version and enables the Raspberry Pi to work as a virtual desktop. By using ThinLinX, we can also manage one or more Raspberries centrally.
