- PyTorch - Home
- PyTorch - Introduction
- PyTorch - Installation
- Mathematical Building Blocks of Neural Networks
- PyTorch - Neural Network Basics
- Universal Workflow of Machine Learning
- Machine Learning vs. Deep Learning
- Implementing First Neural Network
- Neural Networks to Functional Blocks
- PyTorch - Terminologies
- PyTorch - Loading Data
- PyTorch - Linear Regression
- PyTorch - Convolutional Neural Network
- PyTorch - Recurrent Neural Network
- PyTorch - Datasets
- PyTorch - Introduction to Convents
- Training a Convent from Scratch
- PyTorch - Feature Extraction in Convents
- PyTorch - Visualization of Convents
- Sequence Processing with Convents
- PyTorch - Word Embedding
- PyTorch - Recursive Neural Networks
- PyTorch Useful Resources
- PyTorch - Quick Guide
- PyTorch - Useful Resources
- PyTorch - Discussion
PyTorch - Convolutional Neural Network
Deep learning is a division of machine learning and is considered as a crucial step taken by researchers in recent decades. The examples of deep learning implementation include applications like image recognition and speech recognition.
The two important types of deep neural networks are given below −
- Convolutional Neural Networks
- Recurrent Neural Networks.
In this chapter, we will be focusing on the first type, i.e., Convolutional Neural Networks (CNN).
Convolutional Neural Networks
Convolutional Neural networks are designed to process data through multiple layers of arrays. This type of neural networks are used in applications like image recognition or face recognition.
The primary difference between CNN and any other ordinary neural network is that CNN takes input as a two dimensional array and operates directly on the images rather than focusing on feature extraction which other neural networks focus on.
The dominant approach of CNN includes solution for problems of recognition. Top companies like Google and Facebook have invested in research and development projects of recognition projects to get activities done with greater speed.
Every convolutional neural network includes three basic ideas −
- Local respective fields
- Convolution
- Pooling
Let us understand each of these terminologies in detail.
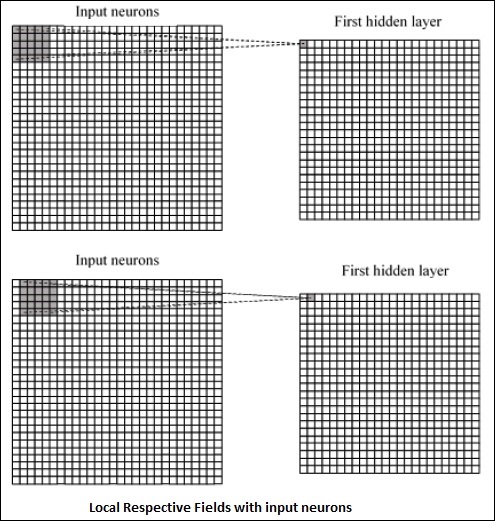
Local Respective Fields
CNN utilize spatial correlations that exists within the input data. Each in the concurrent layers of neural networks connects of some input neurons. This specific region is called Local Receptive Field. It only focusses on hidden neurons. The hidden neuron will process the input data inside the mentioned field not realizing the changes outside the specific boundary.
The diagram representation of generating local respective fields is mentioned below −
Convolution
In the above figure, we observe that each connection learns a weight of hidden neuron with an associated connection with movement from one layer to another. Here, individual neurons perform a shift from time to time. This process is called convolution.
The mapping of connections from the input layer to the hidden feature map is defined as shared weights and bias included is called shared bias.
Pooling
Convolutional neural networks use pooling layers which are positioned immediately after CNN declaration. It takes the input from the user as a feature map which comes out convolutional networks and prepares a condensed feature map. Pooling layers help in creating layers with neurons of previous layers.
Implementation of PyTorch
Following steps are used to create a Convolutional Neural Network using PyTorch.
Step 1
Import the necessary packages for creating a simple neural network.
from torch.autograd import Variable
import torch.nn.functional as F
Step 2
Create a class with batch representation of convolutional neural network. Our batch shape for input x is with dimension of (3, 32, 32).
class SimpleCNN(torch.nn.Module):
   def __init__(self):
      super(SimpleCNN, self).__init__()
      #Input channels = 3, output channels = 18
      self.conv1 = torch.nn.Conv2d(3, 18, kernel_size = 3, stride = 1, padding = 1)
      self.pool = torch.nn.MaxPool2d(kernel_size = 2, stride = 2, padding = 0)
      #4608 input features, 64 output features (see sizing flow below)
      self.fc1 = torch.nn.Linear(18 * 16 * 16, 64)
      #64 input features, 10 output features for our 10 defined classes
      self.fc2 = torch.nn.Linear(64, 10)
Step 3
Compute the activation of the first convolution size changes from (3, 32, 32) to (18, 32, 32).
Size of the dimension changes from (18, 32, 32) to (18, 16, 16). Reshape data dimension of the input layer of the neural net due to which size changes from (18, 16, 16) to (1, 4608).
Recall that -1 infers this dimension from the other given dimension.
def forward(self, x):
   x = F.relu(self.conv1(x))
   x = self.pool(x)
   x = x.view(-1, 18 * 16 *16)
   x = F.relu(self.fc1(x))
   #Computes the second fully connected layer (activation applied later)
   #Size changes from (1, 64) to (1, 10)
   x = self.fc2(x)
   return(x)
