
Article Categories
- All Categories
-
 Data Structure
-
 Networking
-
 RDBMS
RDBMS
-
 Operating System
-
 Java
Java
-
 MS Excel
-
 iOS
iOS
-
 HTML
HTML
-
 CSS
CSS
-
 Android
-
 Python
-
 C Programming
-
 C++
C++
-
 C#
C#
-
 MongoDB
-
 MySQL
MySQL
-
 Javascript
-
 PHP
PHP
-
 Economics & Finance
Push segue from UITableViewCell to ViewController in Swift
To create a segue from a UITableViewCell to another View controller, we’ll do it like any other ViewController to ViewController segue. We’ll do this with help of an example here.
First Create a project, delete the View Controller from storyboard and add One Table View Controller and one View Controller in the storyboard.
There will be one prototype cell in the Table View Controller by default. Click on it, go to its attribute inspector and give it “cell” as Identifier.
Now from the prototype cell, press control and drag to the Second View Controller and select show from there.
- The storyboard should look like this after the above steps.
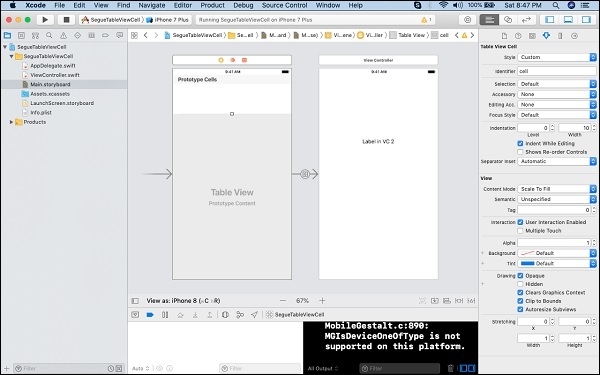
Give storyboard ID VC2 to the view Controller we added in the storyboard.
Create a class for the Table View Controller.
Now in the Table View class, add the following code −
override func tableView(_ tableView: UITableView, cellForRowAt indexPath: IndexPath) -> UITableViewCell {
   let cell = tableView.dequeueReusableCell(withIdentifier: "cell")
   cell?.textLabel?.text = "\(indexPath.row)"
   return cell!
}
override func numberOfSections(in tableView: UITableView) -> Int {
   return 1
}
override func tableView(_ tableView: UITableView, numberOfRowsInSection section: Int) -> Int {
   return 5
}
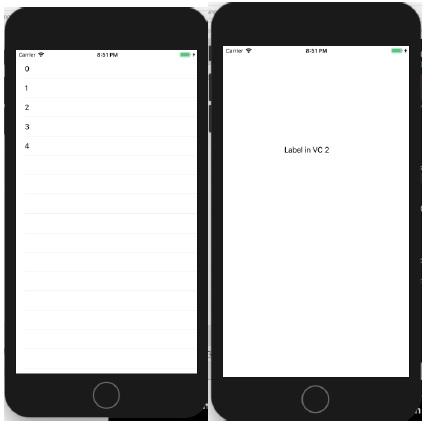
This should make the table to return 1 section with 5 rows, and title of each row should be the row number. Now if you wish to perform some operation when the segue occurs, you can do it in the method mentioned below.
override func prepare(for segue: UIStoryboardSegue, sender: Any?) {
   if segue.identifier == "segueID" {
      // perform custom segue operation.
   }
}
When we run the above code and click on any cell, below is the result for that.

757 Views
