
Article Categories
- All Categories
-
 Data Structure
-
 Networking
-
 RDBMS
RDBMS
-
 Operating System
-
 Java
Java
-
 MS Excel
-
 iOS
iOS
-
 HTML
HTML
-
 CSS
CSS
-
 Android
-
 Python
-
 C Programming
-
 C++
C++
-
 C#
C#
-
 MongoDB
-
 MySQL
MySQL
-
 Javascript
-
 PHP
PHP
-
 Economics & Finance
Potentiometer and Examples
In this article, using two different examples, the use of potentiometers is demonstrated using ESP32. In the first example, the trimmer type of potentiometer is used to vary the voltage between 0 and 3V. In the second example, the slider potentiometer is used on Wokwi Simulator to show the control of a servo motor. Wokwi simulator is software that can be used for running the code and virtually testing the results without buying the components. The actual diagram of the components is often different from those used in Wokwi, so the actual form of the slider potentiometer is given in Fig 1 above.
Example 1: Using a trimmer type of potentiometer to change the voltage between 0 and 3V/5V.
Circuit Design Steps and Coding
Step 1 ? First the microcontroller ESP32 is placed the breadboard.
Step 2 ? Now insert the potentiometer onto the breadboard.
Step 3 ? The potentiometer?s plus point will connect to 3V3 / Vin pin of ESP32. Connect the potentiometer?s negative point to GND pin of ESP32. The side pins of potentiometer are exchangeable.
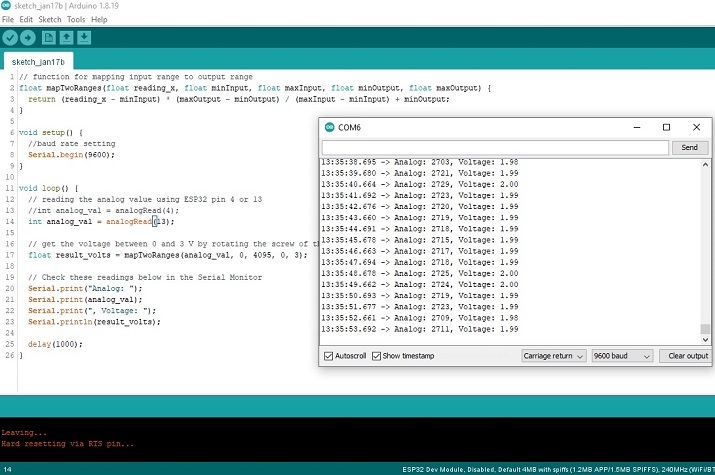
Step 4 ? Write the C program using Arduino for controlling the voltage and connecting the potentiometer middle pin to D13 pin of ESP32.
Step 5 ? Attach the ESP32 to the computer using USB data cable.
Step 6 ? Compile and transfer the code into ESP32 and check the result on the serial monitor.
Example 2: Using a Slider potentiometer to control a servo motor.
Circuit Design Steps and Coding
Step 1 ? Start a new ESP32 project on Wokwi Simulator.
Step 2 ? Put ESP32 on the virtual circuit area.
Step 3 ? Attach the potentiometer to the ESP32. Connect its GND to ESP32 GND and its Vin to 3V3 of ESP32 and its third pin to the D26 of ESP32.
Step 4 ? Attach a servo motor to the ESP32. Connect its GND to ESP32 GND and its Vin to 3V3 of ESP32 and its third pin to the D27 of ESP32.
Step 5 ? Write the C program using Wokwi and include the library <ESP32Servo.h> from the library tab.
Step 6 ? Compile the program using the play button on Wokwi.
Step 7 ? Check the result of seeing the Servo horn movement by changing the slider setting.
Types of Potentiometers
A potentiometer is a device that can control and adjust the voltages. It comes in different forms, for example, slider, trimmer, and thumb rotatory types.

Example 1: Using a trimmer type of potentiometer to change the voltage between 0 and 3V/5V
he trimmer potentiometer is usually used for fixing the controlled setting of the potentiometer once as rotating the screw is difficult, however, in this programming example, the task of rotating the screw is used to change the voltage while seeing the result. The circuit is made and the program is written using Arduino software.
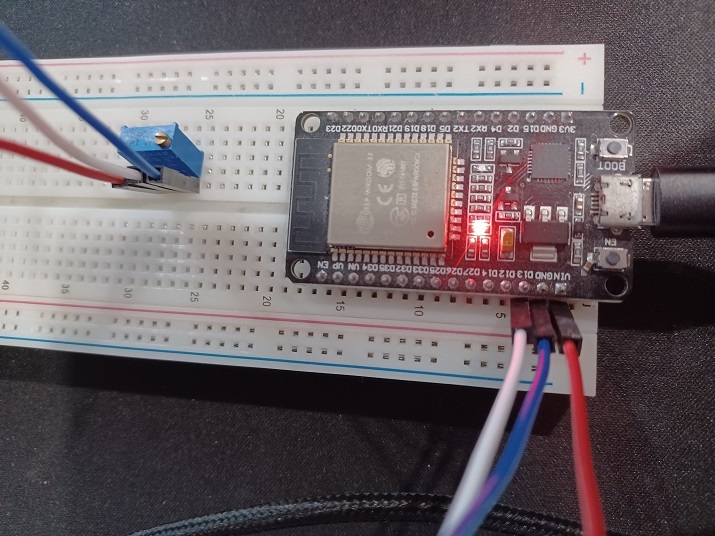
Fig 2: Circuit diagram for potentiometer.
The Code
// function for mapping input range to output range
float mapTwoRanges(float reading_x, float minInput, float maxInput, float minOutput, float maxOutput) {
   return (reading_x - minInput) * (maxOutput - minOutput) / (maxInput - minInput) + minOutput;
}
void setup() {
   //baud rate setting
   Serial.begin(9600);
}
void loop() {

   // reading the analog value using ESP32 pin D4 or D13
   //int analog_val = analogRead(4);

   int analog_val = analogRead(13);

   // get the voltage between 0 and 3 V by rotating the screw of the potentiometer
   float result_volts = mapTwoRanges(analog_val, 0, 4095, 0, 3);

   // Check these readings below in the Serial Monitor
   Serial.print("Analog: ");
   Serial.print(analog_val);
   Serial.print(", Voltage: ");
   Serial.println(result_volts);
   delay(1000);
}
Viewing The Result - Example 1:
The result can be seen as soon the code is compiled and transferred/uploaded to the ESP32.
Example 2: Using a Slider potentiometer to control a servo motor
The slider potentiometer is usually used for fixing or adjusting the setting of the potentiometer by sliding it. In this programming example, the slider is used to change the angle of the servo motor horn while seeing the result. The circuit is virtually made using the Wokwi simulator and the program is written using C language.
The Code
//The required library
#include <ESP32Servo.h>
const byte servoObjMotorPin = 27;
const byte potentiometerReadingentiometerPin = 26;
Servo servoObj;
void setup(){

   // baud rate specification
   Serial.begin(115200);

   // attach the 27 ESP32 pin
   servoObj.attach(servoObjMotorPin);
   servoObj.write(0);
   delay(1000);
}
void loop(){

   //Getting the analog reading of the potentiometer
   int potentiometerReading = analogRead(potentiometerReadingentiometerPin);

   //getting the resulting angle by mapping the potentiometer analog reading
   int angleResult = map(potentiometerReading , 0 , 4095 , 0 , 180);

   //Changing the angle for the horn of the servomotor
   servoObj.write(angleResult);
   delay(10);
}
Viewing The Result - Example 2

Fig 3: Showing the virtual Circuit on Wokwi online simulator for the potentiometer and servo motor control.
In this article, using two different examples, the ways to use a potentiometer with ESP32 are given. First, the method is given for connecting a trimmer potentiometer with ESP32 analog pin. In the second example, Wokwi online simulator is used for making a virtual circuit with a potentiometer and a servo motor. First, the potentiometer is used to control the voltage and map it to an angle between 0 and 180 degrees and that is later used for controlling the horn alignment of a servo motor.

982 Views
