- Microsoft CRM - Home
- Microsoft CRM - Overview
- Microsoft CRM - Environment
- Microsoft CRM - Functional Modules
- Microsoft CRM - Entities & Records
- Microsoft CRM - Fields
- Microsoft CRM - Forms
- Microsoft CRM - Searching
- Microsoft CRM - Web Resources
- JScript Web Resources
- HTML Web Resources
- Microsoft CRM - Workflow Processes
- Microsoft CRM - Plugins
- Microsoft CRM - Plugin Registration
- Microsoft CRM - Web Services
- Microsoft CRM - Solutions
Workflow Processes
Workflows in CRM allow you to automate simple and complex business processes within CRM. You can either create workflows using CRM out-of-the-box functionalities or write custom workflows with .NET code for implementing complex workflows. Workflow processes run in the background or in real-time and can optionally require a user input.
Workflows can be triggered based on specific conditions or can even be started manually by the users. Internally, CRM workflows are implemented using Windows Workflow Foundation. In this chapter, we will be learning about configuring workflows.
Configuring a workflow has the following major parts (in sequence) −
- Configure the entity on which the workflow will run
- Configure whether the workflow will run synchronously or asynchronously
- Configure the message (event) on which the workflow will run
- Configure the scope in which the workflow will run
- Configure the stages and steps (actions) of the workflow
Synchronous/Asynchronous Workflow
When you create a workflow, you will see the option of Run this workflow in the background (recommended) which determines whether the workflow will run in real-time (synchronously) or in background (asynchronously).
Generally, the recommended approach is to run the workflows in the background since they use system resources as and when available. However, you can always switch back from a real-time workflow to background workflow and vice versa.
Workflow Messages
Workflows can be registered on specific events as follows −
- When a record is created
- When a record status changes
- When a record is assigned
- When a record field value changes
- When a record is deleted
Workflow Scope
Workflows allow you to set the scope in which the workflow will run. Following are the supported workflow scopes −
| User | Workflow will run only on the records owned by the same user as the workflow user. |
| Business Unit | Workflow will run on the records owned by the users of the business unit same as the workflow user. |
| Parent Child Business Units | Workflow will run on the records owned by the users of the business unit same as the workflow user as well as any child business units. |
| Organization | Workflow will run on records owned by any user in CRM. |
Workflow Steps
Workflows in CRM are a combination of series of steps which the workflow will follow. You can even divide these steps in logical stages. Following steps are supported by CRM workflows −
| Conditional Steps |
|
||||||||||||||
| Wait Steps |
|
||||||||||||||
| Action Steps |
|
Workflow Example
In this example, we will create a simple workflow that runs in the background to assign any newly created Contact record to a specific user and then send out a welcome email to the customer.
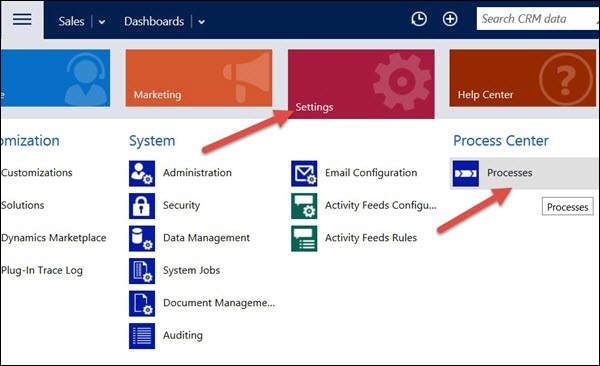
Step 1 − Go to Settings → Processes.
Step 2 − Click New.
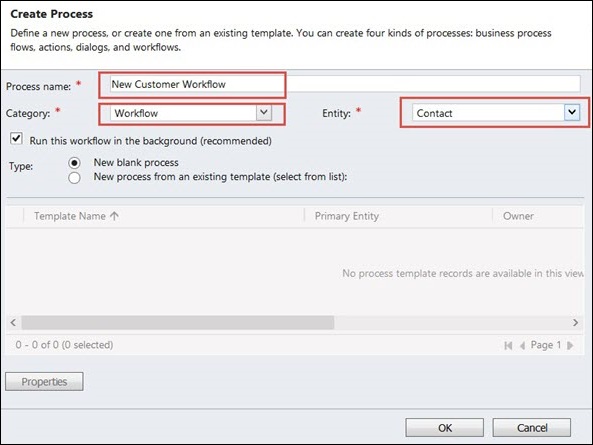
Step 3 − In the CreateProcess window, enter the following details −
Process Name − New Customer Workflow (This can be any name that you want)
Category − Workflow
Entity − Contact (This will be the entity on which you are creating the workflow. In our case it is Contact)
Run this workflow in the background (recommended) − Check this option as we are creating a background asynchronous workflow. Finally, click OK.
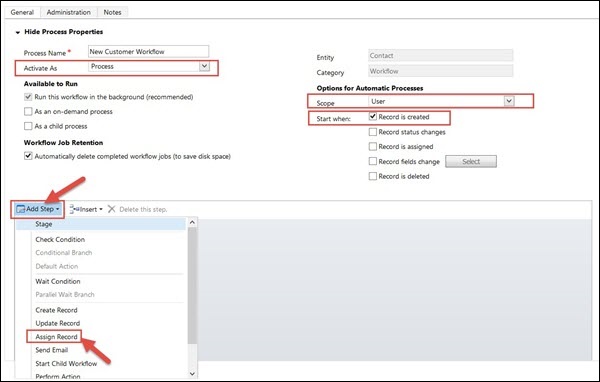
Step 4 − In the New Process Window enter the following details −
Activate As − Process
Scope − User
Start when − Record is created
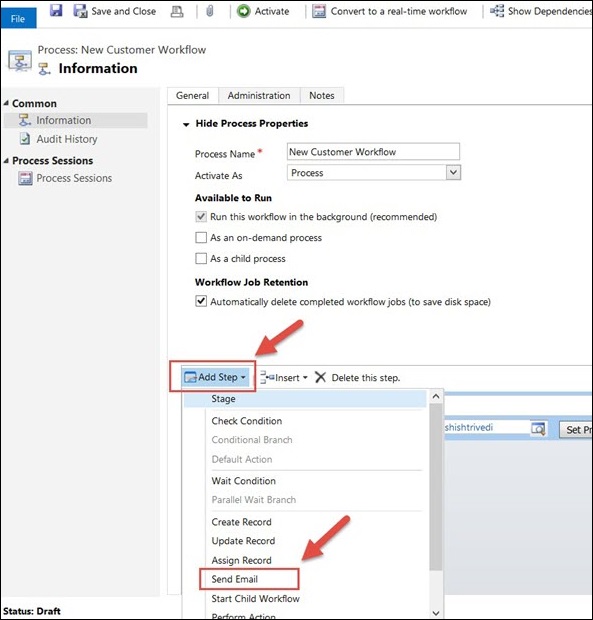
Click Add Step → Assign Record.
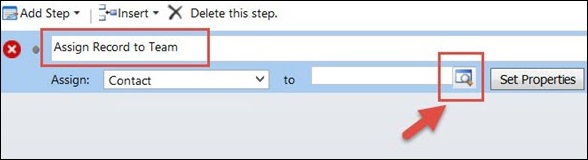
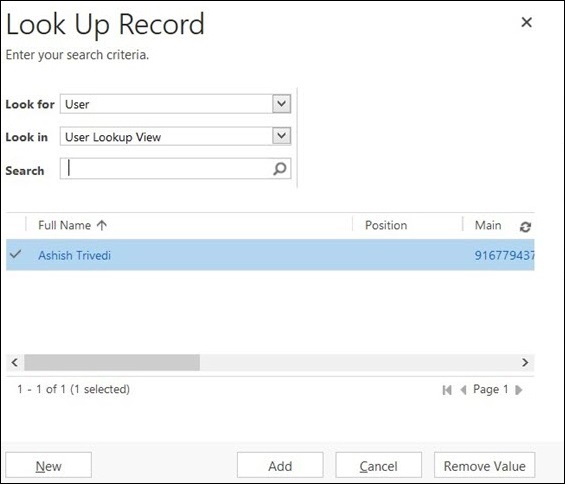
Step 5 − You will see a new step added to the workflow. In this step, we will specify the user to whom all the created contacts should be assigned. Enter the name of step as Assign Record to Team. The Assign option will be defaulted as the entity on which we are creating the workflow (Contact in our case). Click the Lookup icon.
Step 6 − In the Lookup window, select any user that you want. You can even select a specific team to whom you want to assign the records to. Click Add.
Step 7 − Add another step by clicking Add Step → Send Email. In this step, we will configure sending email to the customer.
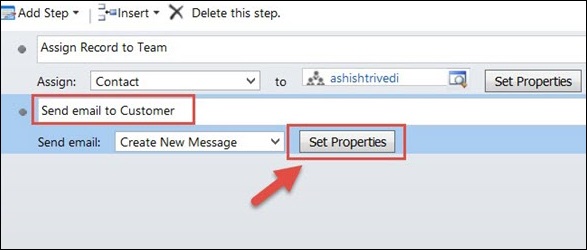
Step 8 − A new step will be added. Enter its name as Send email to Customer. Click Set Properties.
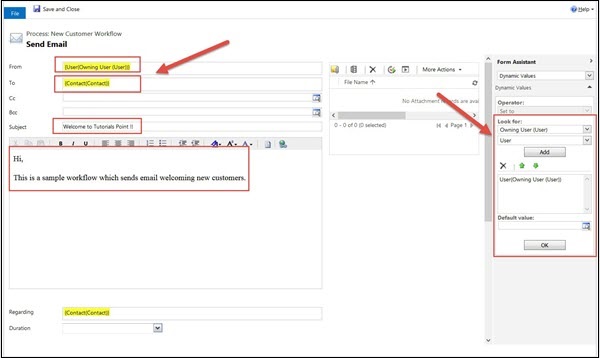
Step 9 − In the next window to configure email, perform the following operations−
From − Click From field. On the right panel, select OwningUser and User. Click Add → OK.
To − Click To field. On the right panel, select Contact and Contact. Click Add → OK.
Subject − Enter a relevant Subject.
Body − Enter a relevant Body content.
Step 10 − Click Save and then Activate.
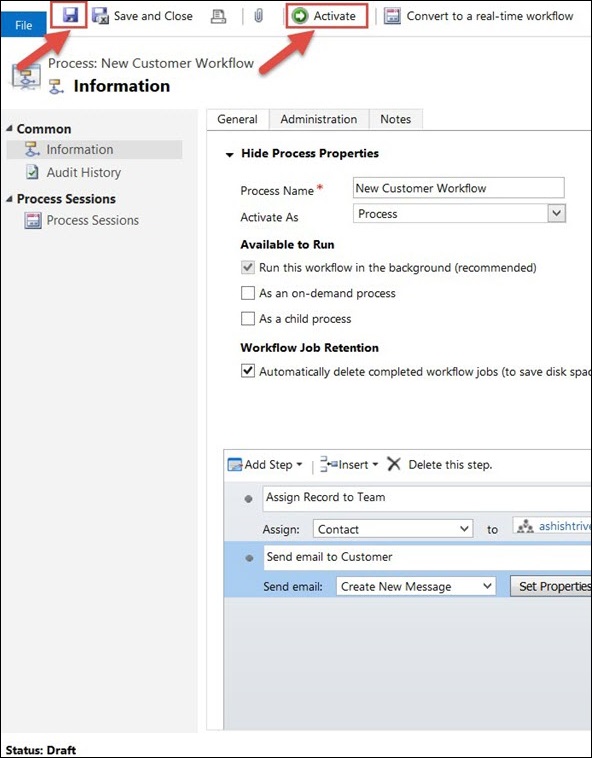
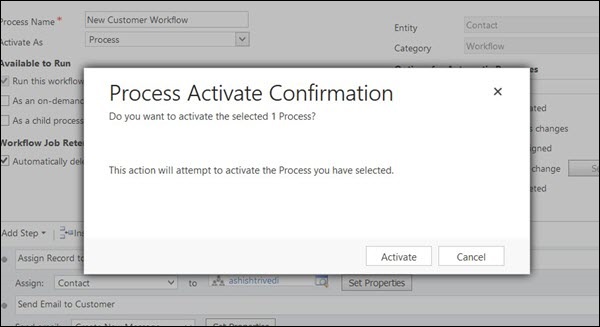
Step 11 − In the Process Activate Confirmation popup that follows, click Activate.
Step 12 − Go to Contacts tab and create a new contact. As soon as you create a new contact by saving the record, you will see the Owner field set to the user, which you had configured in the workflow. Also, if you click the Activities tab, you will see an email activity being created for this contact. This confirms that the workflow ran successfully.

Workflow vs Plugin
Workflows and plugins can both be used to extend and automate CRM functionalities. In many scenarios, both the approaches can be interchangeably used in place of each other. For example, if you have a simple requirement of sending an email to your customers, you can either do it via a plugin or a workflow.
So, how do you choose between creating a workflow vs plugin? The following list tries to explain the same −
Although plugins and workflows both can be used to run synchronous as well as asynchronous logic, plugins are generally preferred for synchronous logic, while workflows for asynchronous logic.
Generally, to implement complex business logic, plugins are preferred over workflows. Workflows are preferred when you want to achieve relatively easier functionalities (such as sending emails, assigning users, etc.)
Plugins need to be developed with coding, while workflows can be configured directly by business users without any knowledge of workflows.
Workflows can run on-demand. Hence, if there are requirements where the user wants to run some logic manually, workflows would be a better choice.
From performance impact, synchronous plugins provide a better performance (and throughput) as compared to real-time workflows in scenarios where the request frequency is higher.
Conclusion
This chapter introduced us to one of the very important functionalities of CRM Workflows. We first understood the sync/async workflows, messages, scope, steps and finally looked at a live example of creating and running a workflow. Finally, we saw the differences between a workflow and a plugin.
