- Microsoft CRM - Home
- Microsoft CRM - Overview
- Microsoft CRM - Environment
- Microsoft CRM - Functional Modules
- Microsoft CRM - Entities & Records
- Microsoft CRM - Fields
- Microsoft CRM - Forms
- Microsoft CRM - Searching
- Microsoft CRM - Web Resources
- JScript Web Resources
- HTML Web Resources
- Microsoft CRM - Workflow Processes
- Microsoft CRM - Plugins
- Microsoft CRM - Plugin Registration
- Microsoft CRM - Web Services
- Microsoft CRM - Solutions
Microsoft Dynamics CRM - Quick Guide
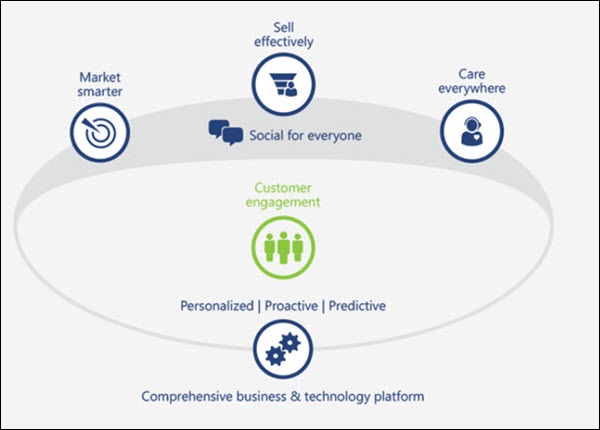
Microsoft Dynamics CRM - Overview
Customer Relationship Management (CRM) is a system for managing a companys interactions with current and future customers. It often involves using technology to organize, automate, and synchronize sales, marketing, customer service, and technical support. CRM can help reduce costs and increase profitability by organizing and automating business processes that nurture customer satisfaction and loyalty.
Microsoft Dynamics CRM
Microsoft Dynamics CRM is a customer relationship management software package developed by Microsoft focused on enhancing the customer relationship for any organization. Out of the box, the product focuses mainly on Sales, Marketing, and Customer Service sectors, though Microsoft has been marketing Dynamics CRM as an XRM platform and has been encouraging partners to use its proprietary (.NET based) framework to customize it. In recent years, it has also grown as an Analytics platform driven by CRM.
The CRM Solution can be used to drive the sales productivity and marketing effectiveness for an organization, handle the complete customer support chain, and provide social insights, business intelligence, and a lot of other out-of-the-box functionalities and features. As a product, Microsoft Dynamics CRM also offers full mobile support for using CRM apps on mobiles and tablets.
As of writing this tutorial, the latest version of CRM is CRM 2016. However, in this tutorial we will be using CRM 2015 Online version as it is the latest stable version as well as frequently used in many organizations. Nevertheless, even if you are using any other versions of CRM, all the concepts in the tutorial will still hold true.
Product Offerings
Microsoft Dynamics CRM is offered in two categories −
CRM Online
CRM Online is a cloud-based offering of Microsoft Dynamics CRM where all the backend processes (such as application servers, setups, deployments, databases, licensing, etc.) are managed on Microsoft servers. CRM Online is a subscription-based offering which is preferred for organizations who may not want to manage all the technicalities involved in a CRM implementation. You can get started with setting up your system in a few days (not weeks, months or years) and access it on web via your browser.
CRM On-Premise
CRM on-premise is a more customized and robust offering of Microsoft Dynamics CRM, where the CRM application and databases will be deployed on your servers. This offering allows you to control all your databases, customizations, deployments, backups, licensing and other network and hardware setups. Generally, organizations who want to go for a customized CRM solution prefer on-premise deployment as it offers better integration and customization capabilities.
From the functional standpoint, both the offerings offer similar functionalities; however, they differ significantly in terms of implementation. The differences are summarized in the following table.
| CRM Online | CRM On-Premise |
|---|---|
| This is a cloud-based solution provided by Microsoft in which all the servers and databases are managed by Microsoft. | This is an on-premise solution provided by Microsoft in which the servers and databases are managed by the customer. |
| You can get started with an online offering in a matter of few days. You pay for the users and used space on-the-go. | Setting up an on-premise offering needs technical skills as well as sufficient time to setup the CRM instance and get it running. |
| It supports relatively less customizations and extensions. | It supports relatively more customization and extensions. |
| CRM Online does not give the ability to perform manual data backup and restore options, since the database is hosted on Microsoft servers. However, Microsoft performs daily backups of the database. | CRM on-premise gives complete ability to manage your database. |
| CRM Online has various plans based on the data storage limits such as 5GB, 20 GB, etc. | CRM on-premise does not have any such limits on storage size, since the data exists on your own servers. |
| CRM Online provides inbuilt capabilities of features such as insights, social listening, analytics, etc. | CRM on-premise has extra costs for these features. |
| CRM Online supports automatic updates to future version. | CRM on-premise updates need to be installed by the administrator. |
Accessing CRM
Microsoft Dynamics CRM can be accessed via any of the following options −
- Browser
- Mobile and Tablets
- Outlook
Product Competitors
Microsoft Dynamics CRM is undoubtedly one of the top products in the CRM space. However, following are the other products that compete with Microsoft Dynamics CRM.
- Salesforce.com
- Oracle
- SAP
- Sage CRM
- Sugar CRM
- NetSuite
Product Versions
Microsoft Dynamics CRM has grown over the years starting from its 1.0 version in 2003. The latest version (as of writing this article) is 2015. Following is the chronological list of release versions −
- Microsoft CRM 1.0
- Microsoft CRM 1.2
- Microsoft Dynamics CRM 3.0
- Microsoft Dynamics CRM 4.0
- Microsoft Dynamics CRM 2011
- Microsoft Dynamics CRM 2013
- Microsoft Dynamics CRM 2015
- Microsoft Dynamics CRM 2016
Microsoft Dynamics CRM - Environment
Let's start by setting up our CRM environment. We will be using the online version of CRM 2015, since the online version provides one-month free trial access. By doing this, you will not need to purchase any license to learn CRM.
Note − Since Microsoft Dynamics CRM is a growing product, it is possible that by the time you are learning this, you will have a newer version of the product. In that case, the application may not look exactly as you would see in the screenshots of this tutorial. However, the core concepts of the product remain the same. The look-and-feel and the navigation of the product may change, however, in most of the cases you will be able to easily navigate and locate the required options.
Setting Up Microsoft Dynamics CRM Online Account
Step 1 − Navigate to the following URL −
https://www.microsoft.com/en-us/dynamics365/home
In case you do not see the options of Trial version via this link in future, just try searching "Microsoft Dynamics CRM Free Trial" on Google.
Step 2 − Click the Try it free button. This will start a 3-step registration process as shown in the following screenshot. In Step 1 of 3-step registration, fill in the mandatory details such as name, email, and language.
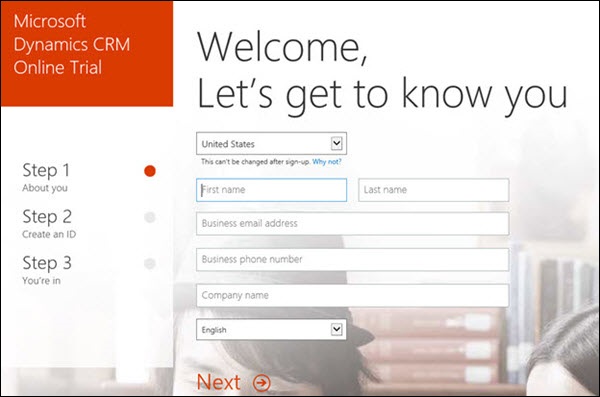
Step 3 − Click the Try it free button. This will start a 3-step registration process as shown in the following screenshot. In Step 1 of 3-step registration, fill in the mandatory details such as name, email, and language.
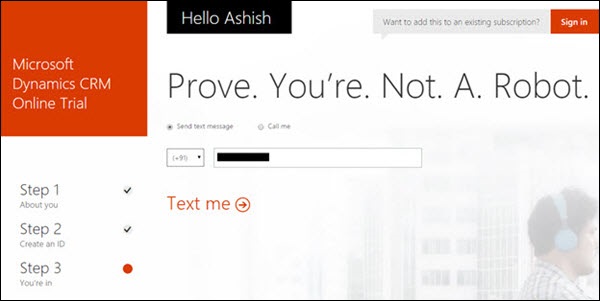
Step 4 − In Step 3 of 3-step registration, Microsoft will validate the mobile number that you have specified. For this, you can provide your mobile number and click Text me. It will then send an OTP to your mobile using which you will be able to proceed further with the setup.
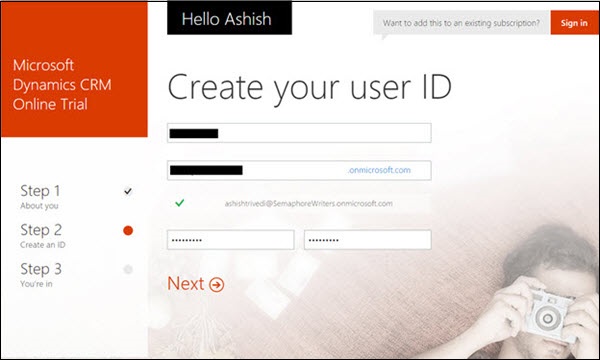
Step 5 − Your Office 365 user ID will be created. You can save this user ID information for later access.

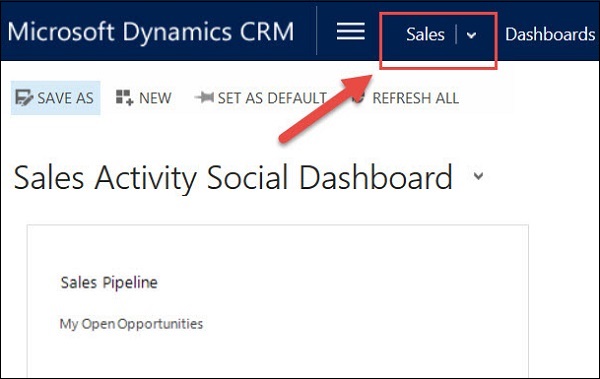
After setting up the account, it will now open your CRM Dashboard which will look something like the following.
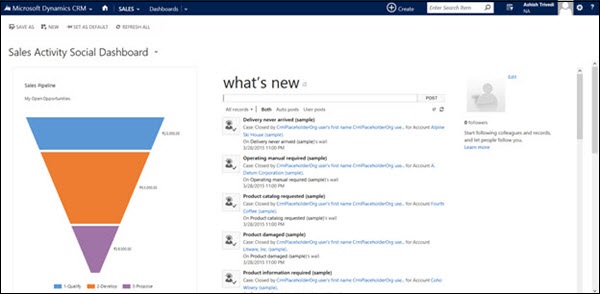
Just to emphasize again, the screenshots above may change with a future version, however setting up the environment will be a pretty simple process.
Downloading CRM SDK
The Software Development Kit (SDK) of Microsoft Dynamics CRM contains important code samples including server side code, client side code, extensions, plugins, web services, workflows, security model, etc. Basically, the SDK contains every development resource that you would need to get started with CRM. Whether you are planning to set up a new plugin project or setting up a web services project for CRM, the SDK provides the basic architecture and examples ranging from simple to advanced level to help you kick-off. We will now look at the steps to download and install the SDK.
Step 1 − Every version of Microsoft Dynamics CRM comes with its own SDK version. The best way to get the correct SDK version would be to search on Google for your respective CRM version. For example, if your CRM version is 2015, then try searching for "Microsoft Dynamics CRM 2015 SDK".
Step 2 − Once downloaded, run the exe setup. Click Continue.
Step 3 − It will ask you to choose the location where the SDK should be extracted. Select any appropriate location where you would like to keep the reference SDK.
Step 4 − Open the folder where you had extracted. You can access all the SDK content from here.
Conclusion
In this chapter, we have set up our environment by creating a CRM Online account. We then downloaded the CRM SDK, which will be used in the subsequent chapters of this tutorial. Make sure to note down the credentials with which you have set up the account, since you will need these credentials the next time you login.
Functional Modules
The entire Microsoft Dynamics CRM is designed around the following functional modules.
- Sales
- Marketing
- Service Management
These functional modules are often called as Work Areas.
Understanding CRM Functional Modules
The entire CRM application is divided functionally for different types of users and teams. Hence, if an organization is using CRM to manage its processes, the users from the Sales team would use the functionalities that come under the Sales module, while the users from the Marketing team would use functionalities that fall under the Marketing module.
All these three functional modules come together to drive the entire lifecycle of gaining a new customer (Marketing), selling them the services (Sales) and maintaining the existing customers (Service Management).
To understand this flow in a better way, consider a bank which sells credit cards to its customers. The typical lifecycle of selling a credit card to a customer would be as follows. In each step of this lifecycle, you will see how the Sales, Marketing and Service modules perform their role.
Sales & Marketing − The banks call center office executive receives data of potential customers; often called as Leads in CRM. These Leads are captured in the CRM system via marketing campaigns, sales drives, referrals, etc.
Sales − The call center executive communicates with these Leads either through phone calls/emails/etc. If the customer is interested in the credit card offering, the Lead record will be converted to an Opportunity record (won Lead).
Service − Once a customer becomes a part of the system, the company would assist him/her with payments, billing, refunds, etc. Whenever the customer has any queries or concerns, they will make a call to the call center and raise incidents. The executive will followup to resolve the case with the aim to provide quality service to the customer. These tasks fall under CRM Service Management.
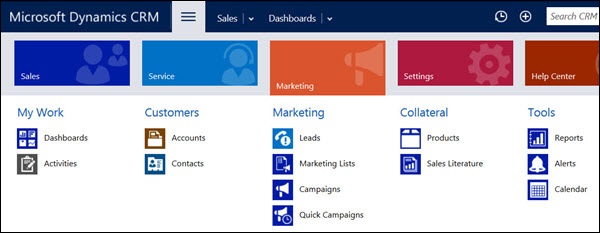
Navigating CRM Work Areas
Step 1 − Open CRM Home Page.
Step 2 − By default, you will see the Sales work area as selected.
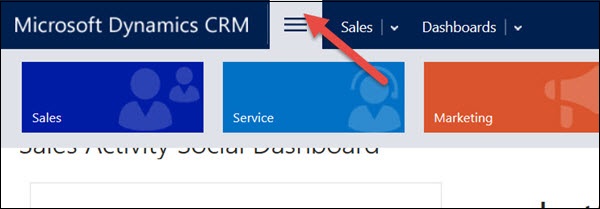
Step 3 − To change the work area, click the Show work areas option. You will see the options for selecting Sales, Service, and Marketing.
Step 4 − Click Sales. This will show you all the entities which fall under Sales such as Accounts, Contacts, Leads, Opportunities, Competitors, etc. Each of these entities are categorized by their business process such as My Work, Customers, Sales, Collateral, etc.
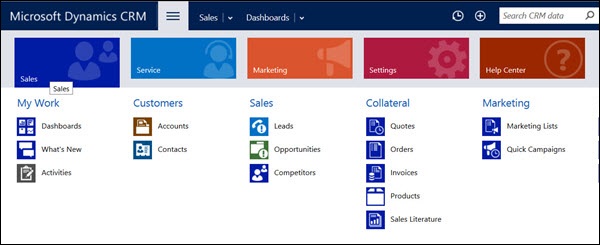
Step 5 − Similarly, if you click the Marketing work area, you will see all the entities related to Marketing business functionalities.
Sales Module
The Sales module of CRM is designed to drive the entire sales lifecycle of a new customer. The Sales module consists of the following sub-modules −
Leads − Represents a person or an organization that can be a potential customer to the company in future. This is the first step towards getting a potential customer in the system.
Opportunities − Represents a potential sale to the customer. Once a Lead shows interest in the offering, it gets converted to an Opportunity. An Opportunity will either be won or lost.
Accounts − Represents a company with which the organization has relations. Once an Opportunity wins, it gets converted to either an Account or Contacts.
Contacts − Represents a person, or any individual with whom the organization has relations. Mostly these Contacts are the customers of the organizations (e.g. all credit card customers of a bank). Once an Opportunity wins, it gets converted to either an Account or Contacts.
Competitors − Manages all the market competitors of the organization.
Products − Manages all the products offered by the organization to its customers (Example, all the credit card plans).
Quotes − A formal offer for products or services proposed at specific prices sent to a prospective customer (Example, yearly pricing of a certain credit card plan sent to the customer).
Orders − A quote that gets accepted by the customer turns into an Order (Example, out of all the plans that the organization offers you, you may go for a 6-month subscription).
Invoices − A billed order generates an invoice.
Marketing Module
The Marketing module of CRM is designed to drive the entire marketing process of an organization for its existing and potential customers. The Marketing module consists of the following sub-modules −
Marketing Lists − Provides a way to group your Contacts, Accounts, and Leads and interact with them via sending promotional emails, event details, newsletters and other updates relevant to the target customers. You can define the criteria to create your marketing lists (Example, contacts aged between 25 and 35).
Campaigns − Campaigns are designed to measure the effectiveness and accomplish a specific result, such as introducing a new product or increasing the market share and may include various communication channels such as email, newspaper ads, YouTube ads, etc.
Quick Campaigns − A Quick Campaign is similar to Campaign however it can be related to only one type of activity.
All the above Marketing modules work in close co-ordination with the Sales module.
Service Management Module
The Service Management module of CRM is designed to focus, manage, and track the customer service operations of an organization such as supporting the incident-based services, supporting the customers using service scheduling, etc.
The Service Management module covers the following sub-modules −
Cases (Incidents) − Supports any customer requests, issues, or complaints to be tracked via incidents/cases. A case follows various stages of an issue resolution process and then finally gets resolved and is closed.
Knowledge Base − Maintains a master repository for all the common questions and answers that the customer frequently asks.
Contracts − Contracts work with Cases indicating all the active contracts that the customer has.
Resources/Resource Groups − Represents the people, tools, rooms, or pieces of equipment that are used to deliver a service. These resources can be used to solve a specific customer issue.
Services − Represents all the services that the organization offers to the customers.
Service Calendar − Used to schedule work timings and schedules of the users who work in the organization.
Activity Management
All the modules explained above use the Activity Management module of CRM. An Activity represents any kind of interaction with the customer such as a Phone Call, Email, Letter, etc. These activities can be related to any of the entities explained earlier such as Account, Contact, Lead, Case, etc. By default, CRM provides following types of activities out-of-the-box −
- Phone Call
- Task
- Appointment
- Recurring Appointment
- Letter
- Fax
- Campaign Response
- Campaign Activities
- Service Activity
- Custom Activities
Conclusion
In this chapter, we have learnt about the three major modules of CRM Sales, Marketing, and Service Management. We understood how the work areas are organized in CRM and how the entire lifecycle of a CRM organization works. We also looked at the Activity Management module of CRM which allows to create Phone, Email, Fax and other types of customer interaction activities.
Entities and Records
Now that we have a functional overview of all the CRM modules, let us learn and understand about the entities and forms in CRM.
What is an Entity?
An entity is used to model and manage business data in CRM. Contacts, Cases, Accounts, Leads, Opportunities, Activities, etc. are all entities which hold data records. Conceptually, a CRM entity is equivalent to a database table. For example, Contacts entity would hold Contact records, Cases entity would hold Cases records, and so on.
You can have both: out-of-the-box entities (which comes by default with the CRM) and custom entities (which you can create with customization). For instance, suppose that you are maintaining the data of the books your customers have read. For this, you will be storing the customer data using out-of-the-box Contacts entity but where would you store the books data? You do not have any entity that can store data for books. In such scenarios, you will create a new custom entity named Books and relate this with the existing Contacts entity.
For this tutorial, let us take an example of storing employers and employees in CRM. Taking this example into consideration, out-of-the-box, CRM provides Contact entity in which you can ideally store all your employees. It also provides an Account entity in which you can store all your employers. But for the sake of learning entities, we will create a new custom entity called Employer (and not use the existing Account entity).
Creating a New Entity
Step 1 − Click the top ribbon button followed by Settings option. Click Customizations option from the Customization section (Refer the following screenshot).
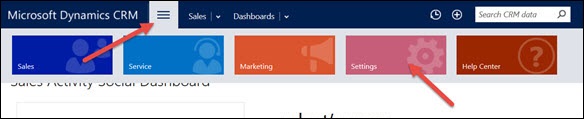
Step 2 − Now click Customize the System option.
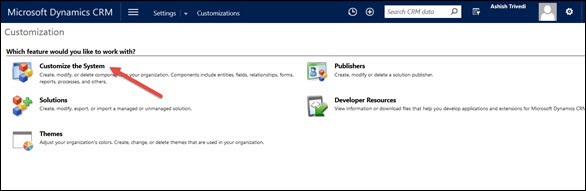
This will open up the Default Solution window. You will learn more about CRM Solutions in the next chapters but for now you will be using the default CRM Solution.
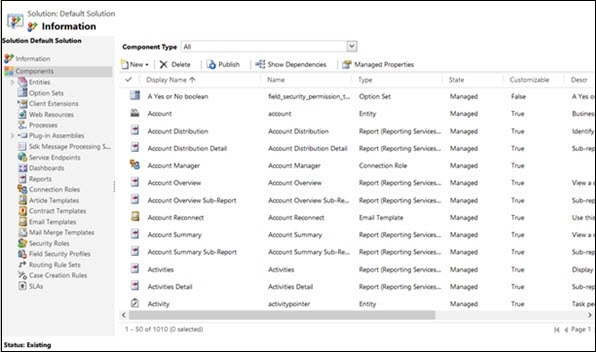
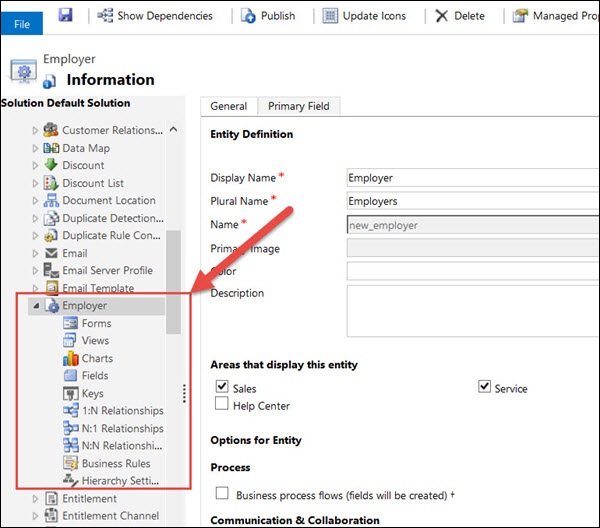
Step 3 − Expand the Entities option from the left panel.
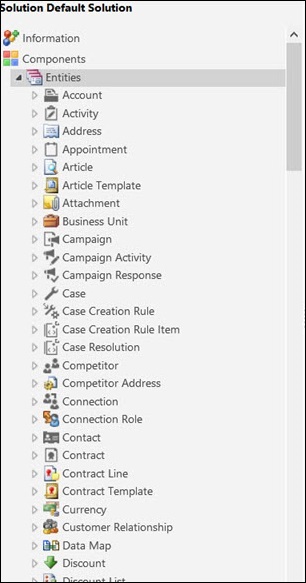
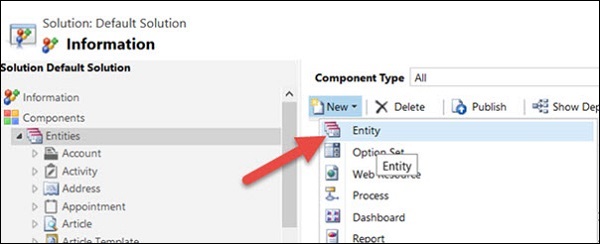
Step 4 − Now click New → Entity.
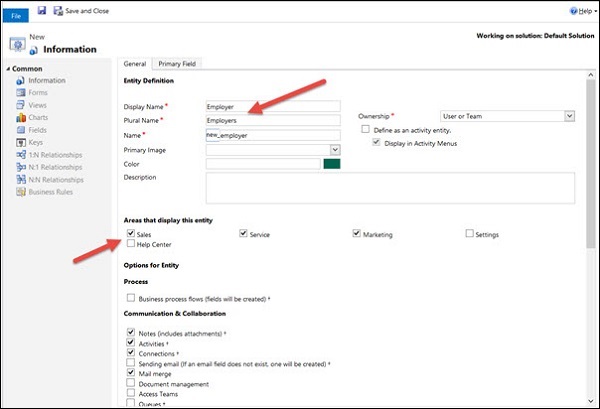
Step 5 − In the Entity Form, enter the Display Name as Employer and PluralName as Employers. In the section Areas that display this entity, check Sales, Service and Marketing. Checking these options will display the newly created entity in Sales, Service, and Marketing tabs of CRM.
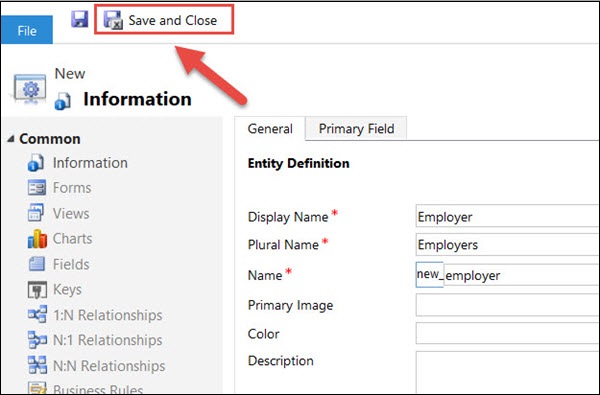
Step 6 − Click on the Save and Close icon. This will create a new entity in CRM database behind the scenes.
Step 7 − In the Default Solution parent window, you will see the newly created Employer entity.
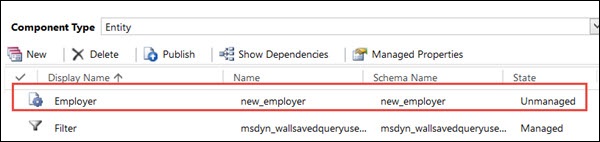
Step 8 − Click Publish All Customizations option from the top ribbon bar. This will publish (aka commit) all the changes we did till now. You can close this window by clicking Save and Close.

Creating Records
CRM is all about managing valuable data in your system. In this section, we will learn how to create, open, read, and delete records in CRM. We will continue with the employer entity that we created in the last chapter.
Step 1 − Navigate to Employer entity records grid via Show work areas → Sales → Extensions → Employers.
Step 2 − Click the New icon.
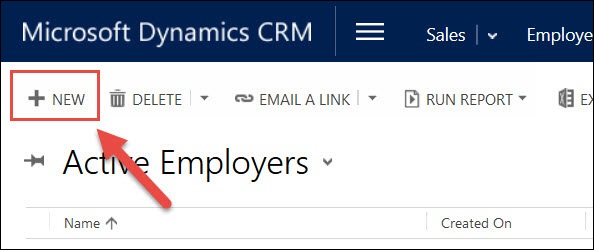
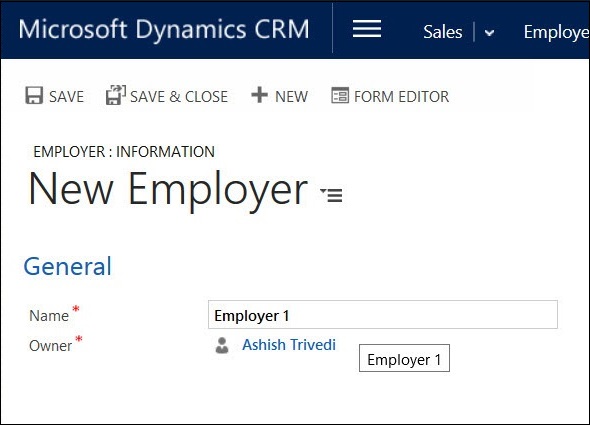
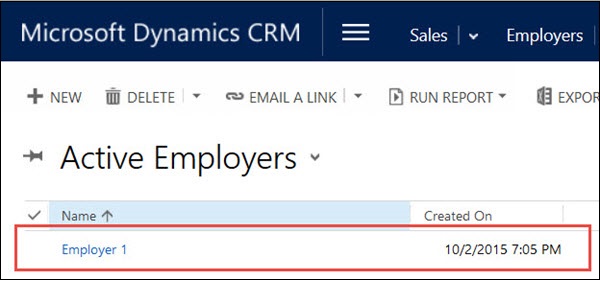
This will open the default new employer form. You can see that there is only one editable field Name in this default form. Enter Employer 1 in the Name field. Click Save and Close.
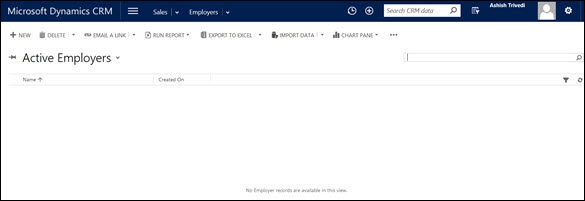
Step 3 − In the Active Employers view, you can see the newly created employer record.
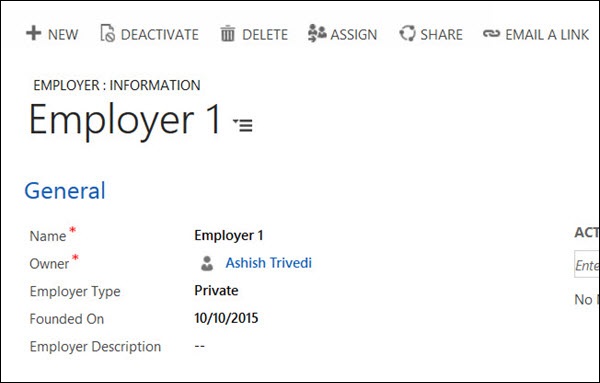
Accessing Records
To access the already created records in CRM, go to that entity page. In our case, navigate to Show work areas → Sales → Extensions → Employers. You will see list of records present there in the grid. Click any Employer record to access it.
Updating Records
Once you have a record open, you can just edit any details on the form. By default, CRM 2015 comes with auto-save option which saves any changes made to the form 30 seconds after the change. Alternatively, you can click Ctrl+S.
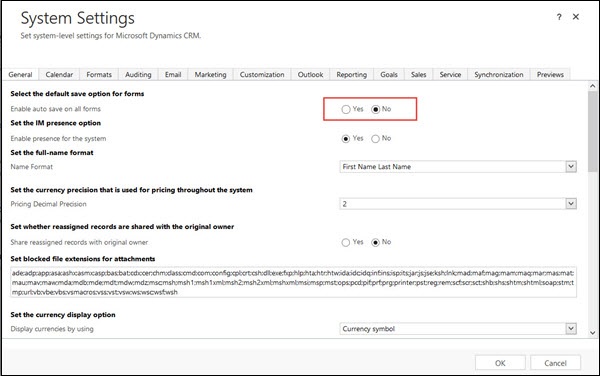
In case you want to disable the auto-save feature, go to Settings → Administration → System Settings → Enable auto-save for all forms and select No.
Deleting Records
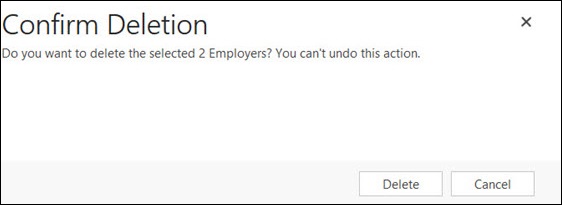
Step 1 − Select one or multiple records which you want to delete and click the Delete button.
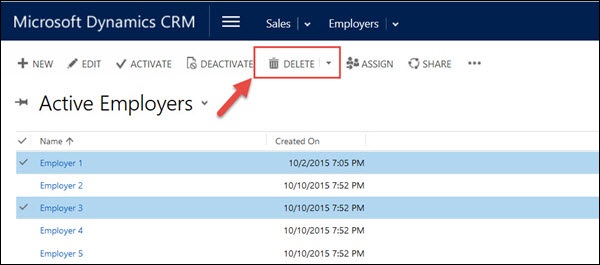
Step 2 − Confirm the deletion of records by clicking Delete.
Conclusion
As seen in the above example, the default Employer form had only one field. However, in real life scenarios, you will have many custom fields on a form. For example, if you look at a sample Contact record (which is an out-of-the-box CRM entity), it will have many fields to store contact information such as Full Name, Email, Phone, Address, Cases, etc.
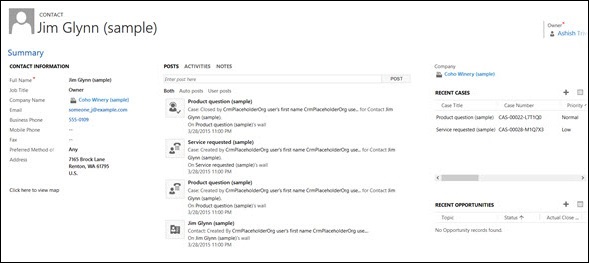
In the next chapters, you will learn how to edit this default form and add different types of fields on it.
Microsoft Dynamics CRM - Fields
Before you learn how to add custom fields to CRM forms, let us take a look at what type of data fields are supported by CRM.
Field Types
Out-of-the-box, CRM provides 11 types of data fields that can be placed on forms −
- Single Line of Text
- Option Set (Dropdown)
- Two Options (Radio Button)
- Image
- Whole Number
- Floating Point Number
- Decimal Number
- Currency
- Multiple Lines of Text
- Date and Time
- Lookup
The following table lists each with a brief description.
| Sr.No | Field Type & Description |
|---|---|
| 1 | Single Line of Text This field stores up to 4000 characters of text. You can also specify the format as one of these: Email, Text, Text Area, URL, Ticker Symbol, and Phone. You can set the maximum length and IME mode for each of these. |
| 2 | Option Set (Dropdown) This field stores a set of options each having a number value and label. In other words, it is a dropdown field in CRM. You can also define Global Option Sets which can be used across multiple forms. |
| 3 | Two Options (Radio Button) This field provides two options for the user to select (0 or 1). In other words, it is a radio button field. |
| 4 | Image When an entity has an image field, it can be configured to display the image for the record in the application. |
| 5 | Whole Number This field stores integer values between -2,147,483,648 and 2,147,483,647. It supports the specifying formats as None, Duration, Time Zone, and Language. You can set the minimum and maximum values too. |
| 6 | Floating Point Number This field stores the floating point numbers up to 5 decimal points of precision between 0.00 and 1,000,000,000.00. You can set the minimum and maximum values too. |
| 7 | Decimal Number This field stores up to 10 decimal points with values ranging from -100,000,000,000.00 and 100,000,000,000.00. |
| 8 | Currency This field is used to store any currency values in the range of 922,337,203,685,477.0000 to 922,337,203,685,477.0000. You can also specify the Precision as Pricing Decimal, Currency Precision or any value between 0 to 4. |
| 9 | Multiple Lines of Text This is a scrolling text box. You can set the maximum number of characters for this field. |
| 10 | Date and Time This field is used to store date-related data in CRM with two supported formats: Date Only, and Date and Time. You can also specify the behavior as User Local, Date Only and Time-Zone Independent. |
| 11 | Lookup You can create a lookup field using an entity relationship that has already been created, but not yet used with another lookup field. If you create a lookup field in an entity form, the relationship is automatically generated. A lookup field is created as a relationship field. |
Microsoft Dynamics CRM - Forms
In the last two chapters, you studied about creating new entities, creating new records and types of fields available in CRM. In this chapter, you will be learning to add new fields on CRM forms.
Out of the 11 types of data fields studied in the previous chapter, you will be using three types of fields on your employer - Option Set (Dropdown), Multiple Lines of Text and DateTime. The Option Set field would be used to store the employer type, Multiple Lines of Text will be used to store brief description of employer and the DateTime field would be used to store date when the company was started. Note:You already had a Name field on your form which was a Single Line of Text type.
Adding Fields on Form
Step 1 − Click the top ribbon button followed by Settings option. Click Customizations option from the Customization section (Refer screenshot below).
Step 2 − Now click the Customize the System option.
This will open the DefaultSolution window. You will learn more about CRM Solutions in the next chapters but for now you will be using the default CRM Solution.
Step 3 − Expand the Entities option from the left panel.
Step 4 − From the expanded entities, select Employer. This will open the details of the entity on the right window. Expand Employer option from the left panel and you will be able to see Forms, Views, Charts, Fields, and other several options.
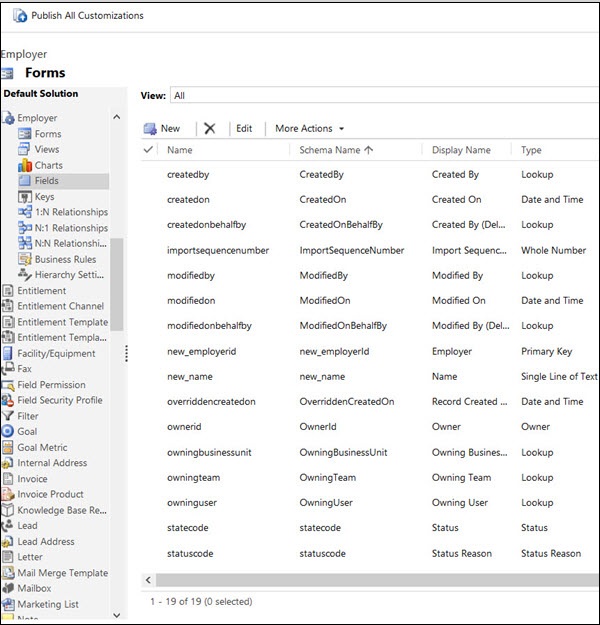
Step 5 − Click Fields. It will open a grid showing all the fields that came by default when you created this entity.
Step 6 − Click the New button. In the new window that opens, enter the following details −
Display Name − Employer Type
Name − This field will be populated automatically based on the display name you select. However, if you would like to change it, you can do so.
Data Type − Option Set. As soon as you select the Data Type as Option Set, it will show you the Options panel. Clicking the plus(+) icon creates a new option set item with default Label as Item and default Value as 100,000,000. You can change the label of this item to add four options representing employer types: Private, Government, Multinational and Public.
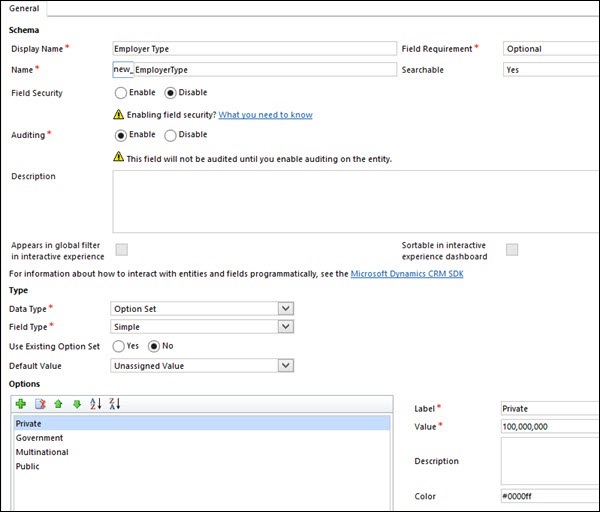
Step 7 − Click Save and Close from the top ribbon. You have successfully created Employer Type field.
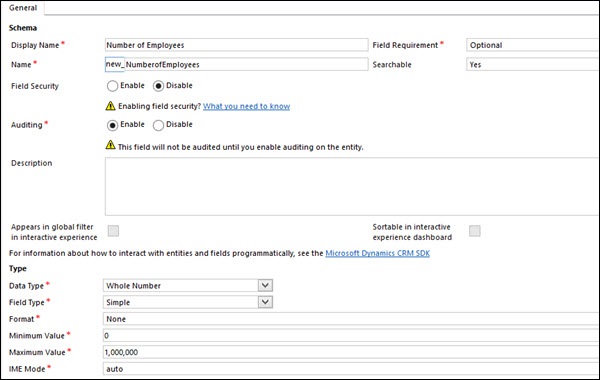
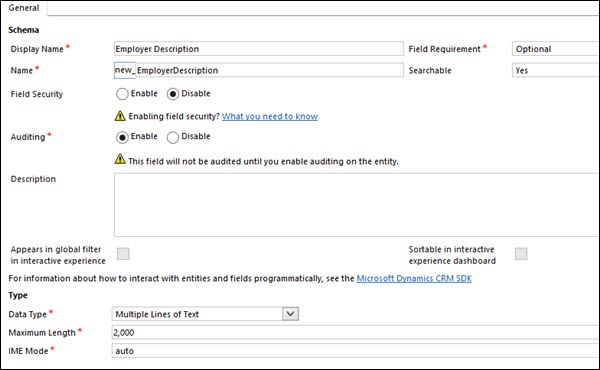
Step 8 − Similar to what you just did for adding Employer Type field, add three other fields as described and shown in the following screenshots −
Number of Employees − This will be a Whole Number field.
Founded On − This will be a DateTime field.
Employer Description − This will be a Multiple Lines of Text field.

Step 9 − Now add these new fields on the employer form. For this, click Forms from the left navigation under Employer entity. This will show you two forms with name Information. By default, CRM creates two forms Main and Mobile-Express. Click on the Main form.
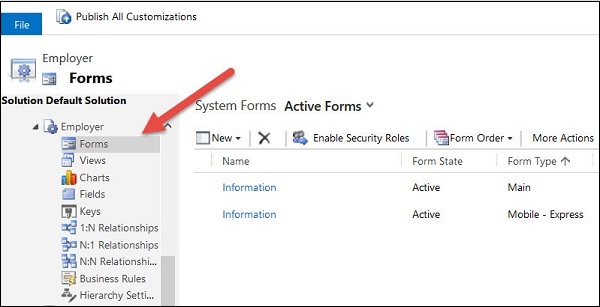
Step 10 − You can see the newly added fields in the Field Explorer panel on the right.
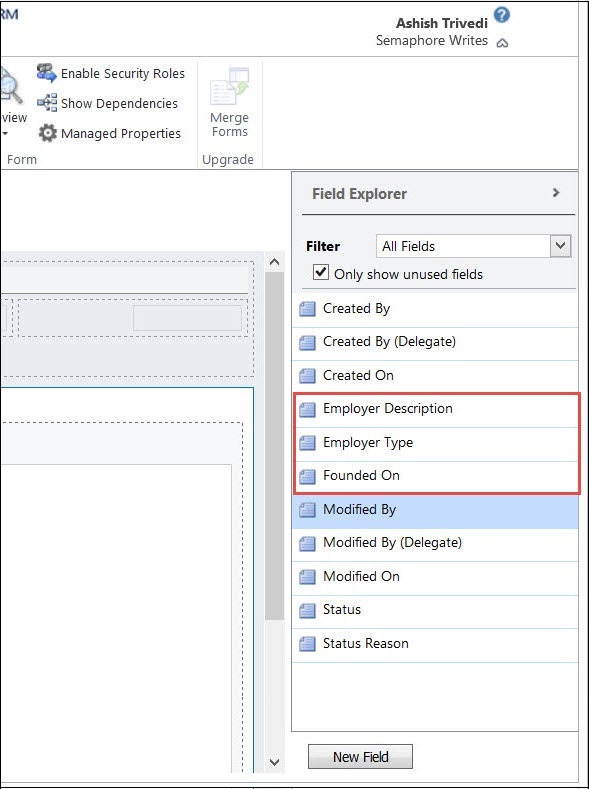
Step 11 − Drag and drop these fields in the General tab.
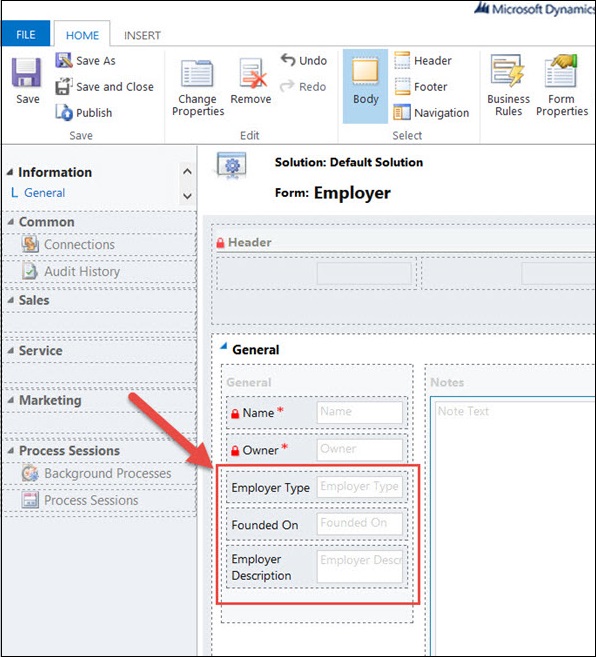
Step 12 − Click Save and then click Publish.
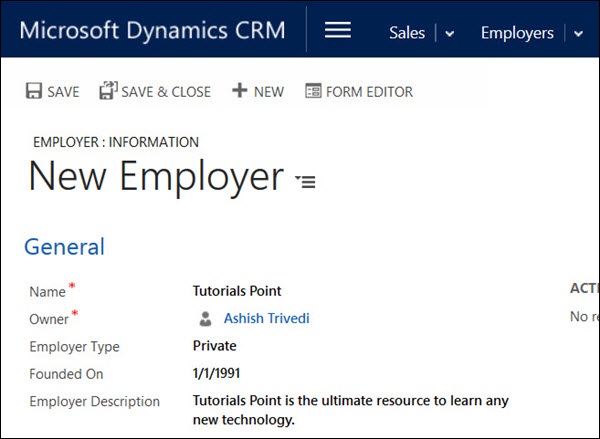
Step 13 − You can now create employer records with the updates fields. Navigate to CRM Home → Sales → Employers → New. The new form which will open this time will contain all the new fields that you added in this chapter. You can fill in some details and click Save and Close.
Conclusion
In this chapter, we learnt working with CRM forms and how to customize them by placing various types of fields in them. We also learnt to add as many fields as we want on any form and arrange them using various tabs and sections as per the business requirement.
Microsoft Dynamics CRM - Searching
Microsoft Dynamics CRM is a vast product which has evolved significantly over the years. The product comes with a lot of out-of-the-box functionalities that are inbuilt in the system. You do not need to write any code for utilizing these features. One of the important out-of-the-box features is the searching capability of CRM, in that it supports advanced querying and filtering capabilities.
Quick Search
By default, the grid view of every entity in CRM supports a Quick Search functionality using a search bar on top right. Following is a screenshot of quick search on Contact entity.
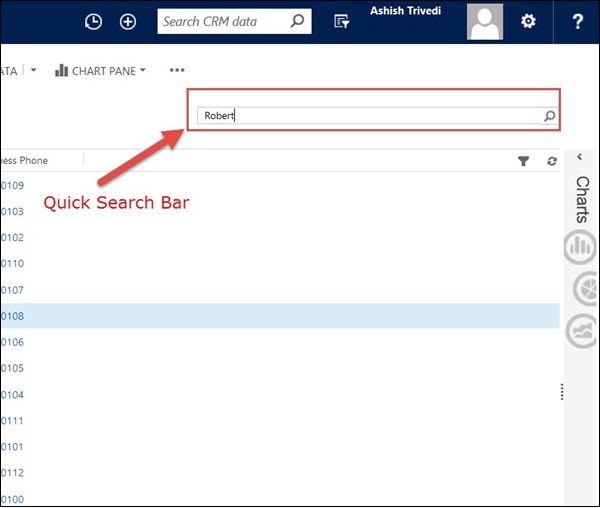
You can try entering a search string like 'Robert' and it will return all the matching records.
You can prefix the search keyword with * (asterisk) to perform a wildcard search.
Note − When using the web client version of Microsoft Dynamics CRM, Quick Search always searches All Active records irrespective of the view selected.
You can customize the Quick Search (like customizing any other View) to modify the filter criteria, configure sorting, add view columns, add find columns and change other properties.
Advanced Search
Advanced Search allows you to search records of any entity in CRM. It is one of the strongest and one of the most useful feature that comes out-of-the-box with CRM. The Advanced Search icon appears on the top ribbon bar of Microsoft Dynamics CRM irrespective of which screen you are on.

Click the Advanced Find icon to open the Advanced Find window. This window will allow you to select the entity for which you want to search records, apply filtering and grouping criteria, and save your Advanced Find views as personal views.
Lets take an example. Suppose, you want to search for all the Contacts with FirstName containing Robert and who are Divorced. For this −
Step 1 − Select Contacts from the Look for dropdown. This dropdown will contain all the entities present in your system.
Step 2 − Enter the search criteria as shown in the following screenshot. You can add as many search query parameters as you want. You can even group such criteria using group parameters. For example, if you would like to search all contacts whose first name is either Robert or Mark, you can add two search criteria and group them using GroupOR.
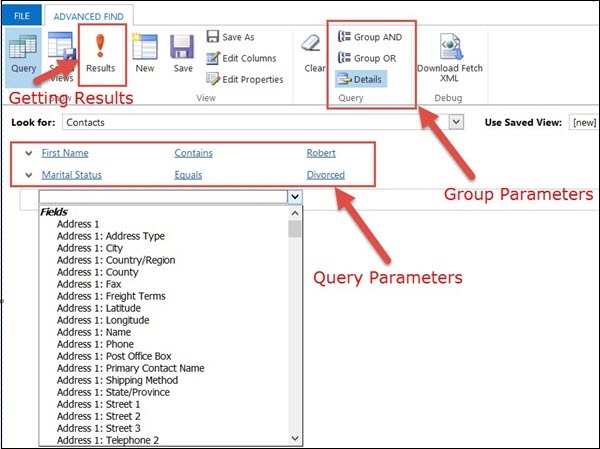
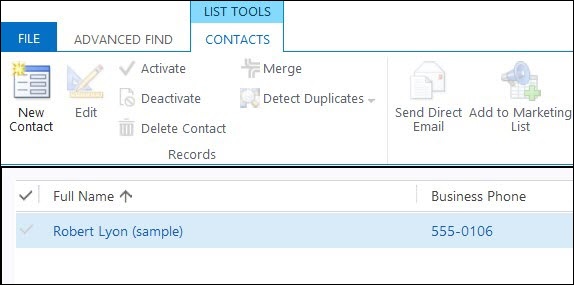
Step 3 − Click the Results button. It will show the matched records in a new tab.
Step 4 − You can also edit the columns that you would like to see in the search results by clicking Edit Columns. For example, our current grid contains only two columns Full Name and Business Phone. However, if you would like to have an additional column of Email ID added to this grid, you can do so using this option.
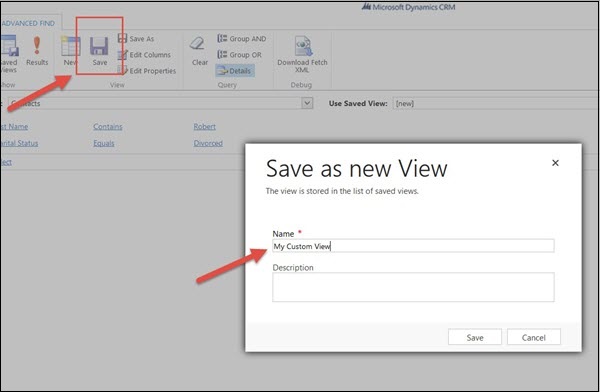
Saving Custom View
At this stage, if you would like to save this search criteria, along with the filters and edited columns, you can do so by clicking the Save button. Once saved, you can use this saved view when you are on that entity page.
For example, consider that as a customer executive you serve two types of customers: Normal and Premium. Hence, you can create an advanced filter with these respective categories and save them as Normal Contacts Assigned to Me and Premium Contacts Assigned to Me. You can then quickly access these views directly from the Contact entity page without carrying out a quick search or an advanced find search every time you use the system.
Microsoft Dynamics CRM - Web Resources
Web Resources in CRM are the virtual web files that are stored in CRM database and used to implement web page functionalities in CRM. These files can be of HTML, JScript, Silverlight, or any other supported types.
CRM being a product, comes with an extensive set of features and functionalities. However, most of the times, you would have to extend these existing functionalities to meet your custom requirements. Extending these functionalities generally happens in two ways −
Extending on Client Side − Using Web Resources and Form Scripting.
Extending on Server Side − Plugins, Workflows and Web Services (we are going to learn this part in the upcoming chapters).
Uses of Web Resources
As mentioned above, extending CRM on the client side is where Web Resources comes in picture. To understand this clearly, consider the following use cases −
You have a CRM form containing certain fields. CRM provides out-of-the-box features for basic validations such as mandatory fields, field lengths, etc. However what if you would like to have a more complex validation such as validating if the entered phone number is in the correct format, or validating if the entered address actually exists, or if the entered SSN is correct?
CRM provides out-of-the-box UI customizations such as creating sections and tabs on a form, rearranging fields, etc. However, what if the client wants to build a custom page which shows all the information of the customer coming from their other ERP system?
CRM comes with a standard ribbon bar, which contains all the buttons and options. What if you want to add a ribbon button of your own?
Consider that you have an ERP system already in place. What if you would like to open some CRM screens from this ERP system?
You can always call any external web services in your server-side plugin code. However, what if you would like to call any external web services while you are still on the client-side?
The answer to all these What ifs is Web Resources. Every Web Resource can be accessed via its unique URL. You can either upload a Web Resource file or for codebased resources (such as HTML, Jscript, etc.) you can even edit them directly inside CRM. Since Web Resources are stored within CRM, they can easily be migrated from one environment to another together, along with any CRM customizations.
Types of Web Resources
| Type of Web Resource | Sample Application in CRM |
|---|---|
| WebPage (HTML) | You may want to create any custom HTML page such as maps, custom application page, etc. and place it inside your CRM form. |
| Style Sheet (CSS) | Any CSS files that will be used together with the HTML files. |
| Script (JScript) | Any client-side logic such as validations, manipulating field values, etc. |
| Data (XML) | Can be used to store any static settings or configuration data. |
| Image (PNG,JPG,GIF, ICO) | Any images used in the application on ribbon buttons, icons, forms, etc. |
| Silverlight (XAP) | Any custom Silverlight application embedded within CRM. |
| StyleSheet (XSL) | Used to transform XML data. |
Out of all these types of web resources, we will be studying the most important types of web resources - HTML Web Resources and JScript Web Resources, in the subsequent chapters.
Accessing Web Resources for Any Entity
All the Web Resources stored in the database can be accessed in CRM. Following are the steps involved −
Step 1 − Go to Settings → Customizations → Customize the System.
Step 2 − From the left navigation, select Web Resources. Currently, you will not be able to see any Web Resources since we have not created anything yet.
We will be looking at how to create web resources in the next chapters.
JScript Web Resources
JScript Web Resources are probably the most important type of web resources that you will be using with Microsoft Dynamics CRM.
Applications of JavaScript in CRM
Form Event Programming
Form Event Programming is used to handle client-side behaviors such as what happens when a user opens a form, changes some data, moves through tabs, etc. To achieve such client-side interactions you will be writing JavaScript code and adding it as a JScript Web Resource in CRM. However, the JavaScript code which you will write has to use Dynamic CRMs Xrm.Page model and not the standard JavaScript DOM. Using Xrm.Page model is Microsofts way of coding which ensures that any code you write using this model will be compatible with any future versions of CRM.
Web Resources
In addition to being used in Form Event Programming, JavaScript is used in other applications of CRM such as −
Open Forms, Views and Dialogs with a unique URL.
Using OData and SOAP endpoints to interact with web services.
Referencing JavaScript code inside other Web Resources (such as HTML web resources).
In such cases, you would write your JavaScript code (using Xrm.Page model) and add it as a JScript Web Resource in CRM, which can then be referenced anywhere with a unique URI.
Ribbon Customizations
Finally, one of the other common use of JavaScript is to handle ribbon customizations such as −
- Display/Hide ribbon buttons based on some logic
- Enable/Disable ribbon buttons based on some logic
- Handle what happens when you click a certain ribbon button
To handle such scenarios, you will write your JavaScript logic (using Xrm.Page model) and then add it as a JScript Web Resource. This Web Resource can then be referenced in the ribbon buttons XML and we can specify which method in which JScript file to call to check if a ribbon button should be displayed/hidden or enabled/disabled or handle click events.
Xrm.Page Object Model
Following is the Xrm.Page objects hierarchy showing the available namespaces, objects, and their collections. You will be using these properties while writing JScript code.

Namespaces
| Sr.No | Object & Description |
|---|---|
| 1 | Context Provides methods to retrieve context-specific information such as organization details, logged-in user details, or parameters that were passed to the form in a query string. |
| 2 | Data Provides access to the entity data and methods to manage the data in the form as well as in the business process flow control. |
| 3 | UI Contains methods to retrieve information about the user interface, in addition to collections for several sub-components of the form. |
Objects
| Sr.No | Object & Description |
|---|---|
| 1 | Entity Provides method to −
|
| 2 | Process Methods to retrieve properties of business process flow. |
| 3 | Navigation Provides access to navigation items using items collection. |
| 4 | FormSelector Uses Items collection to access available forms to the user. Also uses the navigation method to close and open forms. |
| 5 | Stages Each process has a collection of stages that can be accessed using getStages method of process. |
| 6 | Steps Each stage comprises of various steps that can be accessed using getSteps method of stage. |
Collections
| Sr.No | Collections & Description |
|---|---|
| 1 | Attributes Provides access to entity attributes available on the form. |
| 2 | Controls ui.controls − Provides access to each control present on the form. attribute.controls − Provides access to all the controls within an attribute. section.controls − Provides access to all the controls within a section. |
| 3 | Items Provides access to all the navigation items on a form. |
| 4 | Tabs Provides access to all the tabs on a form. |
| 5 | Sections Provides access to all the sections on a form. |
Supported Events in Form Programming
The Form Programming using Xrm.Page model allows you to handle the following form events −
- onLoad
- onSave
- onChange
- TabStateChange
- OnReadyStateComplete
- PreSearch
- Business Process Flow control events
Form Programming Example
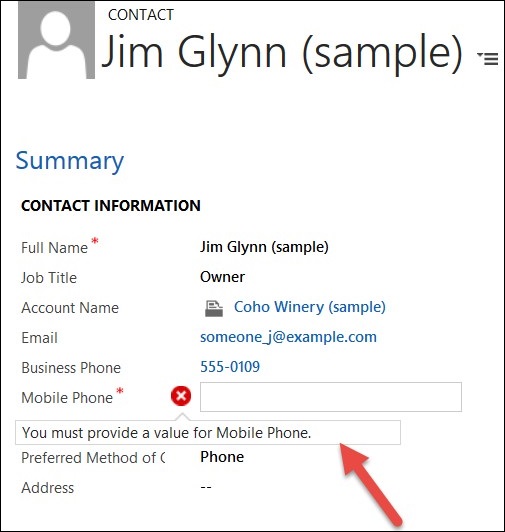
In this example, we will put some validations on the Contact form based on the PreferredMethodofCommunication that the user selects. Hence, if the user selects his/her preferred method as Email, then the Email field should become mandatory and similarly for other fields of Phone and Fax.
Step 1 − Create a JavaScript file named contacts.js and copy the following code.
function validatePreferredMethodOfCommunication() {

   //get the value of Preffered Method of Communication code
   var prefferedContactMethodCode =
      Xrm.Page.getAttribute('preferredcontactmetho dcode').getValue();

   //if Preferred Method = Any, make all fields as non-mandatory

   //else if Preferred Method = Phone, make Mobile Phone field mandatory
   //and all other fields as non-mandatory

   //else if Preferred Method = Fax, make Fax field mandatory
   //and all other fields as non-mandatory

   if(prefferedContactMethodCode == 1) {
      clearAllMandatoryFields();
   }
   if(prefferedContactMethodCode == 2) {
      clearAllMandatoryFields();
      Xrm.Page.getAttribute('emailaddress1').setRequiredLevel('required');
   } else if(prefferedContactMethodCode == 3) {
      clearAllMandatoryFields();
      Xrm.Page.getAttribute('mobilephone').setRequiredLevel('required');
   } else if(prefferedContactMethodCode == 4) {
      clearAllMandatoryFields();
      Xrm.Page.getAttribute('fax').setRequiredLevel('required');
   }
}
function clearAllMandatoryFields() {

   //clear all mandatory fields
   Xrm.Page.getAttribute('emailaddress1').setRequiredLevel('none');
   Xrm.Page.getAttribute('mobilephone').setRequiredLevel('none');
   Xrm.Page.getAttribute('fax').setRequiredLevel('none');
}
Step 2 − Open the Contact entity form by navigating to Settings → Customizations → Customize the System → Contact entity → Forms → Main Form.
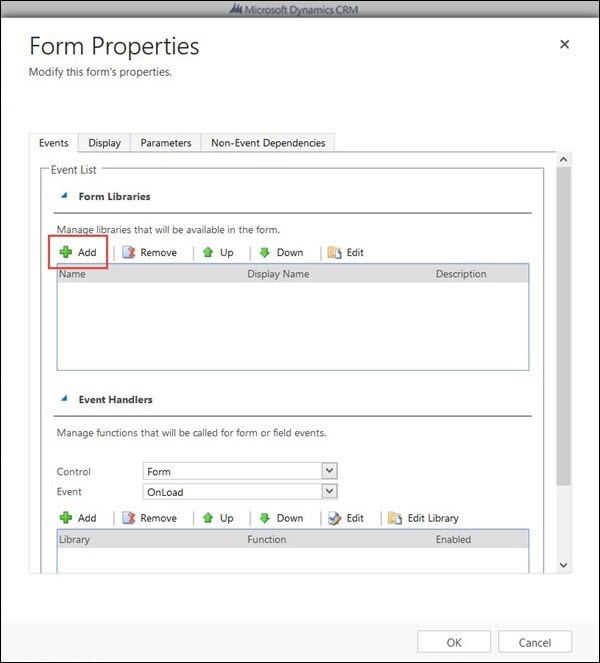
Step 3 − Click Form Properties.

Step 4 − From the Form Properties window, click Add.
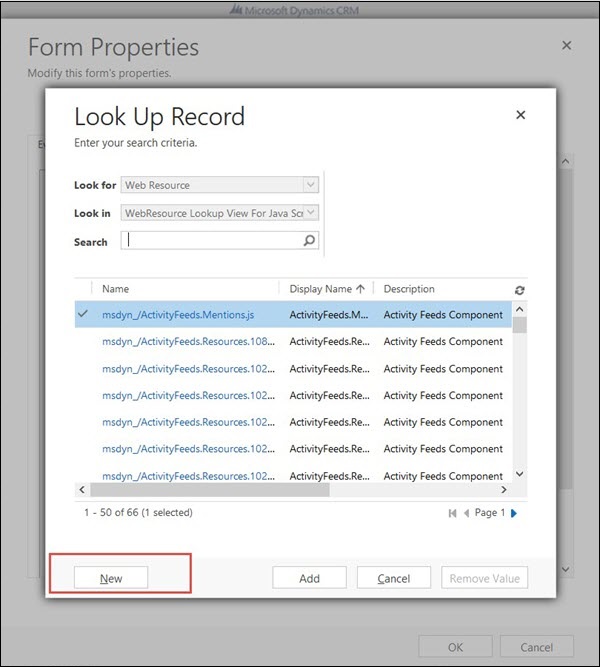
Step 5 − In the next Look Up Web Resource Record window, click New since we are creating a new web resource.
Step 6 − In the New Web Resource window, enter the following details −
Name − new_contacts.js
Display Name − contacts.js
Type − JScript
Upload File − Upload the JavaScript file that you created from your local machine.
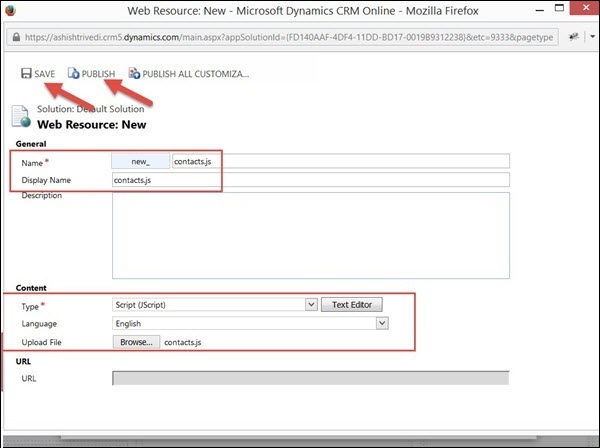
Step 7 − Click Save followed by Publish. After this close the window and you will be back to Look Up Web Resource Record window.
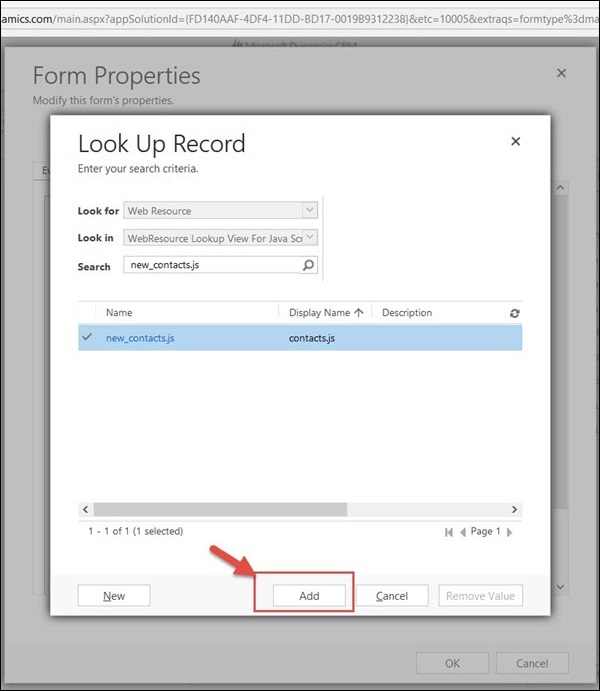
Step 8 − Here, you can now see the new_contacts.js web resource. Select it and click Add. You have now successfully added a new web resource and registered it on the form.
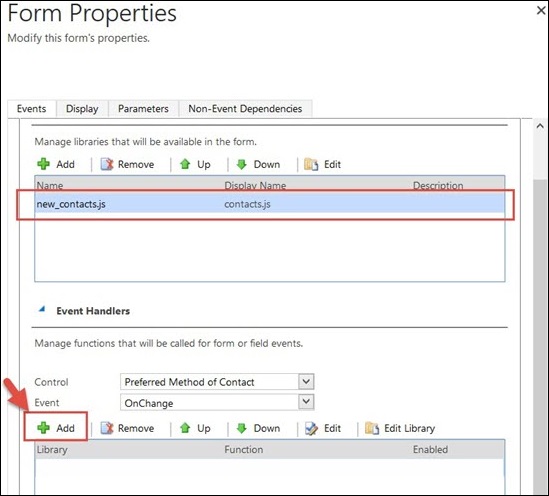
Step 9 − Now we will add an event handler on the change of Preferred Method of Communication field. This event handler will call the JavaScript function that we just wrote. Select the following options from the Event Handler section.
Control − Preferred Method of Communication
Event − OnChange
Then, click the Add button, as shown in the following screenshot.
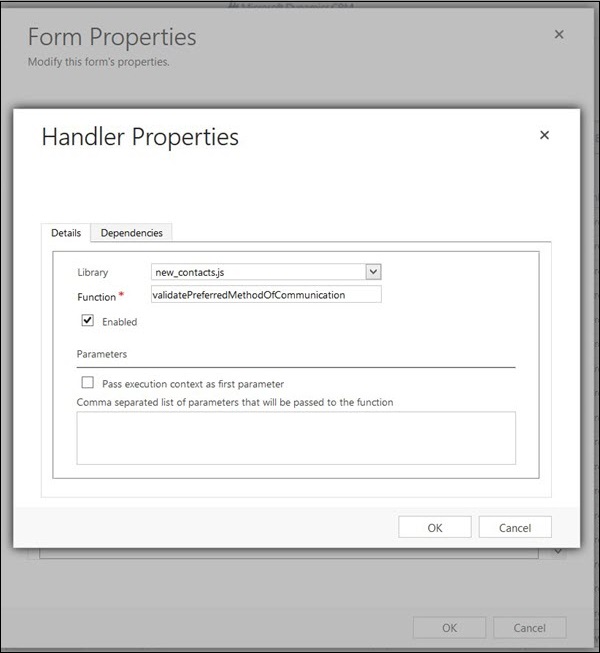
Step 10 − In the next window of Handler Properties, we will specify the method to be called when the change event occurs.
Select Library as new_contacts.js and Function as validatePreferredMethodOfCommunication. Click OK.
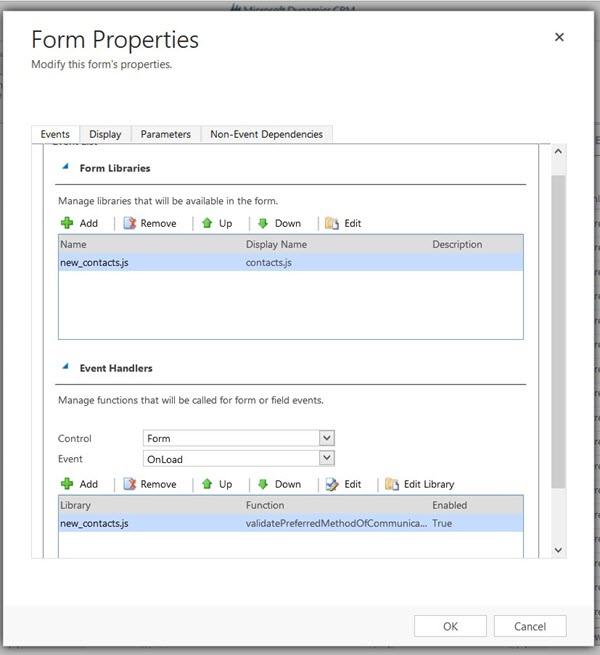
Step 11 − You will now be able to see the Form Library (Web Resource) and events registered on it. Click OK.
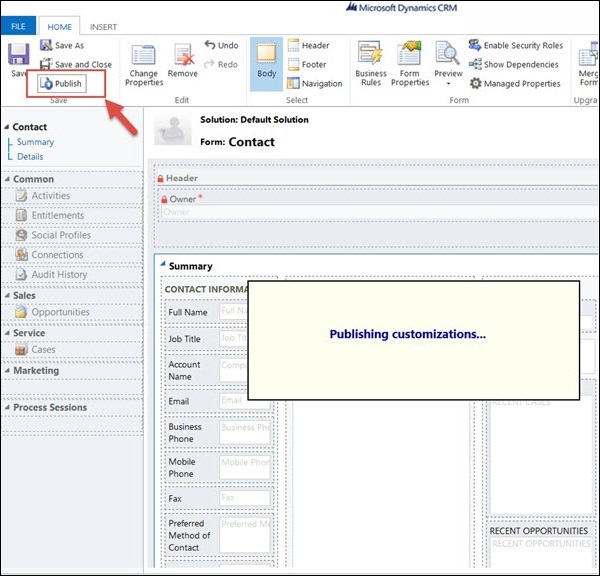
Step 12 − Click Save followed by Publish.
Step 13 − Now open any Contact form and set the Preferred Method of Communication as Phone. This will make the Mobile Phone field as mandatory. If you now try to save this contact without entering any mobile number, it will give you an error saying You must provide a value for Mobile Phone.
Conclusion
In this chapter, we started by understanding the three important applications of JavaScript in CRM. Later, we explored the Xrm.Page model and used it to learn Form programming along with an example.
HTML Web Resources
In this chapter, we will learn about the various web resources in Microsoft Dynamics CRM.
Applications of HTML Web Resources
An HTML Web Resource in CRM can contain any HTML content that can be rendered on a browser. Consider the following scenarios where you would like to use HTML Web Resources −
You have a static HTML page that you want to show inside CRM screen.
You have a custom HTML page that expects some input parameters and gets rendered based on those input parameters. For example, consider you are fetching information from an external API or web service, and you want to display this in CRM.
You want to display some information with a different look and feel from the standard CRM UI.
You have a custom ASPX page (outside CRM application) which gets rendered based on the input parameters. Since CRM does not allow you to have ASPX web resources, you can create an HTML Web Resource and call the external ASPX page from this HTML page.
HTML Web Resource Example
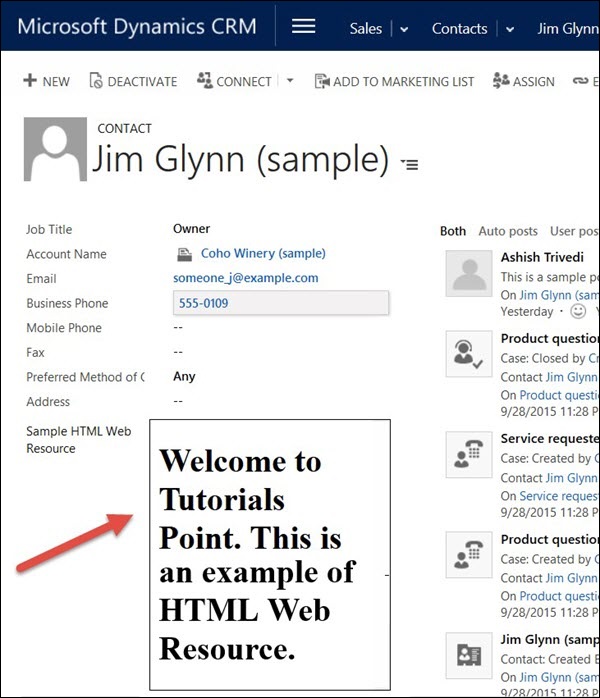
We will create a very simple HTML Web Resource which will display a custom text Welcome to TutorialsPoint. Note that this is a very simple example of an HTML Web Resource. Practically, the HTML Web Resources would be more complex than this.
Step 1 − Create an HTML file named sampleHTMLWebResource.html and copy the following code.
<!DOCTYPE html>
<htmllang = "en"xmlns = "http://www.w3.org/1999/xhtml">
   <head>
      <metacharset = "utf-8"/>
      <title>Welcome to Tutorials Point</title>
   </head>

   <body>
      <h1>Welcome to Tutorials Point. This is an example of HTML Web Resource.</h1>
   </body>
</html>
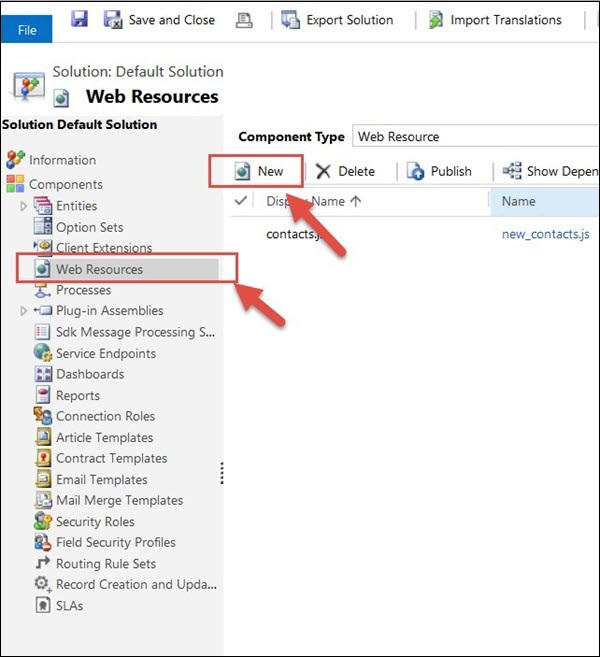
Step 2 − First, we will create a new Web Resource and then reference it on the Contact form. Open the DefaultSolution and navigate to WebResources tab from the left panel. Click New.
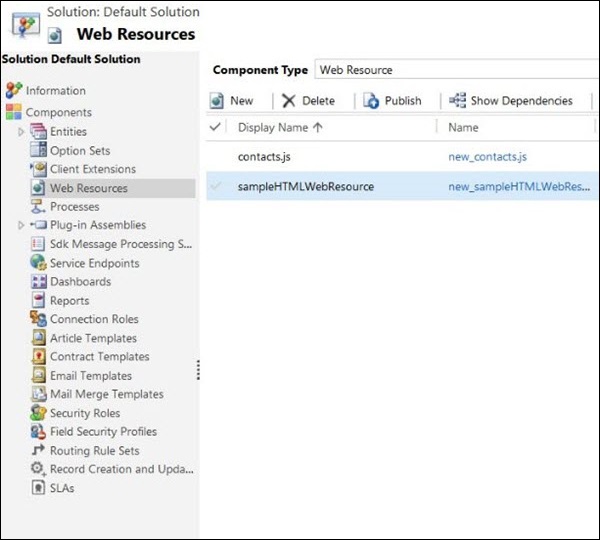
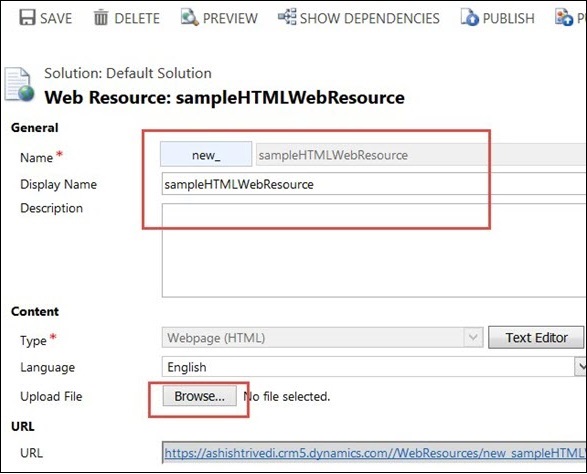
Step 3 − It will open a New Web Resource window. Enter the details as shown in the following screenshot and browse the HTML file that we created in Step 1. Click Save and Publish. Close the window.
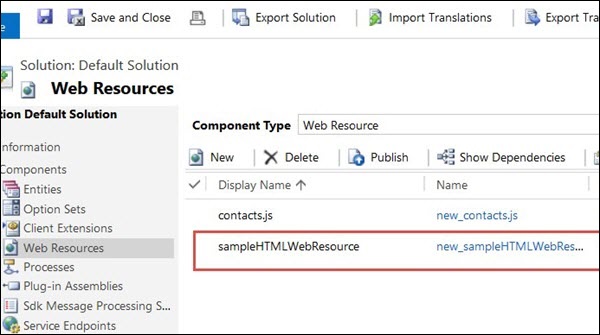
Step 4 − You will see the new Web Resource added to the Web Resources grid.
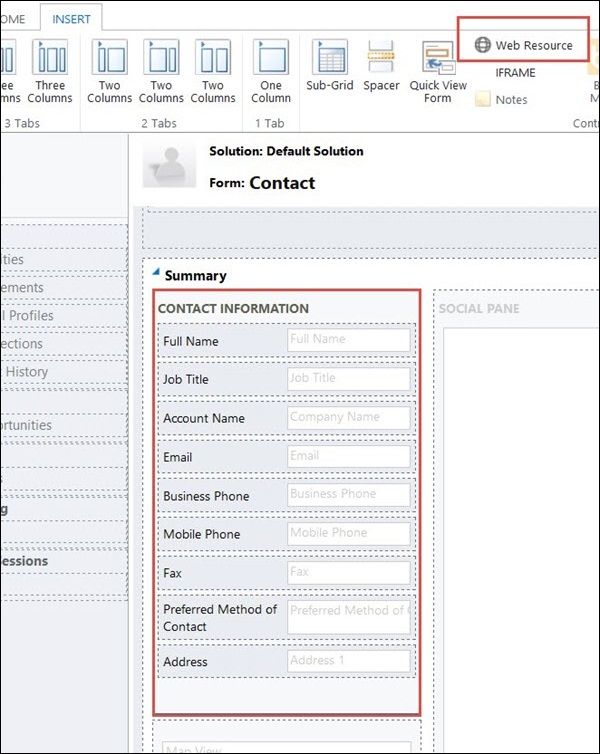
Step 5 − Now open the Contact form via Settings → Customizations → Customize the System → Contact → Main Form. Select the Contact Information section and switch to Insert tab from the top ribbon bar. Click Web Resource.
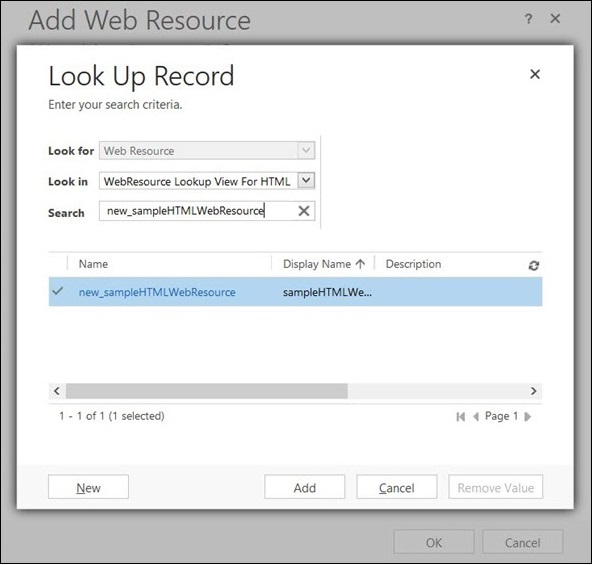
Step 6 − It will open an Add Web Resource window. Click the Web Resource Lookup from this window, which will open the Web Resource Lookup Record window. Search the Web Resource that you just created (new_sampleHTMLWebResource), select it from the grid and click Add.
Step 7 − Coming back to Add Web Resource, enter the Name and Label as shown in the following screenshot and click OK. Close the window.
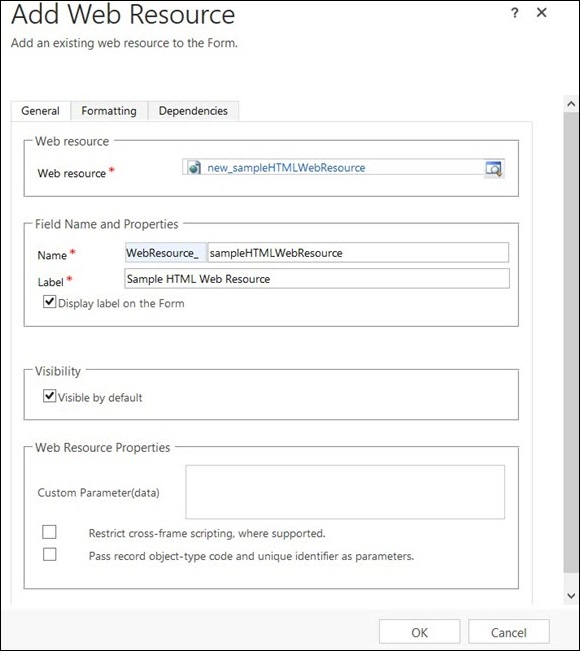
You will see the HTML Web Resource added below the Address field.

Step 8 − To test this out, open any Contact record and you will see the HTML Web Resource content displayed there.
Limitations of HTML Web Resources
There is no supported way of using the server-side code in HTML Web Resources.
HTML Web Resources can accept only limited number of parameters. To pass more than one value in the data parameter, you will have to encode the parameters include decoding logic on the other end.
Workflow Processes
Workflows in CRM allow you to automate simple and complex business processes within CRM. You can either create workflows using CRM out-of-the-box functionalities or write custom workflows with .NET code for implementing complex workflows. Workflow processes run in the background or in real-time and can optionally require a user input.
Workflows can be triggered based on specific conditions or can even be started manually by the users. Internally, CRM workflows are implemented using Windows Workflow Foundation. In this chapter, we will be learning about configuring workflows.
Configuring a workflow has the following major parts (in sequence) −
- Configure the entity on which the workflow will run
- Configure whether the workflow will run synchronously or asynchronously
- Configure the message (event) on which the workflow will run
- Configure the scope in which the workflow will run
- Configure the stages and steps (actions) of the workflow
Synchronous/Asynchronous Workflow
When you create a workflow, you will see the option of Run this workflow in the background (recommended) which determines whether the workflow will run in real-time (synchronously) or in background (asynchronously).
Generally, the recommended approach is to run the workflows in the background since they use system resources as and when available. However, you can always switch back from a real-time workflow to background workflow and vice versa.
Workflow Messages
Workflows can be registered on specific events as follows −
- When a record is created
- When a record status changes
- When a record is assigned
- When a record field value changes
- When a record is deleted
Workflow Scope
Workflows allow you to set the scope in which the workflow will run. Following are the supported workflow scopes −
| User | Workflow will run only on the records owned by the same user as the workflow user. |
| Business Unit | Workflow will run on the records owned by the users of the business unit same as the workflow user. |
| Parent Child Business Units | Workflow will run on the records owned by the users of the business unit same as the workflow user as well as any child business units. |
| Organization | Workflow will run on records owned by any user in CRM. |
Workflow Steps
Workflows in CRM are a combination of series of steps which the workflow will follow. You can even divide these steps in logical stages. Following steps are supported by CRM workflows −
| Conditional Steps |
|
||||||||||||||
| Wait Steps |
|
||||||||||||||
| Action Steps |
|
Workflow Example
In this example, we will create a simple workflow that runs in the background to assign any newly created Contact record to a specific user and then send out a welcome email to the customer.
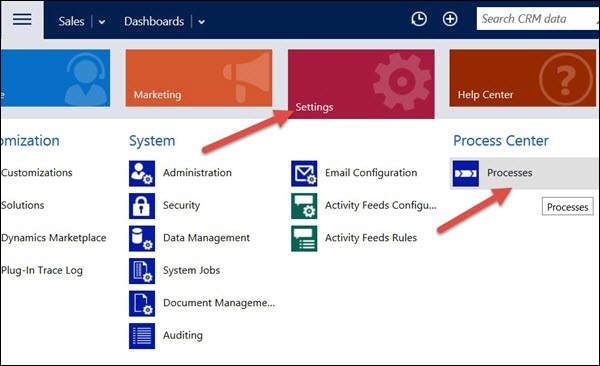
Step 1 − Go to Settings → Processes.
Step 2 − Click New.
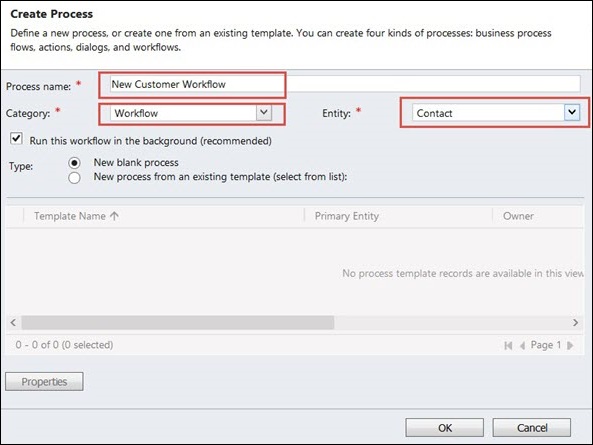
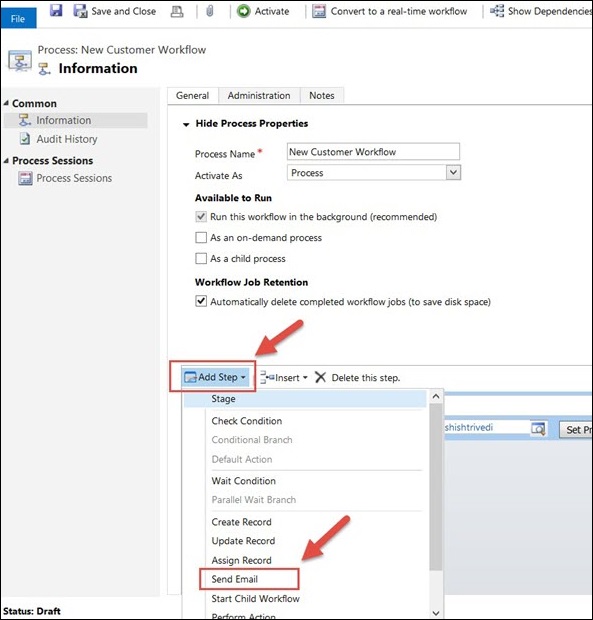
Step 3 − In the CreateProcess window, enter the following details −
Process Name − New Customer Workflow (This can be any name that you want)
Category − Workflow
Entity − Contact (This will be the entity on which you are creating the workflow. In our case it is Contact)
Run this workflow in the background (recommended) − Check this option as we are creating a background asynchronous workflow. Finally, click OK.
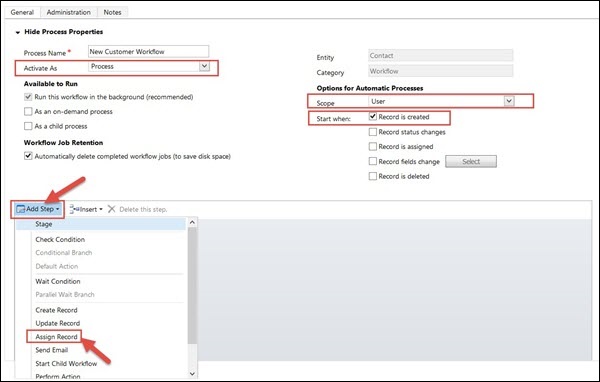
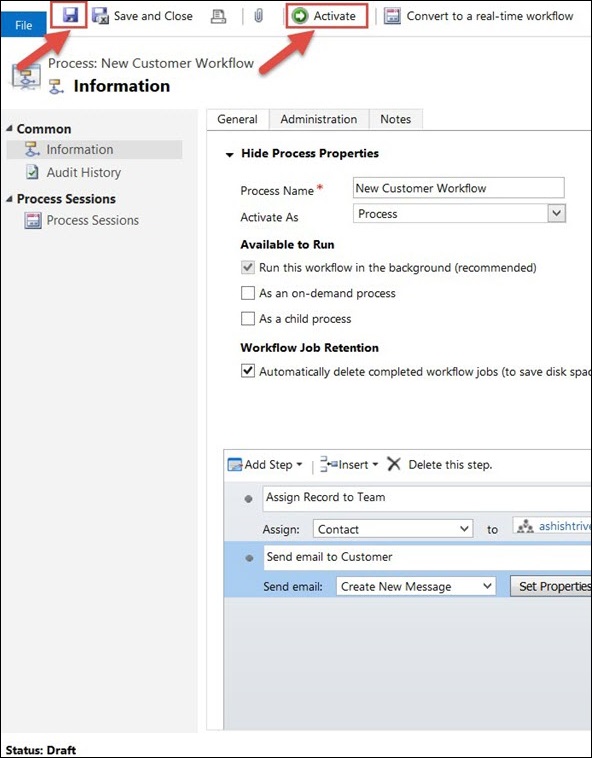
Step 4 − In the New Process Window enter the following details −
Activate As − Process
Scope − User
Start when − Record is created
Click Add Step → Assign Record.
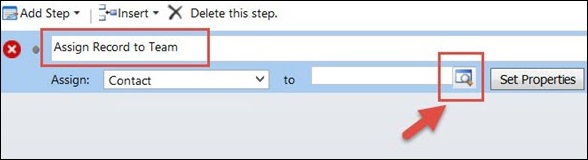
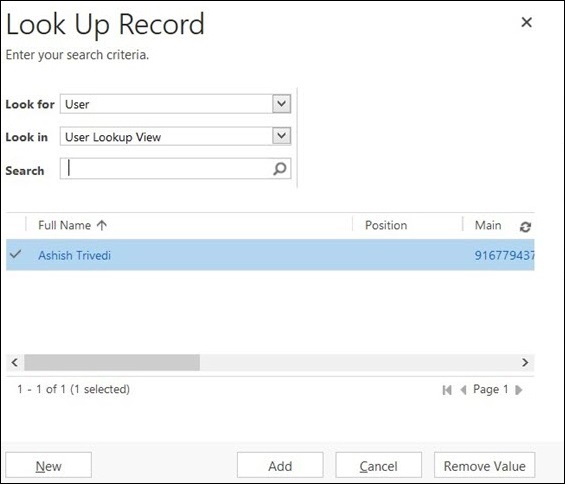
Step 5 − You will see a new step added to the workflow. In this step, we will specify the user to whom all the created contacts should be assigned. Enter the name of step as Assign Record to Team. The Assign option will be defaulted as the entity on which we are creating the workflow (Contact in our case). Click the Lookup icon.
Step 6 − In the Lookup window, select any user that you want. You can even select a specific team to whom you want to assign the records to. Click Add.
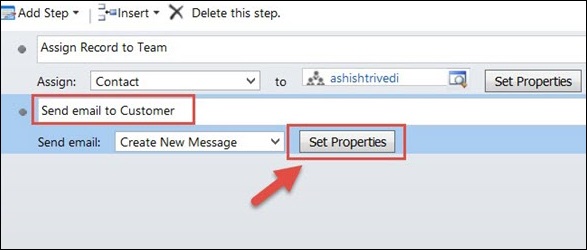
Step 7 − Add another step by clicking Add Step → Send Email. In this step, we will configure sending email to the customer.
Step 8 − A new step will be added. Enter its name as Send email to Customer. Click Set Properties.
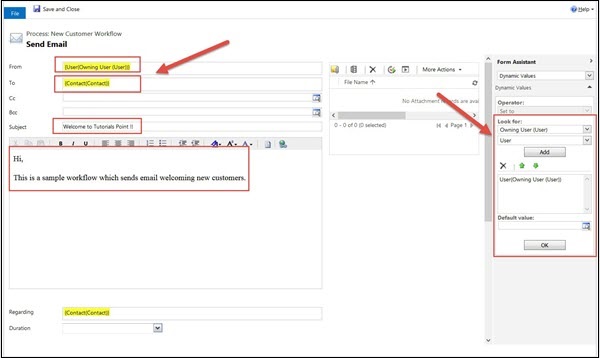
Step 9 − In the next window to configure email, perform the following operations−
From − Click From field. On the right panel, select OwningUser and User. Click Add → OK.
To − Click To field. On the right panel, select Contact and Contact. Click Add → OK.
Subject − Enter a relevant Subject.
Body − Enter a relevant Body content.
Step 10 − Click Save and then Activate.
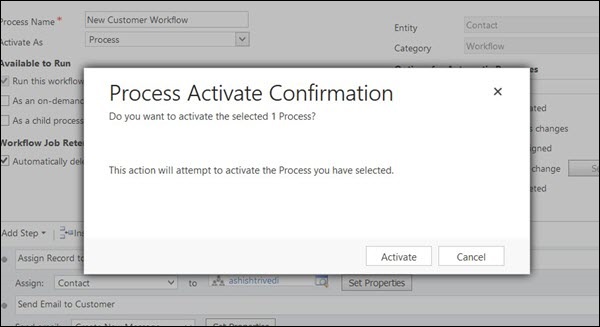
Step 11 − In the Process Activate Confirmation popup that follows, click Activate.
Step 12 − Go to Contacts tab and create a new contact. As soon as you create a new contact by saving the record, you will see the Owner field set to the user, which you had configured in the workflow. Also, if you click the Activities tab, you will see an email activity being created for this contact. This confirms that the workflow ran successfully.

Workflow vs Plugin
Workflows and plugins can both be used to extend and automate CRM functionalities. In many scenarios, both the approaches can be interchangeably used in place of each other. For example, if you have a simple requirement of sending an email to your customers, you can either do it via a plugin or a workflow.
So, how do you choose between creating a workflow vs plugin? The following list tries to explain the same −
Although plugins and workflows both can be used to run synchronous as well as asynchronous logic, plugins are generally preferred for synchronous logic, while workflows for asynchronous logic.
Generally, to implement complex business logic, plugins are preferred over workflows. Workflows are preferred when you want to achieve relatively easier functionalities (such as sending emails, assigning users, etc.)
Plugins need to be developed with coding, while workflows can be configured directly by business users without any knowledge of workflows.
Workflows can run on-demand. Hence, if there are requirements where the user wants to run some logic manually, workflows would be a better choice.
From performance impact, synchronous plugins provide a better performance (and throughput) as compared to real-time workflows in scenarios where the request frequency is higher.
Conclusion
This chapter introduced us to one of the very important functionalities of CRM Workflows. We first understood the sync/async workflows, messages, scope, steps and finally looked at a live example of creating and running a workflow. Finally, we saw the differences between a workflow and a plugin.
Microsoft Dynamics CRM - Plugins
A plug-in is a custom business logic that integrates with Microsoft Dynamics CRM to modify or extend the standard behavior of the platform. Plug-ins act as event handlers and are registered to execute on a particular event in CRM. Plugins are written in either C# or VB and can run either in synchronous or asynchronous mode.
Some scenarios where you would write a plugin are −
You want to execute some business logic such as updating certain fields of a record or updating related records, etc. when you create or update a CRM record.
You want to call an external web service on certain events such as saving or updating a record.
You want to dynamically calculate the field values when any record is opened.
You want to automate processes such as sending e-mails to your customers on certain events in CRM.
Event Framework
The Event Processing Framework in CRM processes the synchronous and asynchronous plugin requests by passing it to the event execution pipeline. Whenever an event triggers a plugin logic, a message is sent to the CRM Organization Web Service where it can be read or modified by other plugins or any core operations of the platform.
Plugin Pipeline Stages
The entire plugin pipeline is divided in multiple stages on which you can register your custom business logic. The pipeline stage specified indicates at which stage of the plugin execution cycle, your plugin code runs. Out of all the specified pipeline stages in the following table, you can register your custom plugins only on Pre- and Post-events. You cant register plugins on Platform Core Main Operations.
| Event | Stage Name | Description |
|---|---|---|
| Pre-Event | Pre-validation | Stage in the pipeline for plug-ins that are to execute before the main system operation. Plug-ins registered in this stage may execute outside the database transaction. |
| Pre-Event | Pre-operation | Stage in the pipeline for plug-ins that are to executed before the main system operation. Plugins registered in this stage are executed within the database transaction. |
| Platform Core Operation | MainOperation | Intransaction,the main operation of the system, such as create, update, delete, and so on. No custom plug-ins can be registered in this stage. For internal use only. |
| Post-Event | Post-operation | Stage in the pipeline for plug-ins which are to executed after the main operation. Plug-ins registered in this stage are executed within the database transaction. |
Whenever the CRM application invokes an event (like saving or updating a record), the following sequence of actions takes place −
The event triggers a Web service call and the execution is passed through the event pipeline stages (pre-event, platform core operations, post-event).
The information is internally packaged as an OrganizationRequest message and finally sent to the internal CRM Web service methods and platform core operations.
The OrganizationRequest message is first received by pre-event plugins, which can modify the information before passing it to platform core operations. After the platform core operations, the message is packaged as OrganizationResponse and passed to the post-operation plugins. The postoperations plugins can optionally modify this information before passing it to the async plugin.
The plugins receive this information in the form of context object that is passed to the Execute method after which the further processing happens.
After all the plugin processing completes, the execution is passed back to the application which triggered the event.
Plugin Messages
Messages are the events on which the plugin (or business logic) is registered. For example, you can register a plugin on Create Message of Contact entity. This would fire the business logic whenever a new Contact record is created.
For custom entities, following are the supported messages based on whether the entity is user-owned or organization-owned.
| Message Name | Ownership Type |
|---|---|
| Assign | User-owned entities only |
| Create | User-owned and organization-owned entities |
| Delete | User-owned and organization-owned entities |
| GrantAccess | User-owned entities only |
| ModifyAccess | User-owned entities only |
| Retrieve | User-owned and organization-owned entities |
| RetrieveMultiple | User-owned and organization-owned entities |
| RetrievePrincipalAccess | User-owned entities only |
| RetrieveSharedPrincipalsAndAccess | User-owned entities only |
| RevokeAccess | User-owned entities only |
| SetState | User-owned and organization-owned entities |
| SetStateDynamicEntity | User-owned and organization-owned entities |
| Update | User-owned and organization-owned entities |
For default out-of-the-box entities, there are more than 100 supported messages. Some of these messages are applicable for all the entities while some of them are specific to certain entities. You can find the complete list of supported message in an excel file inside the SDK: SDK\Message-entity support for plug-ins.xlsx
Writing Plugin
In this section, we will learn the basics of writing a plugin. We will be creating a sample plugin that creates a Task activity to follow-up with the customer whenever a new customer is added to the system, i.e. whenever a new Contactrecord is created in CRM.
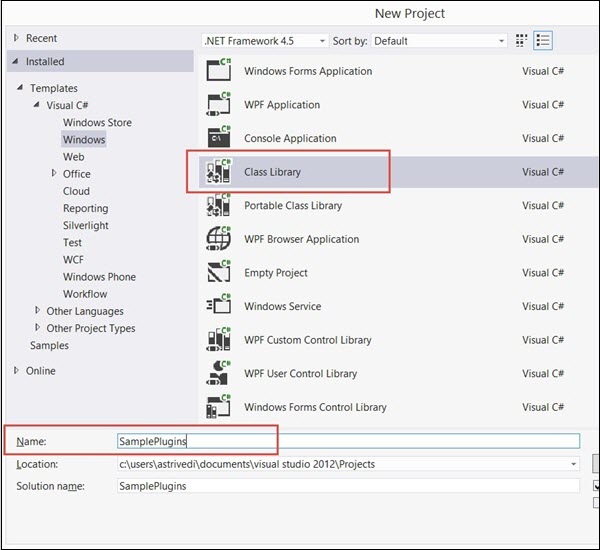
First of all, you would need to include the references to Microsoft.Xrm.Sdk namespace. The CRM SDK contains all the required SDK assemblies. Assuming that you have already downloaded and installed the SDK in Chapter 2, open Visual Studio. Create a new project of type Class Library. You can name the project as SamplePlugins and click OK.
Add the reference of Microsoft.Xrm.Sdk assembly to your project. The assembly is present in SDK/Bin.
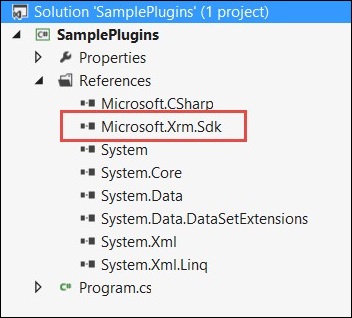
Now, create a class named PostCreateContact.cs and extend the class from IPlugin. Till now, your code will look something like the following.
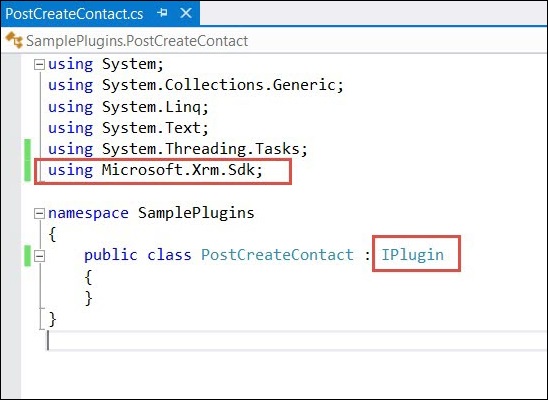
You will also need to add reference to System.Runtime.Serialization. Once you have added the required references, copy the following code inside the PostCreateContact class.
using System;
using System.Collections.Generic;
using System.Linq;
using System.Text;
using System.Threading.Tasks;
using Microsoft.Xrm.Sdk;

namespace SamplePlugins {
   public class PostCreateContact:IPlugin {
      /// A plug-in that creates a follow-up task activity when a new account is created.
      /// Register this plug-in on the Create message, account entity,
      /// and asynchronous mode.

      public void Execute(IServiceProviderserviceProvider) {
         // Obtain the execution context from the service provider.
         IPluginExecutionContext context =(IPluginExecutionContext)
            serviceProvider.GetService(typeof(IPluginExecutionContext));

         // The InputParameters collection contains all the data
            passed in the message request.

         if(context.InputParameters.Contains("Target")&&
            context.InputParameters["Target"]isEntity) {

            // Obtain the target entity from the input parameters.
            Entity entity = (Entity)context.InputParameters["Target"];
            try {

               // Create a task activity to follow up with the account customer in 7 days
               Entity followup = new Entity("task");
               followup["subject"] = "Send e-mail to the new customer.";
               followup["description"] =
                  "Follow up with the customer. Check if there are any new issues
                  that need resolution.";

               followup["scheduledstart"] = DateTime.Now;
               followup["scheduledend"] = DateTime.Now.AddDays(2);
               followup["category"] = context.PrimaryEntityName;

               // Refer to the contact in the task activity.
               if(context.OutputParameters.Contains("id")) {
                  Guid regardingobjectid = new Guid(context.OutputParameter
                     s["id"].ToString());
                  string regardingobjectidType = "contact";
                  followup["regardingobjectid"] =
                     new EntityReference(rega rdingobjectidType,regardingobjectid);
               }

               // Obtain the organization service reference.
               IOrganizationServiceFactory serviceFactory =
                  (IOrganizationSer viceFactory)serviceProvider.GetService
                  (typeof(IOrganizationServiceFactory));
               IOrganizationService service =
                  serviceFactory.CreateOrganizationService(context.UserId);

               // Create the followup activity
               service.Create(followup);
            } catch(Exception ex) {
               throw new InvalidPluginExecutionException(ex.Message);
            }
         }
      }
   }
}
Following is a step-by-step explanation of what this code does −
Step 1 − Implements the Execute method by taking IServiceProvider object as its parameter. The service provider contains references to many useful objects that you are going to use within plugin.
Step 2 − Obtains the IPluginExecutionContext object using the GetService method of IServiceProvider.
Step 3 − Gets the target entitys object from the context objects InputParameters collection. This Entity class object refers to the Contact entity record on which our plugin would be registered.
Step 4 − It then creates an object of Task entity and sets proper subject, description, dates, category and regardingobjectid. The regardingobjectid indicates for which contact record this activity record is being created. You can see that the code gets the id of the parent Contact record using context.OutputParameters and associates it with the Task entity record which you have created.
Step 5 − Creates object of IOrganizationServiceFactory using the IServiceProvider object.
Step 6 − Creates object of IOrganizationService using the IOrganizationServiceFactory object.
Step 7 − Finally, using the Create method of this service object. It creates the follow-up activity which gets saved in CRM.
Signing the Plugin Assembly
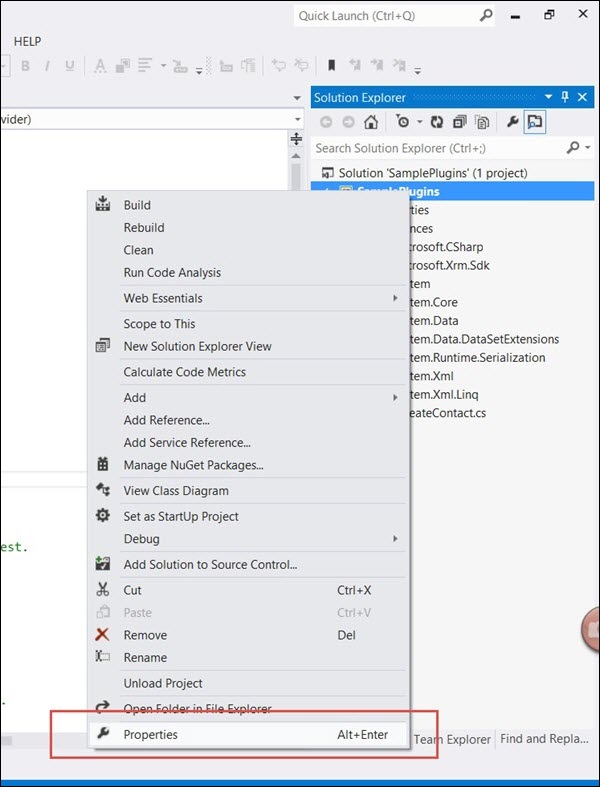
This section is applicable only if you are registering your plugin assembly for the first time. You need to sign in the assembly with a key to be able to deploy the plugin. Rightclick the solution and click Properties.
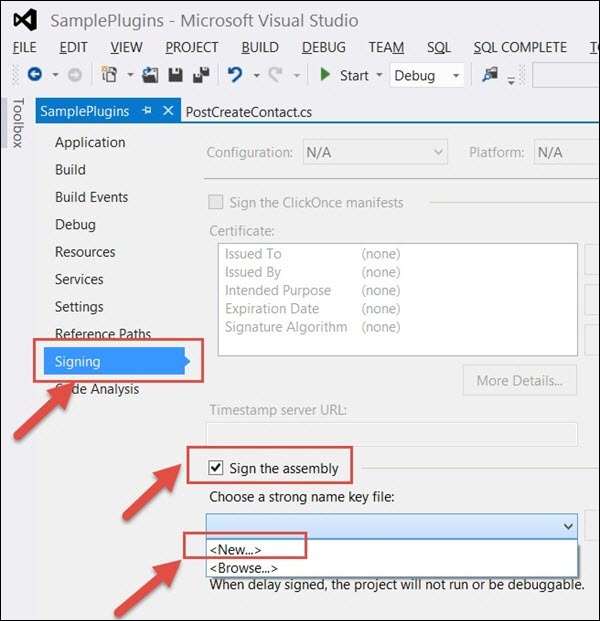
Select the Signing tab from the left options and check the Sign the assembly option. Then, select New from Choose a strong name key file option.
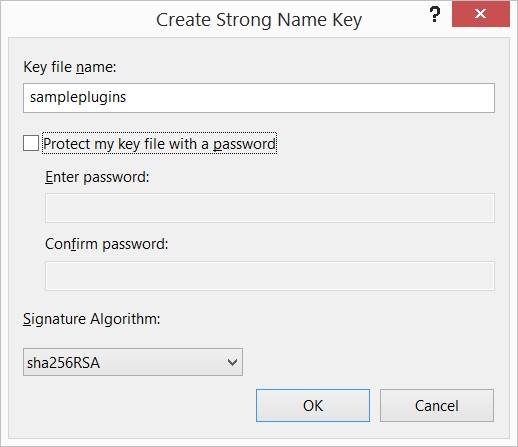
Enter the Key file name as sampleplugins (This can be any other name you want). Uncheck the Protect my key file with a password option and click OK. Click Save.
Finally, build the solution. Right Click → Build. Building the solution will generate assembly DLL, which we will use in the next chapter to register this plugin.
Exception Handling in Plugin
More often than not, your plugin logic will need to handle run-time exceptions. For synchronous plugins, you can return an InvalidPluginExecutionException exception, which will show an error dialog box to the user. The error dialog will contain the custom error message that you pass to the Message object of the exception object.
If you look at our code, we are throwing the InvalidPluginExecutionException exception in our catch block.
throw new InvalidPluginExecutionException(ex.Message);
Conclusion
Plugins are definitely crucial to any custom CRM implementation. In this chapter, we focused on understanding the event framework model, pipeline stages, messages, and writing a sample plugin. In the next chapter, we will register this plugin in CRM and see it working from end-to-end scenario.
Plugin Registration
In the last chapter, we created a sample plugin to create a follow-up Task activity when a Contact record is created. In this chapter, we will see how to register this plugin in CRM using Plugin Registration Tool. You can find the tool at this location: SDK/Tools/PluginRegistration/PluginRegistration.exe.
For convenience, the plugin registration process is divided into three sections −
- Connecting to the Server
- Registering the Assembly
- Registering the Plugin
Connecting to the Server
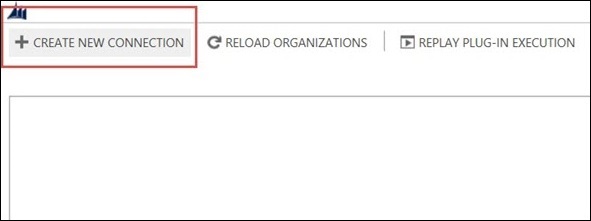
Step 1 − Run the PluginRegistration.exe from the location specified earlier. Click the Create New Connection button.
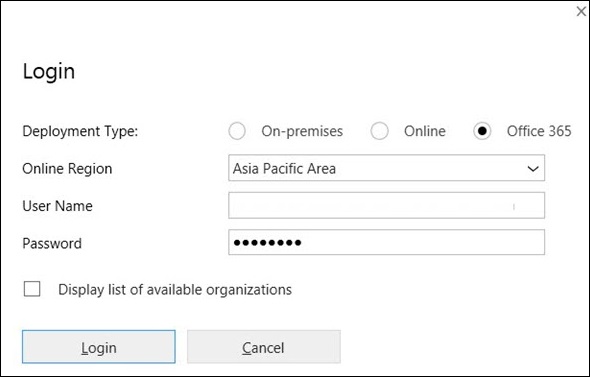
Step 2 − In the Login window, choose Office 365 since we are using the online version of CRM. Enter your credentials and click Login.
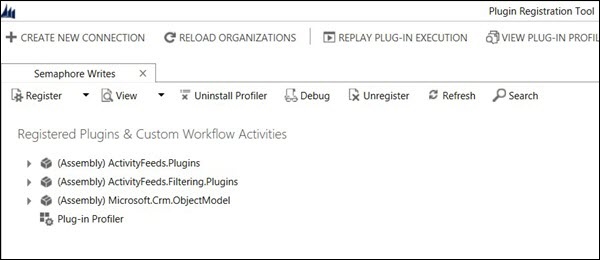
Step 3 − The tool will open and look like the following screenshot.
Registering the Assembly
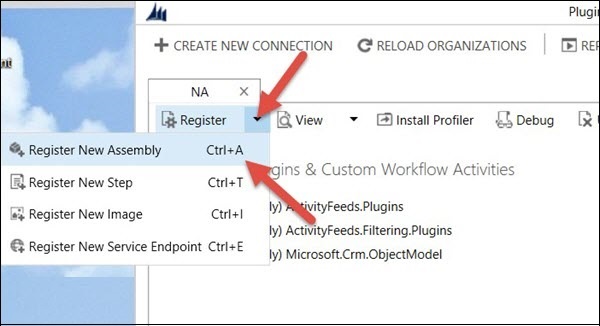
Step 1 − Go to Register → Register New Assembly.
Step 2 − This will open the Register New Assembly window. Click the Navigate icon and locate the Plugin DLL that you created in the last chapter.
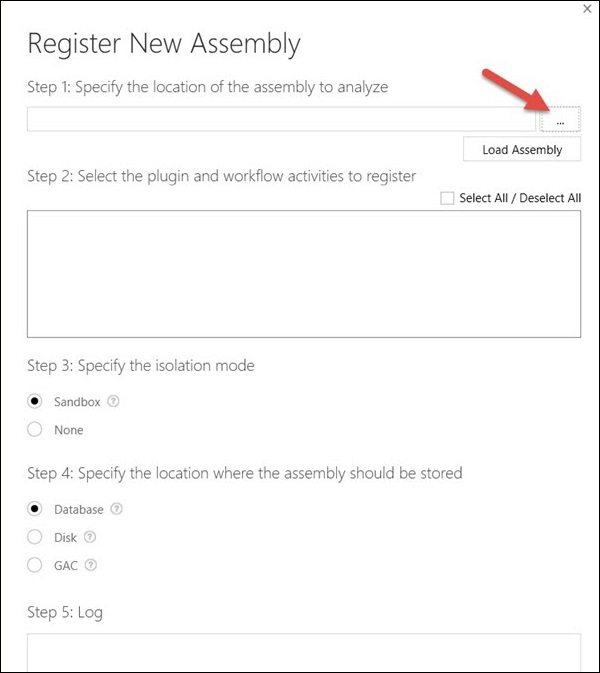
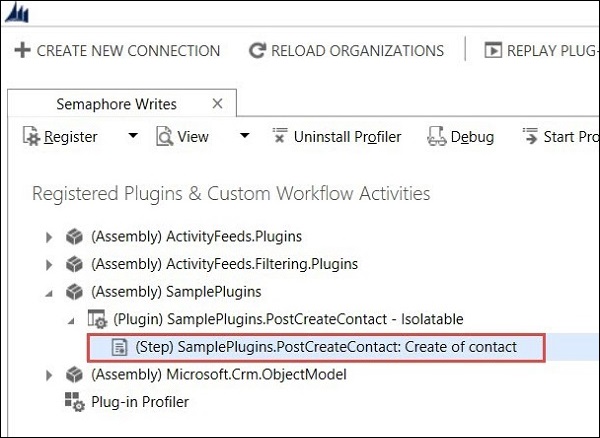
Step 3 − After navigating the DLL, click Load Assembly. This will populate the SamplePlugins assembly and all its plugin classes. You can see the PostCreateContact plugin class highlighted below. If your plugin assembly had 3 plugin classes, it would have shown three plugins listed there.
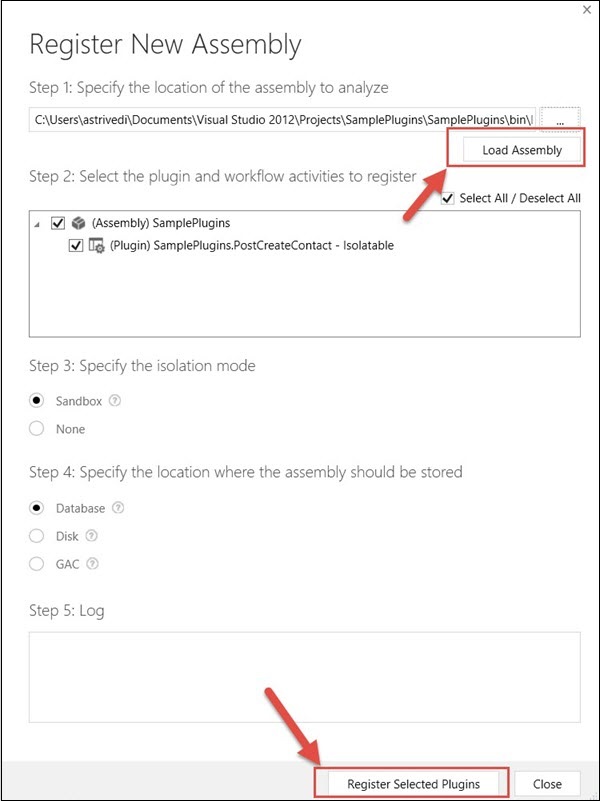
Step 4 − Select Isolation Mode as Sandbox, Location as Database and click Register Selected Plugins. It will show you a success message, if the registration is successful.
Registering the Plugin
Now we will be registering the specific steps on which the individual plugins will be called.
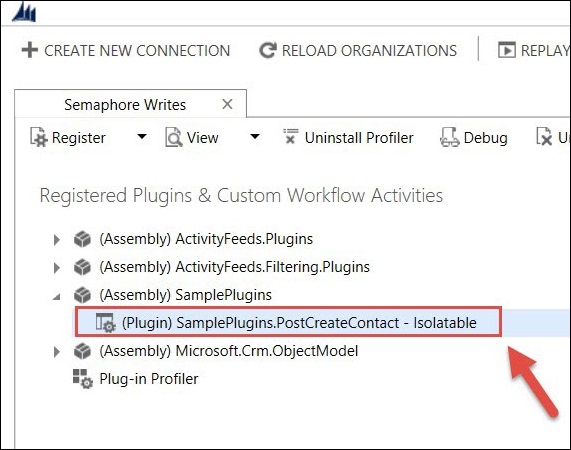
Step 1 − Select the PostCreateContact plugin.
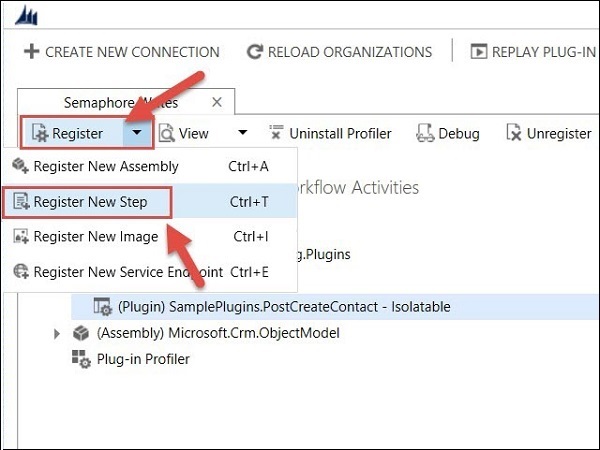
Step 2 − Click Register → Register New Step.
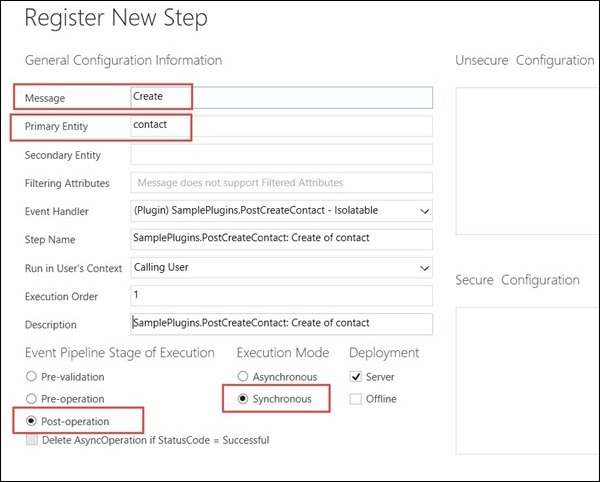
Step 3 − We will be registering this plugin on the creation of the Contact entity, on postoperation stage and in the synchronous mode.
Message − Create
Primary Entity − Contact
Event Pipeline Stage of Execution − Post-operation
Execution Mode − Synchronous
Keep the rest of the options by default and click Register New Step.
You can see a new step added to the plugin.
Now we will go to CRM and test if our plugin is working correctly. Note that these test steps are specific to our example plugin.
Testing the Plugin
Go to Contacts tab and create a new record. Once you save the record, you can see a new activity created and associated with this record.
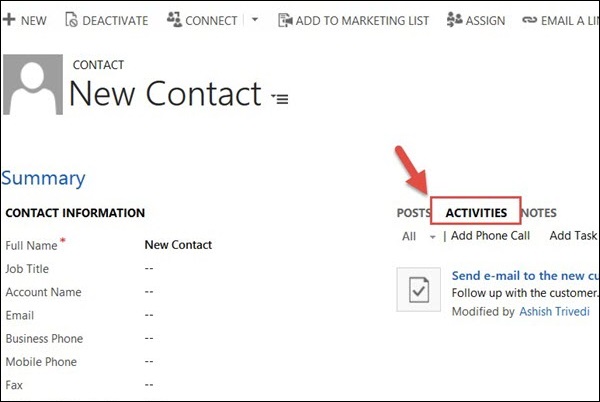
You can click the activity to see the details that we had set in the code.
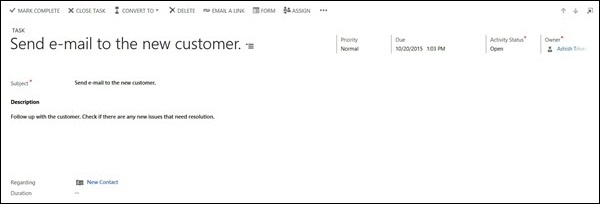
This confirms that our plugin ran successfully. Similarly, you can extend your plugins to achieve highly complex functionalities.
Microsoft Dynamics CRM - Web Services
Microsoft Dynamics CRM provides two important web services that are used to access CRM from an external application and invoke web methods to perform common business data operations such as create, delete, update, and find in CRM.
Consider the following scenarios −
You have an external .NET application, which needs to talk to CRM. For example, you may want to insert a Contact record in CRM when a new customer is registered in your external application.
Or maybe, you want to search records in CRM and display the search results in your external application.
In such scenarios, you can use the web services exposed by CRM to consume them in your application and perform create, delete, update, and find operations in CRM.
IDiscoveryService Web Service
This web service returns a list of organizations that the specified user belongs to and the URL endpoint for each of the organization.
IOrganizationService Web Service
This web service is the primary web service used for accessing data and metadata in CRM. The IOrganizationService uses two important assemblies Microsoft.Xrm.Sdk.dll and Microsoft.Crm.Sdk.Proxy.dll. These assemblies can be found in the CRM SDK package inside the Bin folder.
Microsoft.Xrm.Sdk.dll
This assembly defines the core xRM methods and types, including proxy classes to make the connection to Microsoft Dynamics CRM simpler, authentication methods, and the service contracts.
Microsoft.Crm.Sdk.Proxy.dll
This assembly defines the requests and responses for non-core messages as well as enumerations required for working with the organization data. Following are the namespaces supported by these two assemblies.
Each of these assemblies support certain messages, which will be used to work with the data stored in any entity. A complete list of messages supported by them can be found in the following links −
Supported xRM Messages − https://msdn.microsoft.com/en-us/library/gg334698.aspx
Supported CRM Messages − https://msdn.microsoft.com/en-us/library/gg309482.aspx
IOrganizationService Web Service Methods
The IOrganizationService provides eight methods that allows you to perform all the common operations on the system and custom entities as well as organization metadata.
| Sr.No | Method & Description |
|---|---|
| 1 | IOrganizationService.Create Creates a record. |
| 2 | IOrganizationService.Update Updates an existing record. |
| 3 | IOrganizationService. Retrieve Retrieves a record. |
| 4 | IOrganizationService. RetrieveMultiple Retrieves a collection of records. |
| 5 | IOrganizationService. Delete Deletes a record. |
| 6 | IOrganizationService. Associate Creates a link between records. |
| 7 | IOrganizationService.Disassociate Deletes a link between records. |
| 8 | IOrganizationService.Execute Used for common record processing as well as specialized processing such as case resolution, duplicate detection, etc. |
Web Service Example
To understand how the web services work in CRM, we will look at an example provided by CRM SDK. In this example, we will create a new Account record, update it, and then finally delete it using the CRM IOrganizationService web service.
Step 1 − Open the folder where you had extracted CRM SDK. Now open the QuickStartCS.sln solution by browsing to the following location:SDK\SampleCode\CS\QuickStart
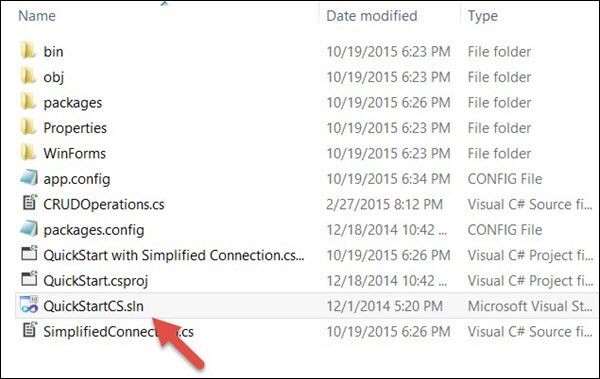
Step 2 − We will be exploring the QuickStart with Simplified Connection project. Open app.config in this project. By default, the connectionStrings section in this file will be commented.
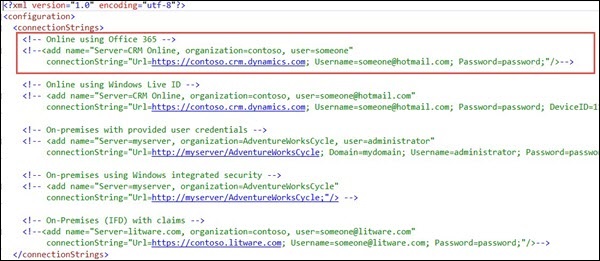
From this, uncomment the first connection string key and edit the following three details −
Url − Specify the URL of your CRM instance. In our case, since we are using the online version of CRM, you will have to mention that URL.
Username − Your CRM Online user name.
Password − Your CRM Online password.

Step 3 − Open the SimplifiedConnection.cs file in this project and Runmethod inside it.
public void Run(StringconnectionString, boolpromptforDelete) {
   try {

      // Establish a connection to the organization web service using CrmConnection.
      Microsoft.Xrm.Client.CrmConnection connection =
         CrmConnection.Parse(connectionString);

      // Obtain an organization service proxy.
      // The using statement assures that the service proxy will be properly disposed.
      using(_orgService = new OrganizationService(connection)) {

         //Create any entity records this sample requires.
         CreateRequiredRecords();

         // Obtain information about the logged on user from the web service.
         Guid userid = ((WhoAmIResponse)_orgService.Execute(new WhoAmIRequest())).UserId;
         SystemUser systemUser = (SystemUser)_orgService.Retrieve("systemuser",userid,
            new ColumnSet(newstring[]{"firstname","lastname"}));

         Console.WriteLine("Logged on user is {0} {1}.",
            systemUser.FirstName,systemUser.LastName);

         // Retrieve the version of Microsoft Dynamics CRM.
         RetrieveVersionRequest versionRequest = new RetrieveVersionRequest();
         RetrieveVersionResponse versionResponse =
            (RetrieveVersionResponse)_orgService.Execute(versionRequest);
         Console.WriteLine("Microsoft Dynamics CRM version {0}.",
            versionResponse.Version);

         // Instantiate an account object. Note the use of option set
         enumerations defined in OptionSets.cs.

         // Refer to the Entity Metadata topic in the SDK documentation to
         determine which attributes must

         // be set for each entity.
         Account account = new Account{Name = "Fourth Coffee"};
         account.AccountCategoryCode = new OptionSetValue(
            (int)AccountAccountCateg oryCode.PreferredCustomer);
         account.CustomerTypeCode = new OptionSetValue(
            (int)AccountCustomerTypeCod e.Investor);

         // Create an account record named Fourth Coffee.
         _accountId = _orgService.Create(account);
         Console.Write("{0} {1} created, ",account.LogicalName,account.Name);

         // Retrieve the several attributes from the new account.
         ColumnSet cols = new ColumnSet(
            new String[]{"name","address1_postalcode","lastusedincampaign"});
         Account retrievedAccount =
            (Account)_orgService.Retrieve("account", _accountId, cols);
         Console.Write("retrieved, ");

         // Update the postal code attribute.
         retrievedAccount.Address1_PostalCode = "98052";

         // The address 2 postal code was set accidentally, so set it to null.
         retrievedAccount.Address2_PostalCode = null;

         // Shows use of a Money value.
         retrievedAccount.Revenue = new Money(5000000);

         // Shows use of a Boolean value.
         retrievedAccount.CreditOnHold = false;

         // Update the account record.
         _orgService.Update(retrievedAccount);
         Console.WriteLine("and updated.");

         // Delete any entity records this sample created.
         DeleteRequiredRecords(promptforDelete);
      }
   }
   // Catch any service fault exceptions that Microsoft Dynamics CRM throws.
   catch(FaultException<microsoft.xrm.sdk.organizationservicefault>) {

      // You can handle an exception here or pass it back to the calling method.
      throw;
   }
}
Step 4 − This method basically demonstrates all the CRUD operations using CRM web services. The code first creates an organization instance, then creates an Account record, updates the created record and then finally deletes it. Let us look at the important components of this code. To see on-the-go changes in CRM when this code runs, you can debug this code step-by-step (as we discuss below) and simultaneously see the changes in CRM.
Step 4.1 − Establishes the connection to the organization using the connection string that we had modified in Step 2.
Microsoft.Xrm.Client.CrmConnection connection = CrmConnection.Parse(connectionString);
Step 4.2 − Obtains a proxy instance of CRM organization web service.
_orgService = new OrganizationService(connection)
Step 4.3 − Creates a new Account entity object and sets its Name, AccountCategoryCode and CustomerTypeCode.
Account account = new Account{Name = "Fifth Coffee"};
account.AccountCategoryCode = new OptionSetValue(
   (int)AccountAccountCategoryCode.P referredCustomer);
account.CustomerTypeCode = new OptionSetValue(
   (int)AccountCustomerTypeCode.Investor);
Step 4.4 − Creates the new record using the Create method of organization service.
_accountId = _orgService.Create(account);
If you navigate to CRM, you will see a newly created account record.

Step 4.5 − Once the account gets created, the service retrieves back the record from CRM using Retrieve web service method.
ColumnSet cols = new ColumnSet(new String[]{
   "name","address1_postalcode","lastusedincampaign"});
Account retrievedAccount =
   (Account)_orgService.Retrieve("account", _accountId, cols);
Step 4.6 − Once you have the retrieved record, you can set the updated value of the record.
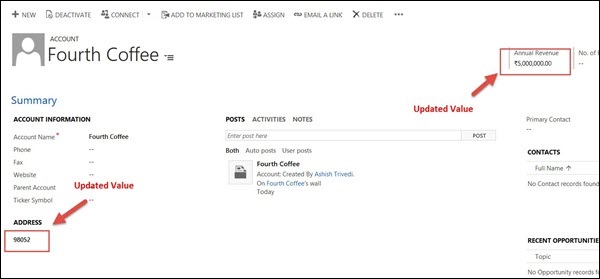
retrievedAccount.Address1_PostalCode = "98052";
retrievedAccount.Address2_PostalCode = null;
retrievedAccount.Revenue = new Money(5000000);
retrievedAccount.CreditOnHold = false;
Step 4.7 − After setting the updated value of the record, update the record back to CRM database using the Update web service method.
_orgService.Update(retrievedAccount);
If you open the record in CRM, you will see these values updated there.
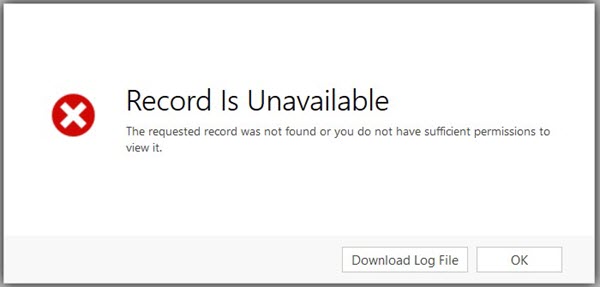
Step 4.8 − Finally, delete the record using the Delete web service method.
_orgService.Delete(Account.EntityLogicalName, _accountId);
If you now refresh the same record in CRM, you will see that the record is no more available since it is already deleted.
Conclusion
In this chapter, we dealt with two important web services provided by CRM and a working example of how these web services can be used from an external application to perform various CRUD operations.
Microsoft Dynamics CRM - Solutions
Solutions provide a framework for packaging, installing, and uninstalling components to match your business functionalities. Solutions allow the customizers and developers to author, package, and maintain units of software that extend CRM. Any customizations, extensions, or configurations performed in CRM are packaged, managed, and distributed using solutions. The solutions can be exported as a zip file from the source organization, which can then be imported in the target organization.
For understanding this, consider the following example scenarios −
You, as a developer or customizer, have extended or customized CRM in the development environment. Now you want to package your changes and move it to the next environment. For this, you can create individual solutions and publish them in higher environments.
You, as a third party CRM provider, have created a CRM module, which allows managing data in Microsoft Dynamics CRM entities using external Web service APIs. Now, you want to sell this module to other clients. Using solutions, you can package this module and distribute them to other clients who will be able to install this solution and use the functionalities provided by your module.
Types of Solutions
Default System Solution
The system solution contains the out-of-the-box solution components defined within Microsoft Dynamics CRM without any customizations. Many of the components in the system solution are customizable and can be used in managed solutions or unmanaged customizations.
Throughout this tutorial, we did not create any solution and were customizing the default system solution. If you recall, we went to Settings → Customizations → Customize the System. This option directly customizes the default solution.
Managed Solution
A managed solution is a solution that is completed and intended to be distributed and installed. Managed solutions can be installed on the top of the system solution or other managed solutions.
Important Points −
If you export a managed solution from one organization and import it to another, you cant edit the solution in the new organization.
A managed solution does not directly reference the system solution.
Uninstalling a managed solution uninstalls all the customizations associated with the solution.
By default, a managed solution cant be customized in the target organization. However, using the concept of managed properties you can define whether a solution component will be customizable and if yes, then which specific parts of the component will be customizable once the solution gets exported as a managed solution.
Unmanaged Solution
An unmanaged solution is a solution that is still under development and not intended to be distributed. An unmanaged solution contains all the unmanaged customizations of CRM components including any added, modified, removed, or deleted components. By default, any new solution is an unmanaged solution. However, you can export an unmanaged solution as a managed or unmanaged solution.
Important Points −
If you export an unmanaged solution from one organization and import it to another, you can edit the solution in the new organization.
An unmanaged solution directly references the system solution. Hence, the changes made to one unmanaged solution will be applied to all the unmanaged solutions that references the same components, including the system solution.
If you delete a solution component from an unmanaged solution, the component gets deleted permanently from the system and will no longer be available. In case you just want to remove the component from specific unmanaged solution, use remove instead of delete.
Uninstalling an unmanaged solution does not remove the associated customizations. It just deletes the solution from the system, but the changes you made will still be there.
Solution Components
A solution can be used to package the following components which can be customized using default, unmanaged, or managed solutions.
| Component Type | Component |
|---|---|
| Schema | Entities |
| Attributes | |
| Relationships | |
| Global Option Sets | |
| User Interface | Application Ribbon |
| SiteMap | |
| Forms | |
| Entity Ribbons | |
| Web Resources | |
| Analytics | Dashboards |
| Reports | |
| Visualizations | |
| Process/Code | Processes |
| Dialogs | |
| Workflows | |
| Plugins | |
| Assemblies | |
| Processing Steps | |
| Templates | Mail-merge |
| Contract | |
| Article | |
| Security | Security Roles |
| Field Level Security Profiles |
Creating a Solution
Step 1 − Navigate to Settings → Solutions. Click New.
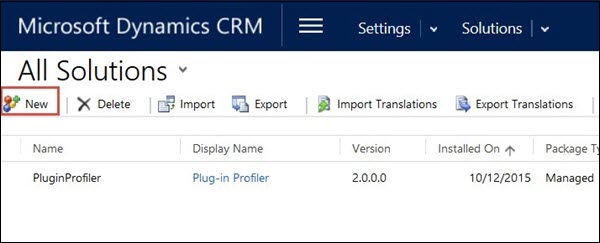
Step 2 − In the window that follows, enter the following details and click Save and Close.
Display Name − Sample Solution (This can be any name that you want).
Name − Will be automatically set based on the Display Name. However, you can change this.
Publisher − Default Publisher. Solution publisher provides a common customization prefix and option value prefix. Defining a solution publisher controls how your managed solutions can be updated once distributed. However, for this example and for most of the general cases, you can set this as Default Publisher.
Version − Specify a version with the following format: major.minor.build.revision. For example: 1.0.0.0.
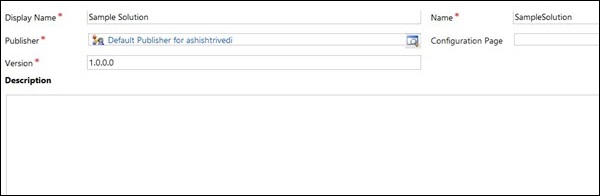
By default, every solution is added as an unmanaged solution. Once a solution is added, you can add solution components by creating them in the context of this solution or by adding the existing components from other solutions. For example, you can create new entities, forms, etc. in the context of this new solution.
Exporting a Solution
Once you have all the changes in place that you want to package as a managed or unmanaged solution, you can export your solution as follows.
Step 1 − Open the source organization and navigate to Settings → Solutions. Select the solution that you want to export and click the Export button.
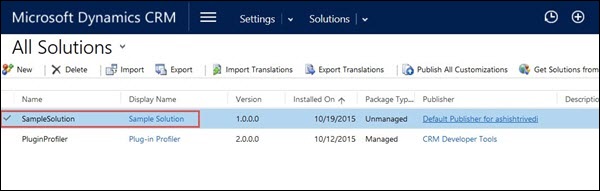
Step 2 − In the Publish Customizations window, click Publish All Customizations and then click Next.
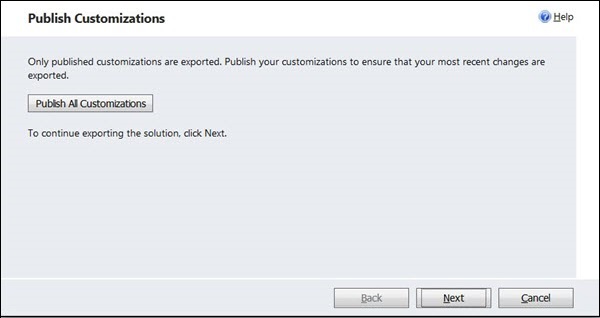
Step 3 − In the window that follows, you can optionally select any system setting such as auto-numbering, calendar settings, etc. to be exported with the solution. For now, you can avoid selecting any option and click Next.
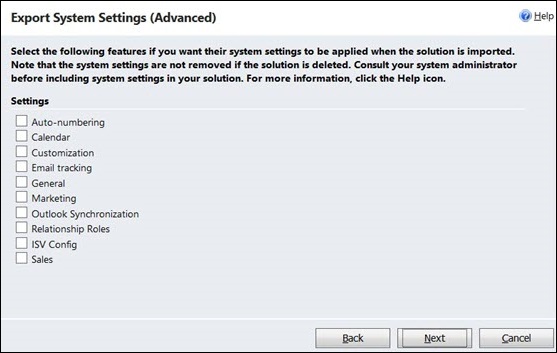
Step 4 − In the Package Type window, you can select whether you want to export the package as a managed or unmanaged solution. For this example, let us export it as unmanaged. Once done, click Next.

Step 5 − In the next window, you can see the source version of CRM that you are using and can select the target version. Click Export.
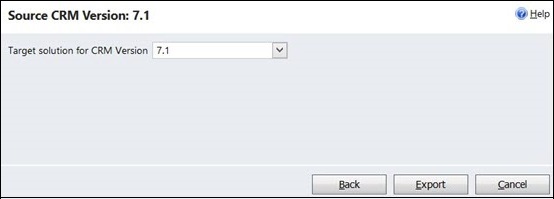
Step 6 − Once you click Export, the solution will be exported as a zip file. Save this zip file at a desired location on your system.
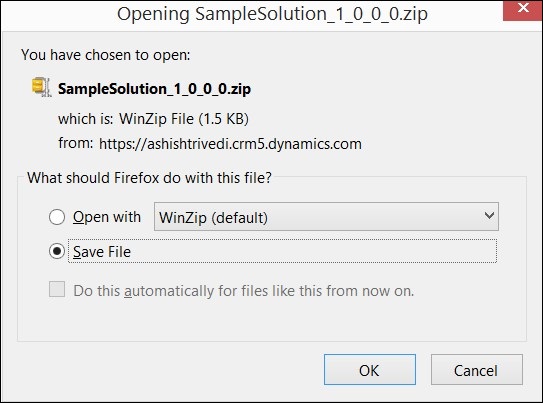
Importing a Solution
Now, we will import the solution zip file that we exported in the previous section to a new target organization.
Step 1 − Open the target organization and navigate to Settings → Solutions. Click Import.
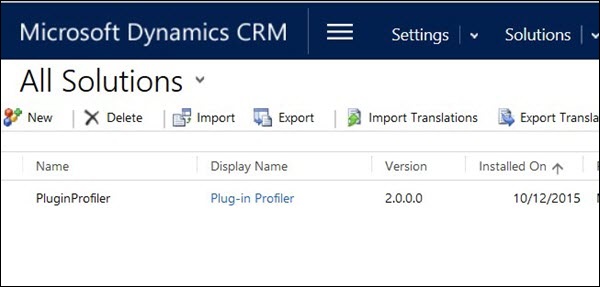
Step 2 − Browse the zip file that you downloaded from the export step and click Next.
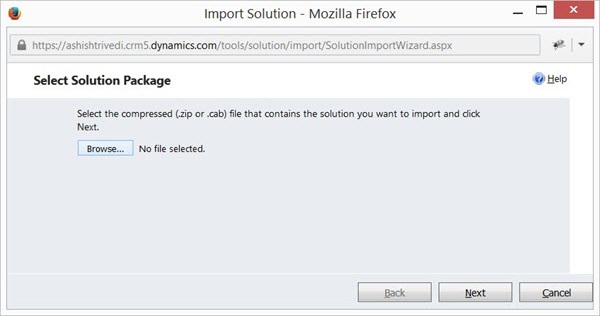
Step 3 − From the next window, you can view the solution package details if needed. Clicking Import will start the solution import process.
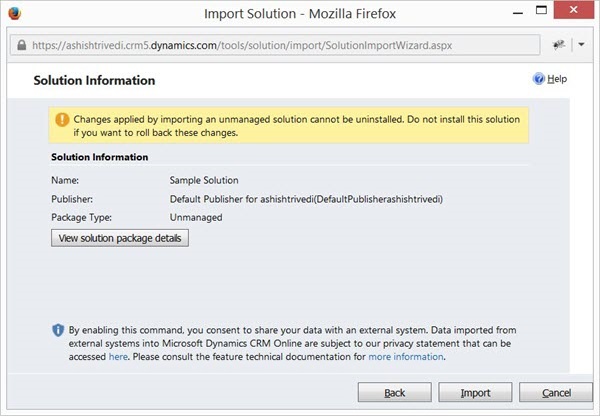
Step 4 − Once the import process completes, it will show the status of success or failure. If the process succeeds, click Publish All Customizations. In case the solution importing fails, it will give you a detailed error log on which step of the import process failed.
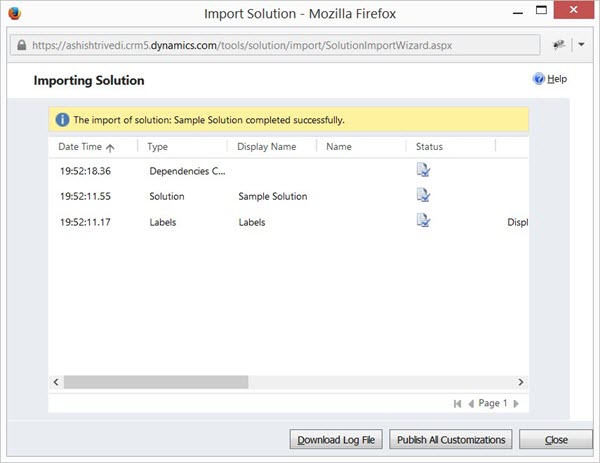
Step 5 − Were done. The solution will be successfully imported to the target organization. Click Close.
Conflict Resolution
Since you can have multiple developers working on customizing and extending CRM, you will have multiple managed and unmanaged solutions. Exporting and importing these solutions can sometimes result in conflict scenarios. For example, suppose Solution A contains a field on a form while Solution B has removed the field and Solution C has renamed the field. In this scenario, what would be the final change? In such conflicting scenarios, CRM uses two approaches.
Merge − This approach is used for user interface components such as command bar, ribbons and site maps. As per this approach, the solution components are re-calculated from the bottom and the organizations unmanaged customizations are the last to apply.
Top Wins − This approach is used for all other conflict scenarios except the user interface components. As per this approach, the last change (either managed or unmanaged) takes the priority and gets applied.
Conclusion
In this chapter, we introduced the concept of solutions and different types of solution and their components. We then learnt how to create, export, and import a solution. Finally, we studied about the two conflict resolution strategies, which takes place when we have multiple managed and unmanaged solution affecting the same solution components.
