- Microservice Architecture - Home
- Introduction
- Microservice Architecture - Scaling
- Microservice Architecture - Blueprint
- Different Elements
- Composition Patterns
- Hands-On SOA
- Hands-On MSA
Microservice Architecture - Quick Guide
Microservice Architecture - Introduction
Microservice is a service-based application development methodology. In this methodology, big applications will be divided into smallest independent service units. Microservice is the process of implementing Service-oriented Architecture (SOA) by dividing the entire application as a collection of interconnected services, where each service will serve only one business need.
The Concept of Going Micro
In a service-oriented architecture, entire software packages will be sub-divided into small, interconnected business units. Each of these small business units will communicate to each other using different protocols to deliver successful business to the client. Now the question is, how Microservice Architecture (MSA) differs from SOA? In one word, SOA is a designing pattern and Microservice is an implementation methodology to implement SOA or we can say Microservice is a type of SOA.
Following are some rules that we need to keep in mind while developing a Microservice-oriented application.
Independent − Each microservice should be independently deployable.
Coupling − All microservices should be loosely coupled with one another such that changes in one will not affect the other.
Business Goal − Each service unit of the entire application should be the smallest and capable of delivering one specific business goal.
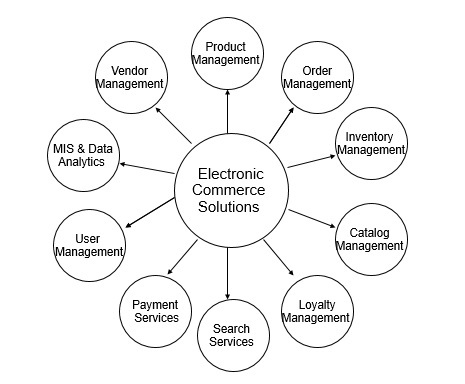
Let us consider an example of online shopping portal to understand microservice in depth. Now, let us break this entire E-commerce portal into small business units such as user management, order management, check-in, payment management, delivery management, etc. One successful order needs to proceed through all of these modules within a specific time frame. Following is the consolidated image of different business units associated with one electronic commerce system.
Each of these business modules should have its own business logic and stakeholders. They communicate with other third party vendor softwares for some specific needs, and also with each other. For example, order management may communicate with user management to get user information.
Now, considering you are running an online shopping portal with all of these business units mentioned earlier, you do need some enterprise level application consisting of different layers such as front-end, back-end, database, etc. If your application is not scaled and completely developed in one single war file, then it will be called as a typical monolithic application. According to IBM, a typical monolithic application should possess the following module structure internally where only one endpoint or application will be responsible to handle all user requests.
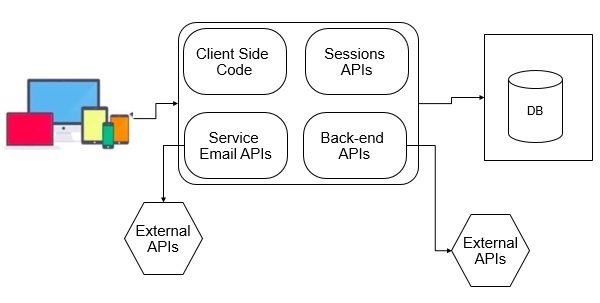
In the above image, you can see different modules such as Database for storing different users and business data. At the front-end, we have different device where we usually render user or business data to use. In the middle, we have one package that can be a deployable EAR or WAR file that accepts request form the users end, processes it with the help of the resources, and renders it back to the users. Everything will be fine until business wants any changes in the above example.
Consider the following scenarios where you have to change your application according to the business needs.
Business unit needs some changes in the Search module. Then, you need to change the entire search process and redeploy your application. In that case, you are redeploying your other units without any changes at all.
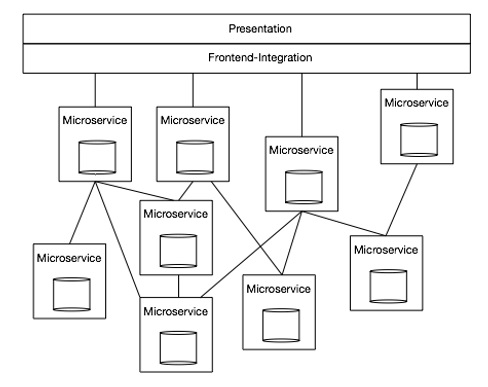
Now again your business unit needs some changes in Check out module to include wallet option. You now have to change your Check out module and redeploy the same into the server. Note, you are redeploying the different modules of your software packages, whereas we have not made any changes to it. Here comes the concept of service-oriented architecture more specific to Microservice architecture. We can develop our monolithic application in such a manner that each and every module of the software will behave as an independent unit, capable of handling a single business task independently.
Consider the following example.
In the above architecture, we are not creating any ear file with compact end-to-end service. Instead, we are dividing different parts of the software by exposing them as a service. Any part of the software can easily communicate with each other by consuming respective services. That's how microservice plays a great role in modern web application.
Let us compare our shopping cart example in the line of microservice. We can break down our shopping cart in the different modules such as Search, Filter, Checkout, Cart, Recommendation, etc. If we want to build a shopping cart portal then we have to build the above-mentioned modules in such a manner that they can connect to each other to give you a 24x7 good shopping experience.
Advantages & Disadvantages
Following are some points on the advantages of using microservice instead of using a monolithic application.
Advantages
Small in size − Microservices is an implementation of SOA design pattern. It is recommended to keep your service as much as you can. Basically, a service should not perform more than one business task, hence it will be obviously small in size and easy to maintain than any other monolithic application.
Focused − As mentioned earlier, each microservice is designed to deliver only one business task. While designing a microservice, the architect should be concerned about the focal point of the service, which is its deliverable. By definition, one microservice should be full stack in nature and should be committed to delivering only one business property.
Autonomous − Each microservice should be an autonomous business unit of the entire application. Hence, the application becomes more loosely coupled, which helps to reduce the maintenance cost.
Technology heterogeneity − Microservice supports different technologies to communicate with each other in one business unit, which helps the developers to use the correct technology at the correct place. By implementing a heterogeneous system, one can obtain maximum security, speed and a scalable system.
Resilience − Resilience is a property of isolating a software unit. Microservice follows high level of resilience in building methodology, hence whenever one unit fails it does not impact the entire business. Resilience is another property which implements highly scalable and less coupled system.
Ease of deployment − As the entire application is sub-divided into small piece of units, every component should be full stack in nature. All of them can be deployed in any environment very easily with less time complexity unlike other monolithic applications of the same kind.
Following are some points on the disadvantages of microservice architecture.
Disadvantages
Distributed system − Due to technical heterogeneity, different technologies will be used to develop different parts of a microservice. A huge set of skilled professionals are required to support this big heterogeneous distributed software. Hence, distributed and heterogeneity stands as a number one disadvantage of using microservice.
Cost − Microservice is costly, as you have to maintain different server space for different business tasks.
Enterprise readiness − Microservice architecture can be considered as a conglomerate of different technologies, as technology is evolving day-by-day. Hence, it is quite difficult to make a microservice application enterprise ready to compare to conventional software development model.
Microservice Over SOA
The following table lists certain features of SOA and Microservice, bringing out the importance of using microservice over SOA.
| Component | SOA | Microservice |
|---|---|---|
| Design pattern | SOA is a design paradigm for computer software, where software components are exposed to the outer world for usage in the form of services. | Micro Service is a part of SOA. It is a specialized implementation of SOA. |
| Dependency | Business units are dependent on each other. | All business units are independent of each other. |
| Size | Software size is bigger than the conventional software. | Software size is small. |
| Technology | Technology stack is less than Microservice. | Microservice is heterogeneous in nature as exact technologies are used to perform a specific task. Microservices can be considered as a conglomerate of many technologies. |
| Autonomous and Focus | SOA applications are built to perform multiple business tasks. | Microservice applications are built to perform a single business task. |
| Nature | Monolithic in nature. | Full stack in nature. |
| Deployment | Deployment is time-consuming. | Deployment is very easy. Hence, it will be less time-consuming. |
| Cost-effectiveness | More cost-effective. | Less cost-effective. |
| Scalability | Less compared to Microservices. | Fully scaled. |
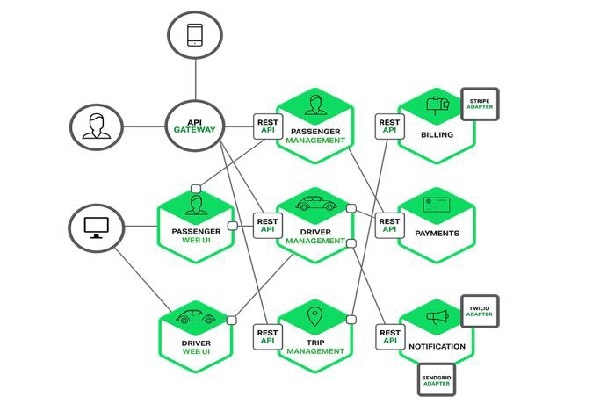
| Example | Let us consider one online CAB booking application. If we want to build that application using SOA, then its software units will be −
|
If the same application is built using microservice architecture, then its APIs will be −
|
Microservice Architecture - Scaling
Scaling is a process of breaking down a software in different units. Scaling also defines in terms of scalability. Scalability is the potential to implement more advance features of the application. It helps to improve security, durability, and maintainability of the application. We have three types of scaling procedures that is followed in the industries. Following are the different scaling methodologies along with the corresponding real-life examples.
X-Axis Scaling
X-axis scaling is also called as horizontal scaling. In this procedure, the entire application is sub-divided into different horizontal parts. Normally, any web server application can have this type of scaling. Consider a normal MVC architecture that follows horizontal scaling as shown in the following figure.
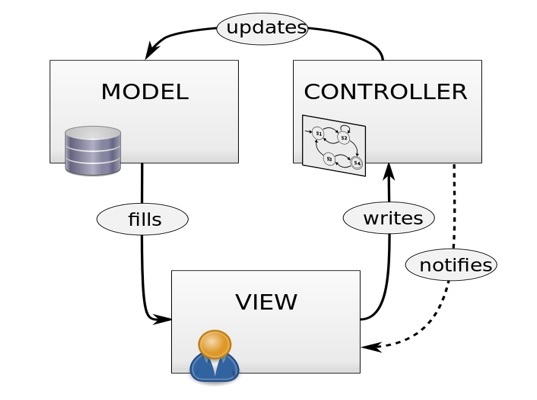
As an example, we can consider any JSP servlet application. In this application, the controller controls every request and it will generate view by communicating with the model whenever necessary. Normally, monolithic applications follow this scaling method. X-Axis scaling is very basic in nature and it is very less time consuming. In this methodology, one software will be scaled depending on its different task that the unit is responsible for. For example, the controller is responsible for controlling the incoming and outgoing request, the view is responsible for representing the business functionality to the users in the browser, while the model is responsible to store our data and it works as the database.
Y-Axis Scaling
Y-axis scaling is also called as a vertical scaling that includes any resource level scaling. Any DBaaS or Hadoop system can be considered to be Y-axis scaled. In this type of scaling, the users request is redirected and restricted by implementing some logic.
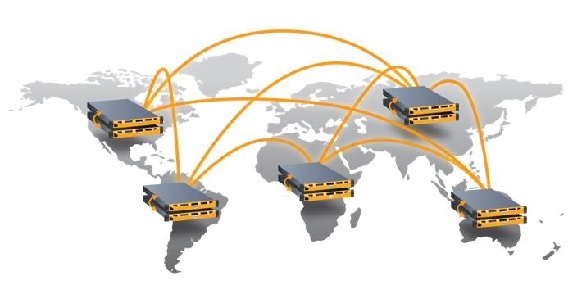
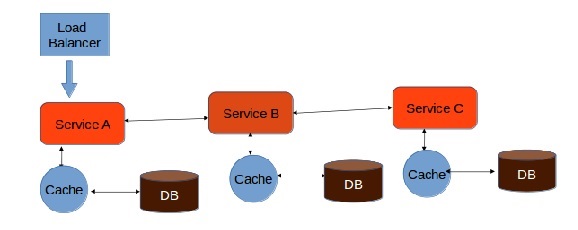
Let us consider Facebook as an example. Facebook needs to handle 1.79 million users in every second; hence, controlling the traffic is a huge responsibility of Facebook network engineers. To overcome from any hazard, they follow Y-axis scaling which includes running multiple servers with the same application at the same time. Now in order to control this huge level of traffic, Facebook redirects all the traffic from one region to a specific server, as depicted in the image. This transferring of traffic based on the region is called load balancing in architectural language.
This method of breaking down resources into small independent business units is known as Y-Axis scaling.
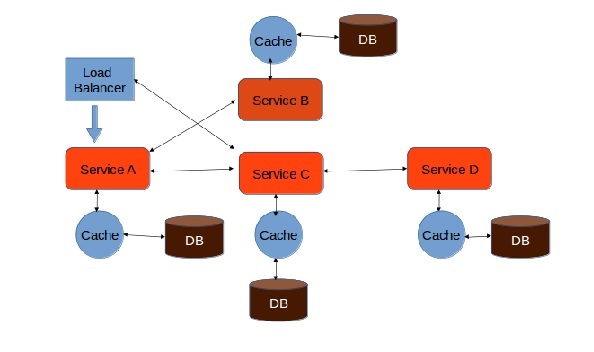
Z-Axis Scaling
X- and Y-axis scaling is pretty much easier to understand. However, one application can also be scaled at the business level, which is called as Z-axis scaling. Following is an example of scaling a cab service application in the different verticals of business units.
Advantages of Scaling
Cost − Proper scaling of a software will reduce the cost for maintenance.
Performance − Due to loose coupling, the performance of a properly scaled software is always better than a non-scaled software.
Load distribution − Using different technologies, we can easily maintain our server load.
Reuse − Scalability of a software also increases the usability of the software.
Microservice Architecture - Blueprint
Microservice implements SOA internally. In a broader sense, we can consider it as a subset of one SOA application.
Rule & Workflow
Following are the principles that need to be taken care of while developing a microservice.
High Cohesion − All the business models need to be sub-divided into the smallest business part as much as possible. Each service should be focused to perform only one business task.
Independent − All the services should be full stack in nature and independent of each other.
Business Domain Centric − Software will modularize according to the business unit and is not tier based.
Automation − Testing deployment will be automated. Try to introduce minimal human interaction.
Observable − Each service will be full stack in nature and they should be independently deployable and observable like an enterprise application.
Team Management
Two Pizza Rule is a kind of rule that restricts the number of attendees in a microservice development team. According to this rule, number of the team members of one application should be so small such that they can be fed by two pizza. Generally, the number should not be more than 8. As microservice is full stack in nature, the team is also full stack in nature. To increase the productivity, we need to build one team of maximum 8 members with all kinds of expertise required for that service.
Task Management
Task is an important role in software development life cycle. Developing a large scale application can be broken down into several small units of task. Let us consider we need to develop one application such as Facebook. Then, Log in functionality can be considered as a task of the entire build process. Progress for each of these tasks need to be monitored properly under highly skilled professionals. Agile is the well-known process structure followed in the industries to keep up with good task management.
Different Elements
Till now we have learned what is Microservice and what are the basic needs of it above the modern MVC architecture. In this chapter, we will learn the different elements of this architecture that are equally important for a service.
Categories of Services
By the name Microservice, we assume that it will be a service that can be consumed over HTTP protocols, however we need to know what kind of services can be build using this architecture. Following is the list of services that can be implemented using Microservice architecture.
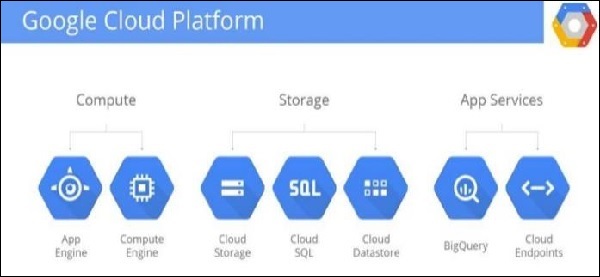
Platform as a Service [PaaS] − In this service-oriented architecture, the platform is given as a tool which can be customized according to the business needs. PaaS plays an important role in mobile application development. The greatest example of PaaS is Google App engine, where Google provides different useful platform to build your application. PaaS originally develops to provide a built-in architecture or infrastructure to developers. It reduces the higher level programming complexity in dramatically reduced time. Following is a snapshot of Google provided PaaS.
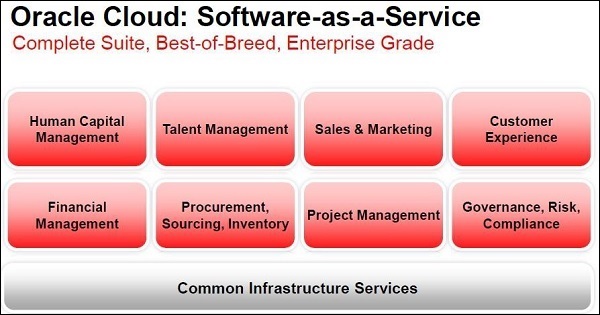
Software as a Service [SaaS] − Software as a Service is a software licensing business, where the software is centrally hosted and licensed on a subscription basis. SaaS can be accessed mainly through the browser and it is a very common architecture pattern in many business verticals such as Human Resource Management (HRM), Enterprise Resource Planning (ERP), Customer Relationship Management (CRM), etc. Following screenshot shows examples of different SaaS provided by Oracle.
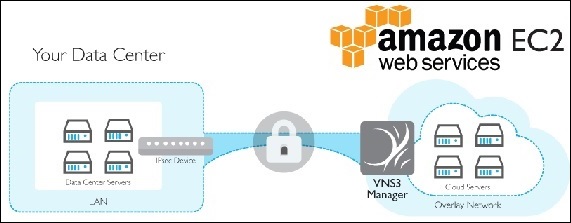
Infrastructure as a Service [IaaS] − Infrastructure plays a good role in IT industries. Using cloud computing, some of the organizations provide virtual infrastructure as their services. IaaS is very helpful for bringing agility, cost-effectiveness, security, performance, productivity, etc. in software development. Amazon EC2 and Microsoft Azure are the biggest examples of IaaS. The following image depicts an example of AWS, where the data center is provided as IaaS.
Data as a Service [DaaS] − Information technology deals with data and some of the top industry leaders believe that data will be the new sustenance of the society. DaaS is a type of service where data is shared with business conglomerates for research and analysis. DaaS brings simplicity, agility, and security in the data access layer. Following is an example of Oracle Data cloud, which can be accessed or licensed for your own business needs.

Back End as a Service [BaaS] − BaaS is also known as MBaaS, which means mobile back-end as a service. In this type of service, backend of the application will be provided to business units for their own business ventures. All push notifications, social networking services fall under this type of services. Facebook and Twitter are examples of well-known BaaS service provider.
Security
When it comes to dealing with tons of customer data, security plays an important role. Security issue is associated with all kinds of services available in the market. Whatever the cloud you are using - private, public, hybrid, etc., security should be maintained at all levels. Entire security issue can be broadly sub-divided into the following parts −
Security issue faced by service providers − This type of security issue is faced by the service providers such as Google, Amazon, etc. To ensure security protection, background check of the client is necessary especially of those who have direct access to the core part of the cloud.
Security issue faced by consumers − Cloud is cost friendly, hence it is widely used across industries. Some organizations store the user details in third party data centers, and pull the data whenever required. Hence, it is mandatory to maintain security levels such that any private data of one customer should not be visible to any other users.
To prevent the above-mentioned security problems, following are some of the defensive mechanisms used by organizations.
Deterrent Control − Know you potential threat to reduce cyber-attack.
Preventive Control − Maintain high level authentication policy to access your cloud.
Detective Control − Monitor your users and detect any potential risk.
Corrective Control − Work closely with different teams and fix the issues that arise during the detective control phase.
Composition Patterns
Software composition means the way to build your software product. Basically it deals with high level software architecture diagram where different modules of your software will communicate for specific business goals. In this chapter, we will learn about different software composition patterns widely used in organizations. In microservice, we split each function into one process. Each of these services will be independent and full stack in nature.
Functional decomposition plays an important role in building your microservices. It provides agility, flexibility, and scalability to your application.
Aggregator Pattern
Aggregator pattern is the simplest web pattern that can be implemented while developing a microservice. In this composition pattern, a simple web module will act as a load balancer, which means it will call different services as per requirements. Following is a diagram depicting a simple microservice web app with aggregator design. As seen in the following image, the "Aggregator" is responsible for calling different services one by one. If we need to apply any business logic over the results of the service A, B and C, then we can implement the business logic in the aggregator itself.
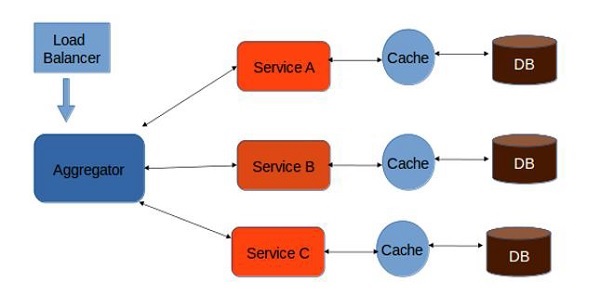
An aggregator can be again exposed as another service to the outer world, which can be consumed by others whenever required. While developing aggregator pattern web service, we need to keep in mind that each of our services A, B and C should have its own caching layers and it should be full stack in nature.
Proxy Pattern
Proxy microservice pattern is a variation of the aggregator model. In this model we will use proxy module instead of the aggregation module. Proxy service may call different services individually.
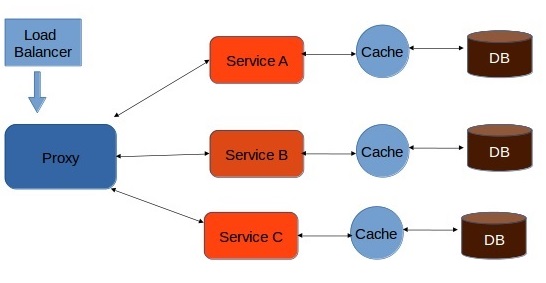
In Proxy pattern, we can build one level of extra security by providing a dump proxy layer. This layer acts similar to the interface.
Chained Pattern
As the name suggests, this type of composition pattern will follow the chain structure. Here, we will not be using anything in between the client and service layer. Instead, we will allow the client to communicate directly with the services and all the services will be chained up in a such a manner that the output of one service will be the input of the next service. Following image shows a typical chained pattern microservice.
One major drawback of this architecture is, the client will be blocked until the entire process is complete. Thus, it is highly recommendable to keep the length of the chain as short as possible.
Branch Microservice Pattern
Branch microservice is the extended version of aggregator pattern and chain pattern. In this design pattern, the client can directly communicate with the service. Also, one service can communicate with more than one services at a time. Following is the diagrammatic representation of Branch Microservice.
Branch microservice pattern allows the developer to configure service calls dynamically. All service calls will happen in a concurrent manner, which means service A can call Service B and C simultaneously.
Shared Resource Pattern
Shared resource pattern is actually a conglomerate of all types of patterns mentioned earlier. In this pattern, the client or the load balancer will directly communicate with each service whenever necessary. This is the most effective designing pattern followed widely in most organizations. Following is a diagrammatic representation of the Shared Resource design pattern.

Microservice Architecture - Hands-On SOA
In this chapter, we will develop a CRUD-based application with SOA architecture. Later on in the subsequent chapters, we will break this service into microservice and we will learn the basic difference between SOA and microservice architecture.
System Configuration and Setup
In this section, we will build a sample CRUD application, which will return a JSON object as a response whenever we call our service. We will use the Jersey framework to develop the same. Following are the steps to set up your local system environment.
Developing a CRUD Application
Step 1 − We will use NetBeans as development IDE. Please download and install the latest version available on NetBeans official website https://netbeans.org/downloads/.
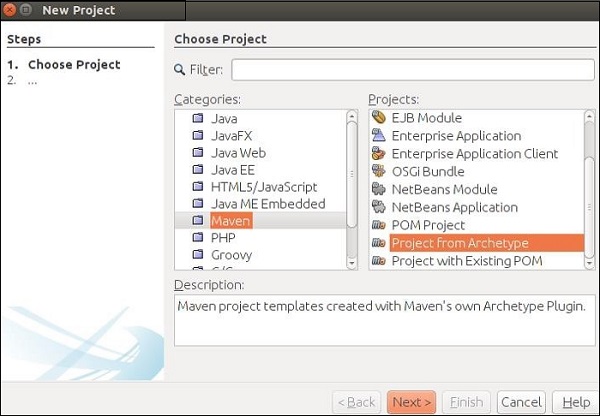
Step 2 − Open your NetBeans IDE. Go to File -> New Project. The following screenshot pops up. Choose Maven as a category and select Project from ArchType as a project and hit Next.
This will download all the required jar files to create your first ever Maven project and RESTful Web Service.
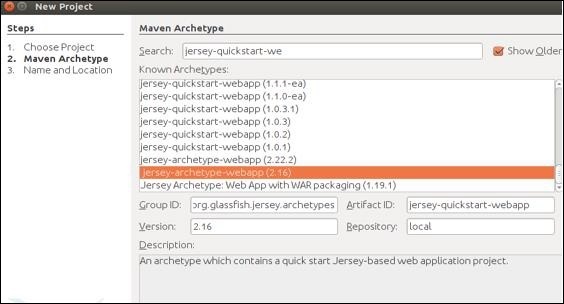
Step 3 − On hitting the Next button in the previous step, the following screenshot appears. Here, you will have to specify the Maven Archetype.
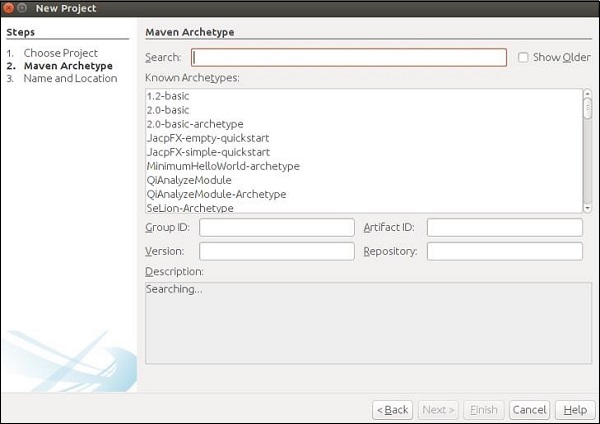
In the search box, search for Jersey-archType-Webapp(2.16) and check the Show Older checkbox.
Step 4 − Once you have selected the same, you will be redirected to the following screen. Select the preferred jar from the list and hit Next to continue.
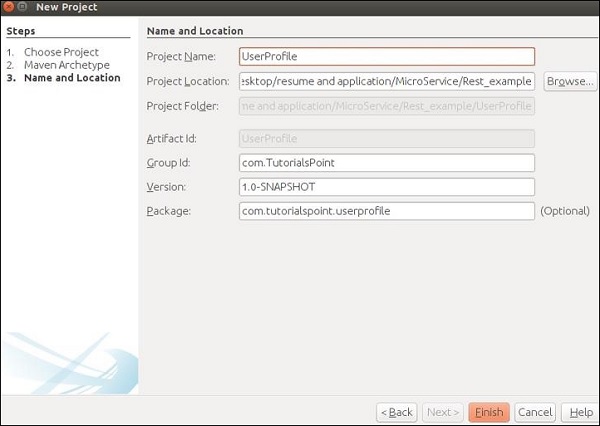
Step 5 − In this step, you need to provide the name of your project and its Group Id as well as the package details. After providing all this information, hit Finish to continue.
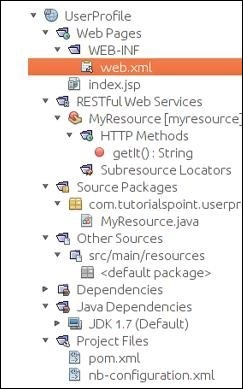
Step 6 − You are done with your workspace setup. The project directory will look like the following.
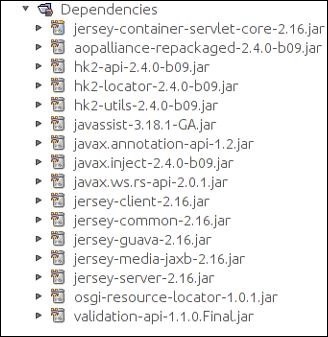
Check out your Dependencies folder and you will find that Maven has automatically downloaded all the required jar files for this project.
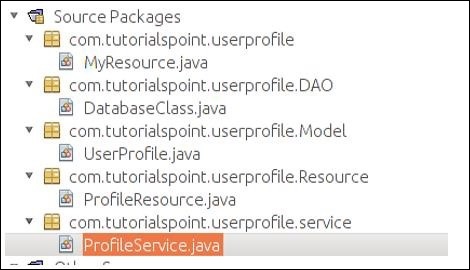
Step 7 − Your workspace is set up and you can start with coding. Go ahead and create four classes and packages as mentioned in the following screenshot. You can find MyResource.java is already created by Maven, as Maven is smart enough to detect that you are going to build your own web service.
Step 8 − Once done with the above step, we will construct our POJO class that is UserProfile.java as follows.
package com.tutorialspoint.userprofile.Model;

import javax.xml.bind.annotation.XmlRootElement;

@XmlRootElement
public class UserProfile {
   private long ProId;
   private String FName;
   private String LName;
   private String Add;
   public UserProfile(){}

   public UserProfile(long Proid, String Fname, String Lname,String Add) {
      this.ProId = Proid;
      this.FName = Fname;
      this.LName = Lname;
      this.Add = Add;
   }
   public long getProId() {
      return ProId;
   }
   public void setProId(long ProId) {
      this.ProId = ProId;
   }
   public String getFName() {
      return FName;
   }
   public void setFName(String FName) {
      this.FName = FName;
   }
   public String getLName() {
      return LName;
   }
   public void setLName(String LName) {
      this.LName = LName;
   }
   public String getAdd() {
      return Add;
   }
   public void setAdd(String Add) {
      this.Add = Add;
   }
}
Step 9 − Now we will create our Database class. As this is a part of learning material, we will not use any DB as our database. We will use an inbuilt Java memory to work as our temporary memory. As you can see in the following set of code, we will use MAP as our database. All the web service operation that we perform, we will work on this MAP defined in the class.
package com.tutorialspoint.userprofile.DAO;

import com.tutorialspoint.userprofile.Model.UserProfile;

import java.util.HashMap;
import java.util.Map;

public class DatabaseClass {
   private static Map<Long,UserProfile> messages = new HashMap<Long,UserProfile>();
   public static Map<Long,UserProfile> getUsers() {
      return messages;
      // Each time this method will return entire map as an instance of database
   }
}
Step 10 − Now let us build our service class. Go ahead and copy paste the following set of code in the ProfileService.java class. This is the class where we will declare all our web service methods that is to be exposed for the outer world. We need to create one reference of our DatabaseClass such that our temporary database can be accessed in this class.
package com.tutorialspoint.userprofile.service;

import com.tutorialspoint.userprofile.DAO.DatabaseClass;
import com.tutorialspoint.userprofile.Model.UserProfile;

import java.util.ArrayList;
import java.util.List;
import java.util.Map;

public class ProfileService {
   private Map<Long,UserProfile> Userprofiles = DatabaseClass.getUsers();

   // Creating some predefine profile and populating the same in the map
   public ProfileService() {
      UserProfile m1 = new UserProfile(1L,"Tutorials1","Point1","TutorialsPoint.com");
      UserProfile m2 = new UserProfile(2L,"Tutorials2","Point2","TutorialsPoint.com2");
      UserProfile m3 = new UserProfile(3L,"Tutorials3","Point3","TutorialsPoint.com3");
      UserProfile m4 = new UserProfile(4L,"Tutorials4","Point4","TutorialsPoint.com4");

      Userprofiles.put(1L, m1);
      Userprofiles.put(2L, m2);
      Userprofiles.put(1L, m3);
      Userprofiles.put(2L, m4);
   }

   //Method to fetch all profile
   public List<UserProfile> getAllProfile() {
      List<UserProfile> list = new ArrayList<UserProfile>(Userprofiles.values());
      return list;
   }  // Method to fetch only one profile depending on the ID provided

   public UserProfile getProfile(long id) {
      return Userprofiles.get(id);
   }  //Method to add profile

   public UserProfile addProfile(UserProfile UserProfile) {
      UserProfile.setProId(Userprofiles.size()+1);
      Userprofiles.put(UserProfile.getProId(), UserProfile);
      return UserProfile;
   }  //method to update Profile

   public UserProfile UpdateProfile(UserProfile UserProfile) {
      if(UserProfile.getProId()<=0) {
         return null;
      } else {
         Userprofiles.put(UserProfile.getProId(), UserProfile);
         return UserProfile;
      }
   } //method to delete profile

   public void RemoveProfile(long Id) {
      Userprofiles.remove(Id);
   }
}
Step 11 − In this step, we will create our Resource class that will be linked with the URL and the corresponding service will be called.
package com.tutorialspoint.userprofile.Resource;

import com.tutorialspoint.userprofile.Model.UserProfile;
import com.tutorialspoint.userprofile.service.ProfileService;

import java.util.List;
import javax.ws.rs.Consumes;
import javax.ws.rs.DELETE;
import javax.ws.rs.GET;
import javax.ws.rs.POST;
import javax.ws.rs.PUT;
import javax.ws.rs.Path;
import javax.ws.rs.PathParam;
import javax.ws.rs.Produces;
import javax.ws.rs.core.MediaType;

@Path("/Profile")
@Consumes(MediaType.APPLICATION_XML)
@Produces(MediaType.APPLICATION_XML)

public class ProfileResource {
   ProfileService messageService = new ProfileService();

   @GET
   public List<UserProfile> getProfile() {
      return messageService.getAllProfile();
   }

   @GET
   @Path("/{ProID}")
   public UserProfile getProfile(@PathParam("ProID")long Id) {
      return messageService.getProfile(Id);
   }

   @POST
   public UserProfile addProfile(UserProfile profile) {
      return messageService.addProfile(profile);
   }

   @PUT
   @Path("/{proID}")
   public UserProfile UpdateProfile(@PathParam("proID")long Id,UserProfile UserProfile) {
      UserProfile.setProId(Id);
      return messageService.UpdateProfile(UserProfile);
   }

   @DELETE
   @Path("/{ProID}")
   public void deleteProfile(@PathParam("ProID")long Id) {
      messageService.RemoveProfile(Id);
   }
}
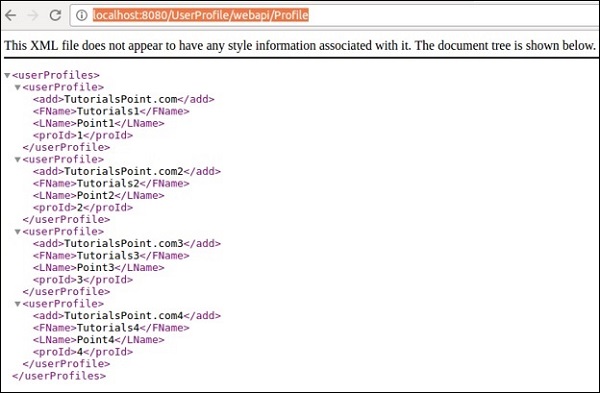
Step 12 − Clean build the project and run it. If everything goes well then you should get the following output in the browser, while accessing http://localhost:8080/UserProfile/webapi/Profile URL.
You can see different entries are populated using XML representation.
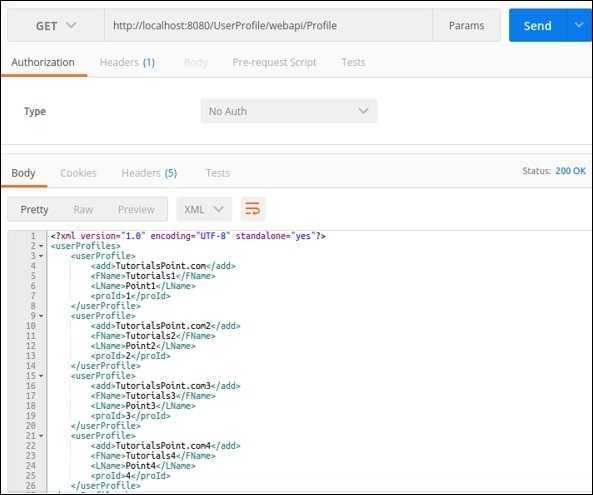
Different method can be tested using Postman by applying proper method URL.
@GET method − The following screenshot demonstrates how we can get the desired result for get request, which returns all user details.
@POST − The following request can be used to test our Post method. Notice how the proId has been generated automatically.
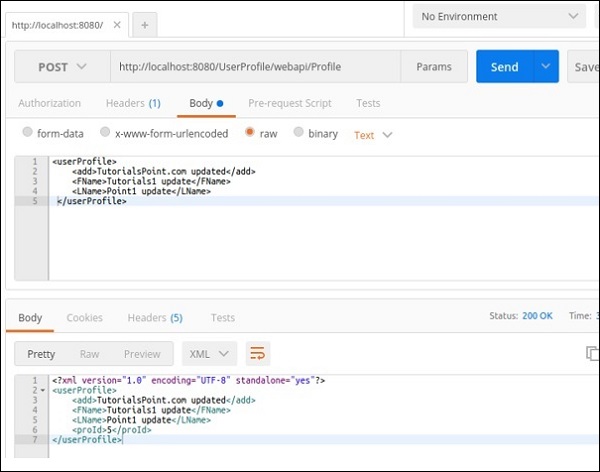
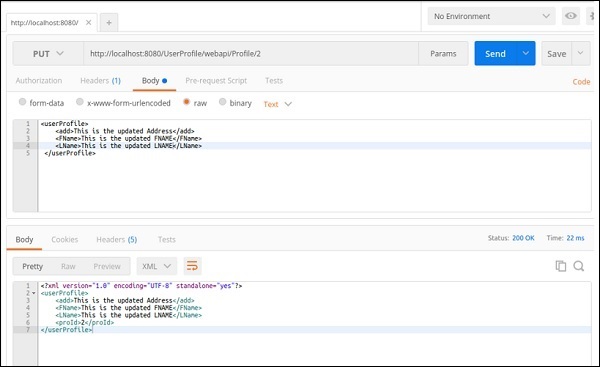
@PUT − This method will update the entries. The following screenshot demonstrates how Jersey takes the proId from the request URL and updates the same user profile reply.
In the same way, you can check for other methods available in your web services.
In the previous section, we have developed one service which will expose CRUD functionality. Now whenever we try to implement this service in our application, we need to create a client of this application and attach it to our application. In this chapter, we will learn how to build this functionality using the concept of Microservice. Following is a diagrammatic representation of our application built using the above steps.
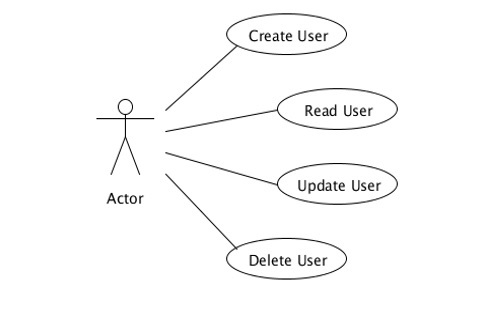
The actor should be the entry point of our service. In this case ProfileResource.java performs the responsibility of an actor. This class will call different methods to perform different operations such as add, update and delete.
Decomposition of CRUD Application
According to the main principle of microservice, we need to have only one business task for each of the modules, hence one actor should not be responsible for all four CRUD functionalities. Consider the following example where we have introduced some new roles such that it will be conceptually clear to you that Microservice is an architectural representation of SOA.
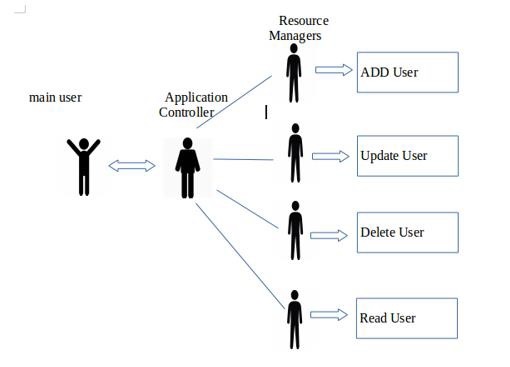
Main user is the user who communicates with the Application Controller to serve ones needs. Application Controller is the one who just calls different Resource Managers depending upon the request from the end user. Resource Manager does the job that is required to be done. Lets take a quick look on the different roles of different units of the application.
End User/Main Users − Requests for some resources to Application Controller.
Application − Receives the request and forwards the same to specific Resource Manager.
Resource Manager − Does the actual job of updating, deleting, and adding users.
See how the total responsibility of one class is distributed among different other classes.
Microservice Architecture - Hands-On MSA
In this chapter, we will build one microservice application that will consume different available services. We all know that microservice is not a cost-effective way to build an application as each and every service we build will be full stack in nature. Building a microservice in the local environment would need high-end system configuration, as you need to have four instances of a server to keep running such that it can be consumed at a point of time. To build our first ever microservice, we will use some of the available SOA endpoints and we will consume the same in our application.
System Configuration and Setup
Before going further to the build phase, prepare your system accordingly. You would need some public web services. You can easily google for this. If you want to consume SOAP web service, then you will get one WSDL file and from there you need to consume the specific web service. For REST service, you will need only one link to consume the same. In this example, you will jam three different web services SOAP, REST, and custom in one application.
Application Architecture
You will create a Java application using microservice implementation plan. You will create a custom service and the output of this service will work as an input for other services.
Following are the steps to follow to develop a microservice application.
Step 1: Client creation for SOAP service − There are many free web APIs available to learn a web service. For the purpose of this tutorial, use the GeoIP service of http://www.webservicex.net/. The WSDL file is provided in the following link on their website webservicex.net. To generate the client out of this WSDL file, all you need to do is run the following command in your terminal.
wsimport http://www.webservicex.net/geoipservice.asmx?WSDL
This command will generate all the required client files under one folder named SEI, which is named after service end point interface.
Step 2: Create your custom web service − Follow the same process mentioned at an earlier stage in this tutorial and build a Maven-based REST api named CustomRest. Once complete, you will find a class named MyResource.java. Go ahead and update this class using the following code.
package com.tutorialspoint.customrest;

import javax.ws.rs.GET;
import javax.ws.rs.Path;
import javax.ws.rs.Produces;
import javax.ws.rs.core.MediaType;

@Path("myresource")
public class MyResource {
   @GET
   @Produces(MediaType.TEXT_PLAIN)

   public String getIt() {
      return "IND|INDIA|27.7.65.215";
   }
}
Once everything is complete, go ahead and run this application on the server. You should get the following output in the browser.

This is the web server, which returns one string object once it is called. This is the input service that provides inputs that can be consumed by other application to generate records.
Step 3: Configure another Rest API − In this step, consume another web service available at services.groupkt.com. This will return a JSON object when invoked.
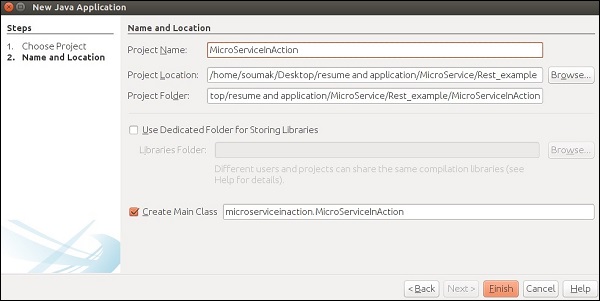
Step 4: Create JAVA application − Create one normal Java application by selecting New Project -> JAVA project and hit Finish as shown in the following screenshot.
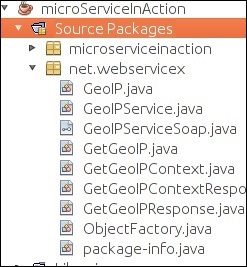
Step 5: Add the SOAP client − In step 1, you have created the client file for the SOAP web service. Go ahead and add these client files to your current project. After successful addition of the client files, your application directory will be look the following.
Step 6: Create your main app − Create your main class where you will consume all of these three web services. Right-click on the source project and create a new class named MicroServiceInAction.java. Next task is to call different web services from this.
Step 7: Call your custom web service − For this, go ahead and add the following set of codes to implement calling your own service.
try {
   url = new URL("http://localhost:8080/CustomRest/webapi/myresource");
   conn = (HttpURLConnection) url.openConnection();
   conn.setRequestMethod("GET");
   conn.setRequestProperty("Accept", "application/json");

   if (conn.getResponseCode() != 200) {
      throw new RuntimeException("Failed : HTTP error code : " + conn.getResponseCode());
   }

   BufferedReader br = new BufferedReader(new InputStreamReader(
      (conn.getInputStream())));
   while ((output = br.readLine()) != null) {
      inputToOtherService = output;
   }
   conn.disconnect();

} catch (MalformedURLException e) {
   e.printStackTrace();
} catch (IOException e) {
   e.printStackTrace();
}
Step 8: Consume SOAP Services − You have generated your client file but you don't know which method should be called in that entire package? For this, you need to refer to the WSDL again, which you used to generate your client files. Every WSDL file should have one wsdl:service tag search for this tag. It should be your entry point of that web service. Following is the service endpoint of this application.
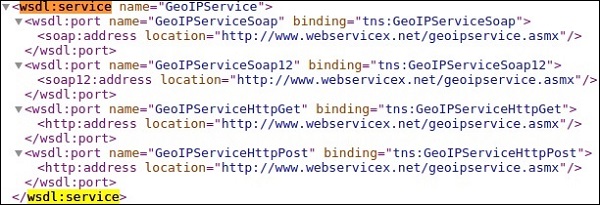
Now you need to implement this service in your application. Following is the set of Java code you need to implement your SOAP web service.
GeoIPService newGeoIPService = new GeoIPService();
GeoIPServiceSoap newGeoIPServiceSoap = newGeoIPService.getGeoIPServiceSoap();
GeoIP newGeoIP = newGeoIPServiceSoap.getGeoIP(Ipaddress);
// Ipaddress is output of our own web service.

System.out.println("Country Name from SOAP Webserivce ---"+newGeoIP.getCountryName());
Step 9: Consume REST web service − Two of the services have been consumed till now. In this step, another REST web service with customized URL will be consumed with the help of your custom web service. Use the following set of code to do so.
String url1="http://services.groupkt.com/country/get/iso3code/";//customizing the Url
url1 = url1.concat(countryCode);

try {
   URL url = new URL(url1);
   HttpURLConnection conn = (HttpURLConnection) url.openConnection();
   conn.setRequestMethod("GET");
   conn.setRequestProperty("Accept", "application/json");

   if (conn.getResponseCode() != 200) {
      throw new RuntimeException("Failed : HTTP error code : " + conn.getResponseCode());
   }

   BufferedReader br = new BufferedReader(new InputStreamReader(
      (conn.getInputStream())));
   while ((output = br.readLine()) != null) {
      System.out.println(output);
   }
   conn.disconnect();

} catch (MalformedURLException e) {
   e.printStackTrace();
} catch (IOException e) {
   e.printStackTrace();
}
Step 10: Consume all services − Considering your CustomRest web service is running and you are connected to Internet, if everything is completed successfully then following should be your consolidated main class.
package microserviceinaction;
import java.io.BufferedReader;
import java.io.IOException;
import java.io.InputStreamReader;
import java.net.HttpURLConnection;
import java.net.MalformedURLException;
import java.net.URL;
import java.util.StringTokenizer;
import net.webservicex.GeoIP;
import net.webservicex.GeoIPService;
import net.webservicex.GeoIPServiceSoap;
public class MicroServiceInAction {
static URL url;
static HttpURLConnection conn;
static String output;
static String inputToOtherService;
static String countryCode;
static String ipAddress;
static String CountryName;
public static void main(String[] args) {
//consuming of your own web service
try {
url = new URL("http://localhost:8080/CustomRest/webapi/myresource");
conn = (HttpURLConnection) url.openConnection();
conn.setRequestMethod("GET");
conn.setRequestProperty("Accept", "application/json");
if (conn.getResponseCode() != 200) {
throw new RuntimeException("Failed : HTTP error code : " + conn.getResponseCode());
}
BufferedReader br = new BufferedReader(new InputStreamReader(
(conn.getInputStream())));
while ((output = br.readLine()) != null) {
inputToOtherService = output;
}
conn.disconnect();
} catch (MalformedURLException e) {
e.printStackTrace();
} catch (IOException e) {
e.printStackTrace();
}
//Fetching IP address from the String and other information
StringTokenizer st = new StringTokenizer(inputToOtherService);
countryCode = st.nextToken("|");
CountryName = st.nextToken("|");
ipAddress = st.nextToken("|");
// Call to SOAP web service with output of your web service---
// getting the location of our given IP address
String Ipaddress = ipAddress;
GeoIPService newGeoIPService = new GeoIPService();
GeoIPServiceSoap newGeoIPServiceSoap = newGeoIPService.getGeoIPServiceSoap();
GeoIP newGeoIP = newGeoIPServiceSoap.getGeoIP(Ipaddress);
System.out.println("Country Name from SOAP Webservice ---"+newGeoIP.getCountryName());
// Call to REST API --to get all the details of our country
String url1 = "http://services.groupkt.com/country/get/iso3code/"; //customizing the Url
url1 = url1.concat(countryCode);
try {
URL url = new URL(url1);
HttpURLConnection conn = (HttpURLConnection) url.openConnection();
conn.setRequestMethod("GET");
conn.setRequestProperty("Accept", "application/json");
if (conn.getResponseCode() != 200) {
throw new RuntimeException("Failed : HTTP error code : " + conn.getResponseCode());
}
BufferedReader br = new BufferedReader(new InputStreamReader(
(conn.getInputStream())));
while ((output = br.readLine()) != null) {
System.out.println(output);
}
conn.disconnect();
} catch (MalformedURLException e) {
e.printStackTrace();
} catch (IOException e) {
e.printStackTrace();
}
}
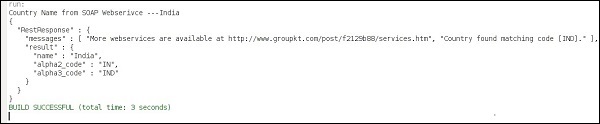
}
Once you run this file, you will see the following output in the console. You have successfully developed your first microservice application.